We’re used to the fact that most of the work related to HTML is done by coders, programmers, and software developers. But in no way does this mean that SEO pros and digital marketers shouldn’t have a good understanding of the essential HTML tags. The bottom line is that tags are a must-know if you want to properly develop technical specifications and understand how tags affect SEO.
So, which tags and attributes matter in search engine optimization? Why do you even need them and how should they be used? We went through every HTML tag out there and put together a list of the most important ones to help you learn the ropes of HTML or simply refresh your memory.
Breaking down HTML basics
HyperText Markup Language (HTML) is the standard markup language for documents that is used by web pages to tell browsers what elements it contains and which ones need to be displayed on the screen.
HTML is the basis of the vast majority of web pages and is one of the most essential parts of technical SEO. With the help of HTML elements, SEOs can relay information on web pages both to people and search engine bots. Doing so can make it clear to everyone what the page structure and order of content is, plus it clarifies how the page is related to other web pages online.
In layman’s terms, if you visit any web page as a human, you will see a marked-up text along with sections, subheadings, images and links. But keep in mind that for web browsers and search engine bots, web pages are no more than an HTML code with specific elements.
We’ve mentioned such terms as HTML element and tag, but there are also meta tags and attributes. It can get very confusing fast if you don’t know the difference. So, let’s take a look at the basic terms we will be using throughout this post.
HTML element structure
HTML elements are essential components of web pages that help organize and display page information, such as headers, paragraphs, images, links, and more. An HTML element consists of an opening tag, attributes, content, and a closing tag (except for self-closing elements).

Provided in this example is an HTML element called a header. The header is indicated in the code by the <h1> start tag and </h1> closing tag. The element has the attribute align=”left”, which means it is positioned and aligned towards the left side of the page. The content of the element is the text, which will be displayed as a heading on the webpage.
An HTML tag is a piece of code that defines elements within a web page. HTML tags play a crucial role in structuring and formatting web content and in enabling web browsers to interpret and display the page correctly.
Tags are enclosed within angle brackets (<>) and can be either an opening tag or a closing tag. Some tags, such as <br> or <img>, do not require a closing tag. The content between the opening and closing tags represents either the element’s content or nested elements. Examples of HTML tags include <p> for paragraphs, <h1> to <h6> for headings, <a> for links, and <img> for images.
A meta tag is an HTML element that provides metadata, serving as additional information about an HTML document. These meta tags are placed within the <head> section of an HTML document and provide structured metadata for web browsers, search engines and other applications. This data includes the title, description, author, publication date, keywords, etc. Each of these elements play a crucial role in determining the results of your SEO efforts and in improving the position and display of your content in search results.
An attribute provides additional information and adjusts the behavior or modifies the display of an HTML element. It is specified within the opening tag of an element. Attributes consist of a name-value pair, where the name represents the specific attribute and its value determines the desired effect. Attributes are used to control various aspects of an element, such as its appearance, behavior, or linking to external resources.
The difference between tags and attributes
Since a lot of people use the terms tag and attribute practically synonymously, let’s take a moment to get the terminology straight.
Here’s an example of an HTML element format that breaks the element down into three parts:
<h1>This is a heading</h1>
In this example, <h1> opens the tag, “This is a heading” is the content of the tag, and </h1> closes the tag.
The HTML element in the example above is a header that is used as a visible title on a web page to introduce content about search engine optimization. Now, let’s draw the distinction.
While tags must have the start and close elements to function properly, attributes don’t, and they are added to HTML elements as modifiers, for example:
<link rel="canonical" href="https://www.website.com" />
In this example, rel and href are attributes of the <link> tag.
Why users and search engines need tags
Now that we have a clear understanding of HTML tags and attributes, let’s discuss why search engines, browsers and users need them.
First off, Google uses meta tags to obtain information on a page’s content and, ultimately, include it in the search results. The snippet is direct confirmation of this, since it’s made up of the title tag and description meta tag.
However, if the page’s title and description are set up incorrectly (as in are misleading, over spammed with keywords, etc.), Google will automatically replace them with more appropriate text from the page content.
Google’s Search Console Help Center has a list of every meta tag supported by the search giant. So, if you feel like you want to dig deeper into every HTML tag, be sure to check it out.
HTML tags and attributes
Now that we’ve covered all the HTML basics, let’s move forward to commonly-used tags and attributes.
| Tag | Description |
|---|---|
| <!DOCTYPE html> | Defines the document type as HTML |
| <head> | Contains metadata and information about the document: scripts, stylesheets, character encoding, viewport settings, etc |
| <body> | Defines the main content of the HTML document |
| <title> | Specifies the title of an HTML document, which appears in the browser’s title bar, search engine results, and bookmarks |
| <meta> | Provides metadata about the HTML document, such as character encoding and keywords |
| <a> | Creates a hyperlink that allows users to navigate to other web pages, files, or specific sections within the same page |
| <link> | Specifies a link between an HTML document and an external resource, such as a stylesheet or an icon |
| <img> | Embeds and displays an image within the HTML document |
| <i>, <em> | Styles text as italicized or semantically marks text as emphasized or important |
| <b>, <strong> | Makes text bold or gives it strong importance |
| <span> | Applies inline styling or groups and targets specific elements for styling or scripting purposes |
| <style> | Defines CSS styles directly within the HTML document |
| <table> | Creates a table for organizing data |
| <ul> | Represents an unordered (bulleted) list |
| <ol> | Represents an ordered (numbered) list |
| <header> | Defines a container for introductory content and site navigation |
| <h1> to <h6> | Specifies headings of different levels, with <h1> being the highest |
| <footer> | Defines a container for the footer of a document or section |
| <div> | Creates a universal container for grouping tags and styling content |
| <section> | Defines a section within a document or document outline |
| <article> | Represents a self-contained and independently distributable piece of content |
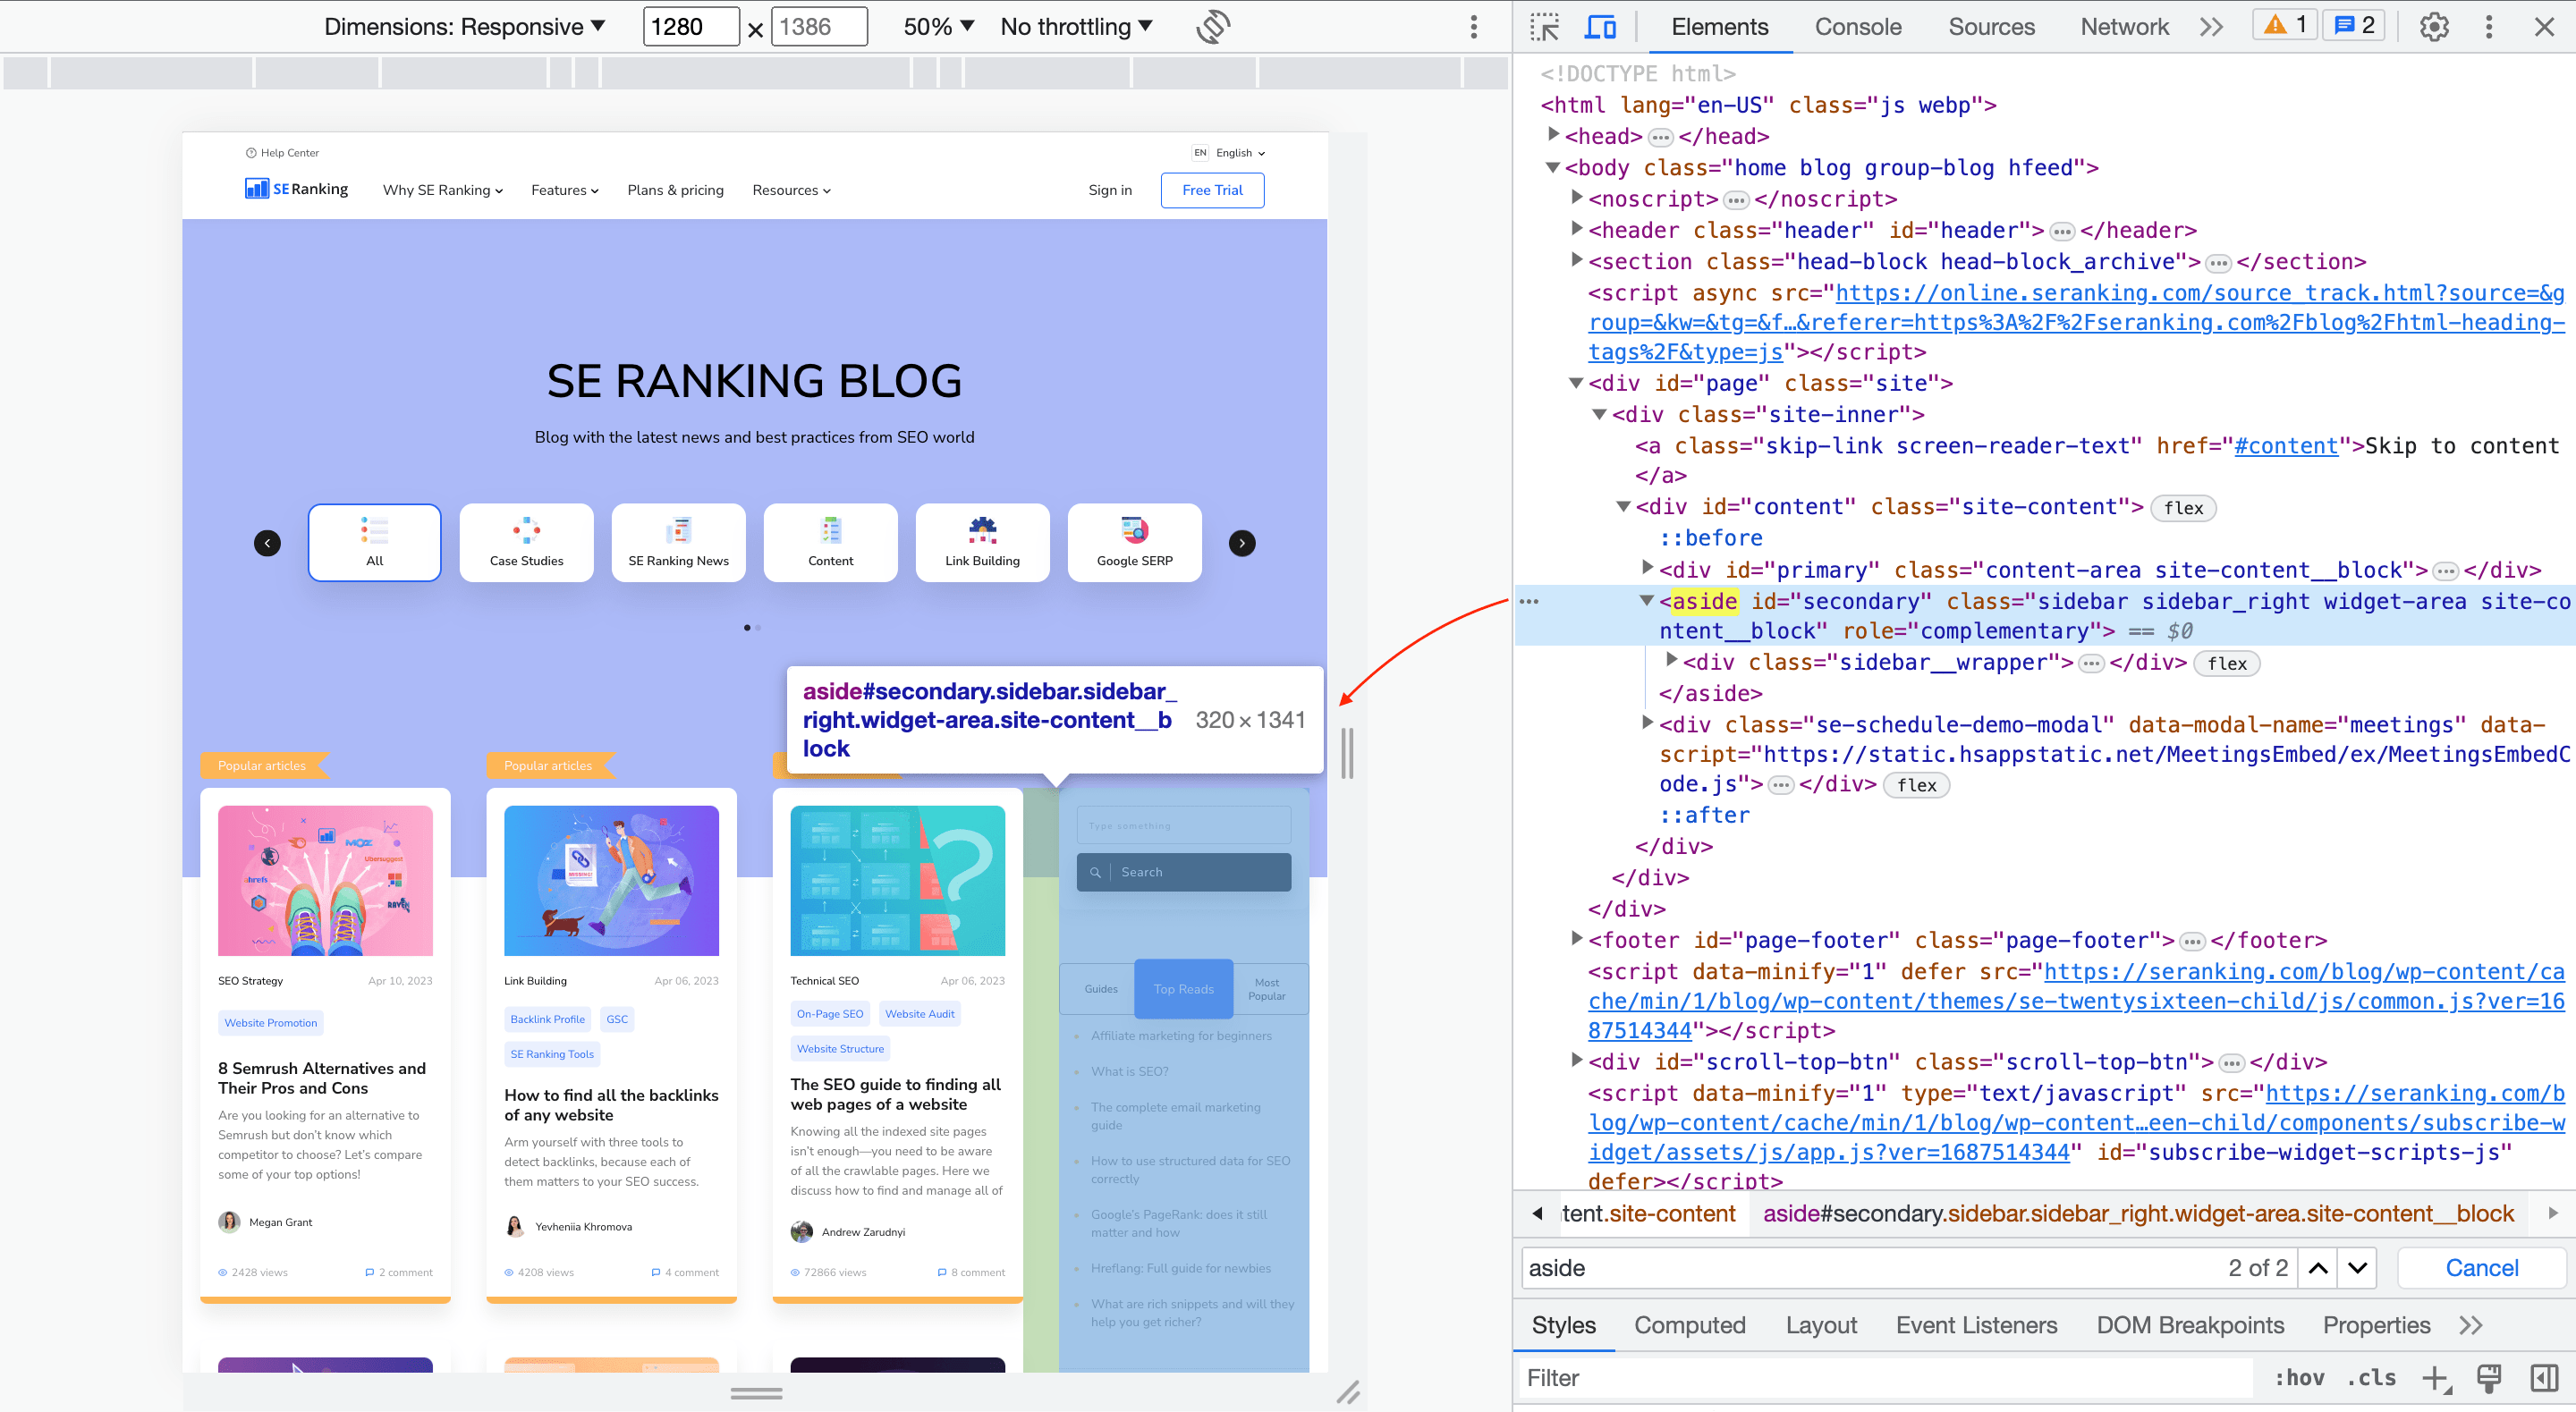
| <aside> | Defines content that is tangentially related to the main content |
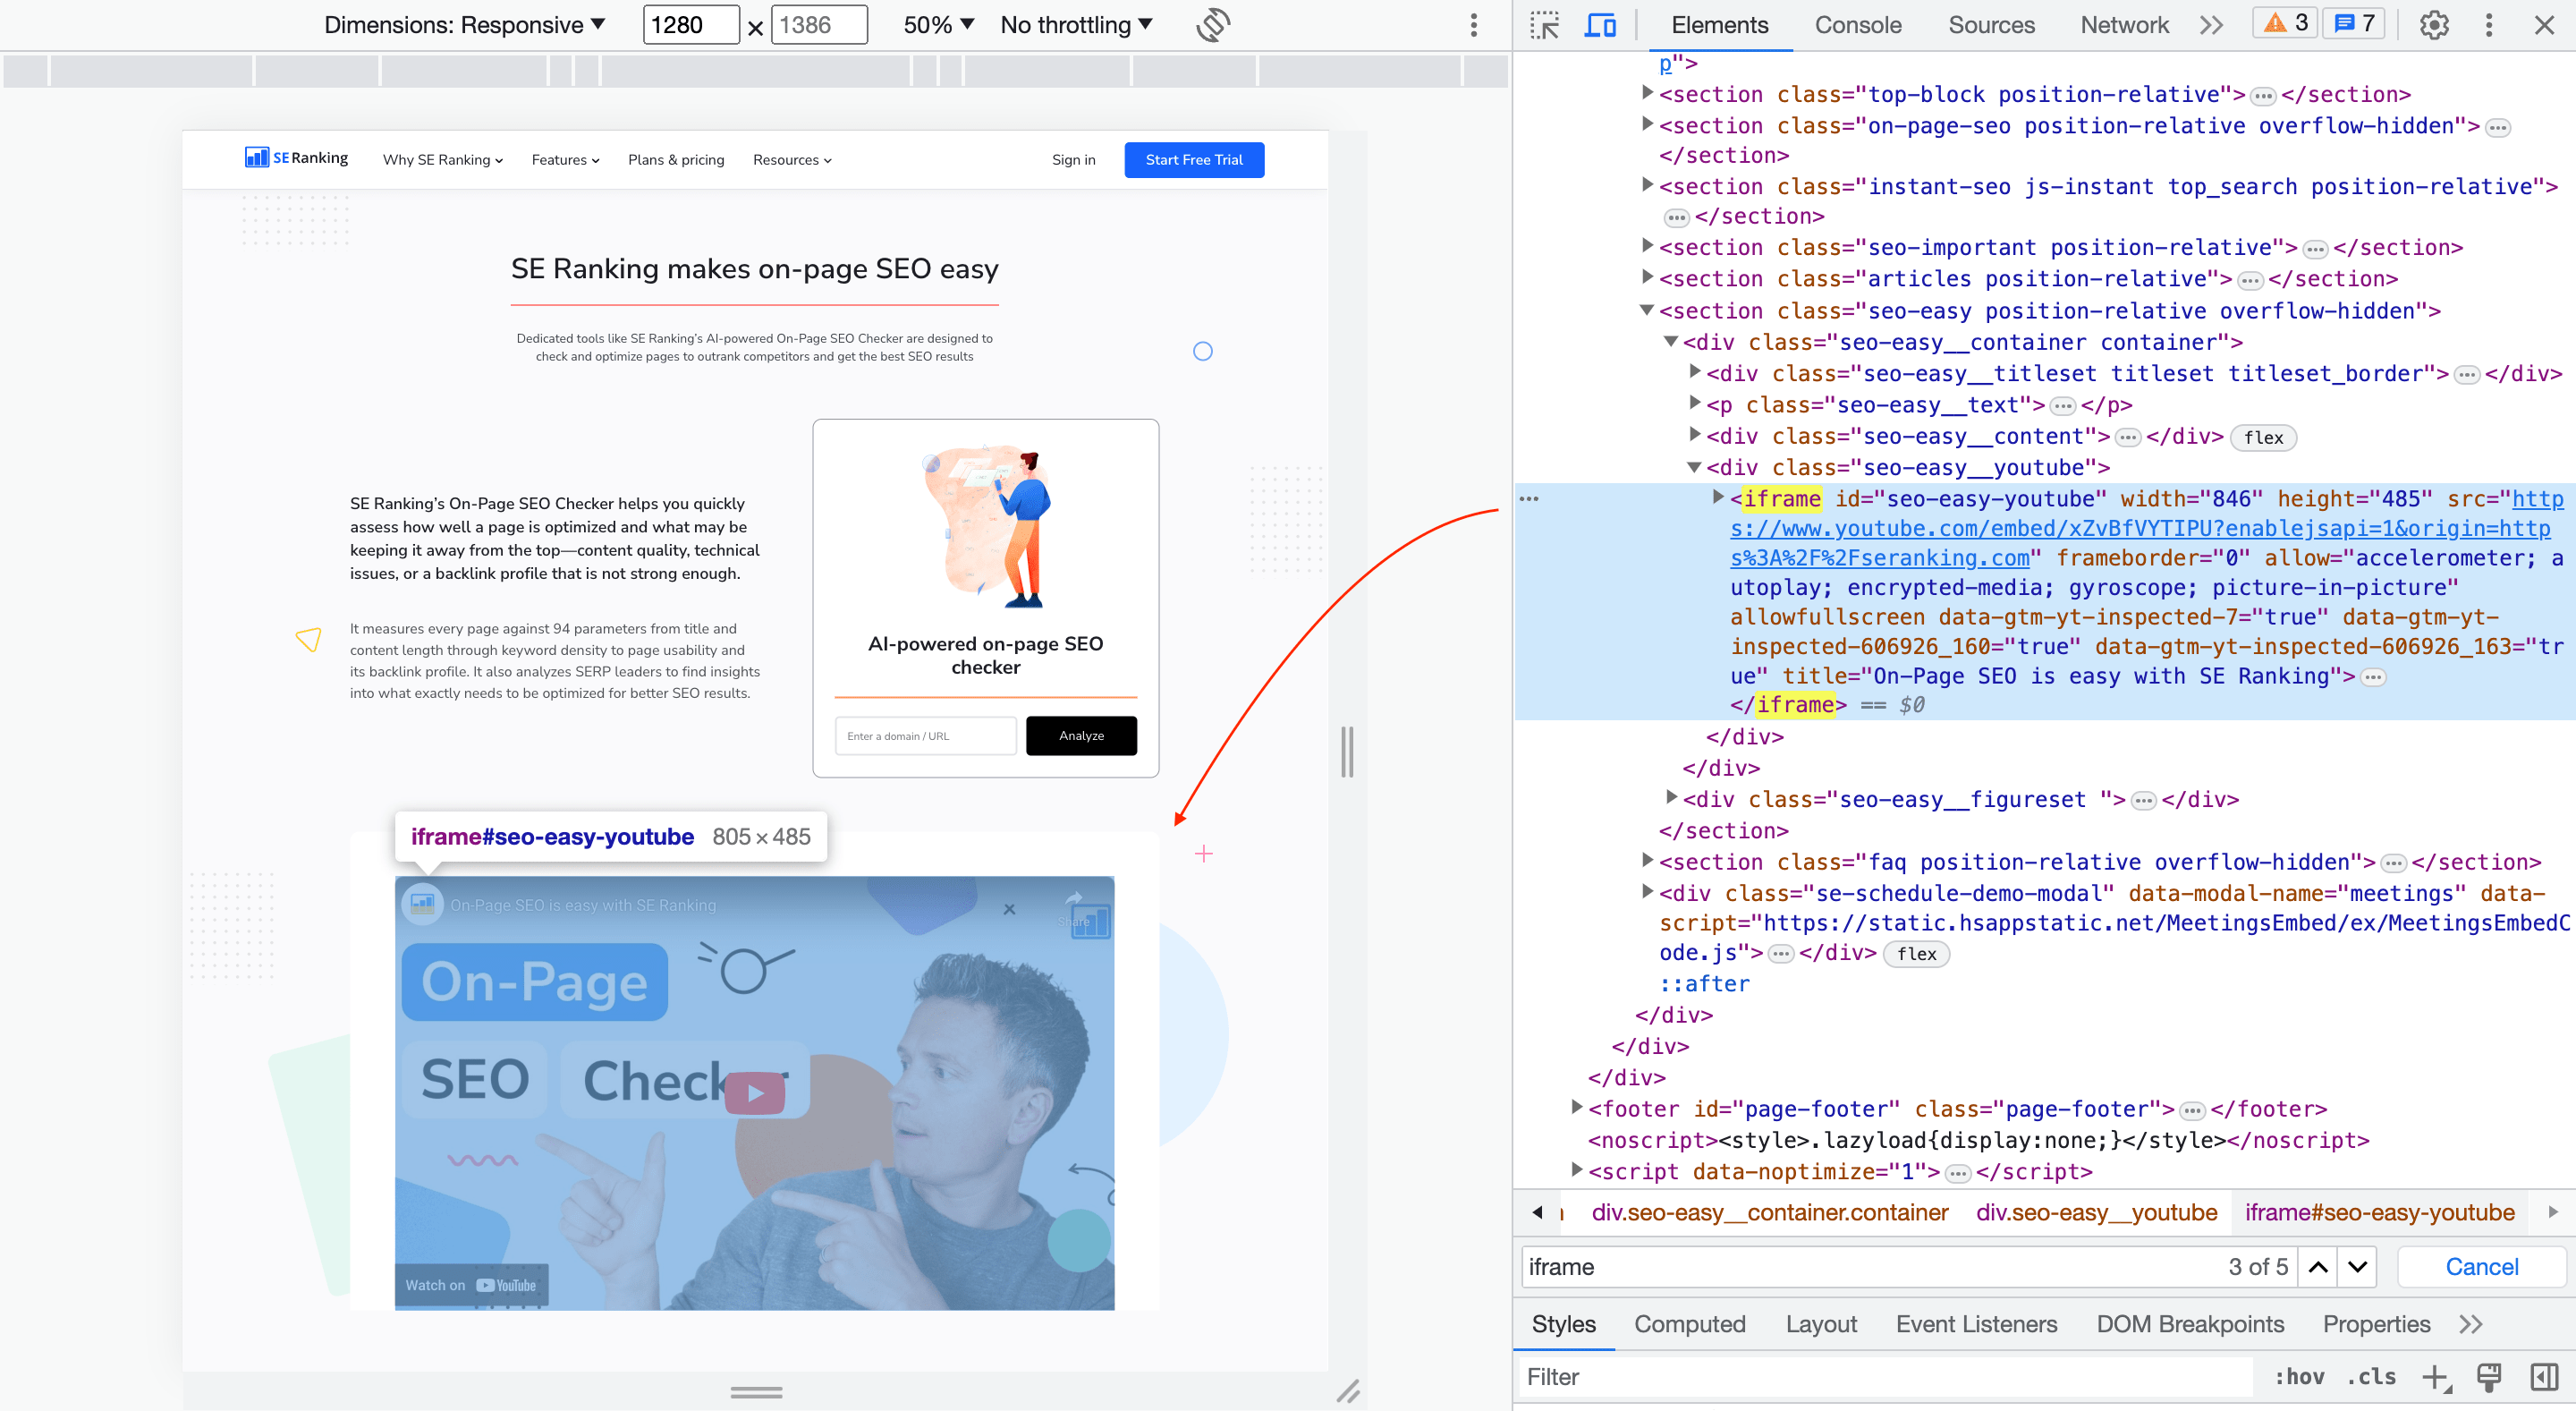
| <iframe> | Embeds an external web page or document within the current document |
| <nav> | Defines a section of navigation links |
| <script> | Embeds or references an external JavaScript file or code |
| <code> | Represents a fragment of computer code |
Fundamental HTML tags
If you want to create a web page that is useful to people and, more importantly in the context of this article, to search engines, there are three key HTML tags you must include.
<!DOCTYPE html>: Specifies that the document is an HTML web page
The <!DOCTYPE html> tag is placed at the beginning of your web page’s code. Its purpose is to introduce the page to search engines and web browsers, indicating that it is an HTML document. By including this tag, you are informing search engines that your page is structured using HTML. This allows them to interpret and display the content correctly.
Note that the <!DOCTYPE html> tag isn’t an HTML tag per se, which is why it doesn’t have any attributes. It provides vitally important information to browsers that lets them know what type of document to expect to find on the page and how it must be displayed.
Here’s an example of the code in use:
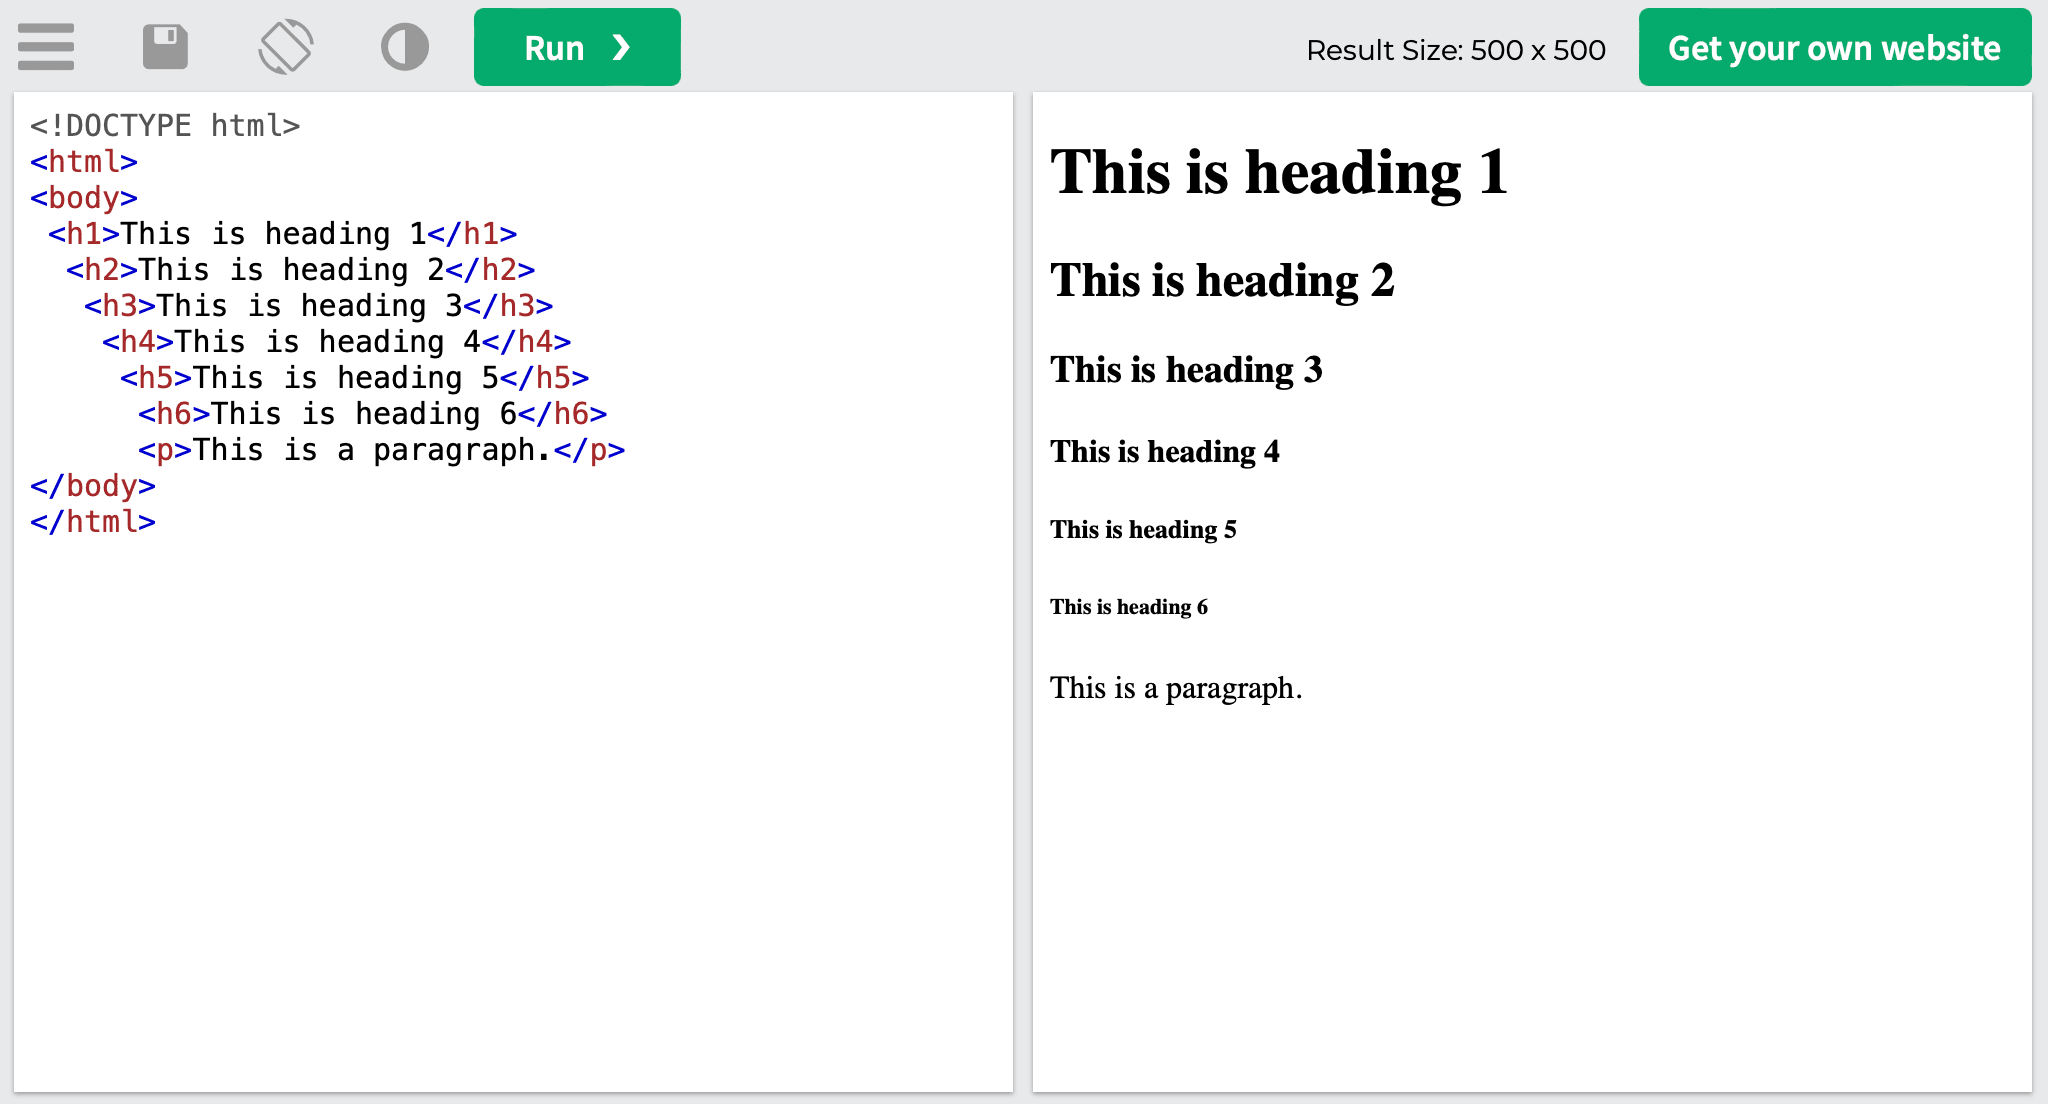
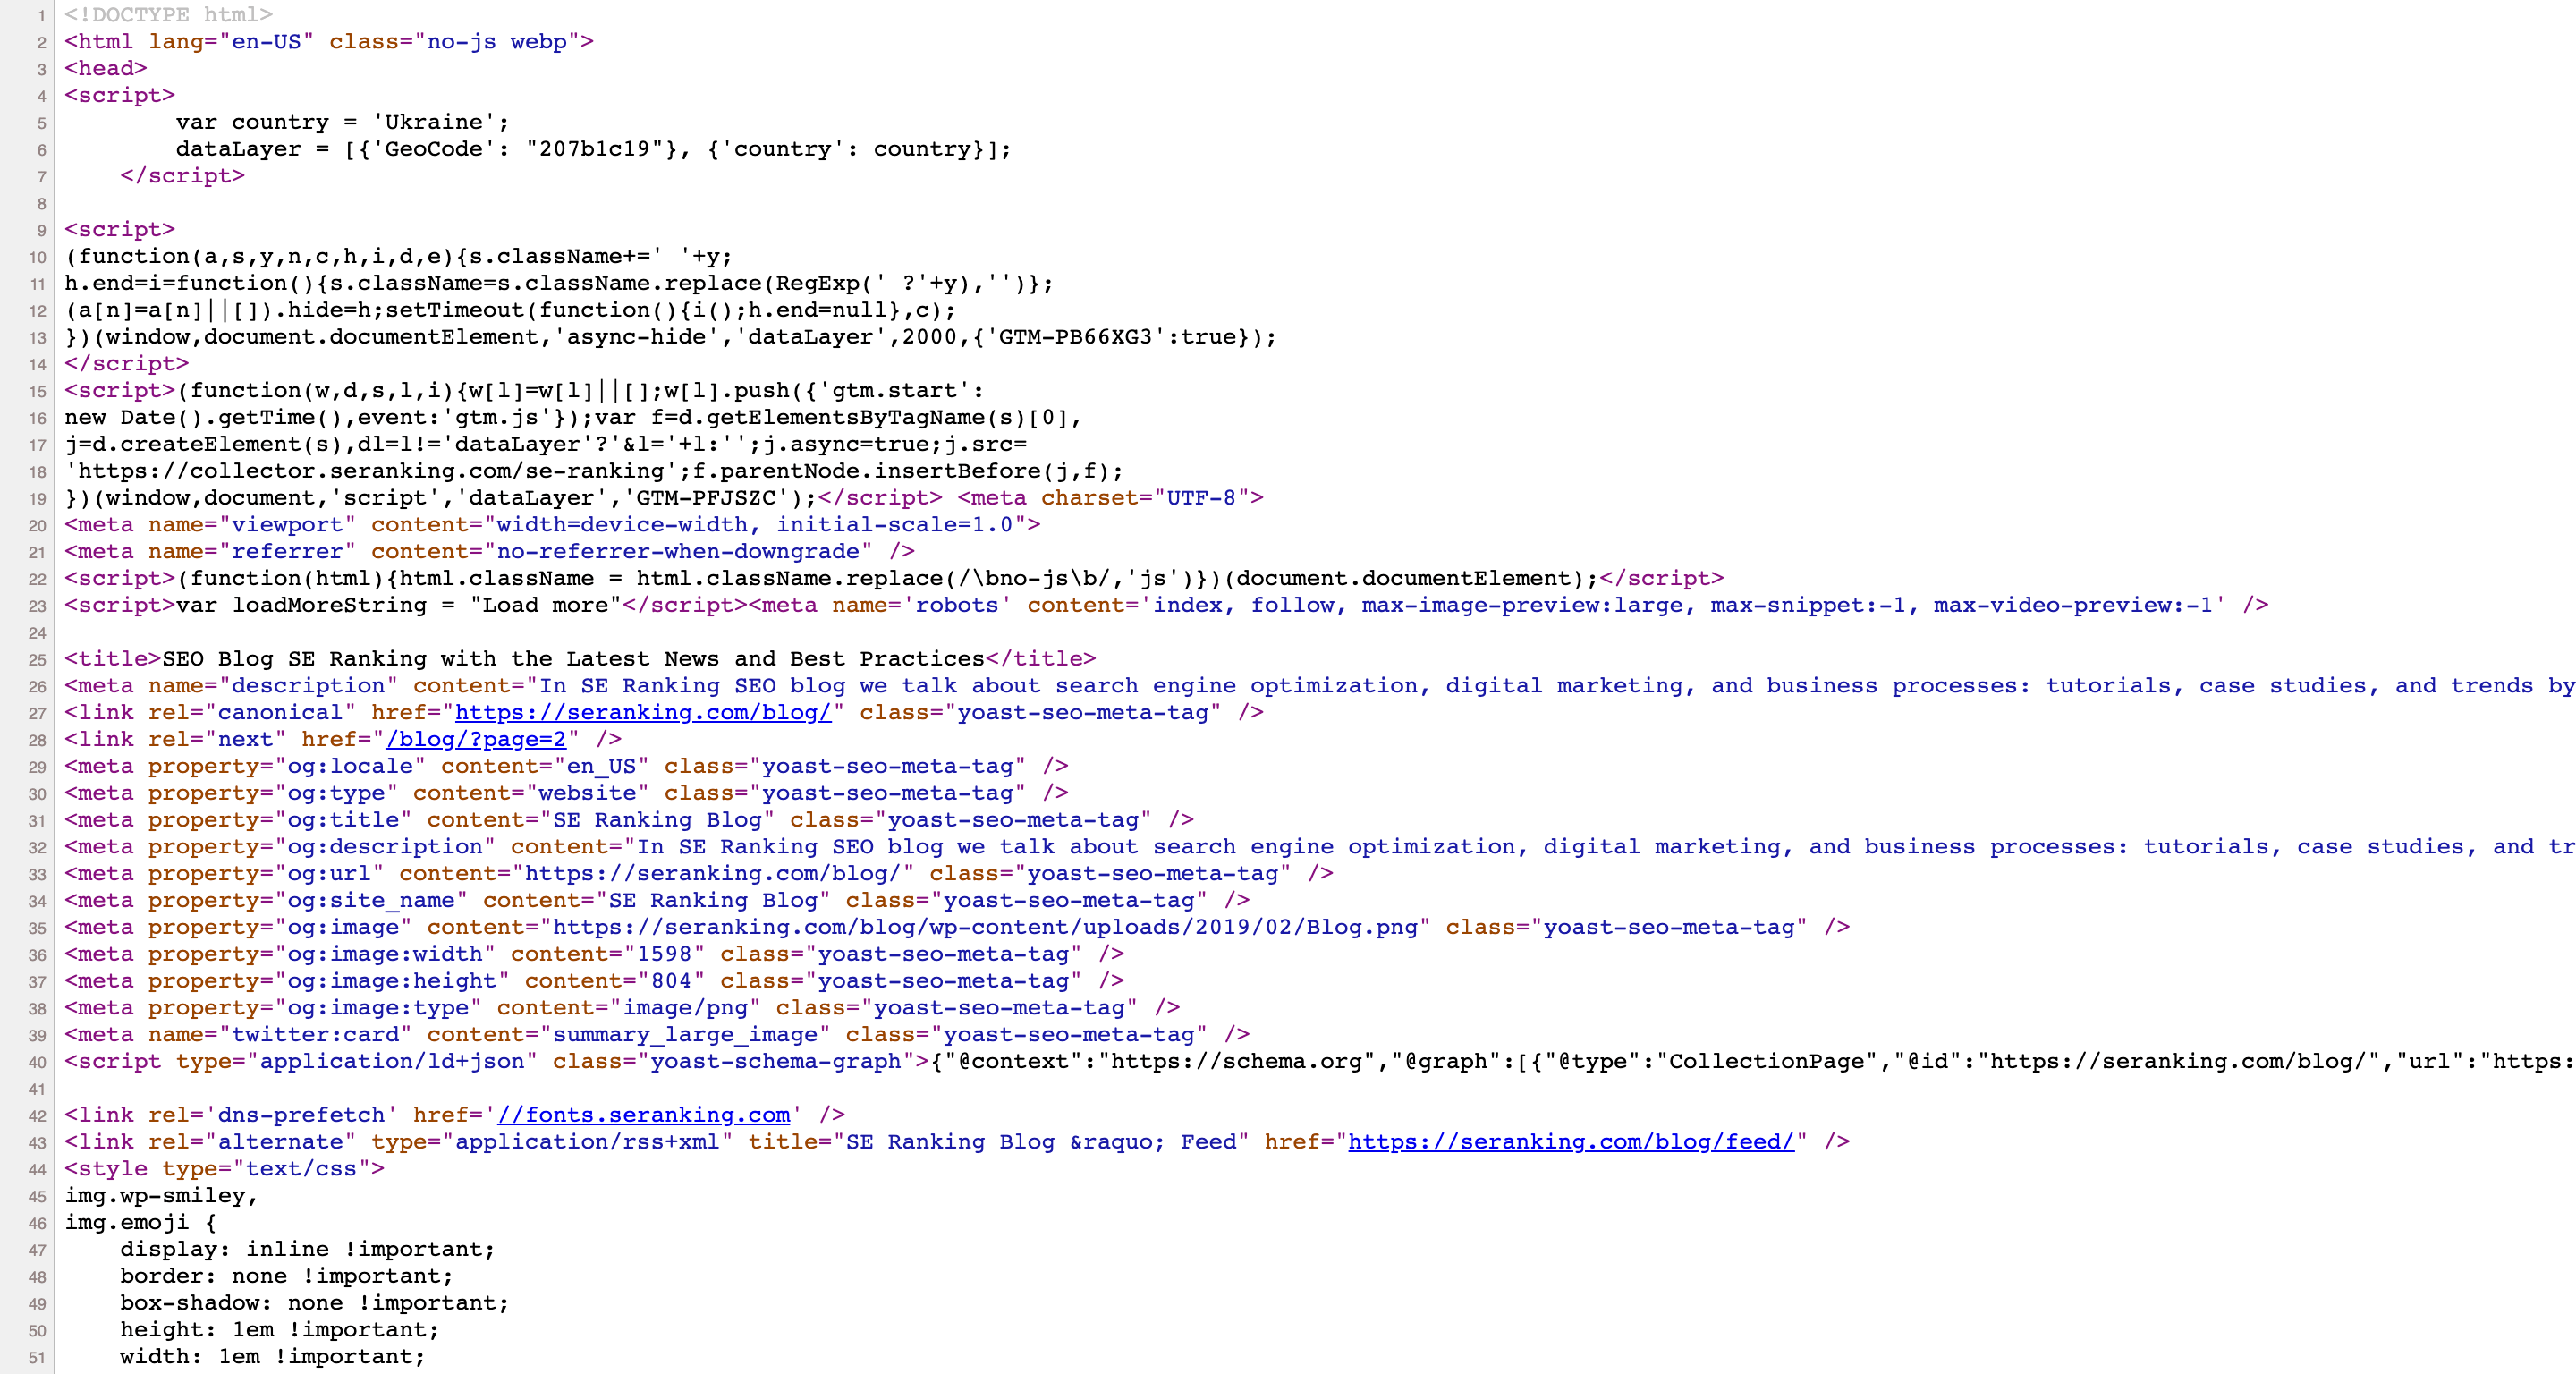
<!DOCTYPE html>
<html lang="en"> <head> <title>This is the title of a document</title> <meta name="description" content="This is a description">
</head> <body> <h1>This is a heading</h1> <p>This is a paragraph.</p>
</body>
</html>
<head>: Contains metadata and other essential information about the page
The <head> element acts as a container for metadata, which means it contains information about the HTML document that is not visible on the webpage. It is positioned between the <html> tag and the <body> tag. You can include various HTML elements within the <head> tag, such as <base>, <link>, <meta>,<script>, <style>, and most importantly, <title>.
Here’s what the HTML code looks like:
<!DOCTYPE html>
<html lang="en"> <head>
 <title>This is the title of a document</title>
 <meta name="description" content="This is a description">
</head> <body> <h1>This is a heading</h1> <p>This is a paragraph.</p>
</body>
</html>
In the example above, you can observe that the <head> tag holds important metadata, including the document’s title, which is not directly visible on the webpage. Additionally, the <head> tag can accommodate various elements that provide additional data about the page.
The <head> tag supports HTML Global Attributes that can be used with any HTML element. These attributes enhance the functionality and behavior of the elements within the <head> section.
<body>: Defines the main content of the web page
The <body> tag defines the body of the document and acts as a container for information on the page, including any text, images, and videos that you display on your web page for everyone to see.
The <body> tag contains the main content of an HTML document, including headings, paragraphs, multimedia, hyperlinks, tables, lists, and so on. Basically, everything the human eye can see on a web page is housed in the <body> tag, which, by the way, there can only be one of.
Here’s what the HTML code looks like:
<!DOCTYPE html>
<html lang="en"> <head> <title>This is the title of a document</title> <meta name="description" content="This is a description">
</head> <body> <h1>This is a heading</h1> <p>This is a paragraph.</p>
</body>
</html>
Once you run the code, you’ll see this:
Here, we can see the HTML elements that are enclosed within the <body> tag: <h1> and <p>. It is worth noting that the <head> tag contains metadata, such as the title and description of the document, which are not visible on the actual page.
The <body> tag also supports HTML Global Attributes. Moreover, it also supports HTML Event Attributes that let events trigger actions in browsers, similar to clicking on an element in JavaScript.
Useful HTML tags and attributes
And now, on to the other HTML tags that can help your SEO.
As we’ve already touched on, tags can tell browsers and search engines everything they need to know in a language they can understand, like how the page should be treated, what it’s about, and what its purpose is.
The only trick is knowing what you want to use and how to use it correctly. To make sure your HTML code is structured correctly and that it adheres to proper standards, you can utilize the HTML validator provided by the W3C.
<title>: Defines the title of the HTML document
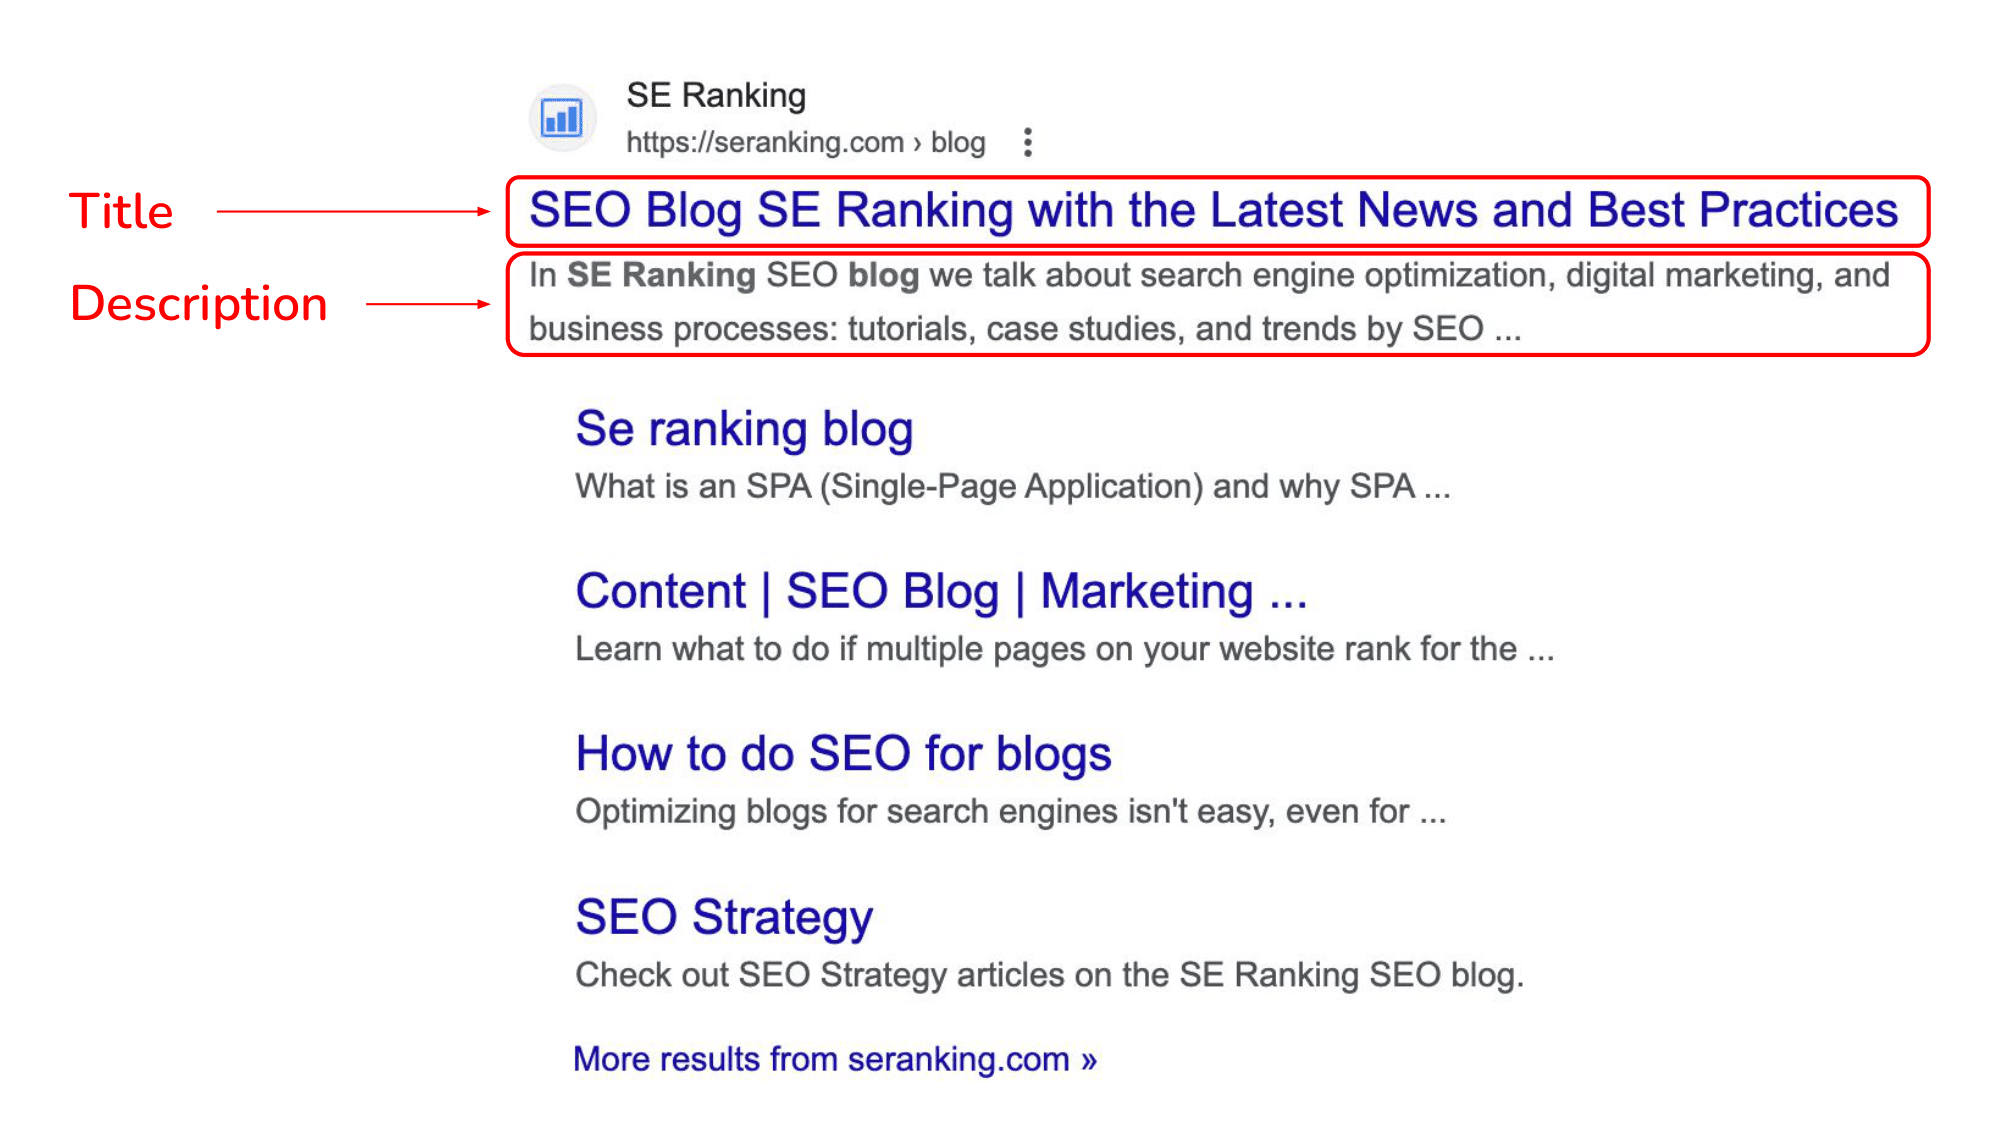
Being one of the most favorite tags of SEO pros, the <title> tag helps both users and search engines understand what a page is about.
Titles are displayed as clickable headings on SERPs. It is very important for usability and search engine optimization. The purpose of this tag is to accurately and concisely describe the content of the page so that searchers are enticed to visit the page, and search engines have enough additional information about the topic of the page. Often, users use clickbait titles to captivate the attention of users and attract them to websites.
The title isn’t only displayed in the snippet but in the browser tab as well, which helps users understand in a glance what pages are open in the browser.

The title is also displayed as the anchor text when you post links on social media, if you don’t use the Open Graph markup that is. That is exactly why the title must be concise, informative, unique and interesting to attract potential readers.
The title length is recommended to be up to 55 characters, since excessively long titles will be truncated down to 600 pixels anyway. As a result, incomplete information will get pulled into the snippet.
Alright, with the title length issue out of the way, let’s figure out whether we need to use target keywords in the title tag. The short answer is, yes. According to studies, the use of the target keyword within the title tag can have a positive effect on a website’s rankings. The target keyword can help boost rankings, but there is no direct relation between the use of the keyword in the title tag and an increase in rankings. Google has long learned to analyze web page semantics without getting hung up on tags alone, as was the case in the past.
The main takeaway is that you do need to use keywords, but only with the aim of helping both search engines and users understand what your page is about, nothing more.
You are also at liberty to specify other additional information in the title, such as price, brand, delivery options, and so on.
Here’s what the HTML code looks like:
<!DOCTYPE html>
<html lang="en"> <head>
 <title>This is the title of a document</title>
 <meta name="description" content="This is a description">
</head> <body>
 <h1>This is a heading</h1>
 <p>This is a paragraph.</p>
</body>
</html>Interestingly enough, since the <title> element is a part of the <head> tag of the HTML file, it isn’t displayed on the page itself. Plus, there should only be one <title> tag in a single document that must be placed inside the <head> container. The <title> tag also supports HTML Global Attributes, but doesn’t support Event Attributes.
<meta>: Provides additional metadata about the webpage
The <meta> tag defines the HTML document’s metadata that isn’t shown on the page, but can be processed by search bots to identify keywords and by browsers to display content or reload the page.
It must always be placed within the <head>, and is usually used to specify the set of characters used on the page, the page description, keywords, document author, as well as viewport settings.
Let’s look at the attributes that the <meta> tag can contain.
Name attribute
The Name attribute is one of the primary attributes of the <meta> tag that we’ll focus on. It is used to specify the name for the metadata. Here’s how it can be used:
- Informing search bots: You can use the name attribute to indicate whether the information on a page is intended for search bots or not. By including a name attribute in the meta tag, you can point out to all or specific bots that they should consider the noindex directive, preventing them from interacting with your page. For example:
<meta name=”googlebot” content=”noindex”> <meta name=”robots” content=”noindex”>
<meta name=”keywords” content=”HTML, tags, attributes”>
- Defining the page’s description: This helps search engines and other apps understand the content of your page. For instance:
<meta name=”description” content=”This is a great description”>
- Identifying the author: The name attribute can also be used to identify the author of the page’s content. This provides attribution to the original author. For example:
<meta name=”author” content=”John Appleseed”>
But these are not all the values of the name attribute. Let’s take a closer look at some other ones.
Description attribute
The description attribute, often referred to as the meta description, is another attribute used with the <meta> tag, which is essential for SEO. This attribute provides a textual description of the page’s content that is displayed in SERPs along with the title.
Here’s what its HTML code looks like:
<meta name="description" content="HTML tags and attributes you need to know">
Besides providing additional information on the page to search engines, the description attribute gives content creators an opportunity to write enticing text that will encourage people to click through to the page directly from the SERPs.
The description text has to be a little clickbaitish, so that people will be motivated to go to the page. But note that Google may replace the provided page description with parts of the content that are relevant to a user’s search query.
Now, although the text of the description doesn’t provide a direct boost in rankings, it can increase your CTR, which, in turn, is seen as a positive ranking signal.
Viewport meta tag
Although it’s not an attribute, the viewport meta tag lets you control the width and scaling of the viewport—the area of a page visible to a user—so that it’s displayed correctly on screens of all sizes: from desktop computers to laptops and from tablets to mobile phones.
Here’s what the HTML code looks like, and I advise you to add it to all your web pages:
<meta name="viewport" content="width=device-width, initial-scale=1.0">
With the help of this data, browsers can get information on how to control the dimensions and scaling of web pages. Taking a closer look at the code, we can see that the width=device-width part is set up in such a way that the width of the page will match the screen-width of the used device.
As for the initial-scale=1.0 part, it sets the initial zoom level when the page is first loaded by the browser. So you may want to test it out depending on how your page is set up. Here’s an example of a page that doesn’t use the viewport meta tag, along with the same web page that does use it:

In the modern age, when the usability of a site directly affects its ranking positions, it is simply unacceptable to create pages that do not adjust to the sizes of different screens. People will immediately leave your page if it looks like the example of the left.
Content attribute
The content attribute works in combination with the name and http-equiv attributes and reveals the meaning/data type of the meta tag to the search engine. Essentially, it specifies the content that contains the meta tag.
Here’s an example of the content attribute used in the meta tag:
<meta name="description" content="What are HTML tags and attributes? How do you use them to get an SEO advantage? Check out every important HTML tag and its attribute in this post!">
In the context of the http-equiv attribute, which we’ll get to next, the content attribute defines the type of data that is sent to the browser. But first, let’s focus on a very important value of the content attribute.
Noindex attribute
Noindex is another commonly used meta tag attribute for SEO purposes. Basically, the noindex attribute allows you to tell search engines that they may not use the given page in their respective indices.
Similar to the meta robots tag, the noindex attribute is commonly referred to as the noindex tag because of its use, although it is an attribute of the meta tag.
Here’s what the HTML code looks like:
<meta name="robots" content="noindex">
Here are a few examples of the commands that can be used in the meta robots tag besides noindex (they can be used in combination):
- Nofollow: do not follow any links from the page, and also do not take link juice into account when calculating rankings.
- Index, nofollow: index the content of the page, but do not follow any links from the page.
This attribute comes in very handy when you want to hide sensitive data from organic search. You could, for example, have an area on your site that can only be accessed by paid members, and failing to use the noindex tag will make the content accessible to anyone from the search result pages.
When using robots directives on your page, make sure the page is not blocked by the robots.txt file. Otherwise, search engines simply won’t be able to access the page and see the directives specified in the <meta> tag.
HTTP-equiv attribute
The http-equiv attribute displays the content of the HTTP header and is used by servers to collect additional page information. In layman’s terms, browsers convert the value of the http-equiv attribute—specified with the help of the content attribute—to the HTTP response header format and treat them as if they came directly from the server.
Here’s an example of what the HTML code looks like:
<meta http-equiv="expires" content="4 May 2022"> <meta http-equiv="refresh" content="60">
The HTTP header reveals a lot of data that is useful for SEO specialists, such as the server response status (200, 404 and so on) or the name of the server that sent the response.
In addition, it can be used to specify the canonical URL for the requested page, block robots from indexing a page using the X-Robots-Tag HTTP header or set up an HTML redirect using the refresh attribute.
Here are some of the attribute values that can be used in the http-equiv attribute:
- Content-security-policy: Specifies the document’s content policy.
<meta http-equiv=”content-security-policy” content=”default-src ‘self'”>
- Content-type: Specifies the document’s character encoding.
<meta http-equiv=”content-type” content=”text/html; charset=UTF-8″>
- Default-style: Specify the document’s preferred stylesheet. The value of the content attribute must match the value of the title attribute on a link element, or it must match the value of the title attribute on a style element.
<meta http-equiv=”default-style” content=”the document’s preferred stylesheet”>
- Refresh: Defines how often (in seconds) the document needs to automatically refresh.
<meta http-equiv=”refresh” content=”120″>
Charset attribute
The charset attribute is responsible for document encoding. It defines the character encoding style of a website, which needs to be specified so that browsers can correctly display the text of the HTML document on the page. If the tag with the encoding data contains an error, you will only see scrambled characters on the page.
Here’s what the HTML code looks like:
<meta charset="UTF-8">
One of the most frequently used coding standards is UTF-8, with 96.6% of analyzed websites using it. It’s supported by all modern browsers and search engines. Some other encoding standards include ISO-8859-1, Windows-1251, and Windows-1252, but they are used by less than 3% of websites.
Don’t use several coding standards in a single document, as this will confuse browsers and search engines alike. In turn, this can lead to content indexing issues and the incorrect display of text.
Nowadays, practically every search engine knows how to identify page encoding without external help. But, to be on the safe side, it’s best if you specify the encoding used on the page to avoid having issues.
<a> and <link>: Create links that allow users to navigate to other webpages or specific locations within those same pages
The <a> tag serves to define hyperlinks that link to other web pages, files, or specific sections within the same page. Here’s an example of what its HTML code looks like:
<a href=”www.website.com”>link anchor text</a>
When added to the HTML code and placed in-content, the example above will look like this.
Now, let’s break it down to understand its parts. First, we have the <a> tag that indicates that the element is a link. Then, the href attribute defines the page the link links out to, which is www.website.com in our case. The text that you can see between the start <a> tag and the close </a> tag is the anchor text, as in the clickable in-content text website visitors will see on the page.
The <a> tag is used for clickable links that are placed within the page’s content, as in within the <body> tag. If you need to link a web page to an external resource, like a document containing fonts or external style sheets, you need to use the <link> tag that appears in the <head> of the page.
Here’s what its HTML code looks like:
<link rel="stylesheet" href="styles.css">
The <link> tag links aren’t hyperlinks, they cannot be clicked on, and the <link> element itself contains only attributes. They simply show how web documents are related to one another.
Now, let’s take a look at the attributes that are associated with link tags.
Hreflang attributes
The most important attributes of the <a> tag are the href and hreflang attributes that indicate the link’s destination and specify the country and language of the alternate page, respectively.
The hreflang attribute was primarily designed for websites that contain the same copy in different languages. It lets search engines know which page version must be displayed to website visitors, allowing them to see the content in their preferred language.
The hreflang attribute can also be used in the <link> tag where it defines the language of the linked-to web page, and here’s what its HTML code looks like:
<link rel="alternate" href="https://website.com" hreflang="en-gb" />
The code can be split up into three parts:
- The alternate value indicates to search engines that the web page has an alternative relevant page.
- The href attribute defines the URL of the linked out to page.
- The language code indicated after the hreflang attribute lets search engines know the language or country of the linked page. Check out the full list of language codes known as ISO 639-1 codes.
The hreflang attribute can additionally be used in the HTTP header for non-HTML documents, or it can be specified in the site’s XML sitemap.
Rel=“nofollow” attribute
The rel=”nofollow” attribute points out to search engine bots that they aren’t allowed to follow the URL indicated in the href attribute.
This attribute does not have any effect on website visitors, so they can still click links to go to other pages. However, it does impact bots, as in they are prohibited to follow a link to visit a page or highlight any specific positive aspect of linking one page to another.
This attribute can either be applied to a single link like so:
<a href=www.website.com rel="nofollow">link anchor text</a>
Or you can mark all links on a page as nofollow by using it in the <head> tag like the noindex attribute:
<meta name="robots" content="nofollow"/>
But it’s not just about search engines and their bots. You can still benefit indirectly from nofollow links if your website visitors click through to the linked web page.
Google’s use of the rel=“nofollow” attribute
Several years ago, Google made a few alterations to the nofollow attribute and introduced the ugc and sponsored attributes. Unlike the nofollow attribute, these new ones allow publishers to state the relationship between links and their target pages in a much clearer way.
They help Google recognize when a linked-to page shouldn’t be taken into account when ranking pages:
- The ugc attribute stands for user-generated content and is used to mark links that have been added through publicly available resources
- The sponsored attribute is used to identify links that were obtained through ads or sponsorships.
Furthermore, Google also stated that the nofollow, ugc, and sponsored attributes are now looked at as hints by the search engine. Google’s bot used to ignore such links, but now it may consider the provided “hint”, but can still treat the link as “nofollow”.
Canonical attribute
The link tag’s rel=”canonical” attribute allows SEOs to point out which other web page is to be considered canonical—as in it is the main version of the page, but its copies may exist. From the SEO perspective, this helps promote a specific page in organic search, blocking its copies from getting ranked.
Here’s what this attribute looks like:
<link rel="canonical" href="https://www.website.com/"/>
The code with the canonical attribute should be placed within the page’s <head> element. Note that you should indicate the page you want search engine bots to see as canonical after the href attribute.
Check out what Google has to say about canonical links to find out more.
<img>: Inserts an image into the webpage
The <img> tag is present on any page that has an image. It is used to embed images into HTML code and display them in PNG, JPEG or GIF formats. You can also add an image in the form of a link to another file. To do this, simply put the <img> tag into the <a> container.
Images can also be used as HTML image maps when the image contains clickable areas that act as links. Image maps don’t differ from regular images in any way except that the former can be broken down into invisible zones of various shapes that can be clicked on.
Interestingly enough, this tag doesn’t actually insert any images into pages, but links out to them so that they are displayed on the page. The <img> tag basically serves as a container for images that are in fact located somewhere else, like a server.
Here’s what the HTML code of the <img> tag looks like:
<img src="imagefilename.jpg" title=”image description goes here” alt="alternative image description goes here">
As you can see, there are three attributes in this tag. One of them must be filled out correctly in order for the tag to function, while the other ones can be left without a value. Let’s look at the three in closer detail.
Src attribute
The main purpose of the src attribute is to indicate where (URL) the file of an image shown on a web page is located. The image’s location, as in its URL, can be specified in two ways for the src attribute.
If the image can be found on the same domain as the container that houses it, then you should use a relative URL. In this case, the domain name isn’t included in the URL address. If there’s no slash at the start of the URL, it is relative to the page at hand.
src=”imagefile.png”
But if there is a slash at the start of the URL, then it’s relative to the domain:
src=”/images/imagefile.png”
The relative URLs won’t break with a domain change, for example, when switching from HTTP to HTTPS. And if an image can’t be found by a browser, the alt text will be displayed along with the broken link icon.
If you want to use an image that is located on another website, use the absolute URL:
src=”https://www.website.com/images/imagefile.png”
Note that using images from external sources without permission may violate copyright laws, plus you have no control over them and won’t know when they are removed or updated.
The sole purpose of this attribute in terms of SEO is that you need it to index images and see them ranked in image search. Plus, the image tag simply won’t work without this attribute.
Alt attribute
The main purpose of this attribute is to indicate alternate text that will appear if an image can’t be displayed on the page for any reason. Since search engines are still struggling to come up with the technology that will allow them to perfectly understand what is portrayed on images, the alt attribute provides another way—in addition to the title attribute—for them to understand what is depicted on an image and, ultimately, rank it in image search.
Use keywords that describe the image, and are relevant to the topic of the web page for better SEO.
In terms of human website visitors, the text in the alt attribute is used by screen readers and assistive tech to give blind or visually impaired people an understanding of what the image contains. So, you may want to make the most of the alt attribute in terms of helping such people absorb content.
Although the alt attribute must be present in the image tag like the title attribute, you aren’t obligated to fill it out. However, considering the points made above, you may want to fill it out after all.
Title attribute
The title attribute describes the image’s content. Although this attribute isn’t as vital for optimization as the alt attribute as it is not used for search ranking, it is still worth filling out since it can provide additional information when users hover over the image.
Many other attributes are used along with the <img> tag that are responsible for the image’s location on the page, size and design features. So, here’s some of them:
- Crossorigin: Allows the use of images from third-party sites that permit cross-origin access use with canvas
- Height: Defines the image height
- Ismap: Defines an image as a server-side image map
- Loading: Defines if a browser should load an image right away or wait until specific conditions are met
- Longdesc: Defines a web page that contains a detailed image description
- Referrerpolicy: Defines what referrer info must be used when fetching an image
- Sizes: Defines the sizes of an image for different page layouts
- Srcset: Provides a list of image files that should be used in different scenarios
- Usemap: Defines an image as a client-side image map
- Width: Defines the image width
The <img> tag also supports HTML Global Attributes and HTML Event Attributes.
<i>, <em>, <b>, <strong>: Emphasize and style text in different ways to highlight importance or add emphasis
A separate group of tags is responsible for emphasizing text—making it bold, italic, underlined, etc. Text selection is useful when you need to logically highlight an important part of the text, both for readers and search engines.
Here are the most common tags that help format text:
- The <i> tag makes the text italic.
<i>Italicized text</i>
- The <em> tag defines emphasized text. The content within the tag is displayed in italic. Screen readers use verbal stress when pronouncing words in <em>:
<em>Emphasized text</em>
Note that the key difference between the <i> and <em> tag is that the latter provides a semantic emphasis on an important word or section of words (useful for SEO), while the former is just offset text conventionally styled in italic to show alternative mood or voice.
- The <b> tag makes the text bold:
<b>Emboldened text</b>
- The <strong> tag makes the text bold as well. However, unlike the <b> tag that simply makes the text bold without any logical meaning behind it, this tag tells search engines that the emboldened text is of great importance:
<strong>Strong text</strong>
Here’s how they look like in the code:
<span>: Applies styles or formatting to selected text sections
The <span> tag is an inline element used to apply styles or formatting to specific sections of text within a larger content block. It does not alter the structure or meaning of the text itself. Instead, it acts as a container for targeted styling.
Here’s what the HTML code looks like:
<p>This word is <span style="color:blue">blue</span>.</p>
And here’s how it looks directly in the code:
The <span> element is versatile and can be nested within other elements to selectively style individual words, phrases, or small sections of a paragraph. By adding CSS styles to the <span> tag, such as changing the font color or applying a background color, you can visually distinguish and emphasize specific parts of the text.
The <span> tag can serve as a hook for JavaScript functionality. By assigning an ID or class to the <span> element, you can easily target and manipulate the content using JavaScript. This opens up possibilities for interactive features, dynamic content updates, or event handling within specific parts of the text.
<style>: Defines internal CSS styles
The <style> tag in HTML is used to define internal CSS styles within an HTML document, allowing you to apply custom styles to specific elements or sections of the webpage without the need for an external CSS file.
<html>
<head>
<style>  h1 {color:red;}
 p {color:blue;}
</style>
</head> <body> <h1>A heading</h1> <p>A paragraph.</p>
</body>
</html>
By placing CSS rules inside the <style> tags, you can control the visual presentation of the content. This includes properties like colors, fonts, layout, and more. The <style> tag provides a convenient way to organize and manage the styling of HTML elements within a single HTML file, making it easier to maintain and modify the appearance of the webpage.
Typically, the <style> tag is placed within the <head> section of the HTML document:
The use of the <style> tag itself does not directly impact SEO, but the way you utilize the <style> tag and apply styles to your HTML elements can indirectly affect it.
Please note that using inline styles directly within the HTML document is generally considered a less optimal practice. This approach can lead to a cluttered and hard-to-maintain codebase that can hinder scalability and reusability. Instead, it is recommended to utilize external CSS files or internal stylesheets to maintain a clear separation of concerns, enhance code organization, and facilitate consistent and efficient styling across the entire website.
<table>, <ul>, <ol>: Structure and organize data into tables and lists
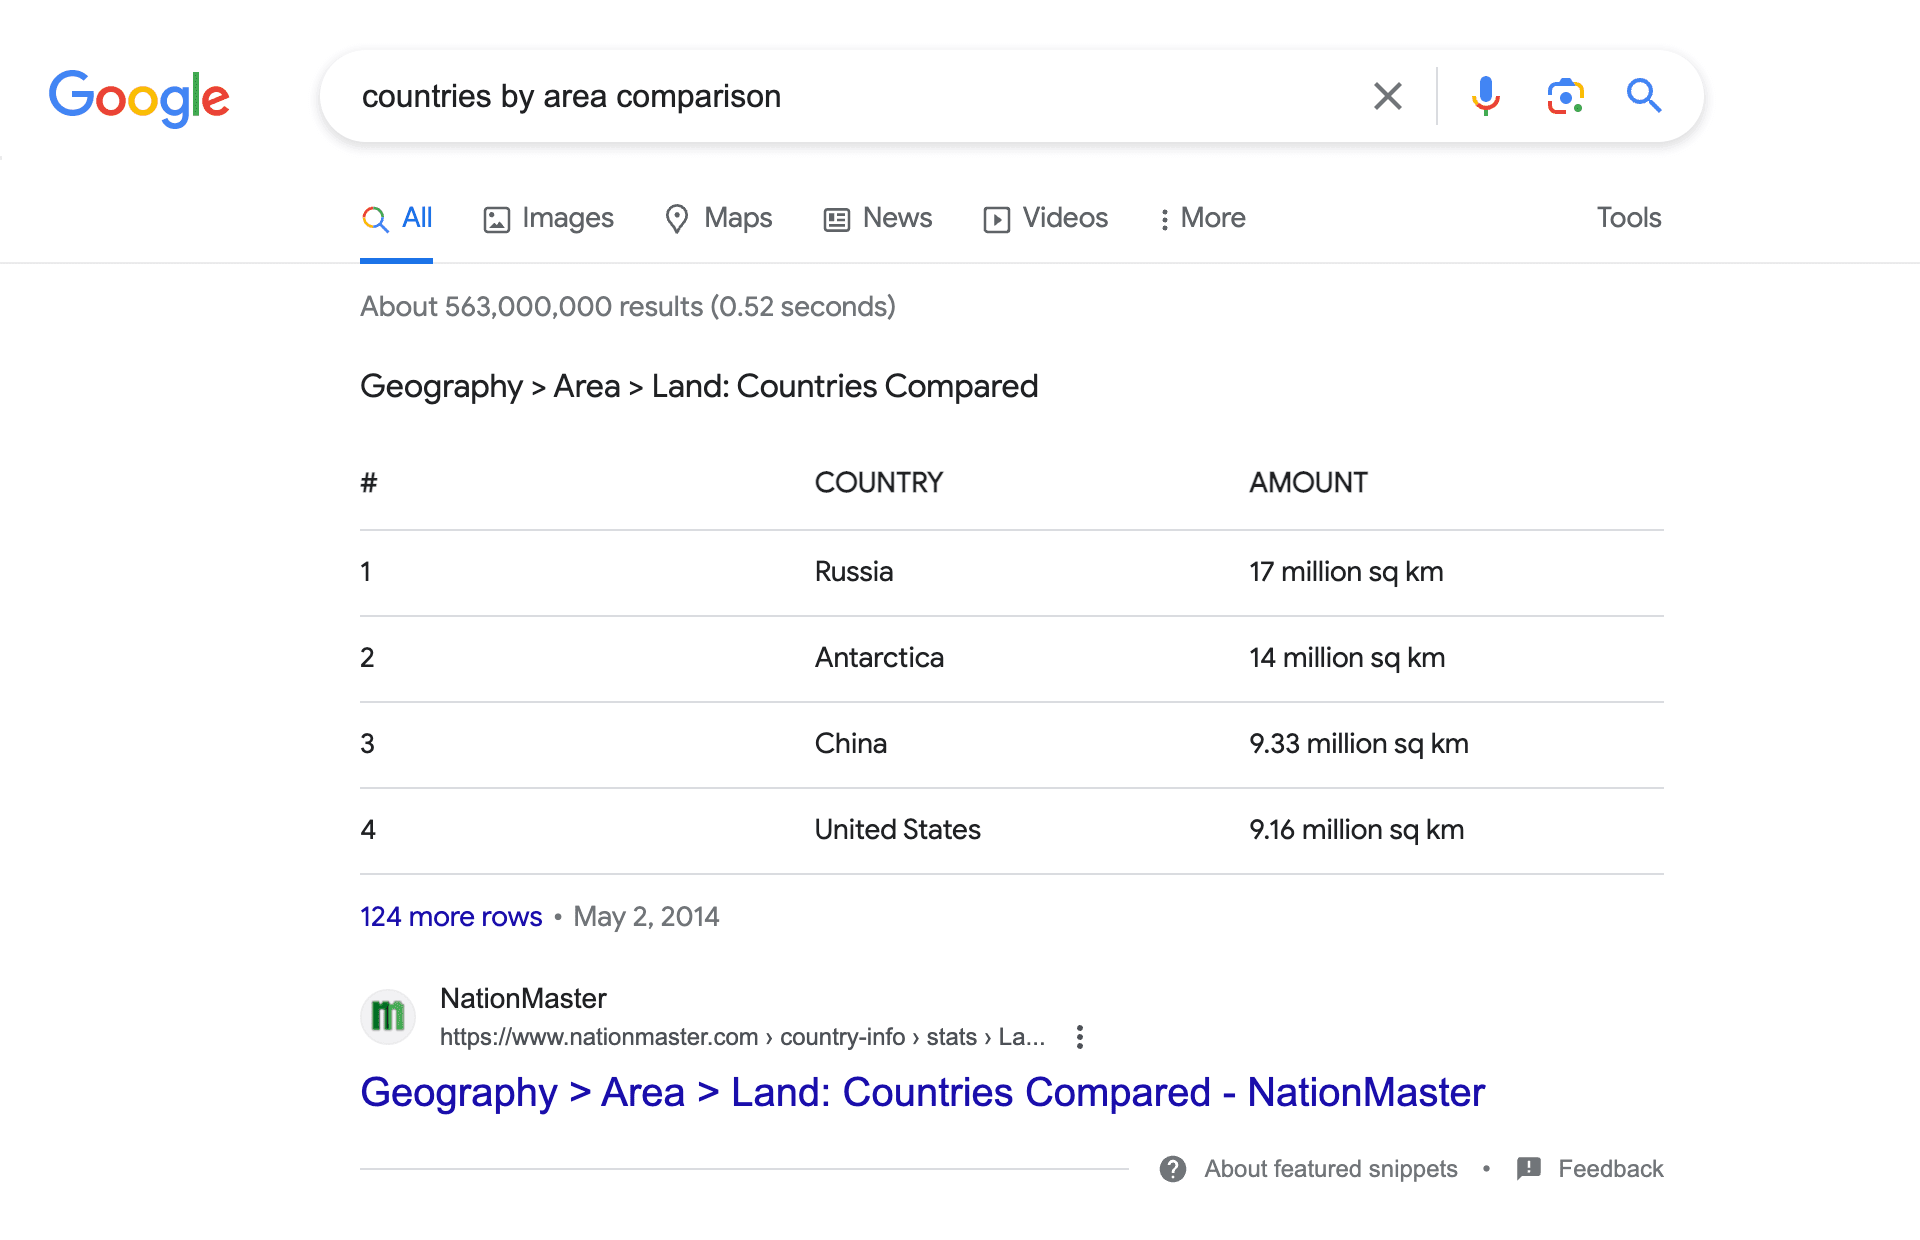
Tables and lists help organize information on a page and give you a sweet bonus—a chance to appear in Google’s Answer Box. For example, when entering the query “countries by area comparison”, we see an Answer Box with the following table:
Here’s what the clean HTML code looks like without all the extra information:
<style>
table, th, td { border: 1px solid black; border-collapse: collapse;
}
</style> <table> <tr> <th>Country</th>
  <th>Amount</th>
 </tr> <tr>
  <td>United States</td>
  <td>9.16 mln sq km</td>
 </tr>
 <tr>
  <td>Canada</td>
  <td>9.9 million km²</td>
 </tr>
</table>
Let’s break down these abbreviations and find out how to use the <table>, <caption>, <tr>, <td> and <th> tags correctly:
- <table>: Defines the table’s structure and content. The <caption>, <td>, <th>, <tr> and other elements are used inside the <table> tag. You can completely change the table using attributes: align the table, set a background image, change the background color, set the border width, etc
- <caption>: Creates a title for the table description
- <tr>: Creates a row in the table
- <td>: Creates a standard cell in the table
- <th>: Creates a header cell in the table with justified emboldened text