Introduction
Artificial Intelligence has many use cases, and some of the best ones are in the Health Industry. It can really help people maintain a healthier life. With the increasing boom in generative AI, certain applications are made these days with less complexity. One very useful application that can be built is the Calorie Advisor App. In this article, we’ll only look at this, inspired by taking care of our health. We will be building a simple Calorie Advisor App where we can input the images of the food, and the app will help us calculate the calories of each item present in the food. This project is a part of NutriGen, focusing on health through AI.
Learning Objective
- The App we will be creating in this article will be based on basic Prompt engineering and image processing techniques.
- We will be using Google Gemini Pro Vision API for our use case.
- Then, we will create the code’s structure, where we will perform Image Processing and Prompt Engineering. Finally, we will work on the User Interface using Streamlit.
- After that, we will deploy our app to the Hugging Face Platform for Free.
- We will also see some of the problems we will face in the output where Gemini fails to depict a food item and gives the wrong calorie count for that food. We will also discuss different solutions for this problem.
Pre-Requisites
Let’s start with implementing our project, but before that, please ensure you have a basic understanding of generative AI and LLMs. It’s okay if you know very little because, in this article, we will be implementing things from scratch.
For Essential Python Prompt Engineering, a basic understanding of Generative AI and familiarity with Google Gemini is required. Additionally, basic knowledge of Streamlit, Github, and Hugging Face libraries is necessary. Familiarity with libraries such as PIL for image preprocessing purposes is also beneficial.
This article was published as a part of the Data Science Blogathon.
Table of contents
Project Pipeline
In this article, we will be working on building an AI assistant who assists nutritionists and individuals in making informed decisions about their food choices and maintaining a healthy lifestyle.
The flow will be like this: input image -> image processing -> prompt engineering -> final function calling to get the output of the input image of the food. This is a brief overview of how we will approach this problem statement.
Overview of Gemini Pro Vision
Gemini Pro is a multimodal LLM built by Google. It was trained to be multimodal from the ground up. It can perform well on various tasks, including image captioning, classification, summarisation, question-answering, etc. One of the fascinating facts about it is that it uses our famous Transformer Decoder Architecture. It was trained on multiple kinds of data, reducing the complexity of solving multimodal inputs and providing quality outputs.
Step1: Creating the Virtual Environment
Creating a virtual environment is a good practice to isolate our project and its dependencies such that they don’t coincide with others, and we can always have different versions of libraries we need in different virtual environments. So, we will create a virtual environment for the project now. To do this, follow the mentioned steps below:
- Create an Empty folder on the desktop for the project.
- Open this folder in VS Code.
- Open the terminal.
Write the following command:
pip install virtualenv
python -m venv genai_project
You can use the following command if you’re getting sa et execution policy error:
Set-ExecutionPolicy RemoteSigned -Scope ProcessNow we need to activate our virtual environment, for that use the following command:
.genai_projectScriptsactivateWe have successfully created our virtual environment.
Step Create Virtual Environment in Google Colab
We can also create our Virtual Environment in Google Colab; here’s the step-by-step procedure to do that:
- Create a New Colab Notebook
- Use the below commands step by step
!which python
!python --version
#to check if python is installed or not
%env PYTHONPATH=
# setting python path environment variable in empty value ensuring that python
# won't search for modules and packages in additional directory. It helps
# in avoiding conflicts or unintended module loading.!pip install virtualenv # create virtual environment
!virtualenv genai_project!wget https://repo.anaconda.com/miniconda/Miniconda3-latest-Linux-x86_64.sh
#This will help download the miniconda installer script which is used to create
# and manage virtual environments in python!chmod +x Miniconda3-latest-Linux-x86_64.sh
# this command is making our mini conda installer script executable within
# the colab environment. !./Miniconda3-latest-Linux-x86_64.sh -b -f -p /usr/local
# this is used to run miniconda installer script and
# specify the path where miniconda should be installed!conda install -q -y --prefix /usr/local python=3.8 ujson
#this will help install ujson and python 3.8 installation in our venv.import sys
sys.path.append('/usr/local/lib/python3.8/site-packages/')
#it will allow python to locate and import modules from a venv directoryimport os
os.environ['CONDA_PREFIX'] = '/usr/local/envs/myenv'
# used to activate miniconda enviornment
!python --version
#checks the version of python within the activated miniconda environment
Hence, we also created our virtual environment in Google Colab. Now, let’s check and see how we can make a basic .py file there.
!source myenv/bin/activate
#activating the virtual environment
!echo "print('Hello, world!')" >> my_script.py
# writing code using echo and saving this code in my_script.py file!python my_script.py
#running my_script.py fileThis will print Hello World for us in the output. So, that’s it. That was all about working with Virtual Environments in Google Colab. Now, let’s continue with the project.
Step2: Importing Necessary Libraries
import streamlit as st
import google.generativeaias genai
import os
from dotenv import load_dotenv
load_dotenv()
from PIL import Image
If you are having trouble importing any of the above libraries, you can always use the command “pip install library_name” to install it.
We are using the Streamlit library to create the basic user interface. The user will be able to upload an image and get the outputs based on that image.
We use Google Generative to get the LLM and analyze the image to get the calorie count item-wise in our food.
Image is being used to perform some basic image preprocessing.
Step3: Setting up the API Key
Create a new .env file in the same directory and store your API key. You can get the Google Gemini API key from Google MakerSuite.
Step4: Response Generator Function
Here, we will create a response generator function. Let’s break it down step by step:
Firstly, we used genes. Configure to configure the API we created from the Google MakerSuite Website. Then, we made the function get_gemini_response, which takes in 2 input parameters: the input prompt and the image. This is the primary function that will return the output in text.
genai.configure(api_key=os.getenv("GOOGLE_API_KEY"))

def get_gemini_response(input_prompt, image):

    model = genai.GenerativeModel('gemini-pro-vision')

    response = model.generate_content([input_prompt, image[0]])

    return response
Here, we are using the ‘Gemini-pro-vision’ model because it is multimodal. After calling our model from the genie.GenerativeModel dependency, we are just passing in our prompt and the image data to the model. Finally, based on the instructions provided in the prompt and the image data we fed, the model will return the output in the form of text that represents the calorie count of different food items present in the image.
Step5: Image Preprocessing
This function checks if the uploaded_file parameter is None, meaning the user has uploaded a file. If a file has been uploaded, the code proceeds to read the file content into bytes using the getvalue() method of the uploaded_file object. This will return the uploaded file’s raw bytes.
The bytes data obtained from the uploaded file is stored in a dictionary format under the key-value pair “mime_type” and “data.” The “mime_type” key stores the uploaded file’s MIME type, which indicates the type of content (e.g., image/jpeg, image/png). The “data” key stores the uploaded file’s raw bytes.
The image data is then stored in a list named image_parts, which contains a dictionary with the uploaded file’s MIME type and data.
def input_image_setup(uploaded_file):
    if uploaded_file isnotNone:
        #Read the file into bytes
        bytes_data = uploaded_file.getvalue()
        image_parts = [
            {
                "mime_type":uploaded_file.type,
                "data":bytes_data
            }
        ]
        return image_parts
    else:
        raise FileNotFoundError("No file uploaded")
Step6: Creating the UI
So, finally, it’s time to create the user interface for our project. As mentioned before, we will be using the Streamlit library to write the code for the front end.
## initialising the streamlit app
st.set_page_config(page_title="Calories Advisor App")
st.header("Calories Advisor App")
uploaded_file = st.file_uploader("Choose an image...", type=["jpg", "jpeg", "png"])
image = ""
if uploaded_file isnotNone:
    image = Image.open(uploaded_file)
    st.image(image, caption="Uploaded Image", use_column_width=True)
submit = st.button("Tell me about the total calories")
Initially, we set up the page configuration using set_page_config and gave the app a title. Then, we created a header and added a file uploader box where users can upload images. St. Image shows the image that the user uploaded to the UI. At last, there is a submit button, after which we will get the outputs from our large language model, Gemini Pro Vision.
Step7: Writing the System Prompt
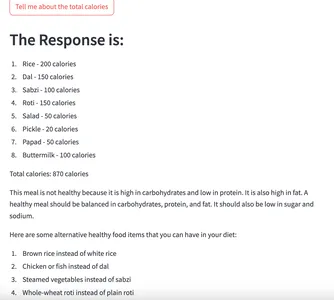
Now’s the time to be creative. Here, we will create our input prompt, asking the model to act as an expert nutritionist. It’s not necessary to use the prompt below; you can also provide your custom prompt. We are asking our model to act a certain way for now. Based on the input image of the food provided, we are asking our model to read that image data and generate the output, which will give us the calorie count of the food items present in the image and provide a judgment of whether the food is healthy or unhealthy. If the food is harmful, we ask it to give more nutritious alternatives to the food items in our image. You can customize it more according to your needs and get an excellent way to keep track of your health.
Sometimes it might not able to read the image data properly, we will discuss solutions regarding this also at the end of this article.
input_prompt = """

You are an expert nutritionist where you need to see the food items from the
image and calculate the total calories, also give the details of all
the food items with their respective calorie count in the below fomat.

        1. Item 1 - no of calories

        2. Item 2 - no of calories

        ----

        ----

Finally you can also mention whether the food is healthy or not and also mention
the percentage split ratio of carbohydrates, fats, fibers, sugar, protein and
other important things required in our diet. If you find that food is not healthy
then you must provide some alternative healthy food items that user can have
in diet.

"""
if submit:

    image_data = input_image_setup(uploaded_file)

    response = get_gemini_response(input_prompt, image_data)

    st.header("The Response is: ")

    st.write(response)
Finally, we are checking that if the user clicks the Submit button, we will get the image data from the
input_image_setup function we created earlier. Then, we pass our input prompt and this image data to the get_gemini_response function we created earlier. We call all the functions we created earlier to get the final output stored in response.
Step8: Deploying the App on Hugging Face
Now’s the time for deployment. Let’s begin.
Will explain the simplest way to deploy this app that we created. There are two options that we can look into if we want to deploy our app: one is Streamlit Share, and the other one is Hugging Face. Here, we will use Hugging Face for the deployment; you can try exploring deployment on Streamlit Share iFaceu if you want. Here’s the reference link for that – Deployment on Streamlit Share
First, let’s quickly create the requirements.txt file we need for the deployment.
Open the terminal and run the below command to create a requirements.txt file.
pip freeze > requirements.txt1plainTextThis will create a new text file named requirements. All the project dependencies will be available there. If this causes an error, it’s okay. You can always create a new text file in your working directory and copy and paste the requirements.txt file from the GitHub link I’ll provide next.
Now, make sure that you have these files handy (because that’s what we need for the deployment):
- app.py
- .env (for the API credentials)
- requirements.txt
If you don’t have one, take all these files and create an account on the hugging face. Then, create a new space and upload the files there. That’s all. Your app will be automatically deployed this way. You will also be able to see how the deployment is taking place in real-time. If some error occurs, you can always figure it out with the simple interface and, of course, the hugging face community, which has a lot of content on resolving some common bugs during deployment.
After some time, you will be able to see the app working. Woo hoo! We have finally created and deployed our calorie predictor app. Congratulations!!, You can share the working link of the app with the friends and family you just built.
Here’s the working link to the app that we just created – The Alorcalorieisor App
Let’s test our app by providing an input image to it:
Before:
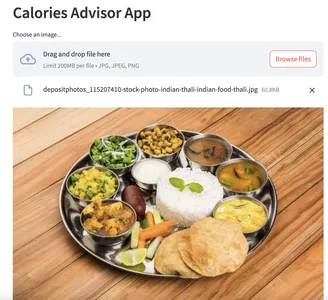
After:
Complete Project GitHub Link
Here’s the complete github repository link that includes source code and other helpful information regarding the project.
You can clone the repository and customize it according to your requirements. Try to be more creative and clear in your prompt, as this will give your model more power to generate correct and proper outputs.
Scope of Improvement
Problems that can occur in the outputs generated by the model and their solutions:
Sometimes, there could be situations where you will not get the correct output from the model. This may happen because the model was not able to predict the image correctly. For example, if you give input images of your food and your food item contains pickles, then our model might consider it something else. This is the primary concern here.
- One way to tackle this is through effective prompt engineering techniques, like few-shot prompt engineering, where you can feed the model with examples, and then it will generate the outputs based on the learnings from those examples and the prompt you provided.
- Another solution that can be considered here is creating our custom data and fine-tuning it. We can create data containing an image of the food item in one column and a description of the food items present in the other column. This will help our model learn the underlying patterns and predict the items correctly in the image provided. Thus, getting more correct outputs of the calorie count for the pictures of the food is essential.
- We can take it further by asking the user about his/her nutrition goals and asking the model to generate outputs based on that. (This way, we will be able to tailor the outputs generated by the model and give more user-specific outputs.)
Conclusion
We’ve delved into the practical application of Generative AI in healthcare, focusing on the creation of the Calorie Advisor App. This project showcases the potential of AI to assist individuals in making informed decisions about their food choices and maintaining a healthy lifestyle. From setting up our environment to implementing image processing and prompt engineering techniques, we’ve covered the essential steps. The app’s deployment on Hugging Face demonstrates its accessibility to a wider audience. Challenges like image recognition inaccuracies were addressed with solutions such as effective prompt engineering. As we conclude, the Calorie Advisor App stands as a testament to the transformative power of Generative AI in promoting well-being.
Key Takeaways
- We have discussed a lot so far, Starting with the project pipeline and then a basic introduction to the large language model Gemini Pro Vision.
- Then, we started with the hands-on implementation. We created our virtual environment and API key from Google MakerSuite.
- Then, we performed all our coding in the created virtual environment. Further, we discussed how to deploy the app on multiple platforms, such as Hugging Face and Streamlit Share.
- Apart from that, we considered the possible problems that can occur, and discussed soluFaces to those problems.
- Hence, it was fun working on this project. Thank you for staying till the end of this article; I hope you got to learn something new.
Frequently Asked Questions
Google developed Gemini Pro Vision, a renowned LLM known for its multimodal capabilities. It performs tasks like image captioning, generation, and summarization. Users can create an API key on the MakerSuite Website to access Gemini Pro Vision.
A. Generative AI has a lot of potential for solving real-world problems. Some of the ways it can be applied to the health/nutrition domain are that it can help doctors give medicine prescriptions based on symptoms and act as a nutrition advisor, where users can get healthy recommendations for their diets.
A. Prompt engineering is an essential skill to master these days. The best place to learn trompt engineering from basic to advanced is here – https://www.promptingguide.ai/
A. To increase the model’s ability to generate more correct outputs, we can use the following tactics: Effective Prompting, Fine Tuning, and Retrieval-Augmented Generation (RAG).
The media shown in this article is not owned by Analytics Vidhya and is used at the Author’s discretion.
- SEO Powered Content & PR Distribution. Get Amplified Today.
- PlatoData.Network Vertical Generative Ai. Empower Yourself. Access Here.
- PlatoAiStream. Web3 Intelligence. Knowledge Amplified. Access Here.
- PlatoESG. Carbon, CleanTech, Energy, Environment, Solar, Waste Management. Access Here.
- PlatoHealth. Biotech and Clinical Trials Intelligence. Access Here.
- Source: https://www.analyticsvidhya.com/blog/2024/04/how-to-build-a-calorie-advisor-app-using-genai/

