Giới thiệu
Khi chúng ta nghe về khoa học dữ liệu, điều đầu tiên chúng ta nghĩ đến là xây dựng mô hình trên sổ ghi chép và đào tạo dữ liệu. Nhưng đây không phải là tình huống trong khoa học dữ liệu trong thế giới thực. Trong thế giới thực, các nhà khoa học dữ liệu xây dựng mô hình và đưa chúng vào sản xuất. Môi trường sản xuất có khoảng cách giữa quá trình phát triển, triển khai và độ tin cậy của mô hình cũng như để tạo điều kiện cho các hoạt động hiệu quả và có thể mở rộng. Đây là nơi các nhà khoa học dữ liệu sử dụng MLOps (Hoạt động học máy) để xây dựng và triển khai các ứng dụng ML trong môi trường sản xuất. Trong bài viết này, chúng tôi sẽ xây dựng và triển khai dự án dự đoán tỷ lệ rời bỏ khách hàng bằng MLOps.

Mục tiêu học tập
Trong bài viết này, bạn sẽ học:
- Tổng quan về dự án
- Chúng tôi sẽ giới thiệu các nguyên tắc cơ bản của ZenML và MLOPS.
- Tìm hiểu cách triển khai mô hình cục bộ để dự đoán
- Tham gia vào quá trình tiền xử lý dữ liệu và kỹ thuật, đào tạo và đánh giá mô hình
Bài báo này đã được xuất bản như một phần của Blogathon Khoa học Dữ liệu.
Mục lục
Tổng quan về dự án
Trước hết chúng ta cần hiểu dự án của mình là gì. Đối với dự án này, chúng tôi có bộ dữ liệu từ một công ty viễn thông. Bây giờ, xây dựng mô hình để dự đoán liệu người dùng có tiếp tục sử dụng dịch vụ của công ty hay không. Chúng tôi sẽ xây dựng ứng dụng ML này bằng cách sử dụng sự trợ giúp của ZenmML và MLFflow. Đây là quy trình làm việc của dự án của chúng tôi.
Quy trình làm việc của dự án của chúng tôi
- Thu Thập Dữ Liệu
- Tiền xử lý dữ liệu
- Mô hình đào tạo
- Đánh giá mô hình
- Triển khai
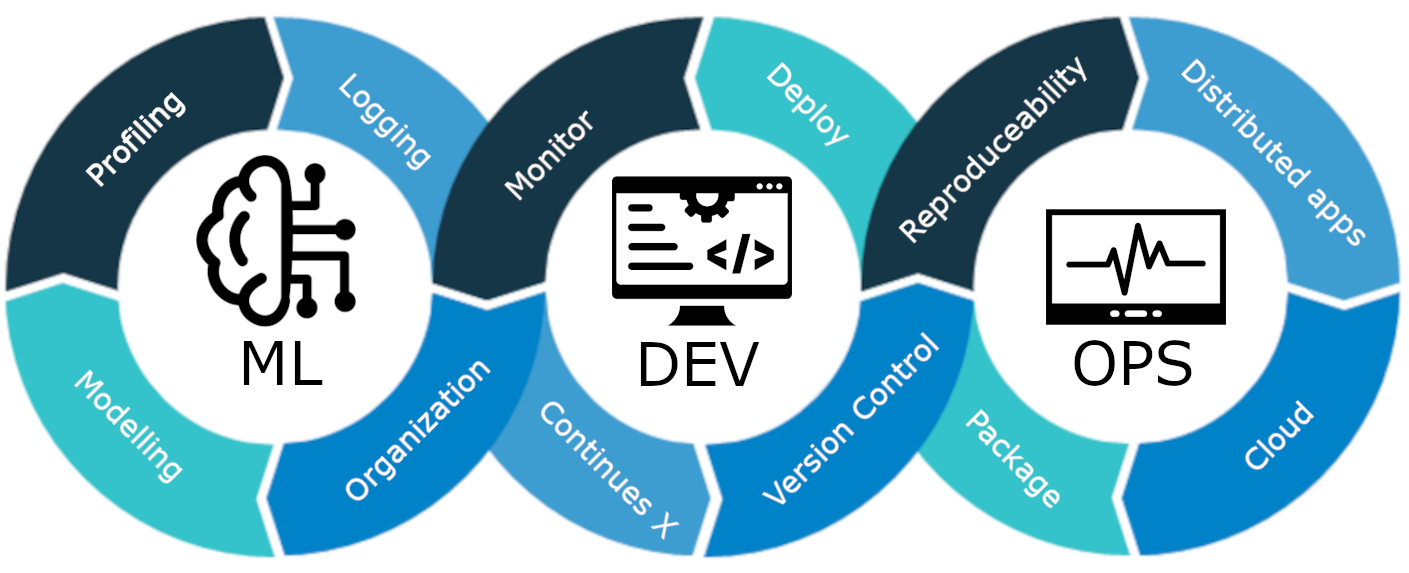
MLOps là gì?
MLOps là vòng đời máy học từ đầu đến cuối, từ phát triển đến triển khai và bảo trì liên tục. MLOps là phương pháp đơn giản hóa và tự động hóa toàn bộ vòng đời của các mô hình học máy, đồng thời đảm bảo khả năng mở rộng, độ tin cậy và hiệu quả.
Hãy giải thích nó bằng một ví dụ đơn giản:
Hãy tưởng tượng bạn đang xây dựng một tòa nhà chọc trời trong thành phố của mình. Việc xây dựng tòa nhà đã hoàn thành. Nhưng nó thiếu điện, nước, hệ thống thoát nước, v.v. Tòa nhà chọc trời sẽ không có chức năng và không thực tế.
Điều tương tự cũng áp dụng cho các mô hình học máy. Nếu các mô hình này được thiết kế mà không tính đến việc triển khai mô hình, khả năng mở rộng và bảo trì lâu dài thì chúng có thể trở nên không hiệu quả và không thực tế. Điều này đặt ra trở ngại lớn cho các nhà khoa học dữ liệu khi xây dựng các mô hình học máy để sử dụng trong môi trường sản xuất.
MLOps là một tập hợp các phương pháp và chiến lược tốt nhất hướng dẫn việc sản xuất, triển khai và bảo trì lâu dài các mô hình học máy. Nó đảm bảo rằng các mô hình này không chỉ đưa ra dự đoán chính xác mà còn duy trì tính mạnh mẽ, có thể mở rộng và là tài sản có giá trị cho các công ty. Vì vậy, nếu không có MLOps, sẽ là một cơn ác mộng khi thực hiện tất cả các nhiệm vụ này một cách hiệu quả, đây là một thách thức. Trong dự án này, chúng tôi sẽ giải thích cách MLOps hoạt động, các giai đoạn khác nhau và dự án toàn diện về cách xây dựng Khách hàng. dự đoán khuấy đảo mô hình.
Giới thiệu ZenML
ZenML là một MLOPS Framework mã nguồn mở giúp xây dựng các quy trình di động và sẵn sàng sản xuất. ZenML Framework sẽ giúp chúng tôi thực hiện dự án này bằng MLOPS.
⚠️ Nếu bạn là người dùng Windows, hãy thử cài đặt wsl trên PC. Zenml không được hỗ trợ trong Windows.
Trước khi chúng ta chuyển sang các dự án.
Các khái niệm cơ bản về MLOPS
- Các bước: Các bước là các đơn vị nhiệm vụ đơn lẻ trong một quy trình hoặc quy trình công việc. Mỗi bước thể hiện một hành động hoặc thao tác cụ thể cần được thực hiện để phát triển quy trình học máy. Ví dụ: làm sạch dữ liệu, xử lý trước dữ liệu, mô hình đào tạo, v.v., là những bước nhất định trong việc phát triển mô hình học máy.
- Đường ống: Chúng kết nối nhiều bước với nhau để tạo ra một quy trình có cấu trúc và tự động cho các tác vụ học máy. ví dụ: quy trình xử lý dữ liệu, quy trình đánh giá mô hình và quy trình đào tạo mô hình.
Bắt đầu
Tạo môi trường ảo cho dự án:
conda create -n churn_prediction python=3.9Sau đó cài đặt các thư viện này:
pip install numpy pandas matplotlib scikit-learnSau khi cài đặt xong, hãy cài đặt ZenML:
pip install zenml["server"]Sau đó khởi tạo kho lưu trữ ZenML.
zenml init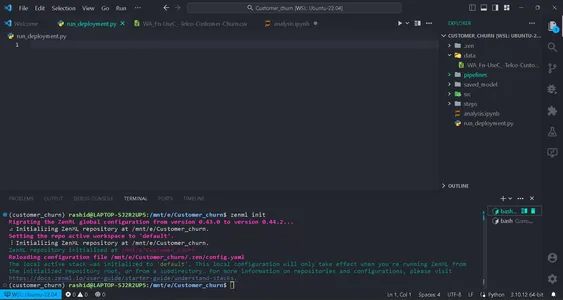
Bạn sẽ nhận được cờ xanh để đi tiếp nếu màn hình của bạn hiển thị điều này. Sau khi khởi tạo một thư mục .zenml sẽ được tạo trong thư mục của bạn.
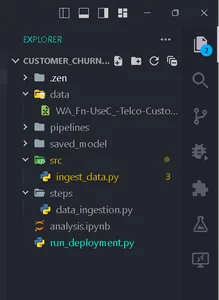
Tạo một thư mục cho dữ liệu trong thư mục. Lấy dữ liệu tại đây Link:
Tạo thư mục theo cấu trúc này.
Thu Thập Dữ Liệu
Trong bước này, chúng tôi sẽ nhập dữ liệu từ tệp csv của mình. Dữ liệu này sẽ được sử dụng để huấn luyện mô hình sau khi làm sạch và mã hóa.
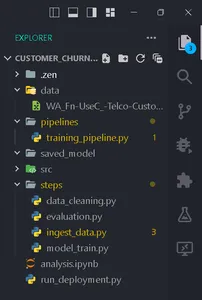
Tạo một tệp nhập_data.py bên trong thư mục bước.
import pandas as pd
import numpy as np
import logging
from zenml import step class IngestData: """ Ingesting data to the workflow. """ def __init__(self, path:str) -> None: """ Args: data_path(str): path of the datafile """ self.path = path def get_data(self): df = pd.read_csv(self.path) logging.info("Reading csv file successfully completed.") return df @step(enable_cache = False)
def ingest_df(data_path:str) -> pd.DataFrame: """ ZenML step for ingesting data from a CSV file. """ try: #Creating an instance of IngestData class and ingest the data ingest_data = IngestData(data_path) df = ingest_data.get_data() logging.info("Ingesting data completed") return df except Exception as e: #Log an error message if data ingestion fails and raise the exception logging.error("Error while ingesting data") raise e
Đây là dự án Link.
Trong mã này, trước tiên chúng tôi tạo lớp IngestData để đóng gói logic nhập dữ liệu. Sau đó chúng tôi đã tạo một ZenML bươc, ăn_df, là một đơn vị riêng lẻ của quy trình thu thập dữ liệu.
Tạo một tệp Training_pipeline.py bên trong đường dẫn thư mục.
Viết mã
from zenml import pipeline from steps.ingest_data import ingest_df #Define a ZenML pipeline called training_pipeline. @pipeline(enable_cache=False)
def train_pipeline(data_path:str): ''' Data pipeline for training the model. Args: data_path (str): The path to the data to be ingested. ''' df = ingest_df(data_path=data_path)
Ở đây, chúng tôi đang tạo một quy trình đào tạo để đào tạo mô hình học máy bằng một loạt các bước.
Sau đó, tạo một tệp có tên run_pipeline.py trong thư mục cơ sở để chạy đường ống dẫn.
from pipelines.training_pipeline import train_pipeline if __name__ == '__main__': #Run the pipeline train_pipeline(data_path="/mnt/e/Customer_churn/data/WA_Fn-UseC_-Telco-Customer-Churn.csv")Mã này được sử dụng để chạy đường ống.
Vậy là bây giờ chúng ta đã hoàn thành quy trình nhập Dữ liệu. Hãy chạy nó.
Chạy lệnh trong thiết bị đầu cuối của bạn:
python run_pipeline.py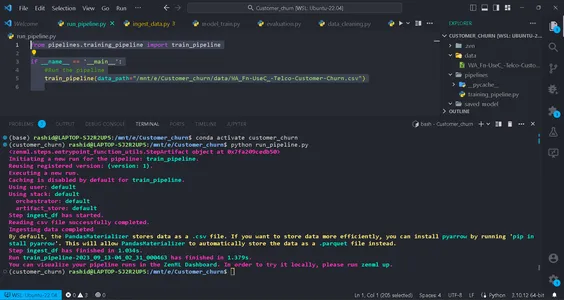
Sau đó, bạn có thể thấy các lệnh cho biết Training_pipeline đã được hoàn thành thành công.
Xử lý dữ liệu
Trong bước này, chúng tôi sẽ tạo các chiến lược khác nhau để làm sạch dữ liệu. Các cột không mong muốn sẽ bị loại bỏ và các cột phân loại sẽ được mã hóa bằng mã hóa Nhãn. Cuối cùng, dữ liệu sẽ được chia thành dữ liệu huấn luyện và kiểm tra.
Tạo một tệp có tên clean_data.py trong Thư mục src.
Trong tệp này, chúng tôi sẽ tạo các lớp chiến lược để làm sạch dữ liệu.
import pandas as pd
import numpy as np
import logging
from sklearn.model_selection import train_test_split
from abc import abstractmethod, ABC
from typing import Union
from sklearn.preprocessing import LabelEncoder class DataStrategy(ABC): @abstractmethod def handle_data(self, df:pd.DataFrame) -> Union[pd.DataFrame,pd.Series]: pass # Data Preprocessing strategy
class DataPreprocessing(DataStrategy): def handle_data(self, df: pd.DataFrame) -> Union[pd.DataFrame, pd.Series]: try: df['TotalCharges'] = df['TotalCharges'].replace(' ', 0).astype(float) df.drop('customerID', axis=1, inplace=True) df['Churn'] = df['Churn'].replace({'Yes': 1, 'No': 0}).astype(int) service = ['PhoneService', 'MultipleLines', 'InternetService', 'OnlineSecurity', 'OnlineBackup', 'DeviceProtection', 'TechSupport', 'StreamingTV', 'StreamingMovies'] for col in service: df[col] = df[col].replace({'No phone service': 'No', 'No internet service': 'No'}) logging.info("Length of df: ", len(df.columns)) return df except Exception as e: logging.error("Error in Preprocessing", e) raise e # Feature Encoding Strategy
class LabelEncoding(DataStrategy): def handle_data(self, df: pd.DataFrame) -> Union[pd.DataFrame, pd.Series]: try: df_cat = ['gender', 'Partner', 'Dependents', 'PhoneService', 'MultipleLines', 'InternetService', 'OnlineSecurity', 'OnlineBackup', 'DeviceProtection', 'TechSupport', 'StreamingTV', 'StreamingMovies', 'Contract', 'PaperlessBilling', 'PaymentMethod'] lencod = LabelEncoder() for col in df_cat: df[col] = lencod.fit_transform(df[col]) logging.info(df.head()) return df except Exception as e: logging.error(e) raise e # Data splitting Strategy
class DataDivideStrategy(DataStrategy): def handle_data(self, df:pd.DataFrame) -> Union[pd.DataFrame, pd.Series]: try: X = df.drop('Churn', axis=1) y = df['Churn'] X_train, X_test, y_train, y_test = train_test_split(X, y, test_size=0.2, random_state=1) return X_train, X_test, y_train, y_test except Exception as e: logging.error("Error in DataDividing", e) raise e
Mã này triển khai quy trình tiền xử lý dữ liệu theo mô-đun cho máy học. Nó bao gồm các chiến lược xử lý trước dữ liệu, mã hóa tính năng và các bước Mã hóa dữ liệu để làm sạch dữ liệu cho mô hình dự đoán.
1. Tiền xử lý dữ liệu: Lớp này chịu trách nhiệm loại bỏ các cột không mong muốn và xử lý các giá trị bị thiếu (giá trị NA) trong tập dữ liệu.
2. Mã hóa nhãn: Lớp LabelEncoding được thiết kế để mã hóa các biến phân loại thành định dạng số mà thuật toán học máy có thể hoạt động hiệu quả. Nó chuyển đổi các danh mục dựa trên văn bản thành các giá trị số.
3. Chiến lược phân chia dữ liệu: Lớp này tách tập dữ liệu thành các biến độc lập (X) và biến phụ thuộc (y). Sau đó, nó chia dữ liệu thành các tập huấn luyện và kiểm tra.
Chúng tôi sẽ triển khai chúng từng bước để chuẩn bị dữ liệu cho các nhiệm vụ học máy.
Các chiến lược này đảm bảo dữ liệu được cấu trúc và định dạng chính xác để đào tạo và đánh giá mô hình.
Tạo data_cleaning.py trong bước thư mục.
import pandas as pd
import numpy as np
from src.clean_data import DataPreprocessing, DataDivideStrategy, LabelEncoding
import logging
from typing_extensions import Annotated
from typing import Tuple
from zenml import step # Define a ZenML step for cleaning and preprocessing data
@step(enable_cache=False)
def cleaning_data(df: pd.DataFrame) -> Tuple[ Annotated[pd.DataFrame, "X_train"], Annotated[pd.DataFrame, "X_test"], Annotated[pd.Series, "y_train"], Annotated[pd.Series, "y_test"],
]: try: # Instantiate the DataPreprocessing strategy data_preprocessing = DataPreprocessing() # Apply data preprocessing to the input DataFrame data = data_preprocessing.handle_data(df) # Instantiate the LabelEncoding strategy feature_encode = LabelEncoding() # Apply label encoding to the preprocessed data df_encoded = feature_encode.handle_data(data) # Log information about the DataFrame columns logging.info(df_encoded.columns) logging.info("Columns:", len(df_encoded)) # Instantiate the DataDivideStrategy strategy split_data = DataDivideStrategy() # Split the encoded data into training and testing sets X_train, X_test, y_train, y_test = split_data.handle_data(df_encoded) # Return the split data as a tuple return X_train, X_test, y_train, y_test except Exception as e: # Handle and log any errors that occur during data cleaning logging.error("Error in step cleaning data", e) raise e
Trong bước này, chúng tôi đã triển khai các chiến lược mà chúng tôi đã tạo trong clean_data.py
Hãy thực hiện điều này bước in đào tạo_pipeline.py
from zenml import pipeline #importing steps from steps.ingest_data import ingest_df
from steps.data_cleaning import cleaning_data
import logging #Define a ZenML pipeline called training_pipeline.
@pipeline(enable_cache=False)
def train_pipeline(data_path:str): ''' Data pipeline for training the model. ''' df = ingest_df(data_path=data_path) X_train, X_test, y_train, y_test = cleaning_data(df=df)
Đó là nó; chúng tôi đã hoàn thành bước tiền xử lý dữ liệu trong quy trình đào tạo.
Đào tạo người mẫu
Bây giờ chúng ta sẽ xây dựng mô hình cho dự án này. Ở đây, chúng tôi đang dự đoán một vấn đề phân loại nhị phân. Chúng ta có thể sử dụng hồi quy logistic. Trọng tâm của chúng tôi sẽ không tập trung vào tính chính xác của mô hình. Nó sẽ dựa trên phần MLOps.
Đối với những người chưa biết về hồi quy logistic, bạn có thể đọc về nó ở đây. Chúng tôi sẽ thực hiện các bước tương tự như chúng tôi đã làm trong bước tiền xử lý dữ liệu. Đầu tiên chúng ta sẽ tạo một tập tin đào tạo_model.py trong src thư mục.
import pandas as pd
from sklearn.linear_model import LogisticRegression
from abc import ABC, abstractmethod
import logging #Abstract model
class Model(ABC): @abstractmethod def train(self,X_train:pd.DataFrame,y_train:pd.Series): """ Trains the model on given data """ pass class LogisticReg(Model): """ Implementing the Logistic Regression model. """ def train(self, X_train: pd.DataFrame, y_train: pd.Series): """ Training the model Args: X_train: pd.DataFrame, y_train: pd.Series """ logistic_reg = LogisticRegression() logistic_reg.fit(X_train,y_train) return logistic_reg
Chúng tôi định nghĩa một lớp Mô hình trừu tượng bằng phương thức 'đào tạo' mà tất cả các mô hình phải triển khai. Lớp LogisticReg là một triển khai cụ thể sử dụng hồi quy logistic. Bước tiếp theo liên quan đến việc định cấu hình tệp có tên config.py trong thư mục các bước. Tạo một tệp có tên config.py trong thư mục các bước.
Cấu hình các thông số mô hình
from zenml.steps import BaseParameters """
This file is used for used for configuring
and specifying various parameters related to your machine learning models and training process """ class ModelName(BaseParameters): """ Model configurations """ model_name: str = "logistic regression"
Trong tập tin có tên config.py, Bên trong bước thư mục, bạn đang định cấu hình các tham số liên quan đến mô hình học máy của mình. Bạn tạo một lớp ModelName kế thừa từ Thông số cơ sở để chỉ định tên mô hình. Điều này giúp dễ dàng thay đổi loại mô hình.
import logging import pandas as pd
from src.training_model import LogisticReg
from zenml import step
from .config import ModelName #Define a step called train_model
@step(enable_cache=False)
def train_model(X_train:pd.DataFrame,y_train:pd.Series,config:ModelName): """ Trains the data based on the configured model """ try: model = None if config == "logistic regression": model = LogisticReg() else: raise ValueError("Model name is not supported") trained_model = model.train(X_train=X_train,y_train=y_train) return trained_model except Exception as e: logging.error("Error in step training model",e) raise e
Trong tệp có tên model_train.py trong thư mục các bước, hãy xác định một bước có tên train_model bằng ZenML. Mục đích của bước này là huấn luyện mô hình học máy dựa trên tên của mô hình trong Tên người mẫu.
Trong chương trình
Kiểm tra tên model đã cấu hình. Nếu đó là “hồi quy logistic”, chúng tôi đã tạo một phiên bản của mô hình LogisticReg và huấn luyện nó bằng dữ liệu huấn luyện được cung cấp (X_train và y_train). Nếu tên model không được hỗ trợ, bạn sẽ gặp lỗi. Bất kỳ lỗi nào trong quá trình này đều được ghi lại và lỗi sẽ được đưa ra.
Sau này, chúng ta sẽ thực hiện bước này trong đào tạo_pipeline.py
from zenml import pipeline from steps.ingest_data import ingest_df
from steps.data_cleaning import cleaning_data
from steps.model_train import train_model
import logging #Define a ZenML pipeline called training_pipeline.
@pipeline(enable_cache=False)
def train_pipeline(data_path:str): ''' Data pipeline for training the model. ''' #step ingesting data: returns the data. df = ingest_df(data_path=data_path) #step to clean the data. X_train, X_test, y_train, y_test = cleaning_data(df=df) #training the model model = train_model(X_train=X_train,y_train=y_train)
Bây giờ, chúng tôi đã triển khai bước train_model trong quy trình. Vậy là bước model_train.py đã hoàn thành.
Đánh giá mô hình
Trong bước này, chúng tôi sẽ đánh giá mức độ hiệu quả của mô hình của chúng tôi. Vì vậy, chúng tôi sẽ kiểm tra điểm chính xác trong việc dự đoán dữ liệu thử nghiệm. Vì vậy, trước tiên, chúng ta sẽ tạo ra các chiến lược mà chúng ta sẽ sử dụng trong quy trình.
Tạo một tập tin có tên đánh giá_model.py trong thư mục src.
import logging
from sklearn.metrics import confusion_matrix, classification_report, accuracy_score
from abc import ABC, abstractmethod
import numpy as np # Abstract class for model evaluation
class Evaluate(ABC): @abstractmethod def evaluate_model(self, y_true: np.ndarray, y_pred: np.ndarray) -> float: """ Abstract method to evaluate a machine learning model's performance. Args: y_true (np.ndarray): True labels. y_pred (np.ndarray): Predicted labels. Returns: float: Evaluation result. """ pass #Class to calculate accuracy score
class Accuracy_score(Evaluate): """ Calculates and returns the accuracy score for a model's predictions. """ def evaluate_model(self, y_true: np.ndarray, y_pred: np.ndarray) -> float: try: accuracy_scr = accuracy_score(y_true=y_true, y_pred=y_pred) * 100 logging.info("Accuracy_score:", accuracy_scr) return accuracy_scr except Exception as e: logging.error("Error in evaluating the accuracy of the model",e) raise e
#Class to calculate Precision score
class Precision_Score(Evaluate): def evaluate_model(self, y_true: np.ndarray, y_pred: np.ndarray) -> float: """ Generates and returns a precision score for a model's predictions. """ try: precision = precision_score(y_true=y_true,y_pred=y_pred) logging.info("Precision score: ",precision) return float(precision) except Exception as e: logging.error("Error in calculation of precision_score",e) raise e class F1_Score(Evaluate): def evaluate_model(self, y_true: np.ndarray, y_pred: np.ndarray): """ Generates and returns an F1 score for a model's predictions. """ try: f1_scr = f1_score(y_pred=y_pred, y_true=y_true) logging.info("F1 score: ", f1_scr) return f1_scr except Exception as e: logging.error("Error in calculating F1 score", e) raise e
Bây giờ chúng ta đã xây dựng được các chiến lược đánh giá, chúng ta sẽ sử dụng chúng để đánh giá mô hình. Hãy triển khai mã trong bước đánh giá_model.py trong thư mục bước. Ở đây, điểm thu hồi, điểm chính xác và điểm chính xác là những chiến lược chúng tôi đang sử dụng làm thước đo để đánh giá mô hình.
Hãy thực hiện những điều này theo các bước. Tạo một tập tin có tên đánh giá.py trong các bước:
import logging
import pandas as pd
import numpy as np
from zenml import step
from src.evaluate_model import ClassificationReport, ConfusionMatrix, Accuracy_score
from typing import Tuple
from typing_extensions import Annotated
from sklearn.base import ClassifierMixin @step(enable_cache=False)
def evaluate_model( model: ClassifierMixin, X_test: pd.DataFrame, y_test: pd.Series
) -> Tuple[ Annotated[np.ndarray,"confusion_matix"], Annotated[str,"classification_report"], Annotated[float,"accuracy_score"], Annotated[float,"precision_score"], Annotated[float,"recall_score"] ]: """ Evaluate a machine learning model's performance using common metrics. """ try: y_pred = model.predict(X_test) precision_score_class = Precision_Score() precision_score = precision_score_class.evaluate_model(y_pred=y_pred,y_true=y_test) mlflow.log_metric("Precision_score ",precision_score) accuracy_score_class = Accuracy_score() accuracy_score = accuracy_score_class.evaluate_model(y_true=y_test, y_pred=y_pred) logging.info("accuracy_score:",accuracy_score) return accuracy_score, precision_score except Exception as e: logging.error("Error in evaluating model",e) raise e
Bây giờ, hãy triển khai bước này trong quy trình. Cập nhật Training_pipeline.py:
Mã này định nghĩa một đánh giá_model bước vào quy trình học máy. Nó cần một mô hình phân loại được đào tạo (mô hình), dữ liệu thử nghiệm độc lập (X_test) và nhãn thực cho dữ liệu thử nghiệm (y_test) làm đầu vào. Sau đó, nó đánh giá hiệu suất của mô hình bằng cách sử dụng các số liệu phân loại phổ biến và trả về kết quả, chẳng hạn như độ chính xác_score và độ chính xác_score.
Bây giờ, hãy triển khai bước này trong quy trình. Cập nhật đào tạo_pipeline.py:
from zenml import pipeline from steps.ingest_data import ingest_df
from steps.data_cleaning import cleaning_data
from steps.model_train import train_model
from steps.evaluation import evaluate_model
import logging #Define a ZenML pipeline called training_pipeline.
@pipeline(enable_cache=False)
def train_pipeline(data_path:str): ''' Data pipeline for training the model. Args: data_path (str): The path to the data to be ingested. ''' #step ingesting data: returns the data. df = ingest_df(data_path=data_path) #step to clean the data. X_train, X_test, y_train, y_test = cleaning_data(df=df) #training the model model = train_model(X_train=X_train,y_train=y_train) #Evaluation metrics of data accuracy_score, precision_score = evaluate_model(model=model,X_test=X_test, y_test=y_test)
Đó là nó. Bây giờ chúng ta đã hoàn thành lộ trình đào tạo. Chạy
python run_pipeline.py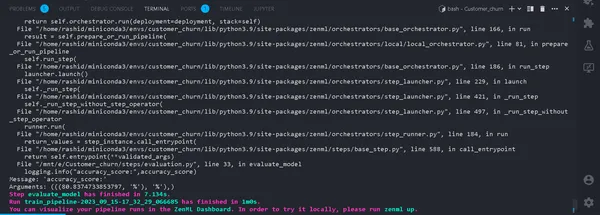
Trong nhà ga. Nếu nó chạy thành công. Bây giờ chúng ta đã hoàn thành việc chạy một quy trình đào tạo tại địa phương, nó sẽ trông như thế này:
Trình theo dõi thử nghiệm là gì?
Trình theo dõi thử nghiệm là một công cụ trong học máy dùng để ghi lại, giám sát và quản lý các thử nghiệm khác nhau trong quá trình phát triển học máy.
Các nhà khoa học dữ liệu thử nghiệm các mô hình khác nhau để có kết quả tốt nhất. Vì vậy, họ cần tiếp tục theo dõi dữ liệu và sử dụng các mô hình khác nhau. Sẽ rất khó khăn cho họ nếu họ ghi chép thủ công bằng bảng Excel.
Dòng chảy ML
MLflow là một công cụ có giá trị để theo dõi và quản lý các thử nghiệm trong học máy một cách hiệu quả. Nó tự động hóa việc theo dõi thử nghiệm, giám sát các lần lặp lại mô hình và dữ liệu liên quan. Điều này hợp lý hóa quá trình phát triển mô hình và cung cấp giao diện thân thiện với người dùng để trực quan hóa kết quả.
Việc tích hợp MLflow với ZenML giúp tăng cường độ mạnh mẽ và khả năng quản lý thử nghiệm trong khung hoạt động học máy.
Để thiết lập MLflow với ZenML, hãy làm theo các bước sau:
- Cài đặt tích hợp MLflow:
- Sử dụng lệnh sau để cài đặt tích hợp MLflow:
zenml integration install mlflow -y2. Đăng ký trình theo dõi thử nghiệm MLflow:
Đăng ký trình theo dõi thử nghiệm trong MLflow bằng lệnh này:
zenml experiment-tracker register mlflow_tracker --flavor=mlflow3. Đăng ký một ngăn xếp:
Trong ZenML, Ngăn xếp là tập hợp các thành phần xác định các tác vụ trong quy trình làm việc ML của bạn. Nó giúp tổ chức và quản lý các bước quy trình ML một cách hiệu quả. Đăng ký một ngăn xếp với:
Bạn có thể tìm thêm thông tin chi tiết trong tài liệu hướng dẫn.
zenml model-deployer register mlflow --flavor=mlflow
zenml stack register mlflow_stack -a default -o default -d mlflow -e mlflow_tracker --set
Điều này liên kết Ngăn xếp của bạn với các cài đặt cụ thể để lưu trữ tạo phẩm, người điều phối, mục tiêu triển khai và theo dõi thử nghiệm.
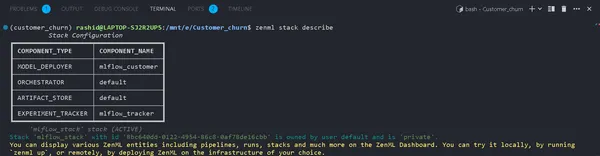
4. Xem chi tiết ngăn xếp:
Bạn có thể xem các thành phần của Ngăn xếp của mình bằng cách sử dụng:
zenml stack describeĐiều này hiển thị các thành phần được liên kết với ngăn xếp “mlflow_tracker”.
Bây giờ, hãy triển khai trình theo dõi thử nghiệm trong mô hình đào tạo và đánh giá mô hình:
Bạn có thể thấy tên của các thành phần là mlflow_tracker.
Thiết lập Trình theo dõi thử nghiệm ZenML
Đầu tiên, hãy bắt đầu cập nhật train_model.py:
import logging
import mlflow
import pandas as pd
from src.training_model import LogisticReg
from sklearn.base import ClassifierMixin
from zenml import step
from .config import ModelName
#import from zenml.client import Client # Obtain the active stack's experiment tracker
experiment_tracker = Client().active_stack.experiment_tracker #Define a step called train_model
@step(experiment_tracker = experiment_tracker.name,enable_cache=False)
def train_model( X_train:pd.DataFrame, y_train:pd.Series, config:ModelName ) -> ClassifierMixin: """ Trains the data based on the configured model Args: X_train: pd.DataFrame = Independent training data, y_train: pd.Series = Dependent training data. """ try: model = None if config.model_name == "logistic regression": #Automatically logging scores, model etc.. mlflow.sklearn.autolog() model = LogisticReg() else: raise ValueError("Model name is not supported") trained_model = model.train(X_train=X_train,y_train=y_train) logging.info("Training model completed.") return trained_model except Exception as e: logging.error("Error in step training model",e) raise e
Trong mã này, chúng tôi thiết lập trình theo dõi thử nghiệm bằng cách sử dụng mlflow.sklearn.autolog(), tự động ghi lại tất cả thông tin chi tiết về mô hình, giúp theo dõi và phân tích thử nghiệm dễ dàng hơn.
Trong tạp chí đánh giá.py
from zenml.client import Client experiment_tracker = Client().active_stack.experiment_tracker @step(experiment_tracker=experiment_tracker.name, enable_cache = False)Chạy đường ống
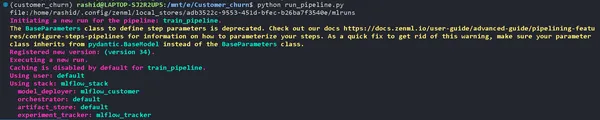
Cập nhật của bạn run_pipeline.py kịch bản như sau:
from pipelines.training_pipeline import train_pipeline
from zenml.client import Client
if __name__ == '__main__': #printimg the experiment tracking uri print(Client().active_stack.experiment_tracker.get_tracking_uri()) #Run the pipeline train_pipeline(data_path="/mnt/e/Customer_churn/data/WA_Fn-UseC_-Telco-Customer-Churn.csv")
Sao chép nó và dán vào lệnh này.
mlflow ui --backend-store-uri "--uri on the top of "file:/home/ "Khám phá các thử nghiệm của bạn
Nhấp vào liên kết được tạo bởi lệnh trên để mở UI MLflow. Tại đây, bạn sẽ tìm thấy một kho tàng thông tin chuyên sâu:
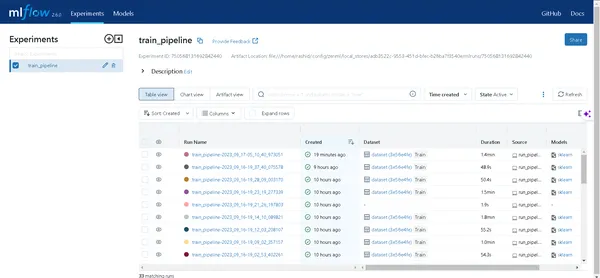
- Đường ống: Dễ dàng truy cập tất cả các quy trình bạn đã chạy.
- Chi tiết mô hình: Nhấp vào một đường dẫn để khám phá mọi chi tiết về mô hình của bạn.
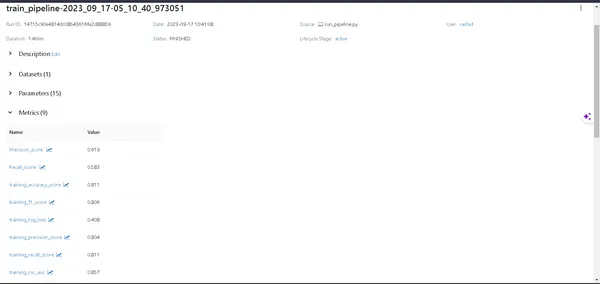
- Metrics: Đi sâu vào phần số liệu để trực quan hóa hiệu suất mô hình của bạn.
Giờ đây, bạn có thể chinh phục khả năng theo dõi thử nghiệm máy học của mình bằng ZenML và MLflow!
Triển khai
Trong phần tiếp theo, chúng ta sẽ triển khai mô hình này. Bạn cần biết những khái niệm sau:
a). Quy trình triển khai liên tục
Đường dẫn này sẽ tự động hóa quá trình triển khai mô hình. Khi một mô hình vượt qua các tiêu chí đánh giá, nó sẽ tự động được triển khai vào môi trường sản xuất. Ví dụ: nó bắt đầu với việc tiền xử lý dữ liệu, làm sạch dữ liệu, huấn luyện dữ liệu, đánh giá mô hình, v.v.
b). Quy trình triển khai suy luận
Quy trình triển khai suy luận tập trung vào việc triển khai các mô hình học máy để suy luận theo đợt hoặc theo thời gian thực. Đường ống triển khai suy luận chuyên triển khai các mô hình để đưa ra dự đoán trong môi trường sản xuất. Ví dụ: nó thiết lập điểm cuối API nơi người dùng có thể gửi văn bản. Nó đảm bảo tính sẵn sàng và khả năng mở rộng của mô hình cũng như giám sát hiệu suất thời gian thực của mô hình. Những quy trình này rất quan trọng để duy trì hiệu suất và hiệu quả của hệ thống học máy. Bây giờ, chúng ta sẽ triển khai đường ống liên tục.
Tạo một tệp có tên triển khai_pipeline.py trong thư mục đường ống.
import numpy as np
import json
import logging
import pandas as pd
from zenml import pipeline, step
from zenml.config import DockerSettings
from zenml.constants import DEFAULT_SERVICE_START_STOP_TIMEOUT
from zenml.integrations.constants import MLFLOW
from zenml.integrations.mlflow.model_deployers.mlflow_model_deployer import ( MLFlowModelDeployer,
)
from zenml.integrations.mlflow.services import MLFlowDeploymentService
from zenml.integrations.mlflow.steps import mlflow_model_deployer_step
from zenml.steps import BaseParameters, Output
from src.clean_data import FeatureEncoding
from .utils import get_data_for_test
from steps.data_cleaning import cleaning_data
from steps.evaluation import evaluate_model
from steps.ingest_data import ingest_df # Define Docker settings with MLflow integration
docker_settings = DockerSettings(required_integrations = {MLFLOW}) #Define class for deployment pipeline configuration
class DeploymentTriggerConfig(BaseParameters): min_accuracy:float = 0.92 @step def deployment_trigger( accuracy: float, config: DeploymentTriggerConfig,
): """ It trigger the deployment only if accuracy is greater than min accuracy. Args: accuracy: accuracy of the model. config: Minimum accuracy thereshold. """ try: return accuracy >= config.min_accuracy except Exception as e: logging.error("Error in deployment trigger",e) raise e # Define a continuous pipeline
@pipeline(enable_cache=False,settings={"docker":docker_settings})
def continuous_deployment_pipeline( data_path:str, min_accuracy:float = 0.92, workers: int = 1, timeout: int = DEFAULT_SERVICE_START_STOP_TIMEOUT
): df = ingest_df(data_path=data_path) X_train, X_test, y_train, y_test = cleaning_data(df=df) model = train_model(X_train=X_train, y_train=y_train) accuracy_score, precision_score = evaluate_model(model=model, X_test=X_test, y_test=y_test) deployment_decision = deployment_trigger(accuracy=accuracy_score) mlflow_model_deployer_step( model=model, deploy_decision = deployment_decision, workers = workers, timeout = timeout )
Khung ZenML cho dự án học máy
Mã này xác định việc triển khai liên tục cho dự án máy học bằng cách sử dụng Khung ZenML.
1. Nhập các thư viện cần thiết: Nhập các thư viện cần thiết để triển khai mô hình.
2. Cài đặt Docker: Bằng cách định cấu hình cài đặt Docker để sử dụng với MLflow, Docker giúp đóng gói và chạy các mô hình này một cách nhất quán.
3. Triển khaiTriggerConfig: Đây là lớp mà ngưỡng độ chính xác tối thiểu được định cấu hình để mô hình triển khai.
4. triển khai_trigger: Bước này sẽ quay trở lại nếu độ chính xác của mô hình vượt quá độ chính xác tối thiểu.
5. liên tục_deployment_pipeline: Quy trình này bao gồm một số bước: nhập dữ liệu, làm sạch dữ liệu, đào tạo mô hình và đánh giá mô hình. Và mô hình sẽ chỉ triển khai nếu đáp ứng được ngưỡng độ chính xác tối thiểu.
Tiếp theo, chúng ta sẽ triển khai quy trình suy luận trong triển khai_pipeline.py
import logging
import pandas as pd
from zenml.steps import BaseParameters, Output
from zenml.integrations.mlflow.model_deployers.mlflow_model_deployer import MLFlowModelDeployer
from zenml.integrations.mlflow.services import MLFlowDeploymentService class MLFlowDeploymentLoaderStepParameters(BaseParameters): pipeline_name: str step_name: str running: bool = True @step(enable_cache=False)
def dynamic_importer() -> str: data = get_data_for_test() return data @step(enable_cache=False)
def prediction_service_loader( pipeline_name: str, pipeline_step_name: str, running: bool = True, model_name: str = "model",
) -> MLFlowDeploymentService: model_deployer = MLFlowModelDeployer.get_active_model_deployer() existing_services = model_deployer.find_model_server( pipeline_name=pipeline_name, pipeline_step_name=pipeline_step_name, model_name=model_name, running=running, ) if not existing_services: raise RuntimeError( f"No MLflow prediction service deployed by the " f"{pipeline_step_name} step in the {pipeline_name} " f"pipeline for the '{model_name}' model is currently " f"running." ) return existing_services[0] @step
def predictor(service: MLFlowDeploymentService, data: str) -> np.ndarray: service.start(timeout=10) data = json.loads(data) prediction = service.predict(data) return prediction @pipeline(enable_cache=False, settings={"docker": docker_settings})
def inference_pipeline(pipeline_name: str, pipeline_step_name: str): batch_data = dynamic_importer() model_deployment_service = prediction_service_loader( pipeline_name=pipeline_name, pipeline_step_name=pipeline_step_name, running=False, ) prediction = predictor(service=model_deployment_service, data=batch_data) return prediction
Mã này thiết lập quy trình đưa ra dự đoán bằng mô hình học máy được triển khai thông qua MLflow. Nó nhập dữ liệu, tải mô hình đã triển khai và sử dụng nó để đưa ra dự đoán.
Chúng ta cần tạo hàm get_data_for_test() in utils.py trên thư mục đường ống. Vì vậy, chúng tôi có thể quản lý mã của mình hiệu quả hơn.
import logging import pandas as pd from src.clean_data import DataPreprocessing, LabelEncoding # Function to get data for testing purposes
def get_data_for_test(): try: df = pd.read_csv('./data/WA_Fn-UseC_-Telco-Customer-Churn.csv') df = df.sample(n=100) data_preprocessing = DataPreprocessing() data = data_preprocessing.handle_data(df) # Instantiate the FeatureEncoding strategy label_encode = LabelEncoding() df_encoded = label_encode.handle_data(data) df_encoded.drop(['Churn'],axis=1,inplace=True) logging.info(df_encoded.columns) result = df_encoded.to_json(orient="split") return result except Exception as e: logging.error("e") raise e
Bây giờ, hãy triển khai quy trình mà chúng tôi đã tạo để triển khai mô hình và dự đoán về mô hình đã triển khai.
tạo run_deployment.py tập tin trong thư mục dự án:
import click # For handling command-line arguments
import logging from typing import cast
from rich import print # For console output formatting # Import pipelines for deployment and inference
from pipelines.deployment_pipeline import (
continuous_deployment_pipeline, inference_pipeline
)
# Import MLflow utilities and components
from zenml.integrations.mlflow.mlflow_utils import get_tracking_uri
from zenml.integrations.mlflow.model_deployers.mlflow_model_deployer import ( MLFlowModelDeployer
)
from zenml.integrations.mlflow.services import MLFlowDeploymentService # Define constants for different configurations: DEPLOY, PREDICT, DEPLOY_AND_PREDICT
DEPLOY = "deploy"
PREDICT = "predict"
DEPLOY_AND_PREDICT = "deploy_and_predict" # Define a main function that uses Click to handle command-line arguments
@click.command()
@click.option( "--config", "-c", type=click.Choice([DEPLOY, PREDICT, DEPLOY_AND_PREDICT]), default=DEPLOY_AND_PREDICT, help="Optionally you can choose to only run the deployment " "pipeline to train and deploy a model (`deploy`), or to " "only run a prediction against the deployed model " "(`predict`). By default both will be run " "(`deploy_and_predict`).",
)
@click.option( "--min-accuracy", default=0.92, help="Minimum accuracy required to deploy the model",
)
def run_main(config:str, min_accuracy:float ): # Get the active MLFlow model deployer component mlflow_model_deployer_component = MLFlowModelDeployer.get_active_model_deployer() # Determine if the user wants to deploy a model (deploy), make predictions (predict), or both (deploy_and_predict) deploy = config == DEPLOY or config == DEPLOY_AND_PREDICT predict = config == PREDICT or config == DEPLOY_AND_PREDICT # If deploying a model is requested: if deploy: continuous_deployment_pipeline( data_path='/mnt/e/Customer_churn/data/WA_Fn-UseC_-Telco-Customer-Churn.csv', min_accuracy=min_accuracy, workers=3, timeout=60 ) # If making predictions is requested: if predict: # Initialize an inference pipeline run inference_pipeline( pipeline_name="continuous_deployment_pipeline", pipeline_step_name="mlflow_model_deployer_step", ) # Print instructions for viewing experiment runs in the MLflow UI print( "You can run:n " f"[italic green] mlflow ui --backend-store-uri '{get_tracking_uri()}" "[/italic green]n ...to inspect your experiment runs within the MLflow" " UI.nYou can find your runs tracked within the " "`mlflow_example_pipeline` experiment. There you'll also be able to " "compare two or more runs.nn" ) # Fetch existing services with the same pipeline name, step name, and model name existing_services = mlflow_model_deployer_component.find_model_server( pipeline_name = "continuous_deployment_pipeline", pipeline_step_name = "mlflow_model_deployer_step", ) # Check the status of the prediction server: if existing_services: service = cast(MLFlowDeploymentService, existing_services[0]) if service.is_running: print( f"The MLflow prediciton server is running locally as a daemon" f"process service and accepts inference requests at: n" f" {service.prediction_url}n" f"To stop the service, run" f"[italic green] zenml model-deployer models delete" f"{str(service.uuid)}'[/italic green]." ) elif service.is_failed: print( f"The MLflow prediciton server is in a failed state: n" f" Last state: '{service.status.state.value}'n" f" Last error: '{service.status.last_error}'" ) else: print( "No MLflow prediction server is currently running. The deployment" "pipeline must run first to train a model and deploy it. Execute" "the same command with the '--deploy' argument to deploy a model." ) # Entry point: If this script is executed directly, run the main function
if __name__ == "__main__": run_main()
Mã này là tập lệnh dòng lệnh để quản lý và triển khai mô hình học máy bằng MLFlow và ZenMl.
Bây giờ hãy triển khai mô hình.
Chạy lệnh này trên thiết bị đầu cuối của bạn.
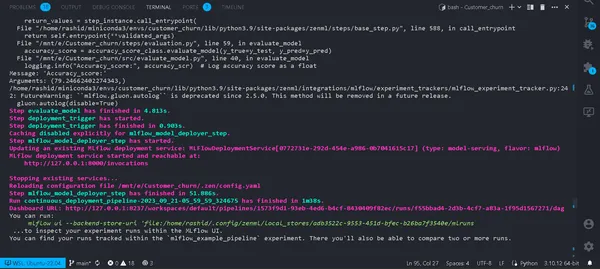
python run_deployment.py --config deploy
Bây giờ chúng tôi đã triển khai mô hình của mình. Quy trình của bạn sẽ được chạy thành công và bạn có thể xem chúng trong bảng điều khiển zenml.
python run_deployment.py --config predictBắt đầu quá trình dự đoán
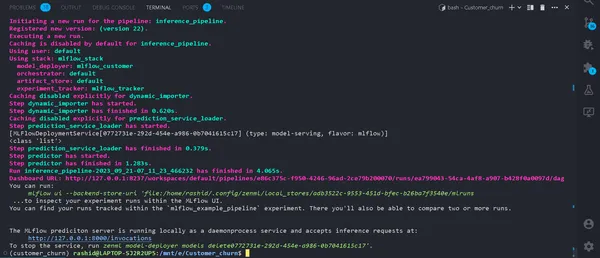
Hiện tại, máy chủ dự đoán MLFlow của chúng tôi đang chạy.
Chúng tôi cần một ứng dụng web để nhập dữ liệu và xem kết quả. Chắc hẳn bạn đang thắc mắc tại sao chúng ta phải tạo một ứng dụng web từ đầu.
Không thực sự. Chúng tôi sẽ sử dụng Streamlit, một khung giao diện người dùng nguồn mở giúp xây dựng ứng dụng web giao diện người dùng nhanh chóng và dễ dàng cho mô hình học máy của chúng tôi.
Cài đặt thư viện
pip install streamlitTạo một tệp có tên Streamlit_app.py trong thư mục dự án của bạn.
import json
import logging
import numpy as np
import pandas as pd
import streamlit as st
from PIL import Image
from pipelines.deployment_pipeline import prediction_service_loader
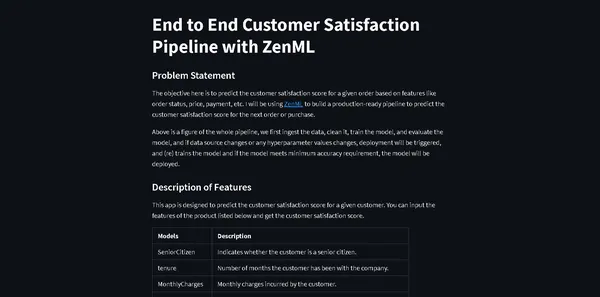
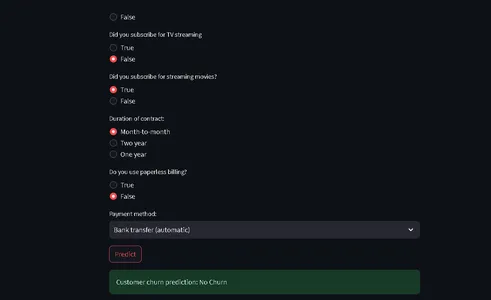
from run_deployment import main def main(): st.title("End to End Customer Satisfaction Pipeline with ZenML") st.markdown( """ #### Problem Statement The objective here is to predict the customer satisfaction score for a given order based on features like order status, price, payment, etc. I will be using [ZenML](https://zenml.io/) to build a production-ready pipeline to predict the customer satisfaction score for the next order or purchase. """ ) st.markdown( """ Above is a figure of the whole pipeline, we first ingest the data, clean it, train the model, and evaluate the model, and if data source changes or any hyperparameter values changes, deployment will be triggered, and (re) trains the model and if the model meets minimum accuracy requirement, the model will be deployed. """ ) st.markdown( """ #### Description of Features This app is designed to predict the customer satisfaction score for a given customer. You can input the features of the product listed below and get the customer satisfaction score. | Models | Description | | ------------- | - | | SeniorCitizen | Indicates whether the customer is a senior citizen. | | tenure | Number of months the customer has been with the company. | | MonthlyCharges | Monthly charges incurred by the customer. | | TotalCharges | Total charges incurred by the customer. | | gender | Gender of the customer (Male: 1, Female: 0). | | Partner | Whether the customer has a partner (Yes: 1, No: 0). | | Dependents | Whether the customer has dependents (Yes: 1, No: 0). | | PhoneService | Whether the customer has dependents (Yes: 1, No: 0). | | MultipleLines | Whether the customer has multiple lines (Yes: 1, No: 0). | | InternetService | Type of internet service (No: 1, Other: 0). | | OnlineSecurity | Whether the customer has online security service (Yes: 1, No: 0). | | OnlineBackup | Whether the customer has online backup service (Yes: 1, No: 0). | | DeviceProtection | Whether the customer has device protection service (Yes: 1, No: 0). | | TechSupport | Whether the customer has tech support service (Yes: 1, No: 0). | | StreamingTV | Whether the customer has streaming TV service (Yes: 1, No: 0). | | StreamingMovies | Whether the customer has streaming movies service (Yes: 1, No: 0). | | Contract | Type of contract (One year: 1, Other: 0). | | PaperlessBilling | Whether the customer has paperless billing (Yes: 1, No: 0). | | PaymentMethod | Payment method (Credit card: 1, Other: 0). | | Churn | Whether the customer has churned (Yes: 1, No: 0). | """ ) payment_options = { 2: "Electronic check", 3: "Mailed check", 1: "Bank transfer (automatic)", 0: "Credit card (automatic)" } contract = { 0: "Month-to-month", 2: "Two year", 1: "One year" } def format_func(PaymentMethod): return payment_options[PaymentMethod] def format_func_contract(Contract): return contract[Contract] display = ("male", "female") options = list(range(len(display))) # Define the data columns with their respective values SeniorCitizen = st.selectbox("Are you senior citizen?", options=[True, False],) tenure = st.number_input("Tenure") MonthlyCharges = st.number_input("Monthly Charges: ") TotalCharges = st.number_input("Total Charges: ") gender = st.radio("gender:", options, format_func=lambda x: display[x]) Partner = st.radio("Do you have a partner? ", options=[True, False]) Dependents = st.radio("Dependents: ", options=[True, False]) PhoneService = st.radio("Do you have phone service? : ", options=[True, False]) MultipleLines = st.radio("Do you Multiplines? ", options=[True, False]) InternetService = st.radio("Did you subscribe for Internet service? ", options=[True, False]) OnlineSecurity = st.radio("Did you subscribe for OnlineSecurity? ", options=[True, False]) OnlineBackup = st.radio("Did you subscribe for Online Backup service? ", options=[True, False]) DeviceProtection = st.radio("Did you subscribe for device protection only?", options=[True, False]) TechSupport =st.radio("Did you subscribe for tech support? ", options=[True, False]) StreamingTV = st.radio("Did you subscribe for TV streaming", options=[True, False]) StreamingMovies = st.radio("Did you subscribe for streaming movies? ", options=[True, False]) Contract = st.radio("Duration of contract: ", options=list(contract.keys()), format_func=format_func_contract) PaperlessBilling = st.radio("Do you use paperless billing? ", options=[True, False]) PaymentMethod = st.selectbox("Payment method:", options=list(payment_options.keys()), format_func=format_func) # You can use PaymentMethod to get the selected payment method's numeric value if st.button("Predict"): service = prediction_service_loader( pipeline_name="continuous_deployment_pipeline", pipeline_step_name="mlflow_model_deployer_step", running=False, ) if service is None: st.write( "No service could be found. The pipeline will be run first to create a service." ) run_main() try: data_point = { 'SeniorCitizen': int(SeniorCitizen), 'tenure': tenure, 'MonthlyCharges': MonthlyCharges, 'TotalCharges': TotalCharges, 'gender': int(gender), 'Partner': int(Partner), 'Dependents': int(Dependents), 'PhoneService': int(PhoneService), 'MultipleLines': int(MultipleLines), 'InternetService': int(InternetService), 'OnlineSecurity': int(OnlineSecurity), 'OnlineBackup': int(OnlineBackup), 'DeviceProtection': int(DeviceProtection), 'TechSupport': int(TechSupport), 'StreamingTV': int(StreamingTV), 'StreamingMovies': int(StreamingMovies), 'Contract': int(Contract), 'PaperlessBilling': int(PaperlessBilling), 'PaymentMethod': int(PaymentMethod) } # Convert the data point to a Series and then to a DataFrame data_point_series = pd.Series(data_point) data_point_df = pd.DataFrame(data_point_series).T # Convert the DataFrame to a JSON list json_list = json.loads(data_point_df.to_json(orient="records")) data = np.array(json_list) for i in range(len(data)): logging.info(data[i]) pred = service.predict(data) logging.info(pred) st.success(f"Customer churn prediction: {'Churn' if pred == 1 else 'No Churn'}") except Exception as e: logging.error(e) raise e if __name__ == "__main__": main()Mã này xác định StreamLit sẽ cung cấp giao diện người dùng để dự đoán tỷ lệ rời bỏ khách hàng trong một công ty viễn thông dựa trên dữ liệu khách hàng và chi tiết nhân khẩu học.
Người dùng có thể nhập thông tin của mình thông qua Giao diện thân thiện với người dùng và mã sử dụng mô hình học máy được đào tạo (được triển khai với ZenML và MLflow) để đưa ra dự đoán.
Kết quả dự đoán sau đó sẽ được hiển thị cho người dùng.
Bây giờ hãy chạy lệnh này:
⚠️ đảm bảo mô hình dự đoán của bạn đang chạy
streamlit run streamlit_app.pyNhấp vào đường dẫn.
Đó là nó; chúng tôi đã hoàn thành dự án của mình
Đó là nó; chúng tôi đã hoàn thành thành công dự án học máy toàn diện, cách các chuyên gia tiếp cận toàn bộ quá trình.
Kết luận
Trong quá trình khám phá toàn diện các hoạt động học máy (MLOps) thông qua việc phát triển và triển khai mô hình dự đoán tỷ lệ rời bỏ khách hàng, chúng tôi đã chứng kiến sức mạnh chuyển đổi của MLOps trong việc hợp lý hóa vòng đời học máy. Từ thu thập và xử lý trước dữ liệu đến đào tạo, đánh giá và triển khai mô hình, dự án của chúng tôi cho thấy vai trò thiết yếu của MLOps trong việc thu hẹp khoảng cách giữa phát triển và sản xuất. Khi các tổ chức ngày càng dựa vào việc ra quyết định dựa trên dữ liệu, các phương pháp thực hành hiệu quả và có thể mở rộng được trình bày ở đây nêu bật tầm quan trọng đặc biệt của MLOps trong việc đảm bảo sự thành công của các ứng dụng học máy.
Chìa khóa chính
- MLOps (Hoạt động học máy) đóng vai trò then chốt trong việc hợp lý hóa vòng đời học máy từ đầu đến cuối, đảm bảo các hoạt động hiệu quả, đáng tin cậy và có thể mở rộng.
- ZenML và MLflow là các khung mạnh mẽ tạo điều kiện thuận lợi cho việc phát triển, theo dõi và triển khai các mô hình học máy trong các ứng dụng trong thế giới thực.
- Quá trình xử lý trước dữ liệu phù hợp, bao gồm làm sạch, mã hóa và phân tách, là nền tảng để xây dựng các mô hình học máy mạnh mẽ.
- Các số liệu đánh giá như độ chính xác, độ chính xác, khả năng thu hồi và điểm F1 cung cấp sự hiểu biết toàn diện về hiệu suất của mô hình.
- Các công cụ theo dõi thử nghiệm như MLflow tăng cường quản lý thử nghiệm và cộng tác trong các dự án khoa học dữ liệu.
- Quy trình triển khai suy luận và liên tục rất quan trọng để duy trì tính hiệu quả và tính khả dụng của mô hình trong môi trường sản xuất.
Những câu hỏi thường gặp
MLOPS có nghĩa là Hoạt động học máy là một vòng đời học máy từ đầu đến cuối từ quá trình phát triển đến Thu thập dữ liệu. Nó là một tập hợp các phương pháp thực hành để thiết kế và tự động hóa toàn bộ chu trình học máy. Nó bao gồm mọi giai đoạn, từ phát triển và đào tạo các mô hình học máy đến triển khai, giám sát và bảo trì liên tục. MLOps rất quan trọng vì nó đảm bảo khả năng mở rộng, độ tin cậy và hiệu quả của các ứng dụng học máy. Nó giúp các nhà khoa học dữ liệu tạo ra các ứng dụng máy học mạnh mẽ mang lại những dự đoán chính xác.
MLOps và DevOps có mục tiêu tương tự nhau là hợp lý hóa và tự động hóa các quy trình trong các miền tương ứng của chúng. DevOps chủ yếu tập trung vào phát triển phần mềm, quy trình phân phối phần mềm. Nó nhằm mục đích tăng tốc phát triển phần mềm, nâng cao chất lượng mã và cải thiện độ tin cậy triển khai. MLOps phục vụ các nhu cầu chuyên biệt của các dự án machine learning, khiến việc tận dụng AI và khoa học dữ liệu trở thành một phương pháp quan trọng.
Đây là một lỗi phổ biến mà bạn sẽ gặp phải trong dự án. Chỉ cần chạy
'zenml xuống'
sau đó
'ngắt kết nối zenml'
một lần nữa chạy đường ống. Nó sẽ được giải quyết.
Phương tiện hiển thị trong bài viết này không thuộc sở hữu của Analytics Vidhya và được sử dụng theo quyết định riêng của Tác giả.
Sản phẩm liên quan
- Phân phối nội dung và PR được hỗ trợ bởi SEO. Được khuếch đại ngay hôm nay.
- PlatoData.Network Vertical Generative Ai. Trao quyền cho chính mình. Truy cập Tại đây.
- PlatoAiStream. Thông minh Web3. Kiến thức khuếch đại. Truy cập Tại đây.
- Trung tâmESG. Than đá, công nghệ sạch, Năng lượng, Môi trường Hệ mặt trời, Quản lý chất thải. Truy cập Tại đây.
- PlatoSức khỏe. Tình báo thử nghiệm lâm sàng và công nghệ sinh học. Truy cập Tại đây.
- nguồn: https://www.analyticsvidhya.com/blog/2023/10/a-mlops-enhanced-customer-churn-prediction-project/

