오늘날 주문을 위한 일대일 고객 상호 작용 환경에서는 드라이브 스루 커피숍이나 패스트푸드점과 같은 환경에서도 계속해서 인간 직원에 의존하는 관행이 널리 퍼져 있습니다. 이러한 전통적인 접근 방식은 몇 가지 과제를 안고 있습니다. 수동 프로세스에 크게 의존하고, 증가하는 고객 요구에 따라 효율적으로 확장하는 데 어려움을 겪고, 인적 오류 가능성이 있으며, 특정 가용성 시간 내에 운영됩니다. 또한 경쟁이 치열한 시장에서 수동 프로세스에만 의존하는 기업은 효율적이고 경쟁력 있는 서비스를 제공하는 데 어려움을 겪을 수 있습니다. 기술 발전에도 불구하고 인간 중심 모델은 주문 처리에 깊이 뿌리박혀 있어 이러한 한계를 초래합니다.
일대일 주문 처리 지원을 위한 기술 활용 가능성은 한동안 가능했습니다. 그러나 기존 솔루션은 설정 및 유지에 상당한 시간과 노력이 필요한 규칙 기반 시스템과 고객과 인간과 유사한 상호 작용에 필요한 유연성이 부족한 엄격한 시스템이라는 두 가지 범주로 분류되는 경우가 많습니다. 결과적으로 기업과 조직은 이러한 솔루션을 신속하고 효율적으로 구현하는 데 어려움을 겪고 있습니다. 다행히도, 생성 적 AI 과 대규모 언어 모델(LLM), 이제 자연어를 효율적으로 처리하고 가속화된 진행 일정을 갖춘 자동화된 시스템을 만드는 것이 가능합니다.
아마존 기반암 AI21 Labs, Anthropic, Cohere, Meta, Stability AI 및 Amazon과 같은 주요 AI 기업의 고성능 기초 모델(FM)을 단일 API를 통해 선택할 수 있는 완전관리형 서비스입니다. 보안, 개인정보 보호, 책임 있는 AI를 갖춘 생성적 AI 애플리케이션을 구축해야 합니다. Amazon Bedrock 외에도 다음과 같은 다른 AWS 서비스를 사용할 수 있습니다. Amazon SageMaker 점프스타트 과 아마존 렉스 완전히 자동화되고 쉽게 적응할 수 있는 생성적 AI 주문 처리 에이전트를 생성합니다.
이 게시물에서는 Amazon Lex, Amazon Bedrock 및 AWS 람다.
솔루션 개요
다음 다이어그램은 솔루션 아키텍처를 보여줍니다.
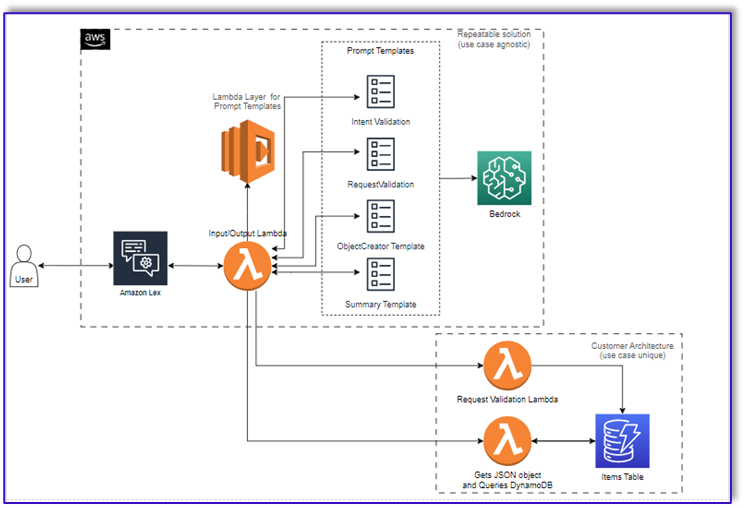
워크플로는 다음 단계로 구성됩니다.
- 고객이 Amazon Lex를 사용하여 주문합니다.
- Amazon Lex 봇은 고객의 의도를 해석하고
DialogCodeHook.
- Lambda 함수는 Lambda 계층에서 적절한 프롬프트 템플릿을 가져오고 연결된 프롬프트 템플릿에 고객 입력을 추가하여 모델 프롬프트의 형식을 지정합니다.
- XNUMXD덴탈의
RequestValidation 프롬프트는 메뉴 항목의 주문을 확인하고 메뉴에 포함되지 않은 주문하려는 항목이 있는 경우 Amazon Lex를 통해 고객에게 알리고 권장 사항을 제공합니다. 프롬프트에서는 주문 완전성에 대한 예비 검증도 수행합니다.
- XNUMXD덴탈의
ObjectCreator 프롬프트는 자연어 요청을 데이터 구조(JSON 형식)로 변환합니다.
- 고객 검증기 Lambda 함수는 주문에 필요한 속성을 확인하고 주문을 처리하는 데 필요한 모든 정보가 있는지 확인합니다.
- 고객 Lambda 함수는 데이터 구조를 주문 처리를 위한 입력으로 사용하고 주문 총액을 오케스트레이션 Lambda 함수에 다시 전달합니다.
- 오케스트레이션 Lambda 함수는 Amazon Bedrock LLM 엔드포인트를 호출하여 고객 데이터베이스 시스템의 주문 총액을 포함하는 최종 주문 요약을 생성합니다(예: 아마존 DynamoDB).
- 주문 요약은 Amazon Lex를 통해 고객에게 다시 전달됩니다. 고객이 주문을 확인한 후 주문이 처리됩니다.
사전 조건
이 게시물에서는 귀하가 활성 AWS 계정을 가지고 있고 다음 개념과 서비스에 대해 잘 알고 있다고 가정합니다.
또한 Lambda 함수에서 Amazon Bedrock에 액세스하려면 Lambda 런타임에 다음 라이브러리가 있는지 확인해야 합니다.
- boto3>=1.28.57
- awscli>=1.29.57
- 보토코어>=1.31.57
이것은 람다 계층 또는 필수 라이브러리와 함께 특정 AMI를 사용합니다.
또한 이러한 라이브러리는 Amazon Bedrock API를 호출할 때 필요합니다. 아마존 세이지 메이커 스튜디오. 다음 코드를 사용하여 셀을 실행하면 됩니다.
%pip install --no-build-isolation --force-reinstall
"boto3>=1.28.57"
"awscli>=1.29.57"
"botocore>=1.31.57"
마지막으로 다음 정책을 생성하고 나중에 Amazon Bedrock에 액세스하는 모든 역할에 연결합니다.
{
    "Version": "2012-10-17",
    "Statement": [
        {
            "Sid": "Statement1",
            "Effect": "Allow",
            "Action": "bedrock:*",
            "Resource": "*"
        }
    ]
}
DynamoDB 테이블 생성
특정 시나리오에서는 고객 데이터베이스 시스템으로 DynamoDB 테이블을 생성했지만 다음을 사용할 수도 있습니다. Amazon 관계형 데이터베이스 서비스 (아마존 RDS). DynamoDB 테이블을 프로비저닝하려면 다음 단계를 완료하십시오(또는 사용 사례에 따라 필요에 따라 설정을 사용자 지정).
- DynamoDB 콘솔에서 테이블 탐색 창에서
- 왼쪽 메뉴에서 표 만들기.
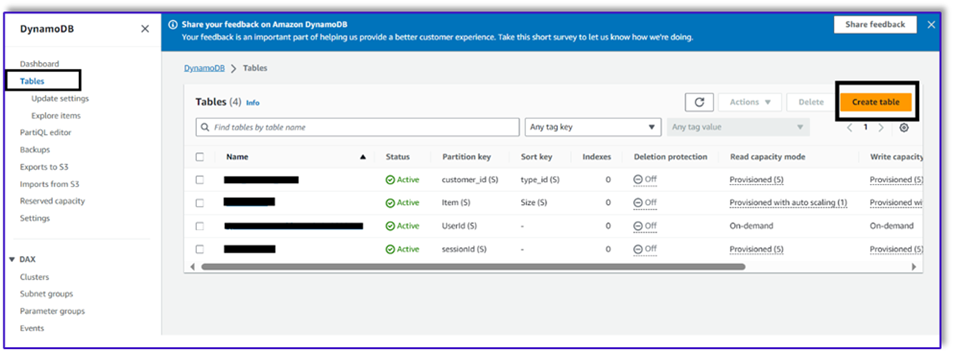
- 럭셔리 테이블 이름, 이름을 입력하십시오 (예 :
ItemDetails).
- 럭셔리 파티션 키, 키를 입력하세요(이 게시물에서는
Item).
- 럭셔리 정렬 키, 키를 입력하세요(이 게시물에서는
Size).
- 왼쪽 메뉴에서 표 만들기.

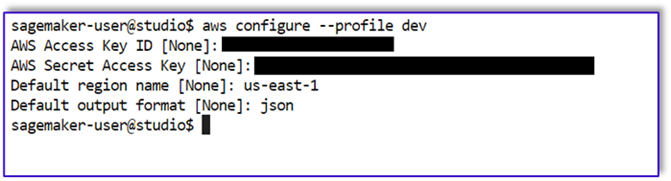
이제 DynamoDB 테이블에 데이터를 로드할 수 있습니다. 이 게시물에서는 CSV 파일을 사용합니다. SageMaker 노트북에서 Python 코드를 사용하여 DynamoDB 테이블에 데이터를 로드할 수 있습니다.
먼저 dev라는 프로필을 설정해야 합니다.
- SageMaker Studio에서 새 터미널을 열고 다음 명령을 실행합니다.
aws configure --profile dev
이 명령은 AWS 액세스 키 ID, 보안 액세스 키, 기본 AWS 리전 및 출력 형식을 입력하라는 메시지를 표시합니다.
- SageMaker 노트북으로 돌아가 Python에서 Boto3 라이브러리를 사용하여 DynamoDB에 대한 연결을 설정하는 Python 코드를 작성합니다. 이 코드 조각은 dev라는 특정 AWS 프로필을 사용하여 세션을 생성한 다음 해당 세션을 사용하여 DynamoDB 클라이언트를 생성합니다. 다음은 데이터를 로드하는 코드 샘플입니다.
%pip install boto3
import boto3
import csv

# Create a session using a profile named 'dev'
session = boto3.Session(profile_name='dev')

# Create a DynamoDB resource using the session
dynamodb = session.resource('dynamodb')

# Specify your DynamoDB table name
table_name = 'your_table_name'
table = dynamodb.Table(table_name)

# Specify the path to your CSV file
csv_file_path = 'path/to/your/file.csv'

# Read CSV file and put items into DynamoDB
with open(csv_file_path, 'r', encoding='utf-8-sig') as csvfile:
    csvreader = csv.reader(csvfile)

    # Skip the header row
    next(csvreader, None)

    for row in csvreader:
        # Extract values from the CSV row
        item = {
            'Item': row[0],  # Adjust the index based on your CSV structure
            'Size': row[1],
            'Price': row[2]
        }

        # Put item into DynamoDB
        response = table.put_item(Item=item)

        print(f"Item added: {response}")
print(f"CSV data has been loaded into the DynamoDB table: {table_name}")
또는 다음을 사용할 수 있습니다. NoSQL 워크벤치 또는 DynamoDB 테이블에 데이터를 빠르게 로드하기 위한 기타 도구입니다.
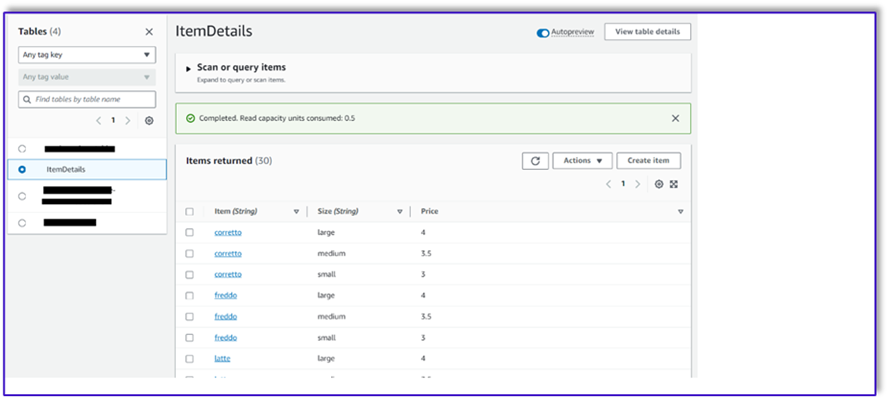
다음은 샘플 데이터가 테이블에 삽입된 후의 스크린샷입니다.
Amazon Bedrock 호출 API를 사용하여 SageMaker 노트북에서 템플릿 생성
이 사용 사례에 대한 프롬프트 템플릿을 생성하기 위해 Amazon Bedrock을 사용합니다. 다음에서 Amazon Bedrock에 액세스할 수 있습니다. AWS 관리 콘솔 그리고 API 호출을 통해. 우리의 경우 SageMaker Studio 노트북의 편리함을 통해 API를 통해 Amazon Bedrock에 액세스하여 프롬프트 템플릿뿐만 아니라 나중에 Lambda 함수에서 사용할 수 있는 전체 API 호출 코드를 생성합니다.
- SageMaker 콘솔에서 기존 SageMaker Studio 도메인에 액세스하거나 새 도메인을 생성하여 SageMaker 노트북에서 Amazon Bedrock에 액세스합니다.
- SageMaker 도메인과 사용자를 생성한 후 사용자를 선택하고 실행 과 Studio. 그러면 JupyterLab 환경이 열립니다.
- JupyterLab 환경이 준비되면 새 노트북을 열고 필요한 라이브러리 가져오기를 시작합니다.
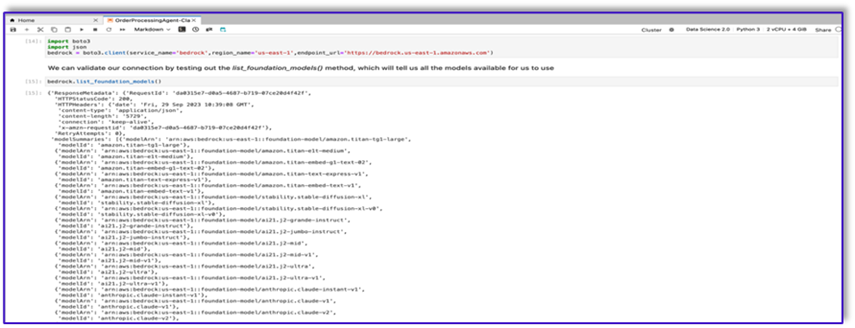
Amazon Bedrock Python SDK를 통해 사용할 수 있는 FM이 많이 있습니다. 이 경우 Anthropic에서 개발한 강력한 기본 모델인 Claude V2를 사용합니다.
주문 처리 담당자에게는 몇 가지 다른 템플릿이 필요합니다. 이는 사용 사례에 따라 달라질 수 있지만, 우리는 여러 설정에 적용할 수 있는 일반적인 작업 흐름을 설계했습니다. 이 사용 사례의 경우 Amazon Bedrock LLM 템플릿은 다음을 수행합니다.
- 고객 의도 검증
- 요청 검증
- 주문 데이터 구조 생성
- 고객에게 주문 요약을 전달합니다.
- 모델을 호출하려면 Boto3에서 기반 런타임 개체를 만듭니다.

#Model api request parameters
modelId = 'anthropic.claude-v2' # change this to use a different version from the model provider
accept = 'application/json'
contentType = 'application/json'

import boto3
import json
bedrock = boto3.client(service_name='bedrock-runtime')
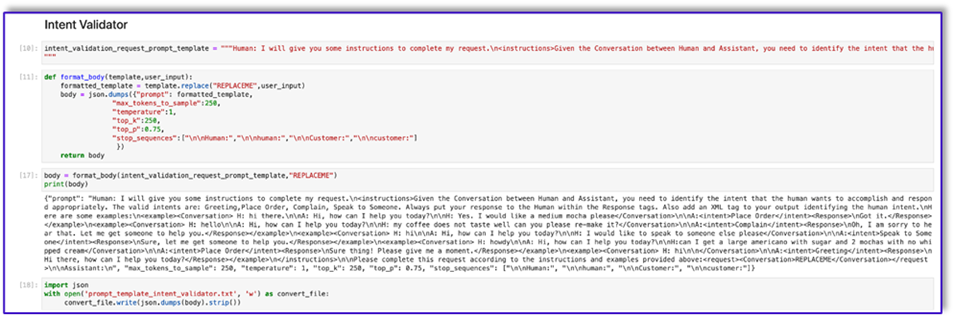
인텐트 유효성 검사기 프롬프트 템플릿 작업부터 시작해 보겠습니다. 이는 반복적인 프로세스이지만 Anthropic의 프롬프트 엔지니어링 가이드 덕분에 작업을 완료할 수 있는 프롬프트를 빠르게 생성할 수 있습니다.
- API 호출을 위한 본문을 준비하는 데 도움이 되는 유틸리티 함수와 함께 첫 번째 프롬프트 템플릿을 만듭니다.
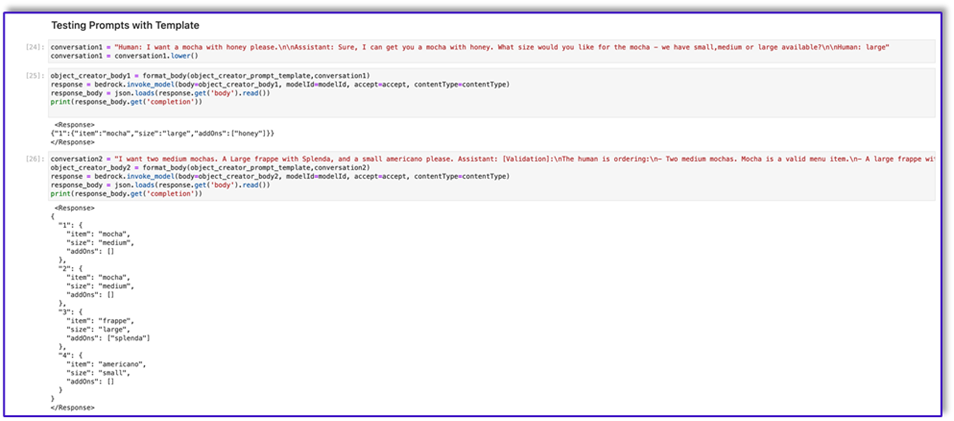
다음은 Prompt_template_intent_validator.txt의 코드입니다.
"{"prompt": "Human: I will give you some instructions to complete my request.n<instructions>Given the Conversation between Human and Assistant, you need to identify the intent that the human wants to accomplish and respond appropriately. The valid intents are: Greeting,Place Order, Complain, Speak to Someone. Always put your response to the Human within the Response tags. Also add an XML tag to your output identifying the human intent.nHere are some examples:n<example><Conversation> H: hi there.nnA: Hi, how can I help you today?nnH: Yes. I would like a medium mocha please</Conversation>nnA:<intent>Place Order</intent><Response>nGot it.</Response></example>n<example><Conversation> H: hellonnA: Hi, how can I help you today?nnH: my coffee does not taste well can you please re-make it?</Conversation>nnA:<intent>Complain</intent><Response>nOh, I am sorry to hear that. Let me get someone to help you.</Response></example>n<example><Conversation> H: hinnA: Hi, how can I help you today?nnH: I would like to speak to someone else please</Conversation>nnA:<intent>Speak to Someone</intent><Response>nSure, let me get someone to help you.</Response></example>n<example><Conversation> H: howdynnA: Hi, how can I help you today?nnH:can I get a large americano with sugar and 2 mochas with no whipped cream</Conversation>nnA:<intent>Place Order</intent><Response>nSure thing! Please give me a moment.</Response></example>n<example><Conversation> H: hinn</Conversation>nnA:<intent>Greeting</intent><Response>nHi there, how can I help you today?</Response></example>n</instructions>nnPlease complete this request according to the instructions and examples provided above:<request><Conversation>REPLACEME</Conversation></request>nnAssistant:n", "max_tokens_to_sample": 250, "temperature": 1, "top_k": 250, "top_p": 0.75, "stop_sequences": ["nnHuman:", "nnhuman:", "nnCustomer:", "nncustomer:"]}"

- Amazon S3에 업로드하고 필요할 때 Lambda 함수에서 호출하려면 이 템플릿을 파일에 저장하세요. 템플릿을 JSON 직렬화된 문자열로 텍스트 파일에 저장합니다. 이전 스크린샷에는 이 작업을 수행하는 코드 샘플도 나와 있습니다.
- 다른 템플릿에도 동일한 단계를 반복합니다.
다음은 다른 템플릿의 일부 스크린샷과 그 중 일부를 사용하여 Amazon Bedrock을 호출할 때의 결과입니다.
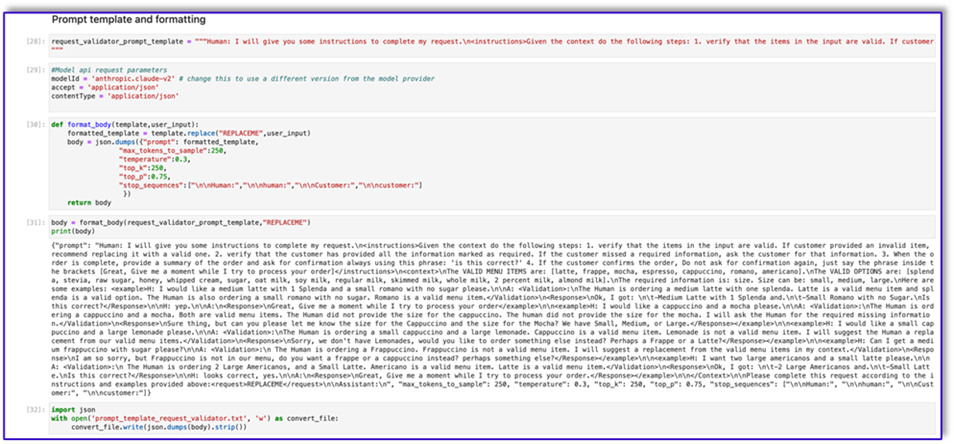
다음은 Prompt_template_request_validator.txt의 코드입니다.
"{"prompt": "Human: I will give you some instructions to complete my request.n<instructions>Given the context do the following steps: 1. verify that the items in the input are valid. If customer provided an invalid item, recommend replacing it with a valid one. 2. verify that the customer has provided all the information marked as required. If the customer missed a required information, ask the customer for that information. 3. When the order is complete, provide a summary of the order and ask for confirmation always using this phrase: 'is this correct?' 4. If the customer confirms the order, Do not ask for confirmation again, just say the phrase inside the brackets [Great, Give me a moment while I try to process your order]</instructions>n<context>nThe VALID MENU ITEMS are: [latte, frappe, mocha, espresso, cappuccino, romano, americano].nThe VALID OPTIONS are: [splenda, stevia, raw sugar, honey, whipped cream, sugar, oat milk, soy milk, regular milk, skimmed milk, whole milk, 2 percent milk, almond milk].nThe required information is: size. Size can be: small, medium, large.nHere are some examples: <example>H: I would like a medium latte with 1 Splenda and a small romano with no sugar please.nnA: <Validation>:nThe Human is ordering a medium latte with one splenda. Latte is a valid menu item and splenda is a valid option. The Human is also ordering a small romano with no sugar. Romano is a valid menu item.</Validation>n<Response>nOk, I got: nt-Medium Latte with 1 Splenda and.nt-Small Romano with no Sugar.nIs this correct?</Response>nnH: yep.nnA:n<Response>nGreat, Give me a moment while I try to process your order</example>nn<example>H: I would like a cappuccino and a mocha please.nnA: <Validation>:nThe Human is ordering a cappuccino and a mocha. Both are valid menu items. The Human did not provide the size for the cappuccino. The human did not provide the size for the mocha. I will ask the Human for the required missing information.</Validation>n<Response>nSure thing, but can you please let me know the size for the Cappuccino and the size for the Mocha? We have Small, Medium, or Large.</Response></example>nn<example>H: I would like a small cappuccino and a large lemonade please.nnA: <Validation>:nThe Human is ordering a small cappuccino and a large lemonade. Cappuccino is a valid menu item. Lemonade is not a valid menu item. I will suggest the Human a replacement from our valid menu items.</Validation>n<Response>nSorry, we don't have Lemonades, would you like to order something else instead? Perhaps a Frappe or a Latte?</Response></example>nn<example>H: Can I get a medium frappuccino with sugar please?nnA: <Validation>:n The Human is ordering a Frappuccino. Frappuccino is not a valid menu item. I will suggest a replacement from the valid menu items in my context.</Validation>n<Response>nI am so sorry, but Frappuccino is not in our menu, do you want a frappe or a cappuccino instead? perhaps something else?</Response></example>nn<example>H: I want two large americanos and a small latte please.nnA: <Validation>:n The Human is ordering 2 Large Americanos, and a Small Latte. Americano is a valid menu item. Latte is a valid menu item.</Validation>n<Response>nOk, I got: nt-2 Large Americanos and.nt-Small Latte.nIs this correct?</Response>nnH: looks correct, yes.nnA:n<Response>nGreat, Give me a moment while I try to process your order.</Response></example>nn</Context>nnPlease complete this request according to the instructions and examples provided above:<request>REPLACEME</request>nnAssistant:n", "max_tokens_to_sample": 250, "temperature": 0.3, "top_k": 250, "top_p": 0.75, "stop_sequences": ["nnHuman:", "nnhuman:", "nnCustomer:", "nncustomer:"]}"
다음은 이 템플릿을 사용한 Amazon Bedrock의 응답입니다.

다음은 에 대한 코드입니다. prompt_template_object_creator.txt:
"{"prompt": "Human: I will give you some instructions to complete my request.n<instructions>Given the Conversation between Human and Assistant, you need to create a json object in Response with the appropriate attributes.nHere are some examples:n<example><Conversation> H: I want a latte.nnA:nCan I have the size?nnH: Medium.nnA: So, a medium latte.nIs this Correct?nnH: Yes.</Conversation>nnA:<Response>{"1":{"item":"latte","size":"medium","addOns":[]}}</Response></example>n<example><Conversation> H: I want a large frappe and 2 small americanos with sugar.nnA: Okay, let me confirm:nn1 large frappenn2 small americanos with sugarnnIs this correct?nnH: Yes.</Conversation>nnA:<Response>{"1":{"item":"frappe","size":"large","addOns":[]},"2":{"item":"americano","size":"small","addOns":["sugar"]},"3":{"item":"americano","size":"small","addOns":["sugar"]}}</Response>n</example>n<example><Conversation> H: I want a medium americano.nnA: Okay, let me confirm:nn1 medium americanonnIs this correct?nnH: Yes.</Conversation>nnA:<Response>{"1":{"item":"americano","size":"medium","addOns":[]}}</Response></example>n<example><Conversation> H: I want a large latte with oatmilk.nnA: Okay, let me confirm:nnLarge latte with oatmilknnIs this correct?nnH: Yes.</Conversation>nnA:<Response>{"1":{"item":"latte","size":"large","addOns":["oatmilk"]}}</Response></example>n<example><Conversation> H: I want a small mocha with no whipped cream please.nnA: Okay, let me confirm:nnSmall mocha with no whipped creamnnIs this correct?nnH: Yes.</Conversation>nnA:<Response>{"1":{"item":"mocha","size":"small","addOns":["no whipped cream"]}}</Response>nn</example></instructions>nnPlease complete this request according to the instructions and examples provided above:<request><Conversation>REPLACEME</Conversation></request>nnAssistant:n", "max_tokens_to_sample": 250, "temperature": 0.3, "top_k": 250, "top_p": 0.75, "stop_sequences": ["nnHuman:", "nnhuman:", "nnCustomer:", "nncustomer:"]}"

다음은 Prompt_template_order_summary.txt의 코드입니다.
"{"prompt": "Human: I will give you some instructions to complete my request.n<instructions>Given the Conversation between Human and Assistant, you need to create a summary of the order with bullet points and include the order total.nHere are some examples:n<example><Conversation> H: I want a large frappe and 2 small americanos with sugar.nnA: Okay, let me confirm:nn1 large frappenn2 small americanos with sugarnnIs this correct?nnH: Yes.</Conversation>nn<OrderTotal>10.50</OrderTotal>nnA:<Response>nHere is a summary of your order along with the total:nn1 large frappenn2 small americanos with sugar.nYour Order total is $10.50</Response></example>n<example><Conversation> H: I want a medium americano.nnA: Okay, let me confirm:nn1 medium americanonnIs this correct?nnH: Yes.</Conversation>nn<OrderTotal>3.50</OrderTotal>nnA:<Response>nHere is a summary of your order along with the total:nn1 medium americano.nYour Order total is $3.50</Response></example>n<example><Conversation> H: I want a large latte with oat milk.nnA: Okay, let me confirm:nnLarge latte with oat milknnIs this correct?nnH: Yes.</Conversation>nn<OrderTotal>6.75</OrderTotal>nnA:<Response>nHere is a summary of your order along with the total:nnLarge latte with oat milk.nYour Order total is $6.75</Response></example>n<example><Conversation> H: I want a small mocha with no whipped cream please.nnA: Okay, let me confirm:nnSmall mocha with no whipped creamnnIs this correct?nnH: Yes.</Conversation>nn<OrderTotal>4.25</OrderTotal>nnA:<Response>nHere is a summary of your order along with the total:nnSmall mocha with no whipped cream.nYour Order total is $6.75</Response>nn</example>n</instructions>nnPlease complete this request according to the instructions and examples provided above:<request><Conversation>REPLACEME</Conversation>nn<OrderTotal>REPLACETOTAL</OrderTotal></request>nnAssistant:n", "max_tokens_to_sample": 250, "temperature": 0.3, "top_k": 250, "top_p": 0.75, "stop_sequences": ["nnHuman:", "nnhuman:", "nnCustomer:", "nncustomer:", "[Conversation]"]}"


보시다시피 우리는 프롬프트 템플릿을 사용하여 메뉴 항목을 검증하고, 누락된 필수 정보를 식별하고, 데이터 구조를 생성하고, 주문을 요약했습니다. Amazon Bedrock에서 사용할 수 있는 기본 모델은 매우 강력하므로 이러한 템플릿을 통해 더 많은 작업을 수행할 수 있습니다.
프롬프트 엔지니어링을 완료하고 템플릿을 텍스트 파일에 저장했습니다. 이제 Amazon Lex 봇 및 관련 Lambda 함수 생성을 시작할 수 있습니다.
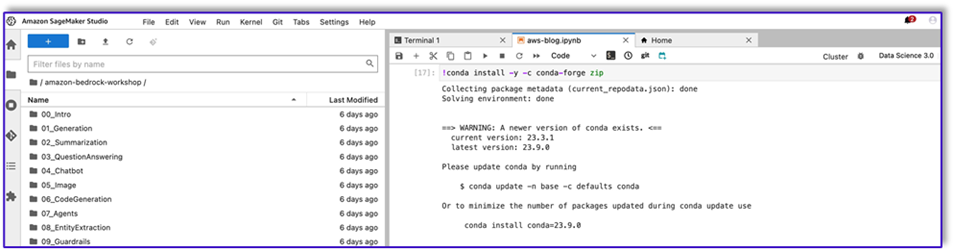
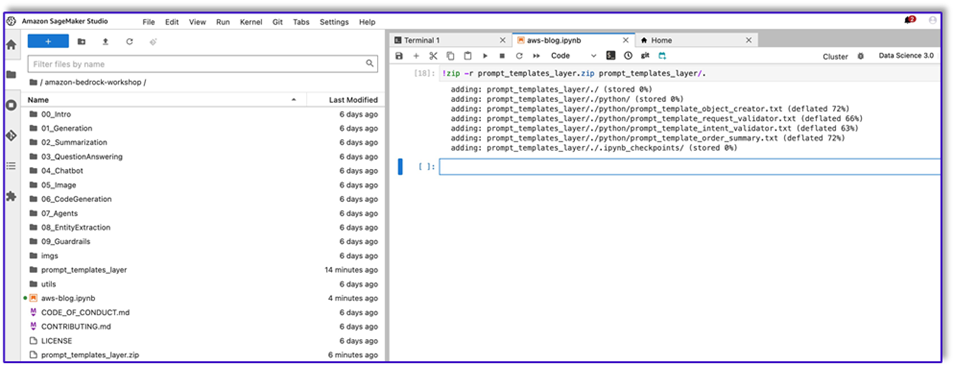
프롬프트 템플릿을 사용하여 Lambda 계층 생성
Lambda 계층을 생성하려면 다음 단계를 완료하십시오.
- SageMaker Studio에서 이름이 하위 폴더인 새 폴더를 생성합니다.
python.
- 프롬프트 파일을 다음 위치에 복사하세요.
python 폴더에 있습니다.

- 다음 명령을 실행하여 노트북 인스턴스에 ZIP 라이브러리를 추가할 수 있습니다.
!conda install -y -c conda-forge zip
- 이제 다음 명령을 실행하여 Lambda 계층에 업로드할 ZIP 파일을 생성합니다.
!zip -r prompt_templates_layer.zip prompt_templates_layer/.
- ZIP 파일을 생성한 후 파일을 다운로드할 수 있습니다. Lambda로 이동하여 파일을 직접 업로드하거나 먼저 Amazon S3에 업로드하여 새 계층을 생성합니다.
- 그런 다음 이 새 계층을 오케스트레이션 Lambda 함수에 연결합니다.
이제 프롬프트 템플릿 파일이 Lambda 런타임 환경에 로컬로 저장됩니다. 이렇게 하면 봇이 실행되는 동안 프로세스 속도가 빨라집니다.
필수 라이브러리를 사용하여 Lambda 계층 생성
필수 라이브러리가 포함된 Lambda 계층을 생성하려면 다음 단계를 완료하십시오.
- 오픈 AWS 클라우드9 인스턴스 환경에서 하위 폴더가 있는 폴더를 생성합니다.
python.
- 내부에서 터미널을 엽니다.
python 폴더에 있습니다.
- 터미널에서 다음 명령을 실행합니다.
pip install “boto3>=1.28.57” -t .
pip install “awscli>=1.29.57" -t .
pip install “botocore>=1.31.57” -t .
- 달리기
cd .. 새 폴더 안에 자신의 위치를 지정하세요. python 하위 폴더.
- 다음 명령을 실행하십시오.
- ZIP 파일을 생성한 후 파일을 다운로드할 수 있습니다. Lambda로 이동하여 파일을 직접 업로드하거나 먼저 Amazon S3에 업로드하여 새 계층을 생성합니다.
- 그런 다음 이 새 계층을 오케스트레이션 Lambda 함수에 연결합니다.
Amazon Lex v2에서 봇 생성
이 사용 사례에서는 모든 인터페이스에서 음성이나 텍스트를 사용하여 Amazon Bedrock을 호출하기 위해 아키텍처에 대한 입력/출력 인터페이스를 제공할 수 있는 Amazon Lex 봇을 구축합니다. LLM이 이 주문 처리 에이전트의 대화 부분을 처리하고 Lambda가 워크플로를 조정하므로 슬롯 없이 세 가지 의도가 있는 봇을 생성할 수 있습니다.
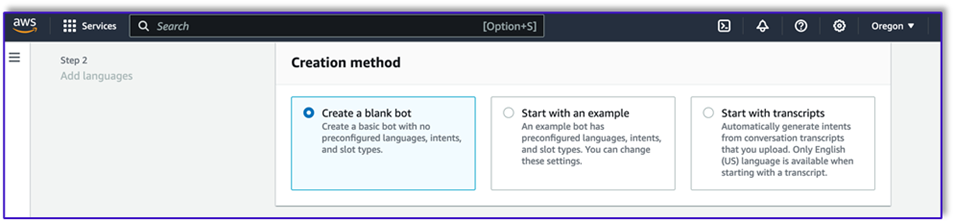
- Amazon Lex 콘솔에서 다음 메서드를 사용하여 새 봇을 생성합니다. 빈 봇 만들기.
이제 최종 사용자가 봇과 대화를 시작할 수 있도록 적절한 초기 발화와 함께 의도를 추가할 수 있습니다. 간단한 인사말을 사용하고 최종 사용자가 요청을 제공할 수 있도록 초기 봇 응답을 추가합니다. 봇을 생성할 때 의도와 함께 Lambda 코드 후크를 사용해야 합니다. 그러면 고객, Amazon Lex 및 LLM 간의 워크플로를 조정하는 Lambda 함수가 트리거됩니다.
- 워크플로를 트리거하고 의도 확인 프롬프트 템플릿을 사용하여 Amazon Bedrock을 호출하고 고객이 달성하려는 작업을 식별하는 첫 번째 의도를 추가합니다. 최종 사용자가 대화를 시작할 수 있도록 몇 가지 간단한 발화를 추가합니다.

봇 인텐트에서 슬롯이나 초기 읽기를 사용할 필요가 없습니다. 실제로 두 번째 또는 세 번째 의도에는 발화를 추가할 필요가 없습니다. 이는 LLM이 프로세스 전반에 걸쳐 Lambda를 안내하기 때문입니다.
- 확인 메시지를 추가합니다. 나중에 Lambda 함수에서 이 메시지를 사용자 정의할 수 있습니다.
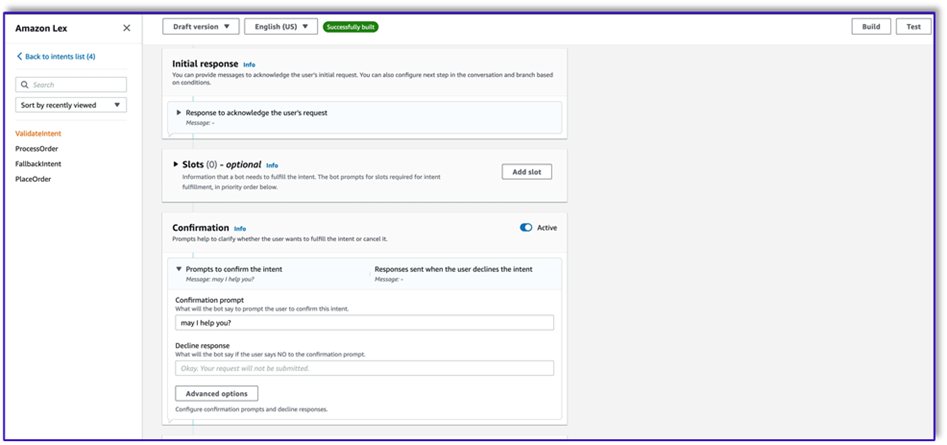
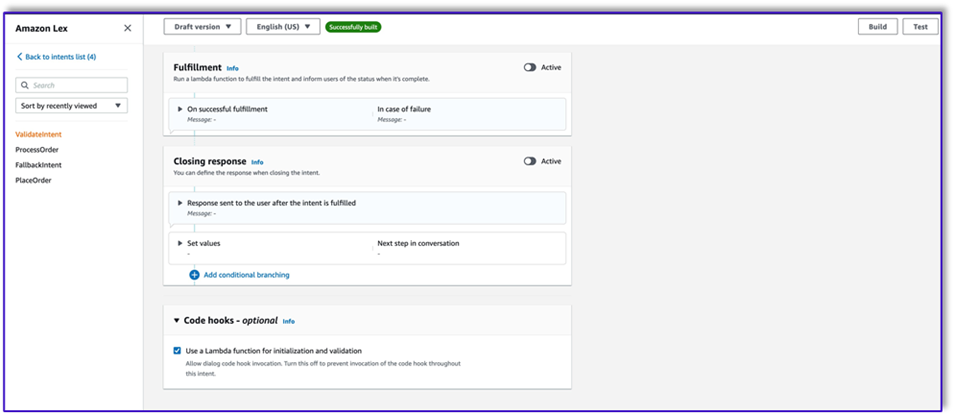
- $XNUMX Million 미만 코드 후크, 고르다 초기화 및 검증을 위해 Lambda 함수 사용.
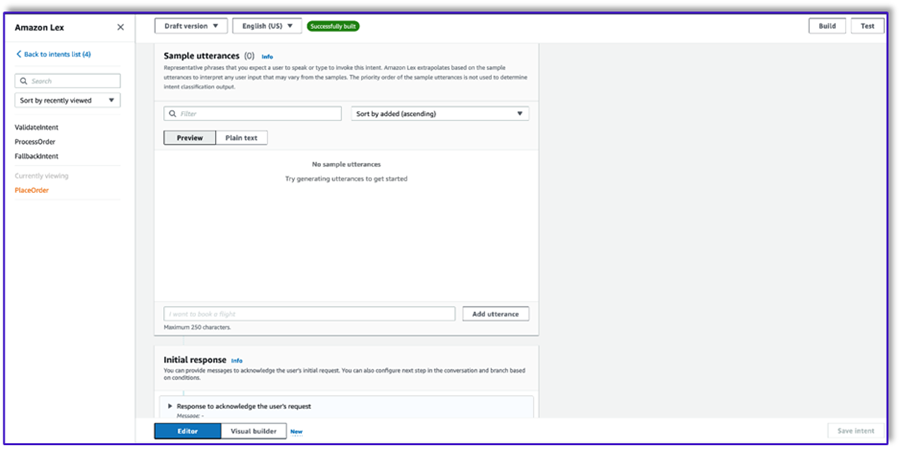
- 발화나 초기 응답이 없는 두 번째 인텐트를 생성합니다. 이것이
PlaceOrder 의도.
LLM이 고객이 주문을 시도하고 있음을 식별하면 Lambda 함수는 이 의도를 트리거하고 메뉴에 대해 고객 요청을 검증하고 필수 정보가 누락되지 않았는지 확인합니다. 이 모든 것이 프롬프트 템플릿에 있으므로 프롬프트 템플릿을 변경하여 모든 사용 사례에 맞게 이 워크플로를 조정할 수 있습니다.
- 슬롯을 추가하지 말고 확인 메시지와 거부 응답을 추가하세요.
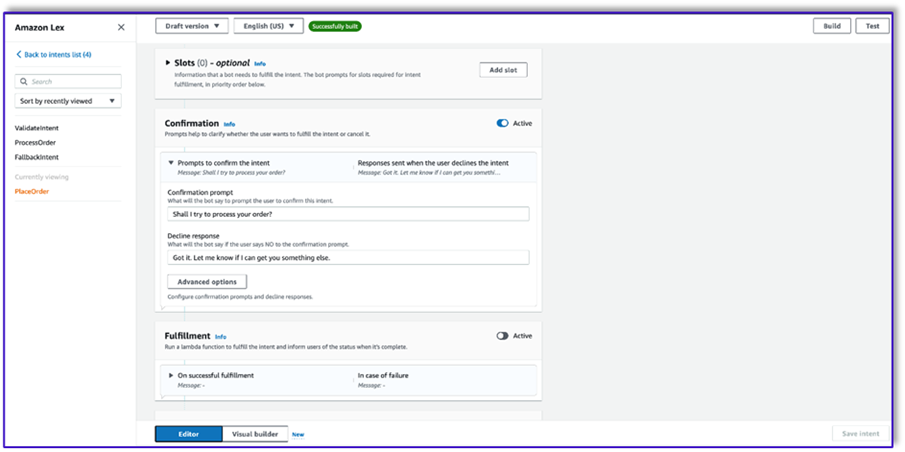
- 선택 초기화 및 검증을 위해 Lambda 함수 사용.

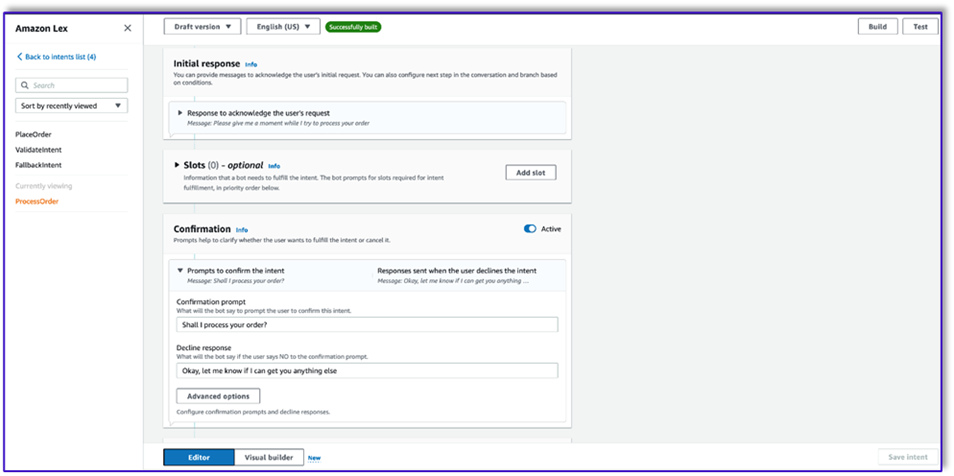
- 이름이 세 번째 인텐트를 만듭니다.
ProcessOrder 샘플 발화나 슬롯이 없습니다.
- 초기 응답, 확인 프롬프트 및 거부 응답을 추가합니다.
LLM이 고객 요청을 확인한 후 Lambda 함수는 주문을 처리하기 위해 세 번째이자 마지막 의도를 트리거합니다. 여기에서 Lambda는 객체 생성자 템플릿을 사용하여 주문 JSON 데이터 구조를 생성하여 DynamoDB 테이블을 쿼리한 다음 주문 요약 템플릿을 사용하여 Amazon Lex가 고객에게 전달할 수 있도록 전체 주문과 전체 주문을 요약합니다.
- 선택 초기화 및 검증을 위해 Lambda 함수 사용. 고객이 최종 확인을 한 후 Lambda 함수를 사용하여 주문을 처리할 수 있습니다.

- 세 가지 의도를 모두 생성한 후 Visual 빌더로 이동하여
ValidateIntent, 이동 의도 단계를 추가하고 긍정적인 확인 출력을 해당 단계에 연결합니다.
- 이동 의도를 추가한 후 이를 편집하고 PlaceOrder 의도를 의도 이름으로 선택합니다.

- 마찬가지로 Visual 빌더로 이동하려면
PlaceOrder 의도를 확인하고 긍정적 확인의 출력을 ProcessOrder 갈 의도. 편집은 필요하지 않습니다. ProcessOrder 의도.
- 이제 다음 섹션에 자세히 설명된 대로 Amazon Lex를 조정하고 DynamoDB 테이블을 호출하는 Lambda 함수를 생성해야 합니다.
Amazon Lex 봇을 조정하는 Lambda 함수 생성
이제 Amazon Lex 봇과 워크플로를 조정하는 Lambda 함수를 구축할 수 있습니다. 다음 단계를 완료하세요.
- 표준 실행 정책을 사용하여 Lambda 함수를 생성하고 Lambda에서 역할을 생성하도록 하십시오.
- 함수의 코드 창에서 템플릿에 lex 컨텍스트를 추가하여 프롬프트 형식을 지정하고, Amazon Bedrock LLM API를 호출하고, 응답에서 원하는 텍스트를 추출하는 등 도움이 되는 몇 가지 유틸리티 함수를 추가합니다. 다음 코드를 참조하세요.
import json
import re
import boto3
import logging

logger = logging.getLogger()
logger.setLevel(logging.DEBUG)

bedrock = boto3.client(service_name='bedrock-runtime')
def CreatingCustomPromptFromLambdaLayer(object_key,replace_items):

    folder_path = '/opt/order_processing_agent_prompt_templates/python/'
    try:
        file_path = folder_path + object_key
        with open(file_path, "r") as file1:
            raw_template = file1.read()
            # Modify the template with the custom input prompt
            #template['inputs'][0].insert(1, {"role": "user", "content": '### Input:n' + user_request})
            for key,value in replace_items.items():
                value = json.dumps(json.dumps(value).replace('"','')).replace('"','')
                raw_template = raw_template.replace(key,value)
            modified_prompt = raw_template

            return modified_prompt
    except Exception as e:
        return {
            'statusCode': 500,
            'body': f'An error occurred: {str(e)}'
        }
def CreatingCustomPrompt(object_key,replace_items):
    logger.debug('replace_items is: {}'.format(replace_items))
    #retrieve user request from intent_request
    #we first propmt the model with current order

    bucket_name = 'your-bucket-name'

    #object_key = 'prompt_template_order_processing.txt'
    try:
        s3 = boto3.client('s3')
        # Retrieve the existing template from S3
        response = s3.get_object(Bucket=bucket_name, Key=object_key)
        raw_template = response['Body'].read().decode('utf-8')
        raw_template = json.loads(raw_template)
        logger.debug('raw template is {}'.format(raw_template))
        #template_json = json.loads(raw_template)
        #logger.debug('template_json is {}'.format(template_json))
        #template = json.dumps(template_json)
        #logger.debug('template is {}'.format(template))

        # Modify the template with the custom input prompt
        #template['inputs'][0].insert(1, {"role": "user", "content": '### Input:n' + user_request})
        for key,value in replace_items.items():
            raw_template = raw_template.replace(key,value)
            logger.debug("Replacing: {} nwith: {}".format(key,value))
        modified_prompt = json.dumps(raw_template)
        logger.debug("Modified template: {}".format(modified_prompt))
        logger.debug("Modified template type is: {}".format(print(type(modified_prompt))))

        #modified_template_json = json.loads(modified_prompt)
        #logger.debug("Modified template json: {}".format(modified_template_json))

        return modified_prompt
    except Exception as e:
        return {
            'statusCode': 500,
            'body': f'An error occurred: {str(e)}'
        }

def validate_intent(intent_request):
    logger.debug('starting validate_intent: {}'.format(intent_request))
    #retrieve user request from intent_request
    user_request = 'Human: ' + intent_request['inputTranscript'].lower()
    #getting current context variable
    current_session_attributes =  intent_request['sessionState']['sessionAttributes']
    if len(current_session_attributes) > 0:
        full_context = current_session_attributes['fullContext'] + 'nn' + user_request
        dialog_context = current_session_attributes['dialogContext'] + 'nn' + user_request
    else:
        full_context = user_request
        dialog_context = user_request
    #Preparing validation prompt by adding context to prompt template
    object_key = 'prompt_template_intent_validator.txt'
    #replace_items = {"REPLACEME":full_context}
    #replace_items = {"REPLACEME":dialog_context}
    replace_items = {"REPLACEME":dialog_context}
    #validation_prompt = CreatingCustomPrompt(object_key,replace_items)
    validation_prompt = CreatingCustomPromptFromLambdaLayer(object_key,replace_items)

    #Prompting model for request validation
    intent_validation_completion = prompt_bedrock(validation_prompt)
    intent_validation_completion = re.sub(r'["]','',intent_validation_completion)

    #extracting response from response completion and removing some special characters
    validation_response = extract_response(intent_validation_completion)
    validation_intent = extract_intent(intent_validation_completion)


    #business logic depending on intents
    if validation_intent == 'Place Order':
        return validate_request(intent_request)
    elif validation_intent in ['Complain','Speak to Someone']:
        ##adding session attributes to keep current context
        full_context = full_context + 'nn' + intent_validation_completion
        dialog_context = dialog_context + 'nnAssistant: ' + validation_response
        intent_request['sessionState']['sessionAttributes']['fullContext'] = full_context
        intent_request['sessionState']['sessionAttributes']['dialogContext'] = dialog_context
        intent_request['sessionState']['sessionAttributes']['customerIntent'] = validation_intent
        return close(intent_request['sessionState']['sessionAttributes'],intent_request['sessionState']['intent']['name'],'Fulfilled','Close',validation_response)
    if validation_intent == 'Greeting':
        ##adding session attributes to keep current context
        full_context = full_context + 'nn' + intent_validation_completion
        dialog_context = dialog_context + 'nnAssistant: ' + validation_response
        intent_request['sessionState']['sessionAttributes']['fullContext'] = full_context
        intent_request['sessionState']['sessionAttributes']['dialogContext'] = dialog_context
        intent_request['sessionState']['sessionAttributes']['customerIntent'] = validation_intent
        return close(intent_request['sessionState']['sessionAttributes'],intent_request['sessionState']['intent']['name'],'InProgress','ConfirmIntent',validation_response)

def validate_request(intent_request):
    logger.debug('starting validate_request: {}'.format(intent_request))
    #retrieve user request from intent_request
    user_request = 'Human: ' + intent_request['inputTranscript'].lower()
    #getting current context variable
    current_session_attributes =  intent_request['sessionState']['sessionAttributes']
    if len(current_session_attributes) > 0:
        full_context = current_session_attributes['fullContext'] + 'nn' + user_request
        dialog_context = current_session_attributes['dialogContext'] + 'nn' + user_request
    else:
        full_context = user_request
        dialog_context = user_request

    #Preparing validation prompt by adding context to prompt template
    object_key = 'prompt_template_request_validator.txt'
    replace_items = {"REPLACEME":dialog_context}
    #validation_prompt = CreatingCustomPrompt(object_key,replace_items)
    validation_prompt = CreatingCustomPromptFromLambdaLayer(object_key,replace_items)

    #Prompting model for request validation
    request_validation_completion = prompt_bedrock(validation_prompt)
    request_validation_completion = re.sub(r'["]','',request_validation_completion)

    #extracting response from response completion and removing some special characters
    validation_response = extract_response(request_validation_completion)

    ##adding session attributes to keep current context
    full_context = full_context + 'nn' + request_validation_completion
    dialog_context = dialog_context + 'nnAssistant: ' + validation_response
    intent_request['sessionState']['sessionAttributes']['fullContext'] = full_context
    intent_request['sessionState']['sessionAttributes']['dialogContext'] = dialog_context

    return close(intent_request['sessionState']['sessionAttributes'],'PlaceOrder','InProgress','ConfirmIntent',validation_response)

def process_order(intent_request):
    logger.debug('starting process_order: {}'.format(intent_request))

     #retrieve user request from intent_request
    user_request = 'Human: ' + intent_request['inputTranscript'].lower()
    #getting current context variable
    current_session_attributes =  intent_request['sessionState']['sessionAttributes']
    if len(current_session_attributes) > 0:
        full_context = current_session_attributes['fullContext'] + 'nn' + user_request
        dialog_context = current_session_attributes['dialogContext'] + 'nn' + user_request
    else:
        full_context = user_request
        dialog_context = user_request
    #   Preparing object creator prompt by adding context to prompt template
    object_key = 'prompt_template_object_creator.txt'
    replace_items = {"REPLACEME":dialog_context}
    #object_creator_prompt = CreatingCustomPrompt(object_key,replace_items)
    object_creator_prompt = CreatingCustomPromptFromLambdaLayer(object_key,replace_items)
    #Prompting model for object creation
    object_creation_completion = prompt_bedrock(object_creator_prompt)
    #extracting response from response completion
    object_creation_response = extract_response(object_creation_completion)
    inputParams = json.loads(object_creation_response)
    inputParams = json.dumps(json.dumps(inputParams))
    logger.debug('inputParams is: {}'.format(inputParams))
    client = boto3.client('lambda')
    response = client.invoke(FunctionName = 'arn:aws:lambda:us-east-1:<AccountNumber>:function:aws-blog-order-validator',InvocationType = 'RequestResponse',Payload = inputParams)
    responseFromChild = json.load(response['Payload'])
    validationResult = responseFromChild['statusCode']
    if validationResult == 205:
        order_validation_error = responseFromChild['validator_response']
        return close(intent_request['sessionState']['sessionAttributes'],'PlaceOrder','InProgress','ConfirmIntent',order_validation_error)
    #invokes Order Processing lambda to query DynamoDB table and returns order total
    response = client.invoke(FunctionName = 'arn:aws:lambda:us-east-1: <AccountNumber>:function:aws-blog-order-processing',InvocationType = 'RequestResponse',Payload = inputParams)
    responseFromChild = json.load(response['Payload'])
    orderTotal = responseFromChild['body']
    ###Prompting the model to summarize the order along with order total
    object_key = 'prompt_template_order_summary.txt'
    replace_items = {"REPLACEME":dialog_context,"REPLACETOTAL":orderTotal}
    #order_summary_prompt = CreatingCustomPrompt(object_key,replace_items)
    order_summary_prompt = CreatingCustomPromptFromLambdaLayer(object_key,replace_items)
    order_summary_completion = prompt_bedrock(order_summary_prompt)
    #extracting response from response completion
    order_summary_response = extract_response(order_summary_completion)
    order_summary_response = order_summary_response + '. Shall I finalize processing your order?'
    ##adding session attributes to keep current context
    full_context = full_context + 'nn' + order_summary_completion
    dialog_context = dialog_context + 'nnAssistant: ' + order_summary_response
    intent_request['sessionState']['sessionAttributes']['fullContext'] = full_context
    intent_request['sessionState']['sessionAttributes']['dialogContext'] = dialog_context
    return close(intent_request['sessionState']['sessionAttributes'],'ProcessOrder','InProgress','ConfirmIntent',order_summary_response)


""" --- Main handler and Workflow functions --- """

def lambda_handler(event, context):
    """
    Route the incoming request based on intent.
    The JSON body of the request is provided in the event slot.
    """
    logger.debug('event is: {}'.format(event))

    return dispatch(event)

def dispatch(intent_request):
    """
    Called when the user specifies an intent for this bot. If intent is not valid then returns error name
    """
    logger.debug('intent_request is: {}'.format(intent_request))
    intent_name = intent_request['sessionState']['intent']['name']
    confirmation_state = intent_request['sessionState']['intent']['confirmationState']
    # Dispatch to your bot's intent handlers
    if intent_name == 'ValidateIntent' and confirmation_state == 'None':
        return validate_intent(intent_request)
    if intent_name == 'PlaceOrder' and confirmation_state == 'None':
        return validate_request(intent_request)
    elif intent_name == 'PlaceOrder' and confirmation_state == 'Confirmed':
        return process_order(intent_request)
    elif intent_name == 'PlaceOrder' and confirmation_state == 'Denied':
        return close(intent_request['sessionState']['sessionAttributes'],intent_request['sessionState']['intent']['name'],'Fulfilled','Close','Got it. Let me know if I can help you with something else.')
    elif intent_name == 'PlaceOrder' and confirmation_state not in ['Denied','Confirmed','None']:
        return close(intent_request['sessionState']['sessionAttributes'],intent_request['sessionState']['intent']['name'],'Fulfilled','Close','Sorry. I am having trouble completing the request. Let me get someone to help you.')
        logger.debug('exiting intent {} here'.format(intent_request['sessionState']['intent']['name']))
    elif intent_name == 'ProcessOrder' and confirmation_state == 'None':
        return validate_request(intent_request)
    elif intent_name == 'ProcessOrder' and confirmation_state == 'Confirmed':
        return close(intent_request['sessionState']['sessionAttributes'],intent_request['sessionState']['intent']['name'],'Fulfilled','Close','Perfect! Your order has been processed. Please proceed to payment.')
    elif intent_name == 'ProcessOrder' and confirmation_state == 'Denied':
        return close(intent_request['sessionState']['sessionAttributes'],intent_request['sessionState']['intent']['name'],'Fulfilled','Close','Got it. Let me know if I can help you with something else.')
    elif intent_name == 'ProcessOrder' and confirmation_state not in ['Denied','Confirmed','None']:
        return close(intent_request['sessionState']['sessionAttributes'],intent_request['sessionState']['intent']['name'],'Fulfilled','Close','Sorry. I am having trouble completing the request. Let me get someone to help you.')
        logger.debug('exiting intent {} here'.format(intent_request['sessionState']['intent']['name']))
    raise Exception('Intent with name ' + intent_name + ' not supported')

def prompt_bedrock(formatted_template):
    logger.debug('prompt bedrock input is:'.format(formatted_template))
    body = json.loads(formatted_template)

    modelId = 'anthropic.claude-v2' # change this to use a different version from the model provider
    accept = 'application/json'
    contentType = 'application/json'

    response = bedrock.invoke_model(body=body, modelId=modelId, accept=accept, contentType=contentType)
    response_body = json.loads(response.get('body').read())
    response_completion = response_body.get('completion')
    logger.debug('response is: {}'.format(response_completion))

    #print_ww(response_body.get('completion'))
    #print(response_body.get('results')[0].get('outputText'))
    return response_completion

#function to extract text between the <Response> and </Response> tags within model completion
def extract_response(response_completion):

    if '<Response>' in response_completion:
        customer_response = response_completion.replace('<Response>','||').replace('</Response>','').split('||')[1]

        logger.debug('modified response is: {}'.format(response_completion))

        return customer_response
    else:

        logger.debug('modified response is: {}'.format(response_completion))

        return response_completion

#function to extract text between the <Response> and </Response> tags within model completion
def extract_intent(response_completion):
    if '<intent>' in response_completion:
        customer_intent = response_completion.replace('<intent>','||').replace('</intent>','||').split('||')[1]
        return customer_intent
    else:
        return customer_intent

def close(session_attributes, intent, fulfillment_state, action_type, message):
    #This function prepares the response in the appropiate format for Lex V2

    response = {
        "sessionState": {
            "sessionAttributes":session_attributes,
            "dialogAction": {
                "type": action_type
            },
            "intent": {
                "name":intent,
                "state":fulfillment_state

            },

            },
        "messages":
            [{
                "contentType":"PlainText",
                "content":message,
            }]
            ,

    }
    return response
- 이전에 생성한 Lambda 계층을 이 함수에 연결합니다.
- 또한 생성한 프롬프트 템플릿에 레이어를 첨부합니다.
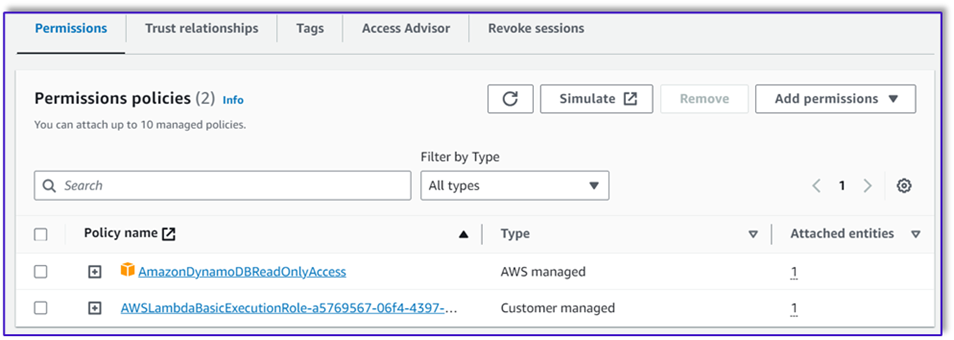
- Lambda 실행 역할에서 이전에 생성된 Amazon Bedrock에 액세스하기 위한 정책을 연결합니다.

Lambda 실행 역할에는 다음 권한이 있어야 합니다.

오케스트레이션 Lambda 함수를 Amazon Lex 봇에 연결
- 이전 섹션에서 함수를 생성한 후 Amazon Lex 콘솔로 돌아가서 봇으로 이동합니다.
- $XNUMX Million 미만 언어 탐색 창에서 영어.
- 럭셔리 출처, 주문 처리 봇을 선택하세요.
- 럭셔리 Lambda 함수 버전 또는 별칭선택한다.
$최근.
- 왼쪽 메뉴에서 찜하기.

지원 Lambda 함수 생성
추가 Lambda 함수를 생성하려면 다음 단계를 완료하십시오.
- 이전에 생성한 DynamoDB 테이블을 쿼리하는 Lambda 함수를 생성합니다.
import json
import boto3
import logging

logger = logging.getLogger()
logger.setLevel(logging.DEBUG)
# Initialize the DynamoDB client
dynamodb = boto3.resource('dynamodb')
table = dynamodb.Table('your-table-name')

def calculate_grand_total(input_data):
    # Initialize the total price
    total_price = 0

    try:
        # Loop through each item in the input JSON
        for item_id, item_data in input_data.items():
            item_name = item_data['item'].lower()  # Convert item name to lowercase
            item_size = item_data['size'].lower()  # Convert item size to lowercase

            # Query the DynamoDB table for the item based on Item and Size
            response = table.get_item(
                Key={'Item': item_name,
                    'Size': item_size}
            )

            # Check if the item was found in the table
            if 'Item' in response:
                item = response['Item']
                price = float(item['Price'])
                total_price += price  # Add the item's price to the total

        return total_price
    except Exception as e:
        raise Exception('An error occurred: {}'.format(str(e)))

def lambda_handler(event, context):
    try:

        # Parse the input JSON from the Lambda event
        input_json = json.loads(event)

        # Calculate the grand total
        grand_total = calculate_grand_total(input_json)

        # Return the grand total in the response
        return {'statusCode': 200,'body': json.dumps(grand_total)}
    except Exception as e:
        return {
            'statusCode': 500,
            'body': json.dumps('An error occurred: {}'.format(str(e)))
- 로 이동 구성 Lambda 함수 탭을 선택하고 권한.
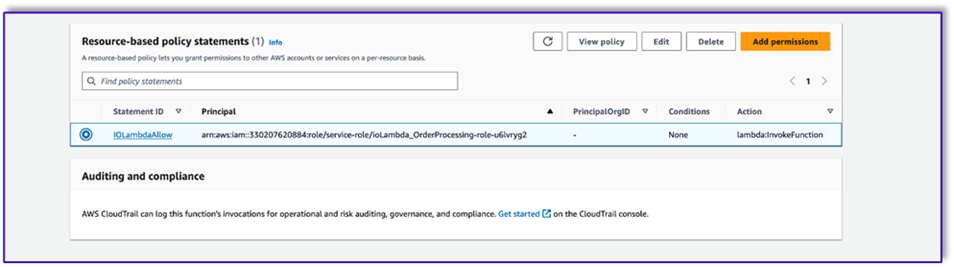
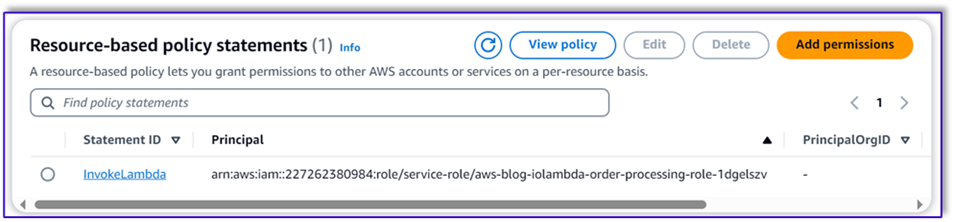
- 주문 처리 Lambda 함수가 이 함수를 호출할 수 있도록 리소스 기반 정책 설명을 첨부합니다.
- 이 Lambda 함수에 대한 IAM 실행 역할로 이동하여 DynamoDB 테이블에 액세스하기 위한 정책을 추가합니다.
- 모든 필수 속성이 고객으로부터 전달되었는지 확인하는 또 다른 Lambda 함수를 생성합니다. 다음 예에서는 크기 속성이 주문에 대해 캡처되었는지 확인합니다.
import json
import logging

logger = logging.getLogger()
logger.setLevel(logging.DEBUG)

def lambda_handler(event, context):
    # Define customer orders from the input event
    customer_orders = json.loads(event)

    # Initialize a list to collect error messages
    order_errors = {}
    missing_size = []
    error_messages = []
    # Iterate through each order in customer_orders
    for order_id, order in customer_orders.items():
        if "size" not in order or order["size"] == "":
            missing_size.append(order['item'])
            order_errors['size'] = missing_size
    if order_errors:
        items_missing_size = order_errors['size']
        error_message = f"could you please provide the size for the following items: {', '.join(items_missing_size)}?"
        error_messages.append(error_message)

    # Prepare the response message
    if error_messages:
        response_message = "n".join(error_messages)
        return {
        'statusCode': 205,
        'validator_response': response_message
            }
    else:
        response_message = "Order is validated successfully"
        return {
        'statusCode': 200,
        'validator_response': response_message
        }
- 로 이동 구성 Lambda 함수 탭을 선택하고 권한.
- 주문 처리 Lambda 함수가 이 함수를 호출할 수 있도록 리소스 기반 정책 설명을 첨부합니다.
솔루션 테스트
이제 고객이 Amazon Lex를 통해 접수한 주문 예시를 통해 솔루션을 테스트할 수 있습니다.
첫 번째 예에서는 고객이 메뉴에 없는 프라푸치노를 요청했습니다. 모델은 주문 검사기 템플릿의 도움으로 유효성을 검사하고 메뉴를 기반으로 몇 가지 권장 사항을 제안합니다. 고객이 주문을 확인하면 주문 총액과 주문 요약이 통보됩니다. 주문은 고객의 최종 확인에 따라 처리됩니다.
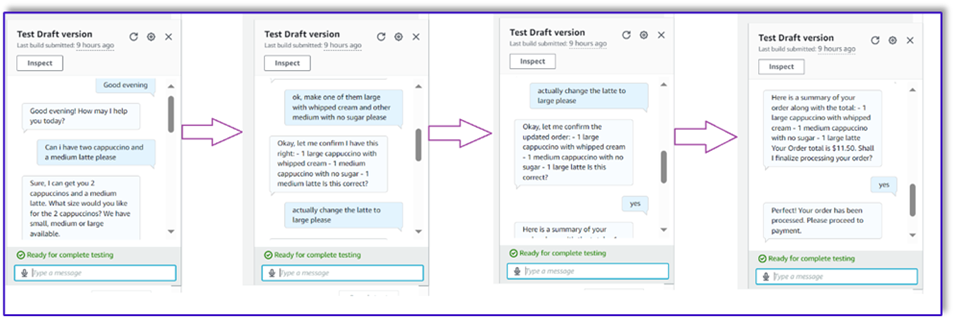
다음 예에서는 고객이 대형 카푸치노를 주문한 후 크기를 대형에서 중형으로 수정합니다. 모델은 필요한 모든 변경 사항을 캡처하고 고객에게 주문 확인을 요청합니다. 모델은 주문 총액과 주문 요약을 제시하고, 고객의 최종 확인을 바탕으로 주문을 처리합니다.

마지막 예에서는 고객이 여러 항목을 주문했는데 몇 가지 항목에 대한 크기가 누락되었습니다. 모델과 Lambda 함수는 주문을 처리하는 데 필요한 모든 속성이 있는지 확인한 다음 고객에게 누락된 정보를 제공하도록 요청합니다. 고객이 누락된 정보(이 경우 커피 크기)를 제공하면 주문 합계와 주문 요약이 표시됩니다. 주문은 고객의 최종 확인에 따라 처리됩니다.
LLM 제한 사항
LLM 결과는 본질적으로 확률론적입니다. 즉, LLM의 결과는 형식이 다양하거나 심지어 허위 콘텐츠(환각)의 형태일 수도 있습니다. 따라서 개발자는 이러한 시나리오를 처리하고 최종 사용자 경험 저하를 방지하기 위해 코드 전체에서 올바른 오류 처리 논리를 사용해야 합니다.
정리
이 솔루션이 더 이상 필요하지 않으면 다음 리소스를 삭제할 수 있습니다.
- Lambda 함수
- 아마존 렉스 박스
- DynamoDB 테이블
- S3 버킷
또한 애플리케이션이 더 이상 필요하지 않은 경우 SageMaker Studio 인스턴스를 종료하십시오.
비용 평가
이 솔루션에서 사용되는 주요 서비스에 대한 가격 정보는 다음을 참조하세요.
프로비저닝할 필요 없이 Claude v2를 사용할 수 있으므로 전체 비용이 최소로 유지됩니다. 비용을 더욱 절감하려면 온디맨드 설정으로 DynamoDB 테이블을 구성하면 됩니다.
결론
이 게시물에서는 Amazon Lex, Amazon Bedrock 및 기타 AWS 서비스를 사용하여 음성 지원 AI 주문 처리 에이전트를 구축하는 방법을 보여주었습니다. 우리는 Claude와 같은 강력한 생성 AI 모델을 사용한 신속한 엔지니어링이 광범위한 교육 데이터 없이도 주문 처리를 위한 강력한 자연어 이해 및 대화 흐름을 어떻게 지원할 수 있는지 보여주었습니다.
솔루션 아키텍처는 Lambda, Amazon S3, DynamoDB와 같은 서버리스 구성 요소를 사용하여 유연하고 확장 가능한 구현을 지원합니다. Amazon S3에 프롬프트 템플릿을 저장하면 다양한 사용 사례에 맞게 솔루션을 사용자 지정할 수 있습니다.
다음 단계에는 더 넓은 범위의 고객 요청과 극단적인 사례를 처리할 수 있도록 상담원의 역량을 확장하는 것이 포함될 수 있습니다. 프롬프트 템플릿은 상담원의 기술을 반복적으로 향상시키는 방법을 제공합니다. 추가 사용자 정의에는 주문 데이터를 재고, CRM 또는 POS와 같은 백엔드 시스템과 통합하는 것이 포함될 수 있습니다. 마지막으로 Amazon Lex의 다중 채널 기능을 사용하여 모바일 앱, 드라이브 스루, 키오스크 등과 같은 다양한 고객 접점에서 에이전트를 사용할 수 있습니다.
자세한 내용은 다음 관련 리소스를 참조하세요.
- 다중 채널 봇 배포 및 관리:
- Claude 및 기타 모델을 위한 신속한 엔지니어링:
- 확장 가능한 AI 도우미를 위한 서버리스 아키텍처 패턴:
저자에 관하여
 모미타 두타 Amazon Web Services의 파트너 솔루션 설계자입니다. 그녀는 자신의 역할에서 파트너와 긴밀히 협력하여 클라우드 배포를 간소화하고 운영 효율성을 향상시키는 확장 가능하고 재사용 가능한 자산을 개발합니다. 그녀는 AI/ML 커뮤니티의 회원이자 AWS의 생성 AI 전문가입니다. 여가 시간에는 정원 가꾸기와 자전거 타기를 즐깁니다.
 페르난도 람모글리아 Amazon Web Services의 파트너 솔루션 아키텍트로서 AWS 파트너와 긴밀히 협력하여 사업부 전반에 걸쳐 최첨단 AI 솔루션의 개발 및 채택을 주도하고 있습니다. 클라우드 아키텍처, 생성적 AI, 기계 학습 및 데이터 분석 분야의 전문 지식을 갖춘 전략적 리더입니다. 그는 시장 진출 전략을 실행하고 조직 목표에 부합하는 영향력 있는 AI 솔루션을 제공하는 것을 전문으로 합니다. 여가 시간에는 가족과 함께 시간을 보내고 다른 나라로 여행하는 것을 좋아합니다.
 미툴 파텔 Amazon Web Services의 수석 솔루션 설계자입니다. 클라우드 기술 조력자로서 그는 고객과 협력하여 고객의 목표와 과제를 이해하고 AWS 제품을 통해 고객의 목표를 달성하기 위한 규범적 지침을 제공합니다. 그는 AI/ML 커뮤니티의 회원이자 AWS의 Generative AI 홍보대사입니다. 여가 시간에는 하이킹과 축구를 즐깁니다.

