In this post, we show how to build a log ingestion pipeline using the new Amazon OpenSearch Ingestion, a fully managed data collector that delivers real-time log and trace data to Amazon OpenSearch Service domains. OpenSearch Ingestion is powered by the open-source data collector Data Prepper. Data Prepper is part of the open-source OpenSearch project. With OpenSearch Ingestion, you can filter, enrich, transform, and deliver your data for downstream analysis and visualization. OpenSearch Ingestion is serverless, so you don’t need to worry about scaling your infrastructure, operating your ingestion fleet, and patching or updating the software.
For a comprehensive overview of OpenSearch Ingestion, visit Amazon OpenSearch Ingestion, and for more information about the Data Prepper open-source project, visit Data Prepper.
In this post, we explore the logging infrastructure for a fictitious company, AnyCompany. We explore the components of the end-to-end solution and then show how to configure OpenSearch Ingestion’s main parameters and how the logs come in and out of OpenSearch Ingestion.
Solution overview
Consider a scenario in which AnyCompany collects Apache web logs. They use OpenSearch Service to monitor web access and identify possible root causes to error logs of type 4xx and 5xx. The following architecture diagram outlines the use of every component used in the log analytics pipeline: Fluent Bit collects and forwards logs; OpenSearch Ingestion processes, routes, and ingests logs; and OpenSearch Service analyzes the logs.

The workflow contains the following stages:
- Generate and collect – Fluent Bit collects the generated logs and forwards them to OpenSearch Ingestion. In this post, you create fake logs that Fluent Bit forwards to OpenSearch Ingestion. Check the list of supported clients to review the required configuration for each client supported by OpenSearch Ingestion.
- Process and ingest – OpenSearch Ingestion filters the logs based on response value, processes the logs using a grok processor, and applies conditional routing to ingest the error logs to an OpenSearch Service index.
- Store and analyze – We can analyze the Apache httpd error logs using OpenSearch Dashboards.
Prerequisites
To implement this solution, make sure you have the following prerequisites:
Configure OpenSearch Ingestion
First, you define the appropriate AWS Identity and Access Management (IAM) permissions to write to and from OpenSearch Ingestion. Then you set up the pipeline configuration in the OpenSearch Ingestion. Let’s explore each step in more detail.
Configure IAM permissions
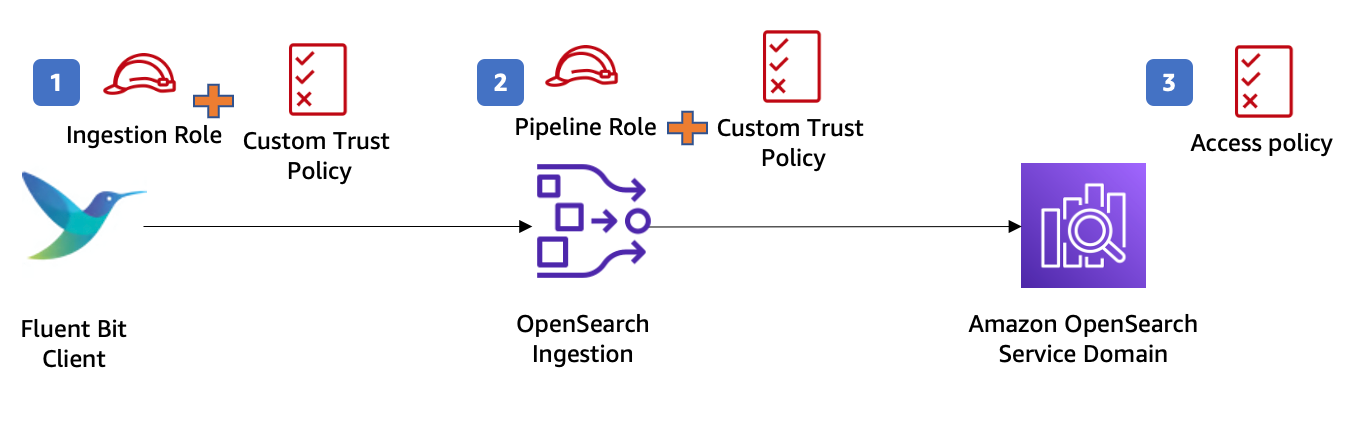
OpenSearch Ingestion works with IAM to secure communications into and out of OpenSearch Ingestion. You need two roles, authenticated using AWS Signature V4 (SigV4) signed requests. The originating entity requires permissions to write to OpenSearch Ingestion. OpenSearch Ingestion requires permissions to write to your OpenSearch Service domain. Finally, you must create an access policy using OpenSearch Service’s fine-grained access control, which allows OpenSearch Ingestion to create indexes and write to them in your domain.
The following diagram illustrates the IAM permissions to allow OpenSearch Ingestion to write to an OpenSearch Service domain. Refer to Setting up roles and users in Amazon OpenSearch Ingestion to get more details on roles and permissions required to use OpenSearch Ingestion.
In the demo, you use the AWS Cloud9 EC2 instance profile’s credentials to sign requests sent to OpenSearch Ingestion. You use Fluent Bit to fetch the credentials and assume the role you pass in the aws_role_arn you configure later.
- Create an ingestion role (called
IngestionRole) to allow Fluent Bit to ingest the logs into your pipeline.
Create a trust relationship to allow Fluent Bit to assume the ingestion role, as shown in the following code. Fluent Bit attempts to fetch the credentials in the following order. In configuring the access policy for this role, you grant permission for the osis:Ingest.
- Create a pipeline role (called
PipelineRole) with a trust relationship for OpenSearch Ingestion to assume that role. The domain-level access policy of the OpenSearch domain grants the pipeline role access to the domain.
- Finally, configure your domain’s security plugin to enable OpenSearch Ingestion’s assumed role to create indexes and write data to the domain.
In this demo, the OpenSearch Service domain uses fine-grained access control for authentication, so you need to map the OpenSearch Ingestion pipeline role to the OpenSearch backend role all_access. For instructions, refer to Step 2: Include the pipeline role in the domain access policy page.
Create the pipeline in OpenSearch Ingestion
To create an OpenSearch Ingestion pipeline, complete the following steps:
- On the OpenSearch Service console, choose Pipelines in the navigation pane.
- Choose Create pipeline.
- For Pipeline name, enter a name.

- Input the minimum and maximum Ingestion OpenSearch Compute Units (Ingestion OCUs). In this example, we use the default pipeline capacity settings of minimum 1 Ingestion OCU and maximum 4 Ingestion OCUs.
Each OCU is a combination of approximately 8 GB of memory and 2 vCPUs that can handle an estimated 8 GiB per hour. OpenSearch Ingestion supports up to 96 OCUs, and it automatically scales up and down based on your ingest workload demand.

- In the Pipeline configuration section, configure Data Prepper to process your data by choosing the appropriate blueprint configuration template on the Configuration blueprints menu. For this post, we choose
AWS-LogAggregationWithConditionalRouting.

The OpenSearch Ingestion pipeline configuration consists of four sections:
- Source – This is the input component of a pipeline. It defines the mechanism through which a pipeline consumes records. In this post, you use the
http_sourceplugin and provide the Fluent Bit output URI value within the path attribute. - Processors – This represents an intermediate processing to filter, transform, and enrich your input data. Refer to Supported plugins for more details on the list of operations supported in OpenSearch Ingestion. In this post, we use the grok processor
COMMONAPACHELOG, which matches input logs against the common Apache log pattern and makes it easy to query in OpenSearch Service. - Sink – This is the output component of a pipeline. It defines one or more destinations to which a pipeline publishes records. In this post, you define an OpenSearch Service domain and index as sink.
- Route – This is the part of a processor that allows the pipeline to route the data into different sinks based on specific conditions. In this example, you create four routes based in the response field value of the log. If the response field value of the log line matches 2xx or 3xx, the log is sent to the OpenSearch Service index
aggregated_2xx_3xx. If the response field value matches 4xx, the log is sent to the indexaggregated_4xx. If the response field value matches 5xx, the log is sent to the indexaggregated_5xx.
- Update the blueprint based on your use case. The following code shows an example of the pipeline configuration YAML file:
Provide the relevant values for your domain endpoint, account ID, and Region related to your configuration.
- Check the health of your configuration setup by choosing Validate pipeline when you finish the update.

When designing a production workload, deploy your pipeline within a VPC. For instructions, refer to Securing Amazon OpenSearch Ingestion pipelines within a VPC.
- For this post, select Public access under Network.

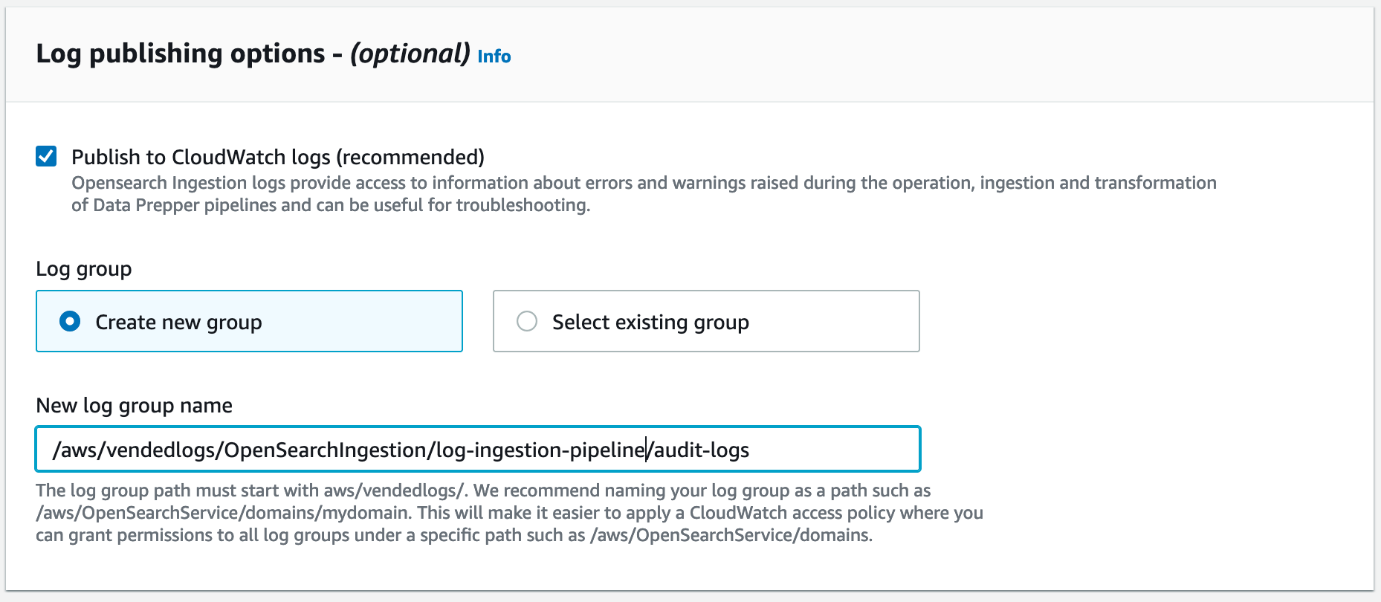
- In the Log publishing options section, select Publish to CloudWatch logs and Create new group.
OpenSearch Ingestion uses the log levels of INFO, WARN, ERROR, and FATAL. Enabling log publishing helps you monitor your pipelines in production.
- Choose Next and Create pipeline.
- Select the pipeline and choose View details to see the progress of the pipeline creation.
Wait until the status changes to Active to start using the pipeline.

Send logs to the OpenSearch Ingestion pipeline
To start sending logs to the OpenSearch Ingestion pipeline, complete the following steps:
- On the AWS Cloud9 console, create a Fluent Bit configuration file and update the following attributes:
- Host – Enter the ingestion URL of your OpenSearch Ingestion pipeline.
- aws_service – Enter
osis. - aws_role_arn – Enter the ARN of the IAM role
IngestionRole.
The following code shows an example of the Fluent-bit.conf file:
- In the AWS Cloud9 environment, create a docker-compose YAML file to deploy Fluent Bit and Flog containers:
Before you start the Docker containers, you need to update the IAM EC2 instance role in AWS Cloud9 so it can sign the requests sent to OpenSearch Ingestion.
- For demo purposes, create an IAM service-linked role and choose EC2 under Use case to allow the AWS Cloud9 EC2 instance to call OpenSearch Ingestion on your behalf.
- Add the OpenSearch Ingestion policy, which is the same policy you used with
IngestionRole. - Add the
AdministratorAccesspermission policy to the role as well.
Your role definition should look like the following screenshot.

- After you create the role, go back to AWS Cloud9, select your demo environment, and choose View details.
- On the EC2 instance tab, choose Manage EC2 instance to view the details of the EC2 instance attached to your AWS Cloud9 environment.
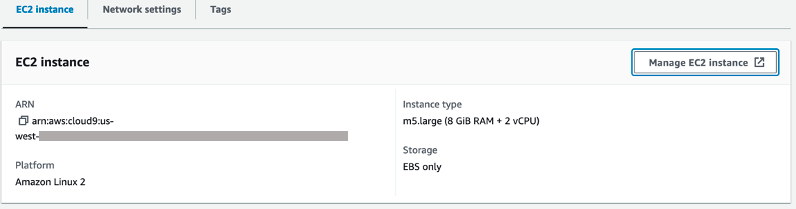
- On the Amazon EC2 console, replace the IAM role of your AWS Cloud9 EC2 instance with the new role.
- Open a terminal in AWS Cloud9 and run the command docker-compose up.
Check the output in the terminal—if everything is working correctly, you get status 200.

Fluent Bit collects logs from the /var/log repository in the container and pushes the data to the OpenSearch Ingestion pipeline.
- Open OpenSearch Dashboards, navigate to Dev Tools, and run the command
GET _cat/indicesto validate that the data has been delivered by OpenSearch Ingestion to your OpenSearch Service domain.
You should see the three indexes created: aggregated_2xx_3xx, aggregated_4xx, and aggregated_5xx.

Now you can focus on analyzing your log data and reinvent your business without having to worry about any operational overhead regarding your ingestion pipeline.
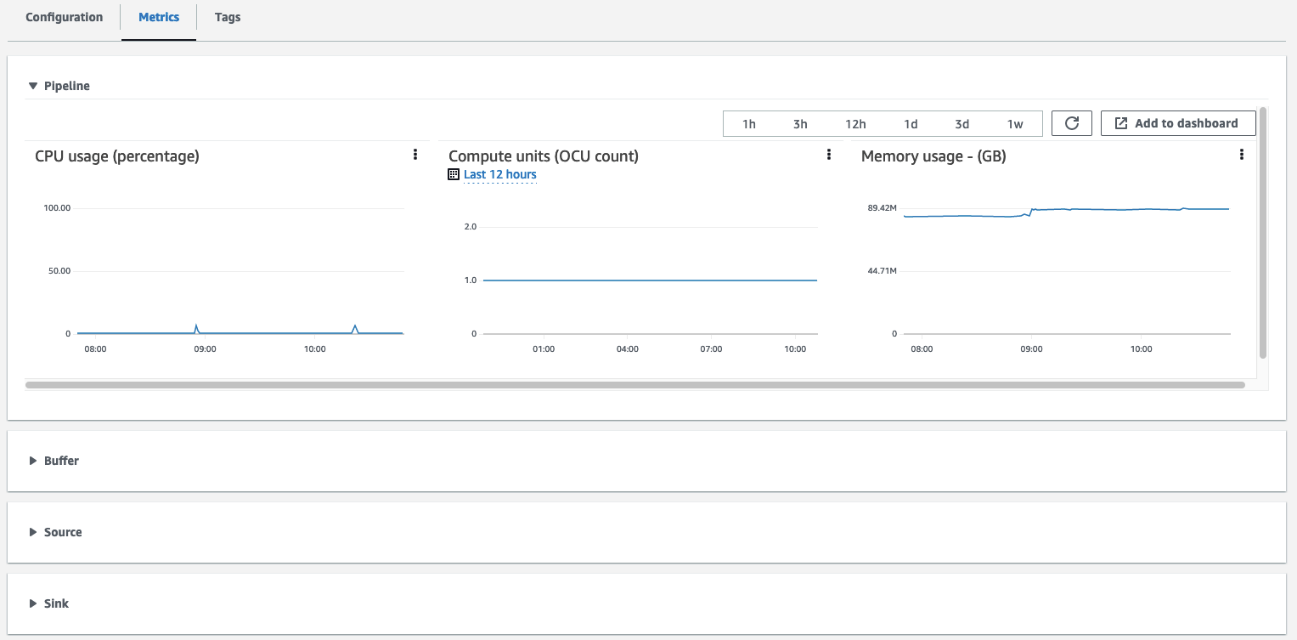
Best practices for monitoring
You can monitor the Amazon CloudWatch metrics made available to you to maintain the right performance and availability of your pipeline. Check the list of available pipeline metrics related to the source, buffer, processor, and sink plugins.
Navigate to the Metrics tab for your specific OpenSearch Ingestion pipeline to explore the graphs available to each metric, as shown in the following screenshot.
In your production workloads, make sure to configure the following CloudWatch alarms to notify you when the pipeline metrics breach a specific threshold so you can promptly remediate each issue.
Managing cost
While OpenSearch Ingestion automatically provisions and scales the OCUs for your spiky workloads, you only pay for the compute resources actively used by your pipeline to ingest, process, and route data. Therefore, setting up a maximum capacity of Ingestion OCUs allows you to handle your workload peak demand while controlling cost.
For production workloads, make sure to configure a minimum of 2 Ingestion OCUs to ensure 99.9% availability for the ingestion pipeline. Check the sizing recommendations and learn how OpenSearch Ingestion responds to workload spikes.
Clean up
Make sure you clean up unwanted AWS resources created during this post in order to prevent additional billing for these resources. Follow these steps to clean up your AWS account:
- On the AWS Cloud9 console, choose Environments in the navigation pane.
- Select the environment you want to delete and choose Delete.
- On the OpenSearch Service console, choose Domains under Managed clusters in the navigation pane.
- Select the domain you want to delete and choose Delete.
- Select Pipelines under Ingestion in the navigation pane.
- Select the pipeline you want to delete and on the Actions menu, choose Delete.
Conclusion
In this post, you learned how to create a serverless ingestion pipeline to deliver Apache access logs to an OpenSearch Service domain using OpenSearch Ingestion. You learned the IAM permissions required to start using OpenSearch Ingestion and how to use a pipeline blueprint instead of creating a pipeline configuration from scratch.
You used Fluent Bit to collect and forward Apache logs, and used OpenSearch Ingestion to process and conditionally route the log data to different indexes in OpenSearch Service. For more examples about writing to OpenSearch Ingestion pipelines, refer to Sending data to Amazon OpenSearch Ingestion pipelines.
Finally, the post provided you with recommendations and best practices to deploy OpenSearch Ingestion pipelines in a production environment while controlling cost.
Follow this post to build your serverless log analytics pipeline, and refer to Top strategies for high volume tracing with Amazon OpenSearch Ingestion to learn more about high volume tracing with OpenSearch Ingestion.
About the authors
 Hajer Bouafif is an Analytics Specialist Solutions Architect at Amazon Web Services. She focuses on OpenSearch Service and helps customers design and build well-architected analytics workloads in diverse industries. Hajer enjoys spending time outdoors and discovering new cultures.
 Francisco Losada is an Analytics Specialist Solutions Architect based out of Madrid, Spain. He works with customers across EMEA to architect, implement, and evolve analytics solutions at AWS. He advocates for OpenSearch, the open-source search and analytics suite, and supports the community by sharing code samples, writing content, and speaking at conferences. In his spare time, Francisco enjoys playing tennis and running.
 Muthu Pitchaimani is a Search Specialist with Amazon OpenSearch Service. He builds large-scale search applications and solutions. Muthu is interested in the topics of networking and security, and is based out of Austin, Texas.
- SEO Powered Content & PR Distribution. Get Amplified Today.
- PlatoData.Network Vertical Generative Ai. Empower Yourself. Access Here.
- PlatoAiStream. Web3 Intelligence. Knowledge Amplified. Access Here.
- PlatoESG. Automotive / EVs, Carbon, CleanTech, Energy, Environment, Solar, Waste Management. Access Here.
- BlockOffsets. Modernizing Environmental Offset Ownership. Access Here.
- Source: https://aws.amazon.com/blogs/big-data/build-a-serverless-log-analytics-pipeline-using-amazon-opensearch-ingestion-with-managed-amazon-opensearch-service/

