Image by Author
Are you a beginner looking to learn programming with Python? If so, this beginner-friendly tutorial is for you to familiarize yourself with the basics of the language.
This tutorial will introduce you to Python’s—rather English-friendly—syntax. You’ll also learn to work with different data types, conditional statements, and loops in Python.
If you already have Python installed in your development and environment, start a Python REPL and code along. Or if you want to skip the installation—and start coding right away—I recommend heading over to Google Colab and coding along.
Before we write the classic “Hello, world!” program in Python, here’s a bit about the language. Python is an interpreted language. What does this mean?
In any programming language, all source code that you write should be translated into machine language. While compiled languages like C and C++ need the entire machine code before the program is run, an interpreter parses the source code and interprets it on the fly.
Create a Python script, type in the following code, and run it:
print("Hello, World!")
To print out Hello, World!, we’ve used the `print()` function, one of the many built-in functions in Python.
In this super simple example, notice that “Hello, World!” is a sequence—a string of characters. Python strings are delimited by a pair of single or double quotes. So to print out any message string, you can use `print(“<message_string>”)`.
Reading in User Input
Now let’s go a step further and read in some input from the user using the `input()` function. You should always prompt the user to let them know what they should input.
Here’s a simple program that takes in the user’s name as input and greets them.
Comments help improve readability of your code by providing additional context to the user. Single-line comments in Python start with a #.
Notice that the string in the code snippet below is preceded by an `f`. Such strings are called formatted strings or f-strings. To replace the value of a variable in an f-string, specify name of the variable within a pair of curly braces as shown:
# Get user input
user_name = input("Please enter your name: ") # Greet the user
print(f"Hello, {user_name}! Nice to meet you!")
When you run the program, you’ll be prompted for the input first, and then the greeting message will be printed out:
Please enter your name: Bala
Hello, Bala! Nice to meet you!
Let’s move on to learning about variables and data types in Python.
Variables, in any programming language, are like containers that store information. In the code that we’ve written so far, we’ve already created a variable `user_name`. When the user inputs their name (a string), it is stored in the `user_name` variable.
Basic Data Types in Python
Let’s go through the basic data types in Python: `int`, `float`, `str`, and `bool`, using simple examples that build on each other:
Integer (`int`): Integers are whole numbers without a decimal point. You can create integers and assign them to variables like so:
age = 25
discount= 10
These are assignment statements that assign a value to the variable. In languages like C, you’ll have to specify the data type when declaring variables, but Python is a dynamically typed language. It infers data type from the value. So you can re-assign a variable to hold a value of a totally different data type:
number = 1
number = 'one'
You can check the data type of any variable in Python using the `type` function:
number = 1
print(type(number))
`number` is an integer:
Output >>> <class 'int'>
We’re now assigning a string value to `number`:
number = 'one'
print(type(number))
Output >>> <class 'str'>
Floating-Point Number (`float`): Floating-point numbers represent real numbers with a decimal point. You can create variables of `float` data type like so:
height = 5.8
pi = 3.14159
You can perform various operations—addition, subtraction, floor division, exponentiation, and more—on numeric data types. Here are some examples:
# Define numeric variables
x = 10
y = 5 # Addition
add_result = x + y
print("Addition:", add_result) # Output: 15 # Subtraction
sub_result = x - y
print("Subtraction:", sub_result) # Output: 5 # Multiplication
mul_result = x * y
print("Multiplication:", mul_result) # Output: 50 # Division (floating-point result)
div_result = x / y
print("Division:", div_result) # Output: 2.0 # Integer Division (floor division)
int_div_result = x // y
print("Integer Division:", int_div_result) # Output: 2 # Modulo (remainder of division)
mod_result = x % y
print("Modulo:", mod_result) # Output: 0 # Exponentiation
exp_result = x ** y
print("Exponentiation:", exp_result) # Output: 100000
String (`str`): Strings are sequences of characters, enclosed in single or double quotes.
name = "Alice"
quote = 'Hello, world!'
Boolean (`bool`): Booleans represent either `True` or `False`, indicating the truth value of a condition.
is_student = True
has_license = False
Python’s flexibility in working with different data types allows you to store, perform a wide range of operations, and manipulate data effectively.
Here’s an example putting together all the data types we’ve learned so far:
# Using different data types together
age = 30
score = 89.5
name = "Bob"
is_student = True # Checking if score is above passing threshold
passing_threshold = 60.0
is_passing = score >= passing_threshold print(f"{name=}")
print(f"{age=}")
print(f"{is_student=}")
print(f"{score=}")
print(f"{is_passing=}")
And here’s the output:
Output >>> name='Bob'
age=30
is_student=True
score=89.5
is_passing=True
Say you’re managing information about students in a classroom. It’d help to create a collection—to store info for all students—than to repeatedly define variables for each student.
Lists
Lists are ordered collections of items—enclosed within a pair of square brackets. The items in a list can all be of the same or different data types. Lists are mutable, meaning you can change their content after creation.
Here, `student_names` contains the names of students:
# List
student_names = ["Alice", "Bob", "Charlie", "David"]
Tuples
Tuples are ordered collections similar to lists, but they are immutable, meaning you cannot change their content after creation.
Say you want `student_scores` to be an immutable collection that contains the exam scores of students.
# Tuple
student_scores = (85, 92, 78, 88)
Dictionaries
Dictionaries are collections of key-value pairs. The keys of a dictionary should be unique, and they map to corresponding values. They are mutable and allow you to associate information with specific keys.
Here, `student_info` contains information about each student—names and scores—as key-value pairs:
student_info = {'Alice': 85, 'Bob': 92, 'Charlie': 78, 'David': 88}
But wait, there’s a more elegant way to create dictionaries in Python.
We’re about to learn a new concept: dictionary comprehension. Don’t worry if it’s not clear right away. You can always learn more and work on it later.
But comprehensions are pretty intuitive to understand. If you want the `student_info` dictionary to have student names as keys and their corresponding exam scores as values, you can create the dictionary like this:
# Using a dictionary comprehension to create the student_info dictionary
student_info = {name: score for name, score in zip(student_names, student_scores)} print(student_info)
Notice how we’ve used the `zip()` function to iterate through both `student_names` list and `student_scores` tuple simultaneously.
Output >>> {'Alice': 85, 'Bob': 92, 'Charlie': 78, 'David': 88}
In this example, the dictionary comprehension directly pairs each student name from the `student_names` list with the corresponding exam score from the `student_scores` tuple to create the `student_info` dictionary with names as keys and scores as values.
Now that you’re familiar with the primitive data types and some sequences/iterables, let’s move on to the next part of the discussion: control structures.
When you run a Python script, the code execution occurs—sequentially—in the same order in which they occur in the script.
Sometimes, you’d need to implement logic to control the flow of execution based on certain conditions or loop through an iterable to process the items in it.
We’ll learn how the if-else statements facilitate branching and conditional execution. We’ll also learn how to iterate over sequences using loops and the loop control statements break and continue.
If Statement
When you need to execute a block of code only if a particular condition is true, you can use the `if` statement. If the condition evaluates to false, the block of code is not executed.
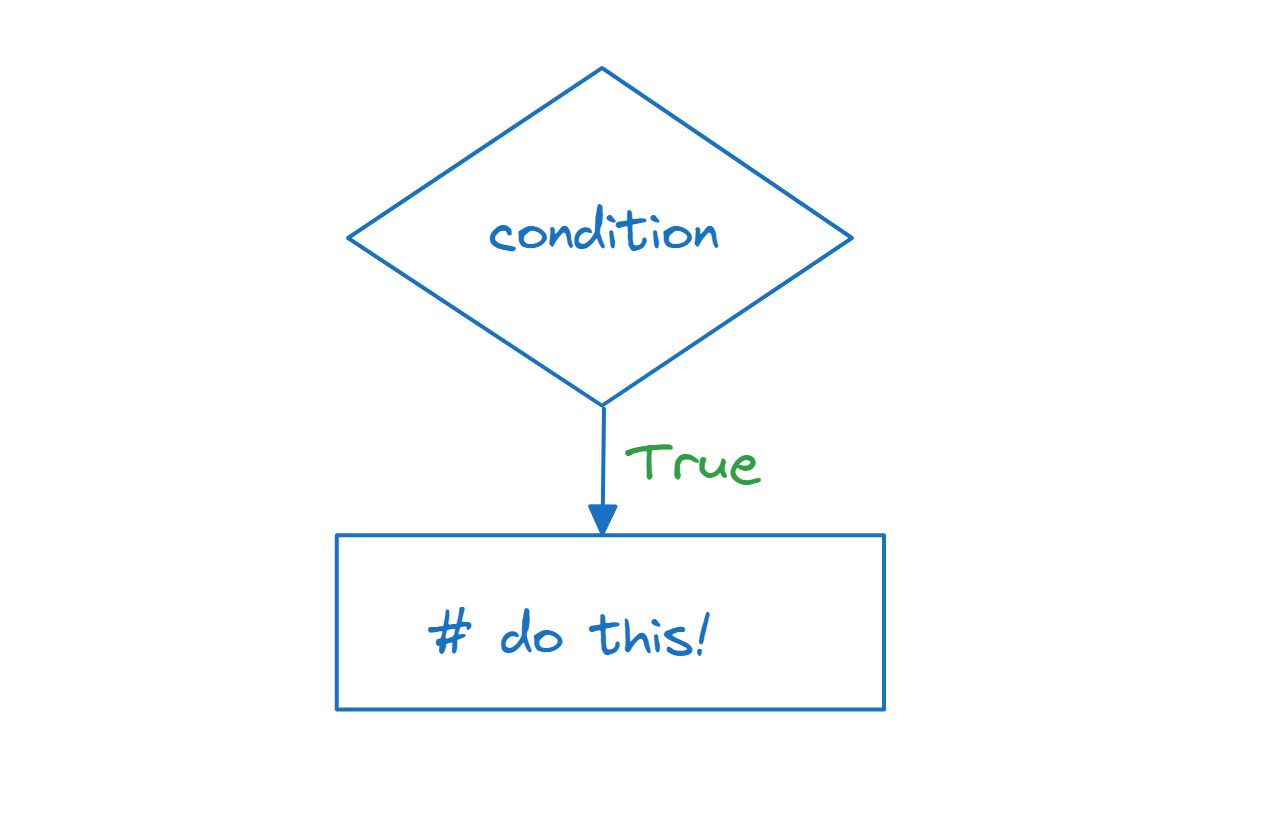
Image by Author
Consider this example:
score = 75 if score >= 60: print("Congratulations! You passed the exam.")
In this example, the code inside the `if` block will be executed only if the `score` is greater than or equal to 60. Since the `score` is 75, the message “Congratulations! You passed the exam.” will be printed.
Output >>> Congratulations! You passed the exam.If-else Conditional Statements
The `if-else` statement allows you to execute one block of code if the condition is true, and a different block if the condition is false.
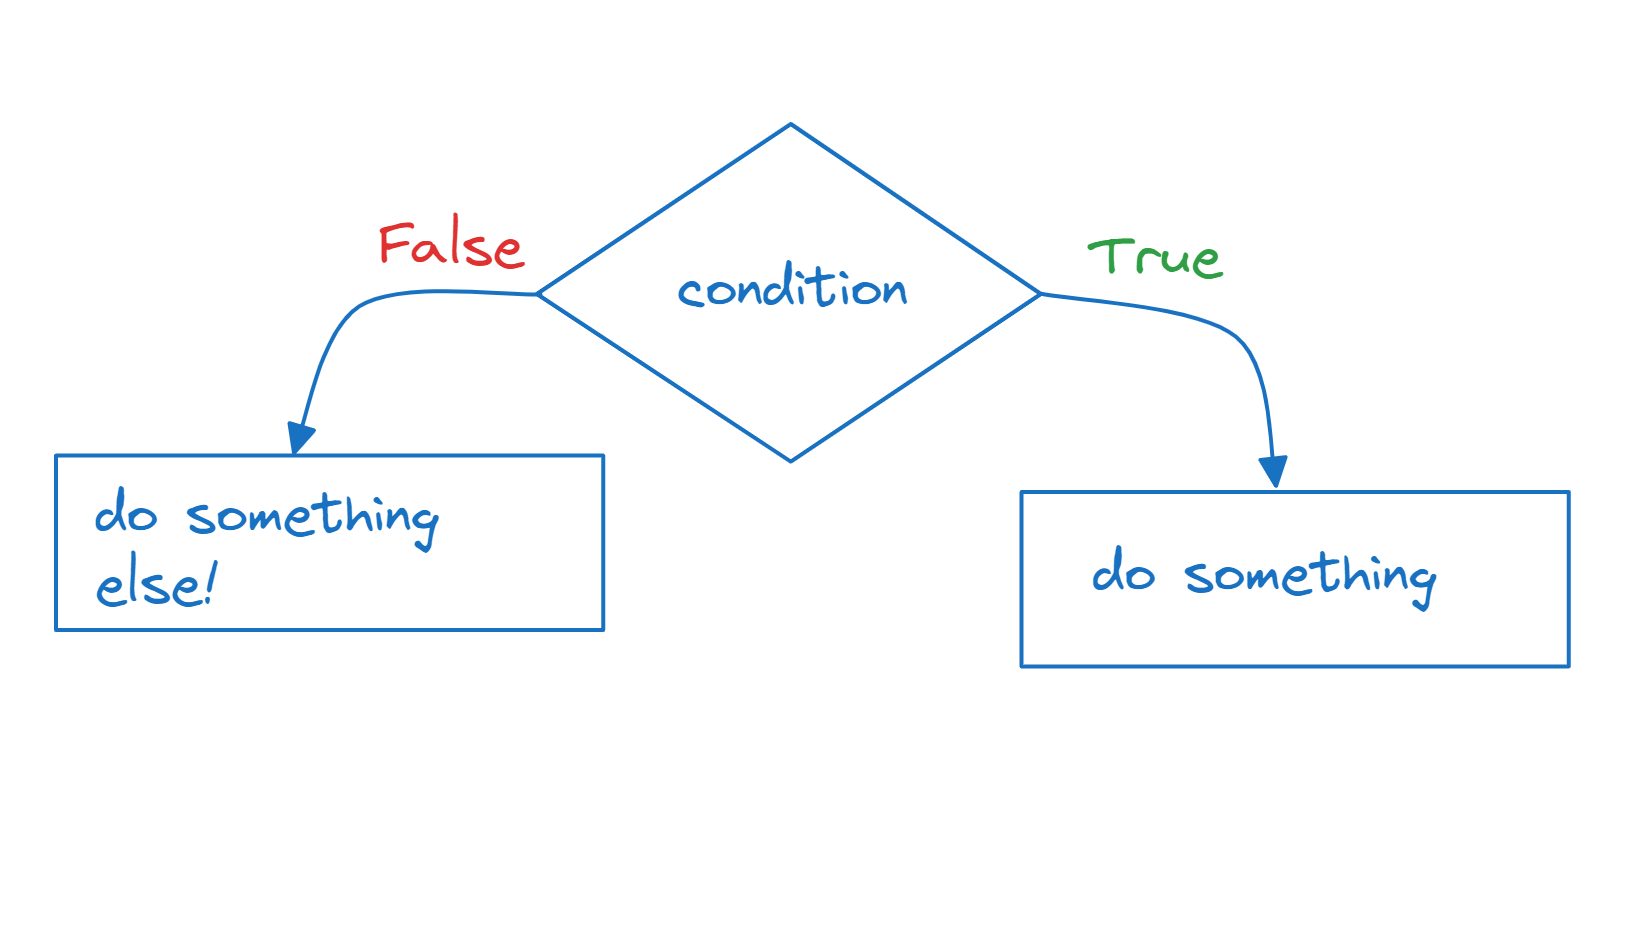
Image by Author
Let’s build on the test scores example:
score = 45 if score >= 60: print("Congratulations! You passed the exam.")
else: print("Sorry, you did not pass the exam.")
Here, if the `score` is less than 60, the code inside the `else` block will be executed:
Output >>> Sorry, you did not pass the exam.If-elif-else Ladder
The `if-elif-else` statement is used when you have multiple conditions to check. It allows you to test multiple conditions and execute the corresponding block of code for the first true condition encountered.
If the conditions in the `if` and all `elif` statements evaluate to false, the `else` block is executed.
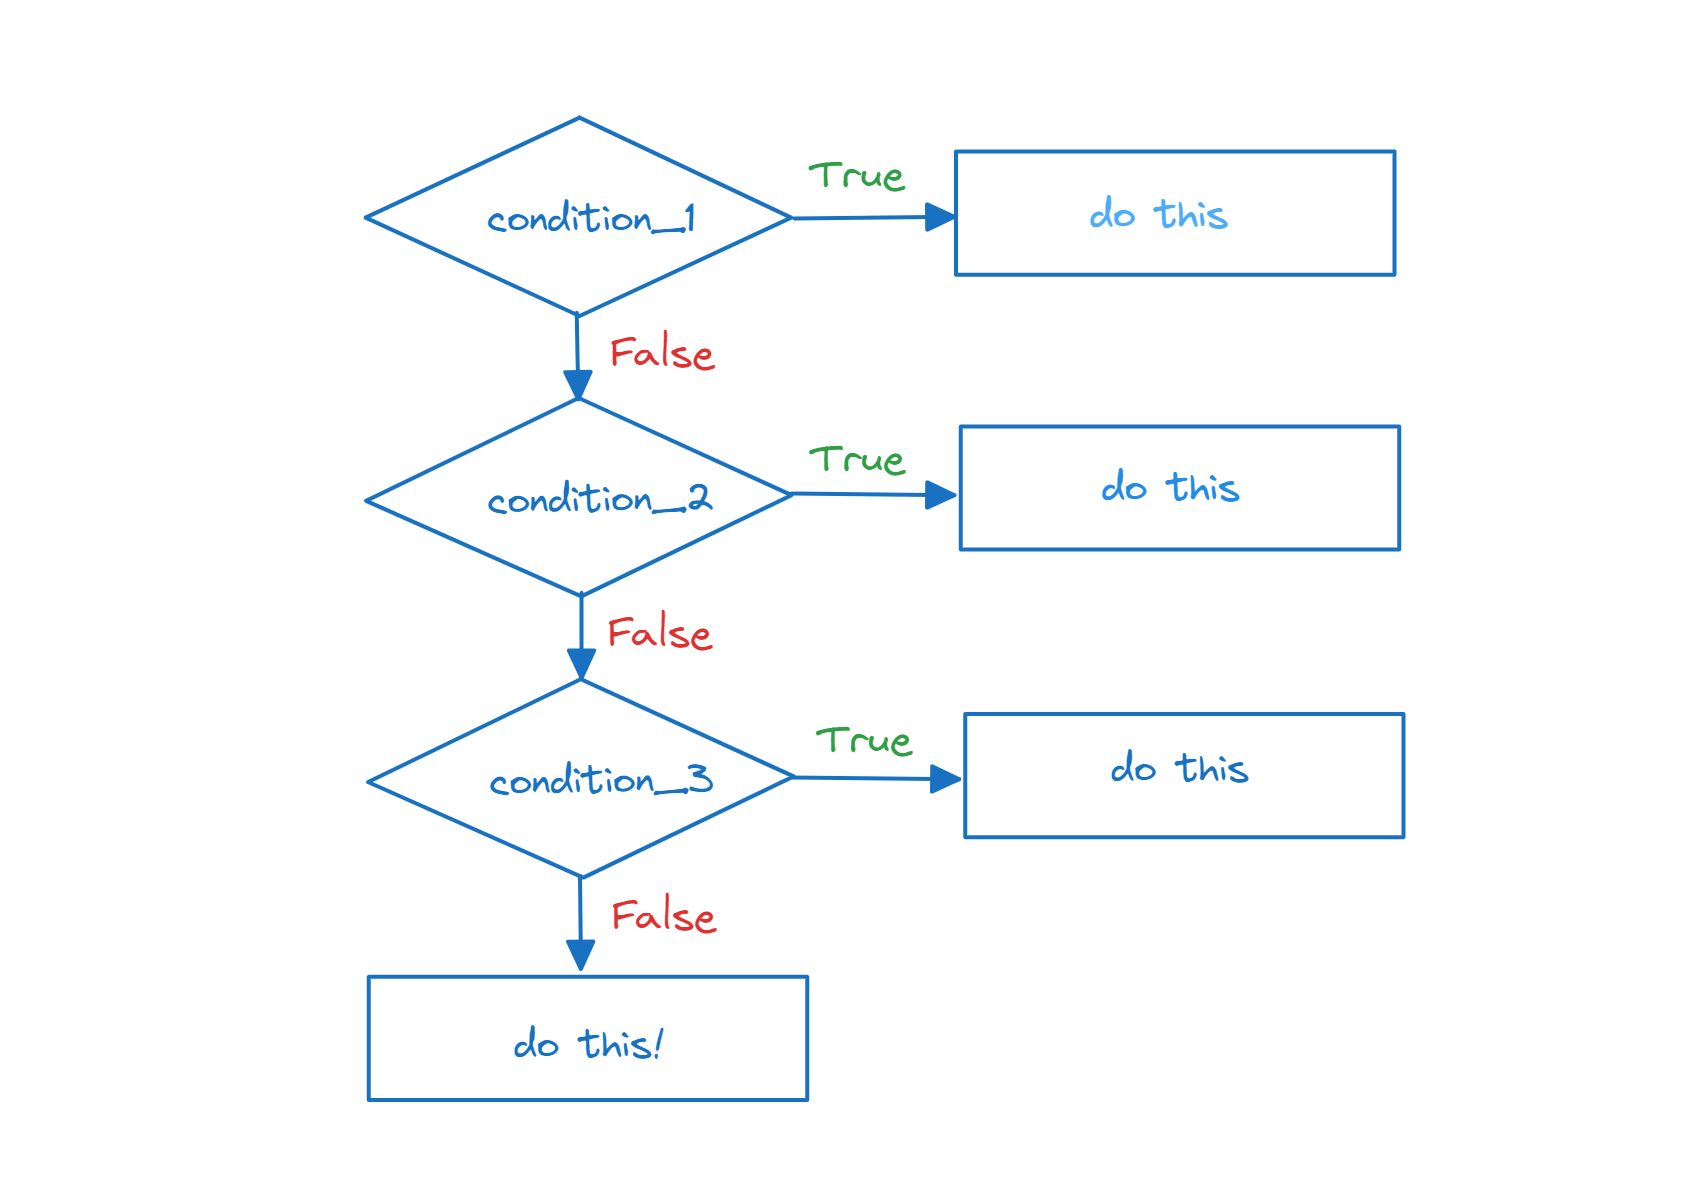
Image by Author
score = 82 if score >= 90: print("Excellent! You got an A.")
elif score >= 80: print("Good job! You got a B.")
elif score >= 70: print("Not bad! You got a C.")
else: print("You need to improve. You got an F.")
In this example, the program checks the `score` against multiple conditions. The code inside the first true condition’s block will be executed. Since the `score` is 82, we get:
Output >>> Good job! You got a B.Nested If Statements
Nested `if` statements are used when you need to check multiple conditions within another condition.
name = "Alice"
score = 78 if name == "Alice": if score >= 80: print("Great job, Alice! You got an A.") else: print("Good effort, Alice! Keep it up.")
else: print("You're doing well, but this message is for Alice.")
In this example, there is a nested `if` statement. First, the program checks if `name` is “Alice”. If true, it checks the `score`. Since the `score` is 78, the inner `else` block is executed, printing “Good effort, Alice! Keep it up.”
Output >>> Good effort, Alice! Keep it up.
Python offers several loop constructs to iterate over collections or perform repetitive tasks.
For Loop
In Python, the `for` loop provides a concise syntax to let us iterate over existing iterables. We can iterate over `student_names` list like so:
student_names = ["Alice", "Bob", "Charlie", "David"] for name in student_names: print("Student:", name)
The above code outputs:
Output >>> Student: Alice
Student: Bob
Student: Charlie
Student: David
While Loop
If you want to execute a piece of code as long as a condition is true, you can use a `while` loop.
Let’s use the same `student_names` list:
# Using a while loop with an existing iterable student_names = ["Alice", "Bob", "Charlie", "David"]
index = 0 while index len(student_names): print("Student:", student_names[index]) index += 1
In this example, we have a list `student_names` containing the names of students. We use a `while` loop to iterate through the list by keeping track of the `index` variable.
The loop continues as long as the `index` is less than the length of the list. Inside the loop, we print each student’s name and increment the `index` to move to the next student. Notice the use of `len()` function to get the length of the list.
This achieves the same result as using a `for` loop to iterate over the list:
Output >>> Student: Alice
Student: Bob
Student: Charlie
Student: David
Let’s use a `while` loop that pops elements from a list until the list is empty:
student_names = ["Alice", "Bob", "Charlie", "David"] while student_names: current_student = student_names.pop() print("Current Student:", current_student) print("All students have been processed.")
The list method `pop` removes and returns the last element present in the list.
In this example, the `while` loop continues as long as there are elements in the `student_names` list. Inside the loop, the `pop()` method is used to remove and return the last element from the list, and the name of the current student is printed.
The loop continues until all students have been processed, and a final message is printed outside the loop.
Output >>> Current Student: David
Current Student: Charlie
Current Student: Bob
Current Student: Alice
All students have been processed.
The `for` loop is generally more concise and easier to read for iterating over existing iterables like lists. But the `while` loop can offer more control when the looping condition is more complex.
Loop Control Statements
`break` exits the loop prematurely, and `continue` skips the rest of the current iteration and moves to the next one.
Here’s an example:
student_names = ["Alice", "Bob", "Charlie", "David"] for name in student_names: if name == "Charlie": break print(name)
The control breaks out of the loop when the `name` is Charlie, giving us the output:
Output >>>
Alice
Bob
Emulating Do-While Loop Behavior
In Python, there is no built-in `do-while` loop like in some other programming languages. However, you can achieve the same behavior using a `while` loop with a `break` statement. Here’s how you can emulate a `do-while` loop in Python:
while True: user_input = input("Enter 'exit' to stop: ") if user_input == 'exit': break
In this example, the loop will continue running indefinitely until the user enters ‘exit’. The loop runs at least once because the condition is initially set to `True`, and then the user’s input is checked inside the loop. If the user enters ‘exit’, the `break` statement is executed, which exits the loop.
Here’s a sample output:
Output >>>
Enter 'exit' to stop: hi
Enter 'exit' to stop: hello
Enter 'exit' to stop: bye
Enter 'exit' to stop: try harder!
Enter 'exit' to stop: exit
Note that this approach is similar to a `do-while` loop in other languages, where the loop body is guaranteed to execute at least once before the condition is checked.
I hope you were able to code along to this tutorial without any difficulty. Now that you’ve gained an understanding of the basics of Python, it’s time to start coding some super simple projects applying all the concepts that you’ve learned.
Bala Priya C is a developer and technical writer from India. She likes working at the intersection of math, programming, data science, and content creation. Her areas of interest and expertise include DevOps, data science, and natural language processing. She enjoys reading, writing, coding, and coffee! Currently, she’s working on learning and sharing her knowledge with the developer community by authoring tutorials, how-to guides, opinion pieces, and more.
- SEO Powered Content & PR Distribution. Get Amplified Today.
- PlatoData.Network Vertical Generative Ai. Empower Yourself. Access Here.
- PlatoAiStream. Web3 Intelligence. Knowledge Amplified. Access Here.
- PlatoESG. Automotive / EVs, Carbon, CleanTech, Energy, Environment, Solar, Waste Management. Access Here.
- PlatoHealth. Biotech and Clinical Trials Intelligence. Access Here.
- ChartPrime. Elevate your Trading Game with ChartPrime. Access Here.
- BlockOffsets. Modernizing Environmental Offset Ownership. Access Here.
- Source: https://www.kdnuggets.com/python-basics-syntax-data-types-and-control-structures?utm_source=rss&utm_medium=rss&utm_campaign=python-basics-syntax-data-types-and-control-structures

