Introduction
Large Language Models are known for their text-generation capabilities. They are trained with millions of tokens during the pre-training period. This will help the large language models understand English text and generate meaningful full tokens during the generation period. One of the other common tasks in Natural Language Processing is the Sequence Classification Task. In this, we classify the given sequence into different categories. This can be naively done with Large Language Models through Prompt Engineering. But this might only sometimes work. Instead, we can tweak the Large Language Model to output a set of probabilities for each category for a given input. This guide will show how to train such LLM and work with the finetune Llama 3 model.
Learning Objectives
- Understand the basics of Large Language Models and their applications
- Learn to finetune Llama 3 model for sequence classification tasks
- Explore essential libraries for working with LLMs in HuggingFace
- Gain experience in loading and preprocessing datasets for LLM training
- Customize training processes using class weights and a custom trainer class
This article was published as a part of the Data Science Blogathon.
Table of contents
Finetune Llama 3- Importing Libraries
For this guide, we will be working in Kaggle. The first step would be to download the necessary libraries that we will require to finetune Llama 3 for Sequence Classification. Let us run the code below:
!pip install -q transformers accelerate trl bitsandbytes datasets evaluate huggingface-cli
!pip install -q peft scikit-learn
Download Libraries
We start by downloading the following libraries:
- Transformers: This is a library from HuggingFace, which we can use to download, create applications with, and fine-tune Deep Learning models, including large language models.
- Accelerate: This is again a library from HuggingFace that speeds up the inference speed of the large language models being run on the GPU.
- Trl: It’s a Python Package from HuggingFace, which we can use to fine-tune the Deep Learning Models available on the HuggingFace hub. With this TRL library, we can even fine-tune the large language models.
- bitsandbytes: LLMs are very high in memory, so we can directly work with them in Low RAM GPUs. We quantize the Large Language Models to a lower precision so we can fit them in the GPU, and for this, we require the bitsandbytes library.
- Datasets: This is a Python library from HuggingFace, with which we can download various open-source datasets belonging to different Deep Learning and Machine Learning Categories, including Image Classification, Text Generation, Text Summarization, and more.
- Evaluate: We will use this library to evaluate our model before and after training.
- Huggingface-cli: This is required because we must log in to HuggingFace to work with the Llama3 model.
- peft: With the GPU we are working with, it is impossible to train all the parameters of the large language models. Instead, we can only train a subset of these parameters, which can be done using the peft library.
- Scikit-learn: This library contains many different machine learning and deep learning tools. We will use this library for the error metrics to compare the Large Language Model before and after training.
After that, try logging in to the HuggingFace hub. For this, we will work with the huggingface-cli tool. The code for this can be seen below:
!huggingface-cli login --token $YOUR_HF_TOKENCode Explanation
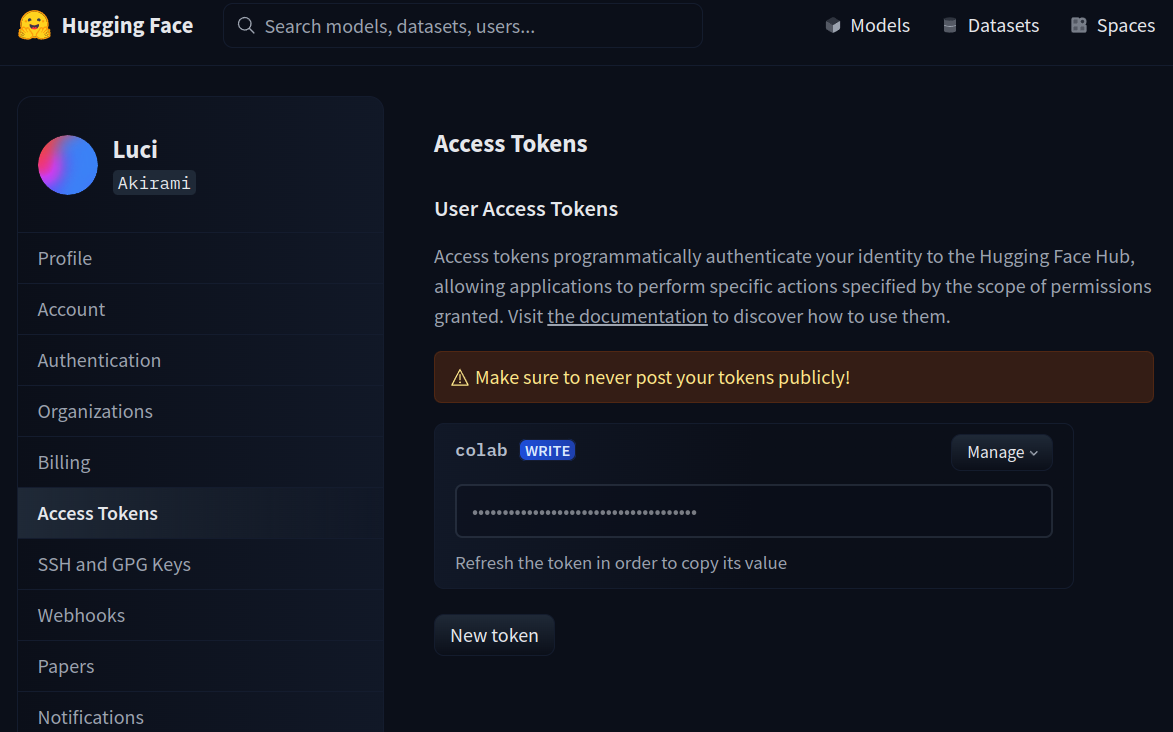
Here, we call the login option for the huggingface-cli with the additional – token option. Here we provide our HuggingFace token to log into the HuggingFace. To get the HuggingFace token, go to this link. As shown in the pic below, you can create an access token by clicking on New Token or using an existing token. Just copy that token and paste it in the place YOUR_HF_TOKEN.
Let’s Load the Dataset
Next, we load the dataset for training. For this, we work with the below code:
from datasets import load_dataset

dataset = load_dataset("ag_news")- We start by importing the load_dataset function from the datasets library
- Then we call the load_dataset function with the dataset name “ag_news”
Running this will download the ag_news dataset to the dataset variable. The ag_news dataset looks like the below pic:

It is a news classification dataset. The news is classified into different categories, such as world, sports, business, and sci/tech. Now, let us see if the examples for each category are represented in equal numbers or if there is any category imbalance.
import pandas as pd

df = pd.DataFrame(dataset['train'])

df.label.value_counts(normalize=True)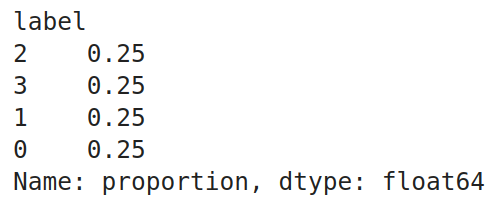
Code Explanation
- Here, we start by importing the pandas library
- The ag_news dataset contains both the training set and a test set. And the dataset variable of type DatasetDict. For ease of use, we convert it into pandas DataFrame
- Then we call the value_counts() function on the “label” column of the dataframe with normalize set to True
Running this code produced the following output. We can check that all 4 labels have an equal proportion, which implies that each category has an equal number of examples in the dataset. The dataset is huge, so we only need a part of it. So, we sample some data from this dataframe with the following code:
# Splitting the dataframe into 4 separate dataframes based on the labels
label_1_df = df[df['label'] == 0]
label_2_df = df[df['label'] == 1]
label_3_df = df[df['label'] == 2]
label_4_df = df[df['label'] == 3]

# Shuffle each label dataframe
label_1_df = label_1_df.sample(frac=1).reset_index(drop=True)
label_2_df = label_2_df.sample(frac=1).reset_index(drop=True)
label_3_df = label_3_df.sample(frac=1).reset_index(drop=True)
label_4_df = label_4_df.sample(frac=1).reset_index(drop=True)

# Splitting each label dataframe into train, test, and validation sets
label_1_train = label_1_df.iloc[:2000]
label_1_test = label_1_df.iloc[2000:2500]
label_1_val = label_1_df.iloc[2500:3000]

label_2_train = label_2_df.iloc[:2000]
label_2_test = label_2_df.iloc[2000:2500]
label_2_val = label_2_df.iloc[2500:3000]

label_3_train = label_3_df.iloc[:2000]
label_3_test = label_3_df.iloc[2000:2500]
label_3_val = label_3_df.iloc[2500:3000]

label_4_train = label_4_df.iloc[:2000]
label_4_test = label_4_df.iloc[2000:2500]
label_4_val = label_4_df.iloc[2500:3000]

# Concatenating the splits back together
train_df = pd.concat([label_1_train, label_2_train, label_3_train, label_4_train])
test_df = pd.concat([label_1_test, label_2_test, label_3_test, label_4_test])
val_df = pd.concat([label_1_val, label_2_val, label_3_val, label_4_val])

# Shuffle the dataframes to ensure randomness
train_df = train_df.sample(frac=1).reset_index(drop=True)
test_df = test_df.sample(frac=1).reset_index(drop=True)
val_df = val_df.sample(frac=1).reset_index(drop=True)- Our data contains 4 labels. So we create 4 dataframes where each dataframe consists of a single label
- Then, we shuffle each of these labels by calling the sample function on them
- Then we split each of these label dataframes into 3 splits called the train, test, and valid dataframes. For train, we provide 2000 labels, and for testing and validation, we provide 500 each
- Now, we concat the training dataframes of all the labels into a single training dataframe through the pd.concat() function
- We do the same thing even for the test and validation dataframes
- Finally, we shuffle the train_df, test_df, and valid_df one more time to ensure randomness in them
Checking the Value Counts
For confirmation, let us check the value counts of each label in the training dataframe. The code for this will be:
train_df.label.value_counts()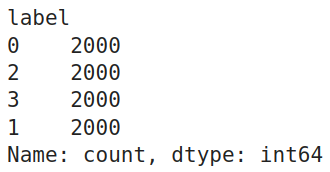
Pandas DataFrames to DatasetDict
So, we can check that the training dataframe has equal examples for each of the four labels. Before sending them to training, we need to convert these Pandas DataFrames to DatasetDict, which the HuggingFace training library accepts. For this, we work with the following code:
from datasets import DatasetDict, Dataset

# Converting pandas DataFrames into Hugging Face Dataset objects:
dataset_train = Dataset.from_pandas(train_df)
dataset_val = Dataset.from_pandas(val_df)
dataset_test = Dataset.from_pandas(test_df)

# Combine them into a single DatasetDict
dataset = DatasetDict({
    'train': dataset_train,
    'val': dataset_val,
    'test': dataset_test
})
dataset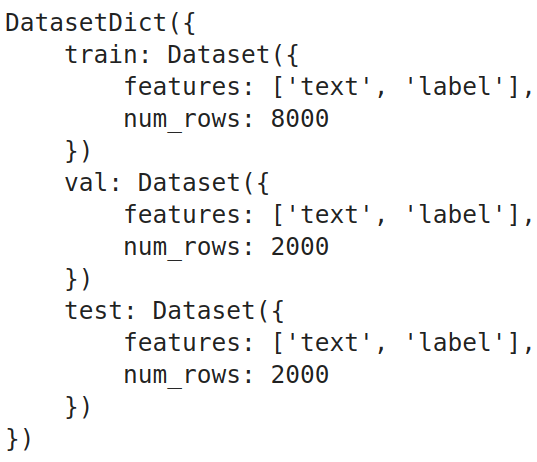
Code Explanation
- First, we import the DatasetDict class from the datasets library
- Then we convert each of the train_df, test_df, and val_df from Pandas DataFrames to the HuggingFace Dataset type
- Finally, we combine all the train, test, and val HuggingFace Dataset, create the final DatasetDict type variable, and store it in the dataset variable
We can see from the output that the DatasetDict contains 3 Datasets, which are the train, test, and validation datasets. Where each of these datasets contains only 2 columns: one is text, and the other is the label.
Here, in our dataset, the proportion of each class is the same. In practical cases, this might only sometimes be true. So when the classes are imbalanced, we need to take proper measures so the LLM doesn’t give more importance to the label containing more examples. For this, we calculate the class weights.
Class weights tell us how much importance we must give to each class; the more class weights there are, the more importance there is to the class. If we have an imbalanced dataset, we may provide more class weight to the label, having fewer examples, thus giving more importance to it. To get these class weights, we can take the inverse of the proportion of class labels (value counts) of the dataset. The code for this will be:
import torch

class_weights=(1/train_df.label.value_counts(normalize=True).sort_index()).tolist()
class_weights=torch.tensor(class_weights)
class_weights=class_weights/class_weights.sum()
class_weights
Code Explanation
- So, we start by taking the values of the inverse of value counts of the class labels
- Then, we convert these from a list type to a torch tensor type
- We then normalize the class_weights by dividing them by the sum of class_weights
We can see from the output that the class weights are equal for all the classes; this is because all the classes have the same number of examples.
Also read: 3 Ways to Use Llama 3 [Explained with Steps]
Model Loading -Quantization
In this section, we will download and prepare the model for the training. The first is to download the model. We cannot work with the full model because we are dealing with a small GPU; hence, we will quantify it. The code for this will be:
from transformers import BitsAndBytesConfig, AutoModelForSequenceClassification

quantization_config = BitsAndBytesConfig(
    load_in_4bit = True,
    bnb_4bit_quant_type = 'nf4',
    bnb_4bit_use_double_quant = True,
    bnb_4bit_compute_dtype = torch.bfloat16
)

model_name = "meta-llama/Meta-Llama-3-8B"

model = AutoModelForSequenceClassification.from_pretrained(
    model_name,
    quantization_config=quantization_config,
    num_labels=4,
    device_map='auto'
)
Code Explanation
- We import the BitsAndBytesConfig and the AutoModelForSequenceClassification classes from the transformers library.
- We must define a quantization config to create a quantization for the model. For this, we will create an instance of BitsAndBytesConfig and give it different quantization parameters.
- load_in_4bit: This is set to True, which tells that we wish to quantize the model to a 4-bit precision
- bnb_4bit_quant_type: This is the type of quantization we wish to work with, and we will be going with Normal Float, aka NF4, which is the recommended one
- bnb_4bit_compute_dtype: This is the data type in which the GPU computations will be performed. This will usually be either torch.float32 / torch.float16 / torch.bfloat16, in our example, based on the GPU, we go with torch.bfloat16
- bnb_4bit_use_double_quant: When set to True, it will further reduce the memory footprint by quantizing the quantization constants
- Next, we provide the model name that we will finetune to the model_name variable, which here is Meta’s newly launched Llama 3 8B
- Then, we create an instance of the AutoModelForSequenceClassification class and give it the model name and the quantization config
- We also used another variable called the num_labels and set it to 4. What AutoModelForSequenceClassification does is remove the last layer of the Llama 3 LLM and replace it with a linear layer
- We are setting the output of this linear layer to 4; this is because there are 4 class labels in our dataset
- Finally, we set the device_map to “auto,” so the model gets loaded to the GPU
So running the above will download the Llama 3 8B Large Language Model from the HuggingFace hub, quantize it based on the quantization_config that we have provided to it, and then replace the output head of the LLM with a linear head with 4 neurons for the output and pushed the model to the GPU. Next, we will create a LoRA config for the model to train only a subset of parameters. The code for this will be:
LoRA Configuration
from peft import LoraConfig, prepare_model_for_kbit_training, get_peft_model

lora_config = LoraConfig(
    r = 16,
    lora_alpha = 8,
    target_modules = ['q_proj', 'k_proj', 'v_proj', 'o_proj'],
    lora_dropout = 0.05,
    bias = 'none',
    task_type = 'SEQ_CLS'
)

model = prepare_model_for_kbit_training(model)
model = get_peft_model(model, lora_config)
Code Explanation
- We start by importing LoraConfig, prepare_model_for_kbit_training, and get_peft_model from peft library
- Then, we instantiate a LoraConfig class and give it different parameters, which include
- r: This defines the rank of the matrix of parameters that we will be training. We have set this to 16
- lora_alpha: This is a hyperparameter for the LoRA-based training. This is usually set to half of the value of r
- target_modules: This is a list where we specify where we should be adding the LoRA-based training. For this, we choose all the attention layers, like the K, Q, V, and the Output Projections
- lora_dropout: This we set to 0.05, which will randomly drop the neurons so that overfitting does not happen
- bias: If set to true, then even the bias term will be added along with the weights for training
- task_type: Because we are training for a classification dataset and have added the classification layer to the LLM, we will be keeping this “SEQ_CLS”
- Then, we call the prepare_model_for_kbit_training() function, to which we give the model. This function preprocess the quantized model for training
- Finally, we call the get_peft_model() function by giving it both the model and the LoraConfig
Running this, the get_peft_model will take the model and prepare it for training with a PEFT method, like the LoRA in this case, by wrapping the model and the LoRA Configuration.
Model Testing – Pre Training
In this section, we will test the Llama 3 model on the test data before the model has been trained. To do this, we will first download the tokenizer. The code for this will be:
from transformers import AutoTokenizer

model_name = "meta-llama/Meta-Llama-3-8B"
tokenizer = AutoTokenizer.from_pretrained(model_name, add_prefix_space=True)

tokenizer.pad_token_id = tokenizer.eos_token_id
tokenizer.pad_token = tokenizer.eos_token
Code Explanation
- Here, we import the AutoTokenizer class from the transformers library
- We instantiate a tokenizer by calling the from_pretrained() function of the AutoTokenizer class and passing it the model name
- We then set the pad_token of the tokenizer to the eos_token, and the same goes for the pad_token_id
model.config.pad_token_id = tokenizer.pad_token_id
model.config.use_cache = False
model.config.pretraining_tp = 1
Next, we even edit the model configuration by setting the pad token ID of the model to the pad token ID of the tokenizer and not using the cache. Now, we will give our test data to the model and collect the outputs:
sentences = test_df.text.tolist()

batch_size = 32

all_outputs = []

for i in range(0, len(sentences), batch_size):
    batch_sentences = sentences[i:i + batch_size]

    inputs = tokenizer(batch_sentences, return_tensors="pt",
    padding=True, truncation=True, max_length=512)

    inputs = {k: v.to('cuda' if torch.cuda.is_available() else 'cpu') for k, v in inputs.items()}

    with torch.no_grad():
        outputs = model(**inputs)
        all_outputs.append(outputs['logits'])

final_outputs = torch.cat(all_outputs, dim=0)
test_df['predictions']=final_outputs.argmax(axis=1).cpu().numpy()
Code Explanation
- First, we convert the elements in the text column of the test DataFrame into a list of sentences and store them in the variable sentences.
- Then, we define a batch size to represent the model’s inputs in a batch; here, we set this size to 32.
- We then create an empty list of all_outputs to store the outputs that the model will generate
- We start iterating through the sentence variable with the step size set to the batch size we have defined.
- So, in each iteration, we tokenize the input sentences in batches.
- Then, we move these tokenized sentences to the device on which we run the model, either a GPU or CPU.
- Finally, we perform the model inference by passing the inputs to the model and appending the output logits to the all_outputs list. We then concatenate all these outputs to form a final output tensor.
Running this code will store the model results in a variable. We will add these predictions to the test DataFrame in a new column. We take the argmax of each output; this gives us the label that has the highest probability for each output in the final_outputs list. Now, we need to evaluate the output generated by the LLM, which we can do through the code below:
from sklearn.metrics import accuracy_score, confusion_matrix
from sklearn.metrics import balanced_accuracy_score, classification_report

def get_metrics_result(test_df):
    y_test = test_df.label
    y_pred = test_df.predictions

    print("Classification Report:")
    print(classification_report(y_test, y_pred))

    print("Balanced Accuracy Score:", balanced_accuracy_score(y_test, y_pred))
    print("Accuracy Score:", accuracy_score(y_test, y_pred))

get_metrics_result(test_df)
Code Explanation
- We start by importing the accuracy_score, balanced_accuracy_score, and classification_report from the sklearn library.
- Then we define a function called get_metrics_result(), which takes in a dataframe and outputs the results.
- In this function, we first start by storing the predictions and actual labels in a variable.
- Then, we give these actual and predicted values to the classification report, accuracy_score, and balance_accuracy_score, and print them.
- The balance_accuracy_score is useful when dealing with imbalanced data.
Running that has produced the following results. We can see that we get an accuracy of 0.23, which is very low. The model’s precision, recall, and f1-score are very low, too; they do not even reach a percentage above 50%. Testing them after training the model will give us an understanding of how well it is trained.
Before we start training, we need to preprocess the data before sending it to the model. For this, we work with the following code:
def data_preprocesing(row):
    return tokenizer(row['text'], truncation=True, max_length=512)

tokenized_data = dataset.map(data_preprocesing, batched=True,
remove_columns=['text'])
tokenized_data.set_format("torch")
Code Explanation
- We define a function called data_preprocessing(), which expects a row of data
- Inside it, we pass the text content of that row to the tokenizer with truncation set to true and max length set to 512 tokens
- Then we create the tokenized_data, by mapping this function to the dataset that we have created and removing the text column after mapping because we only need the tokens which the model expects
- Finally, we convert these tokenized data to torch format
Now each Dataset in the datasetdict contains three features/columns, i.e. labels, input_ids, and attention_masks. The input_ids and attention_masks are produced for each text with the above preprocessing function. We will need a data collator for batch processing of data while training. For this, we work with the following code:
from transformers import DataCollatorWithPadding

collate_fn = DataCollatorWithPadding(tokenizer=tokenizer)- Here, we import the DataCollatorWithPadding class from the transformers library
- Then, we instantiate this class by giving it the tokenizer
- This collate_fn will pad the batch of inputs to a length equal to the maximum input length in that batch
This will ensure that all the inputs in the batch have the same length, which will be required for faster training. So, we uniformly pad the inputs to the longest sequence length using a special token like the pad token, thus allowing simultaneous batch processing.
Also read: How to Run Llama 3 Locally?
Finetune Llama 3: Model Training and Post-Training Evaluation
Before we start training, we need an error metric to evaluate it. The default error metric for the Large Language Model is the negative log-likelihood loss. But here, because we are modifying the LLM to make it a sequence classification tool, we need to redefine the error metric that we need to test the model while training:
def compute_metrics(evaluations):
    predictions, labels = evaluations
    predictions = np.argmax(predictions, axis=1)
    return {'balanced_accuracy' : balanced_accuracy_score(predictions, labels),
'accuracy':accuracy_score(predictions,labels)}- Here, we define a function compute_metrics, which takes in a tuple containing the predictions and labels
- Then, from the given predictions, we extract the indices of the ones that have the highest probability through the np.argmax() function
- Finally, we return a dictionary containing the balanced accuracy and the original accuracy scores
Because we are going with a custom metric, we even define a custom trainer for training our LLM, which is needed because we are working with class weights here. For this, the code will be
class CustomTrainer(Trainer):
    def __init__(self, *args, class_weights=None, **kwargs):
        super().__init__(*args, **kwargs)
        if class_weights is not None:
            self.class_weights = torch.tensor(class_weights,
            dtype=torch.float32).to(self.args.device)
        else:
            self.class_weights = None

    def compute_loss(self, model, inputs, return_outputs=False):
        labels = inputs.pop("labels").long()

        outputs = model(**inputs)

        logits = outputs.get('logits')

        if self.class_weights is not None:
            loss = F.cross_entropy(logits, labels, weight=self.class_weights)
        else:
            loss = F.cross_entropy(logits, labels)

        return (loss, outputs) if return_outputs else loss
Code Explanation
- Here, we define a custom trainer class that inherits from the Trainer class from HuggingFace
- This class implements an init function, where we define that if class_weights are provided, then assign the class_weights as one of the instance variables, else assign it to None
- Before assigning, we convert the class_weights to torch.tensor and change the dtype to float32
- Then we define the compute_loss function of the Trainer class, which is needed for it to perform backpropagation
- In this, first, we extract the labels from the inputs and convert them to data type long
- Then we give the inputs to the model, which takes in these inputs and generates the probabilities for the classes; we take the logits from these outputs
- Then we call the cross entropy loss because we are dealing with multiple labels classification and give it the model output logits and labels. And if class weights are present, we even provide these to the model
- Finally, we return these losses and outputs as required
Training Arguments
Now, we will define our Training Arguments. The code for this will be below
training_args = TrainiAgrumentsngArguments(
    output_dir = 'sentiment_classification',
    learning_rate = 1e-4,
    per_device_train_batch_size = 8,
    per_device_eval_batch_size = 8,
    num_train_epochs = 1,
    logging_steps=1,
    weight_decay = 0.01,
    evaluation_strategy = 'epoch',
    save_strategy = 'epoch',
    load_best_model_at_end = True,
    report_to="none"
)
Code Explanation
- We instantiate an object of the TrainingArguments class. To this, we pass parameters like
- output_dir: This is where we wish to save the model. We can provide the path here
- learning_rate: Here, we give the learning rate to be applied while training
- per_device_train_batch_size: Here, and we set the batch size for the training data while training
- per_device_eval_batch_size; Here, we set the evaluation batch size for the test/evaluation data
- num_train_epochs: Here, we give the number of training epochs we want in training the LLM
- logging_steps: Here, we tell how often to log the results
- weight_decay: By how much should the weights decay
- save_strategy: This is set to epoch, which tells that for every epoch, the model weights are saved
- evaluation_strategy: This is set to epoch, which tells that for every epoch, evaluation of the model is performed
- load_best_model_at_end: Giving it a value of True will load the model with the best parameters that provide the best results
Passing Object to Trainer
This will create our TrainingArguments object. Now, we are ready to pass it to the Trainer we created. The code for this will be below
trainer = CustomTrainer(
    model = model,
    args = training_args,
    train_dataset = tokenized_datasets['train'],
    eval_dataset = tokenized_datasets['val'],
    tokenizer = tokenizer,
    data_collator = collate_fn,
    compute_metrics = compute_metrics,
    class_weights=class_weights,
)

train_result = trainer.train()
Code Explanation
- We start by creating an object of the CustomTrainer() class that we have created earlier
- To this, we give the model that is the Llama 3 with custom Sequential Head, the training arguments
- We even pass in the tokenized training data and the evaluation data along with the tokenizer
- We even give the collator function so that batch processing takes place while the LLM is being trained
- Finally, we give the metric function that we have created and the class weights, which will help if we have data with imbalanced labels
We have now created the trainer object. We now call the .train() function of the trainer object to start the training process and store the results in the train_result

Code Explanation
- Above, we check that the training has taken place for 1000 steps. This is because we have 8000 training data, and each time, in each step, we send 8 samples; hence we have a total of 1000 steps
- The training took place for 2 hours and 36 minutes for the model to iterate over the entire training data for one epoch
- We can see the training loss of the model is 1.12, and the validation loss is 0.29
- The model is showing an impressive result with the validation data, with an accuracy of 93%
Now, let us try to perform evaluations to test the newly trained model on the test data:
def generate_predictions(model,df_test):
    sentences = df_test.text.tolist()
    batch_size = 32
    all_outputs = []

    for i in range(0, len(sentences), batch_size):

        batch_sentences = sentences[i:i + batch_size]

        inputs = tokenizer(batch_sentences, return_tensors="pt",
        padding=True, truncation=True, max_length=512)

        inputs = {k: v.to('cuda' if torch.cuda.is_available() else 'cpu')
        for k, v in inputs.items()}

        with torch.no_grad():
            outputs = model(**inputs)
            all_outputs.append(outputs['logits'])

    final_outputs = torch.cat(all_outputs, dim=0)
    df_test['predictions']=final_outputs.argmax(axis=1).cpu().numpy()

generate_predictions(model,test_df)
get_performance_metrics(test_df)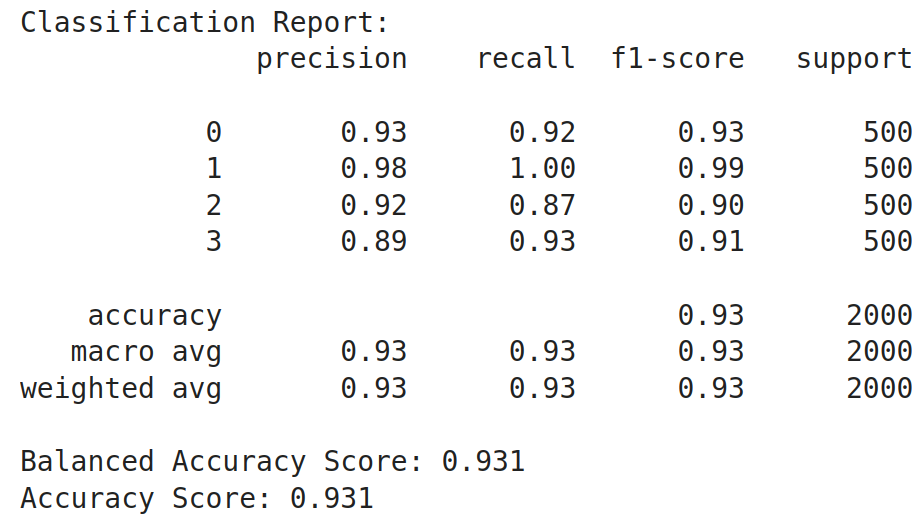
Code Explanation
- Here, we create a function very similar to the one that we have created
- In this function, we convert the text column from the test dataframe into a list of sentences and then run a for loop with a step size equal to the batch size
- In this for loop, we take the batch number of sentences, send them to the tokenizer to tokenize them, and push them to the GPU
- Then, we insert this list of tokens into the model and get the list of probabilities from it
- Finally, we get the index of the highest probability in each output and save the index back in the test dataframe
- This test_df is given back to the get_performance_metric function which takes in this dataframe and outputs the results
Running this code has generated the following results. We see that there is a great boost in the accuracy of the model. Other metrics like precision, recall, and f1-score have increased too from their initial values. The overall accuracy has increased from 0.23 before training to 0.93 after training, which is a 0.7 i.e. 70% improvement in the model after training it. From this, we can get an insight that Large Language Models are very much capable of being employed as sequence classifiers
Conclusion
In conclusion, fine-tuning large language models (LLMs) (finetune Llama 3) for sequence classification involves several detailed steps, from preparing the dataset to quantizing the model for efficient training on limited hardware. By utilizing various libraries from HuggingFace and implementing techniques such as Prompt Engineering and LoRA configurations, it is possible to effectively train these models for specific tasks such as news classification. This guide has demonstrated the entire process, from initial setup and data preprocessing to model training and evaluation, highlighting the versatility and power of LLMs in natural language processing tasks.
Key Takeaways
- Large Language Models (finetune Llama 3) are pre-trained on extensive datasets and are capable of generating and understanding complex text
- While useful, prompt engineering alone may not suffice for all classification tasks; model fine-tuning can provide better performance
- Properly loading, splitting, and balancing datasets are fundamental steps before model training to ensure accurate and fair model performance
- Defining custom error metrics and training loops is necessary for handling specific requirements like class weights in sequence classification tasks
- Pre-training and post-training evaluations using metrics such as accuracy and balanced accuracy provide insights into model performance and the effectiveness of the training process
The media shown in this article are not owned by Analytics Vidhya and is used at the Author’s discretion.
Frequently Asked Questions
A. Large Language Models are AI systems trained on vast amounts of text data to understand and generate human-like language.
A. Sequence Classification is a task where a sequence of text is categorized into predefined classes or labels.
A. Prompt Engineering might not be reliable because it depends heavily on the prompt’s structure and can lack consistency.
A. Quantization reduces models’ memory footprint, making it feasible to run them on hardware with limited resources, like low-RAM GPUs.
A. Class imbalance can be addressed by calculating and applying class weights, giving more importance to less frequent classes during training.
- SEO Powered Content & PR Distribution. Get Amplified Today.
- PlatoData.Network Vertical Generative Ai. Empower Yourself. Access Here.
- PlatoAiStream. Web3 Intelligence. Knowledge Amplified. Access Here.
- PlatoESG. Carbon, CleanTech, Energy, Environment, Solar, Waste Management. Access Here.
- PlatoHealth. Biotech and Clinical Trials Intelligence. Access Here.
- Source: https://www.analyticsvidhya.com/blog/2024/06/finetuning-llama-3-for-sequence-classification/

