Amazon Translate is a neural machine translation service that delivers fast, high quality, affordable, and customizable language translation. Amazon Translate supports 75 languages and 5,550 language pairs. For the latest list, see the Amazon Translate Developer Guide. A key benefit of Amazon Translate is its speed and scalability. It can translate a large body of content or text passages in batch mode or translate content in real-time through API calls. This helps enterprises get fast and accurate translations across massive volumes of content including product listings, support articles, marketing collateral, and technical documentation. When content sets have phrases or sentences that are often repeated, you can optimize cost by implementing a write-through caching layer. For example, product descriptions for items contain many recurring terms and specifications. This is where implementing a translation cache can significantly reduce costs. The caching layer stores source content and its translated text. Then, when the same source content needs to be translated again, the cached translation is simply reused instead of paying for a brand-new translation.
In this post, we explain how setting up a cache for frequently accessed translations can benefit organizations that need scalable, multi-language translation across large volumes of content. You’ll learn how to build a simple caching mechanism for Amazon Translate to accelerate turnaround times.
Solution overview
The caching solution uses Amazon DynamoDB to store translations from Amazon Translate. DynamoDB functions as the cache layer. When a translation is required, the application code first checks the cache—the DynamoDB table—to see if the translation is already cached. If a cache hit occurs, the stored translation is read from DynamoDB with no need to call Amazon Translate again.
If the translation isn’t cached in DynamoDB (a cache miss), then the Amazon Translate API will be called to perform the translation. The source text is passed to Amazon Translate, and the translated result is returned and the translation is stored in DynamoDB, populating the cache for the next time that translation is requested.
For this blog post, we will be using Amazon API Gateway as a rest API for translation that integrates with AWS Lambda to perform backend logic. An Amazon Cognito user pool is used to control who can access your translate rest API. You can also use other mechanisms to control authentication and authorization to API Gateway based on your use-case.
Amazon Translate caching architecture
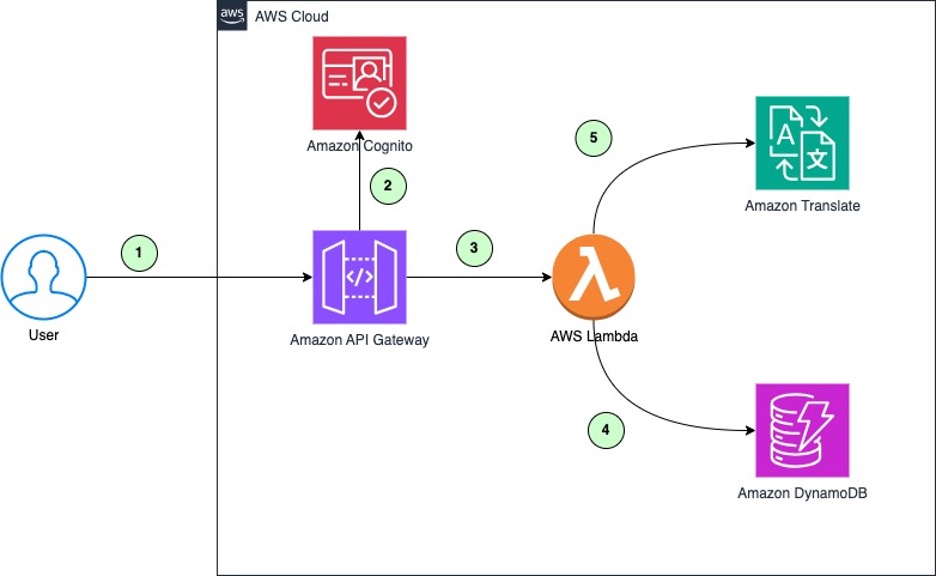
- When a new translation is needed, the user or application makes a request to the translation rest API.
- Amazon Cognito verifies the identity token in the request to grant access to the translation rest API.
- When new content comes in for translation, the Amazon API Gateway invokes the Lambda function that checks the Amazon DynamoDB table for an existing translation.
- If a match is found, the translation is retrieved from DynamoDB.
- If no match is found, the content is sent to Amazon Translate to perform a custom translation using parallel data. The translated content is then stored in DynamoDB along with a new entry for hit rate percentage.
These high-value translations are periodically post-edited by human translators and then added as parallel data for machine translation. This improves the quality of future translations performed by Amazon Translate.
We will use a simple schema in DynamoDB to store the cache entries. Each item will contain the following attributes:
src_text:The original source texttarget_locale:The target language to translate totranslated_text:The translated textsrc_locale:The original source languagehash:The primary key of the table
The primary key will be constructed from the src_locale, target_locale, and src_text to uniquely identify cache entries. When retrieving translations, items will be looked up by their primary key.
Prerequisites
To deploy the solution, you need
- An AWS account. If you don’t already have an AWS account, you can create one.
- Your access to the AWS account must have AWS Identity and Access Management (IAM) permissions to launch AWS CloudFormation templates that create IAM roles.
- Install AWS CLI.
- Install jq tool.
- AWS Cloud Development Kit (AWS CDK). See Getting started with the AWS CDK.
- Postman installed and configured on your computer.
Deploy the solution with AWS CDK
We will use AWS CDK to deploy the DynamoDB table for caching translations. CDK allows defining the infrastructure through a familiar programming language such as Python.
- Clone the repo from GitHub.
- Run the
requirements.txt, to install python dependencies. - Open
app.pyfile and replace the AWS account number and AWS Region with yours. - To verify that the AWS CDK is bootstrapped, run
cdk bootstrapfrom the root of the repository:
- Define your CDK stack to add DynamoDB and Lambda resources. The DynamoDB and Lambda Functions are defined as follows:
-
- This creates a DynamoDB table with the primary key as hash, because the
TRANSLATION_CACHEtable is schemaless, you don’t have to define other attributes in advance. This also creates a Lambda function with Python as the runtime.
- This creates a DynamoDB table with the primary key as hash, because the
-
- The Lambda function is defined such that it:
- Parses the request body JSON into a Python dictionary.
- Extracts the source locale, target locale, and input text from the request.
- Gets the DynamoDB table name to use for a translation cache from environment variables.
- Calls
generate_translations_with_cache()to translate the text, passing the locales, text, and DynamoDB table name. - Returns a 200 response with the translations and processing time in the body.
- The Lambda function is defined such that it:
-
- The
generate_translations_with_cachefunction divides the input text into separate sentences by splitting on a period (“.”) symbol. It stores each sentence as a separate entry in the DynamoDB table along with its translation. This segmentation into sentences is done so that cached translations can be reused for repeating sentences. - In summary, it’s a Lambda function that accepts a translation request, translates the text using a cache, and returns the result with timing information. It uses DynamoDB to cache translations for better performance.
- The
- You can deploy the stack by changing the working directory to the root of the repository and running the following command.
Considerations
Here are some additional considerations when implementing translation caching:
- Eviction policy: An additional column can be defined indicating the cache expiration of the cache entry. The cache entry can then be evicted by defining a separate process.
- Cache sizing: Determine expected cache size and provision DynamoDB throughput accordingly. Start with on-demand capacity if usage is unpredictable.
- Cost optimization: Balance caching costs with savings from reducing Amazon Translate usage. Use a short DynamoDB Time-to-Live (TTL) and limit the cache size to minimize overhead.
- Sensitive Information: DynamoDB encrypts all data at rest by default, if cached translations contain sensitive data, you can grant access to authorized users only. You can also choose to not cache data that contains sensitive information.
Customizing translations with parallel data
The translations generated in the translations table can be human-reviewed and used as parallel data to customize the translations. Parallel data consists of examples that show how you want segments of text to be translated. It includes a collection of textual examples in a source language; for each example, it contains the desired translation output in one or more target languages.
This is a great approach for most use cases, but some outliers might require light post-editing by human teams. The post-editing process can help you better understand the needs of your customers by capturing the nuances of local language that can be lost in translation. For businesses and organizations that want to augment the output of Amazon Translate (and other Amazon artificial intelligence (AI) services) with human intelligence, Amazon Augmented AI (Amazon A2I) provides a managed approach to do so, see Designing human review workflows with Amazon Translate and Amazon Augmented AI for more information.
When you add parallel data to a batch translation job, you create an Active Custom Translation job. When you run these jobs, Amazon Translate uses your parallel data at runtime to produce customized machine translation output. It adapts the translation to reflect the style, tone, and word choices that it finds in your parallel data. With parallel data, you can tailor your translations for terms or phrases that are unique to a specific domain, such as life sciences, law, or finance. For more information, see Customizing your translations with parallel data.
Testing the caching setup
Here is a video walkthrough of testing the solution.
There are multiple ways to test the caching setup. For this example, you will use Postman to test by sending requests. Because the Rest API is protected by an Amazon Cognito authorizer, you will need to configure Postman to send an authorization token with the API request.
As part of the AWS CDK deployment in the previous step, a Cognito user pool is created with an app client integration. On your AWS CloudFormation console, you can find BaseURL, translateCacheEndpoint, UserPoolID, and ClientID on the CDK stack output section. Copy these into a text editor for use later.
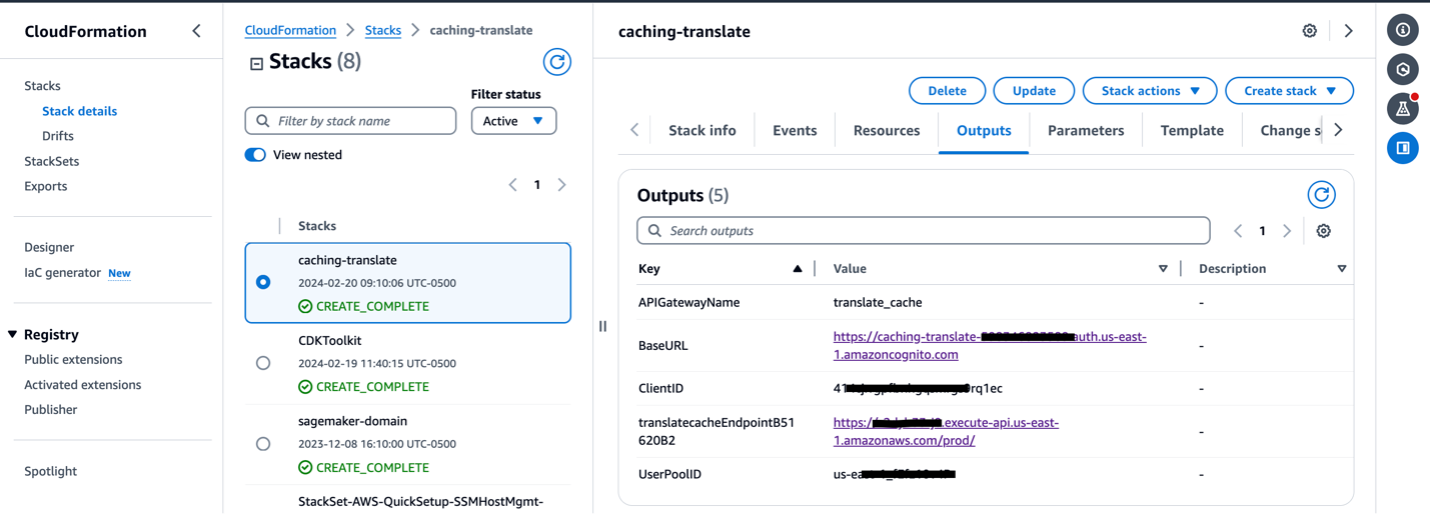
To generate an authorization token from Cognito, the next step is to create a user in the Cognito user pool.
- Go to the Amazon Cognito console. Select the user pool that was created by the AWS CDK stack.
- Select the Users tab and choose Create User.
- Enter the following values and choose Create User.
- On Invitation Message verify that Don’t send an invitation is selected.
- For Email address, enter
test@test.com. - On Temporary password, verify that Set a password is selected.
- In Password enter
testUser123!.
- Now that the user is created, you will use AWS Command Line Interface (CLI) to simulate a sign in for the user. Go to the AWS CloudShell console.
- Enter the following commands on the CloudShell terminal by replacing
UserPoolIDandClientIDfrom the CloudFormation output of the AWS CDK stack.
Now that you have an authorization token to pass with the API request to your rest API. Go to the Postman website. Sign in to the Postman website or download the Postman desktop client and create a Workspace with the name dev.
- Select the workspace dev and choose on New request.
- Change the method type to POST from GET.
- Paste the
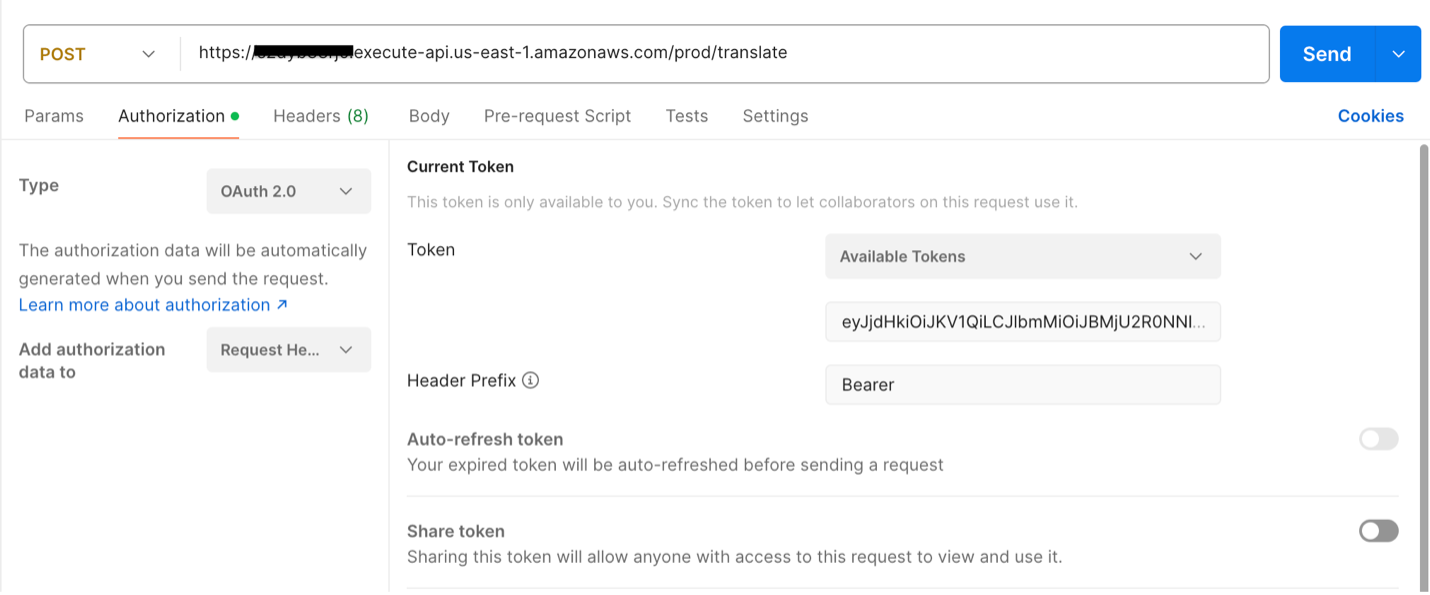
<TranslateCacheEndpoint>URL from the CloudFormation output of the AWS CDK stack into the request URL textbox. Append the API path/translateto the URL, as shown in the following figure.

Now set up authorization configuration on Postman so that requests to the translate API are authorized by the Amazon Cognito user pool.
- Select the Authorization tab below the request URL in Postman. Select OAuth2.0 as the Type.
- Under Current Token, copy and paste Your IdToken from earlier into the Token field.
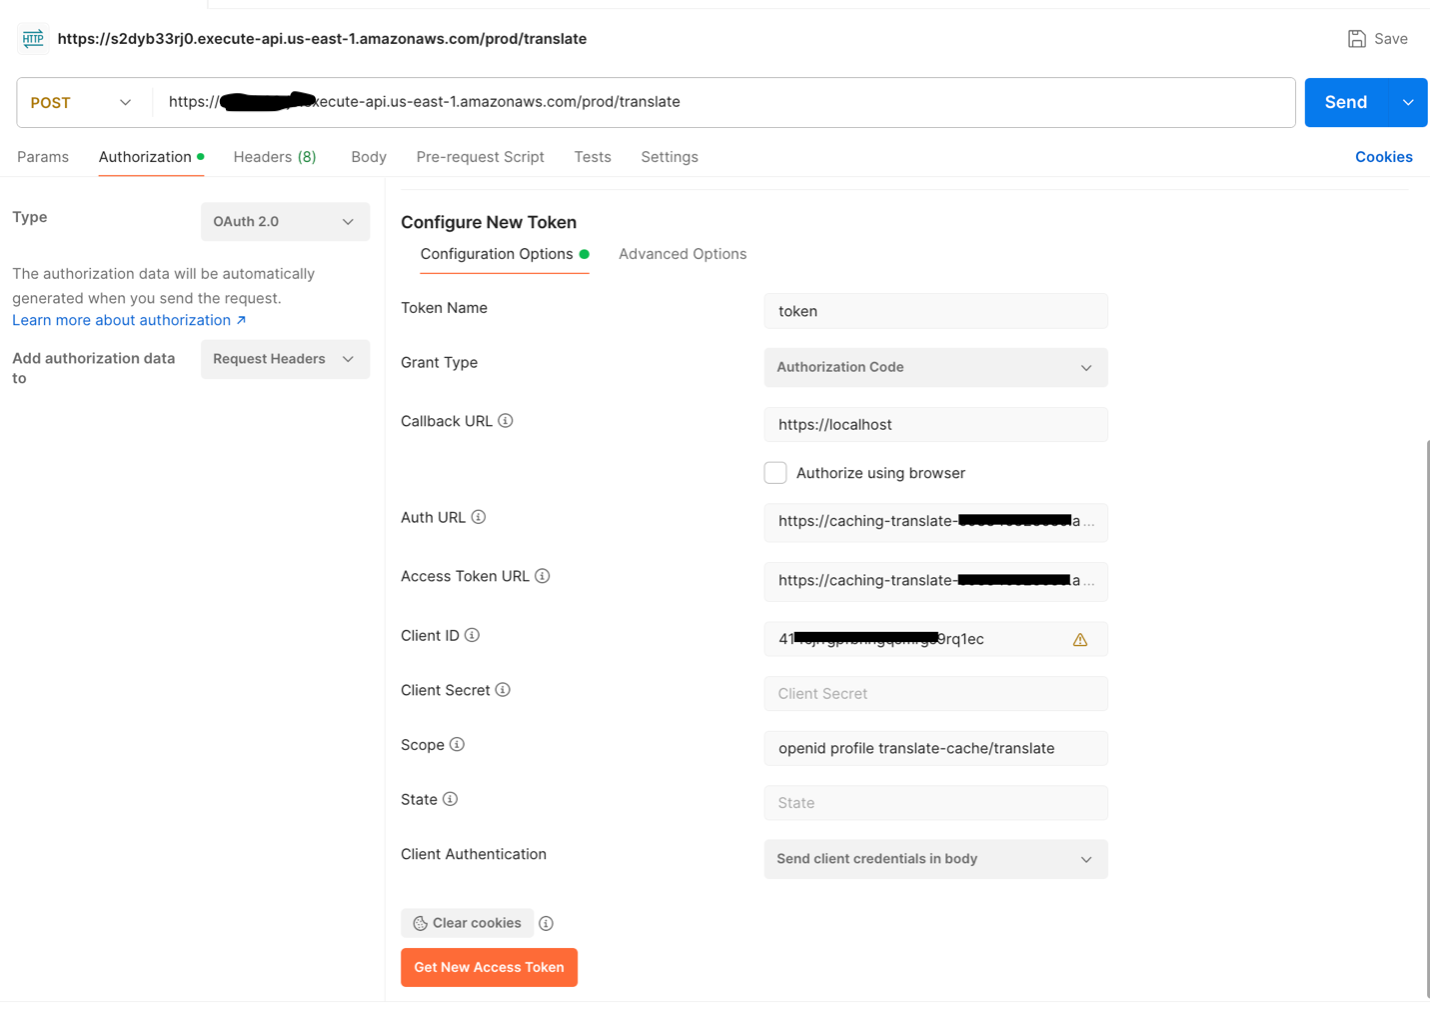
- Select Configure New Token. Under Configuration Options add or select the values that follow. Copy the BaseURL and ClientID from the CloudFormation output of the AWS CDK stack. Leave the remaining fields at the default values.
-
- Token Name: token
- Grant Type: Select Authorization Code
- Callback URL: Enter
https://localhost - Auth URL: Enter
<BaseURL>/oauth2/authorize - Access Token URL: Enter
<BaseURL>/oauth2/token - ClientID: Enter
<ClientID> - Scope: Enter
openid profile translate-cache/translate - Client Authorization: Select Send client credentials in body.
- Click Get New Access Token. You will be directed to another page to sign in as a user. Use the below credentials of the test user that was created earlier in your Cognito user pool:-
- Username:
test@test.com - Password:
testUser456!
- Username:
- After authenticating, you will now get a new id_token. Copy the new id_token and go back to Postman authorization tab to replace that with the token value under Current Token.
- Now, on the Postman request URL and Select the Body tab for Request. Select the raw . Change Body type to JSON and insert the following JSON content. When done, choose Send.
First translation request to the API
The first request to the API takes more time, because the Lambda function checks the given input text against the DynamoDB database on the initial request. Because this is the first request, it won’t find the input text in the table and will call Amazon Translate to translate the provided text.
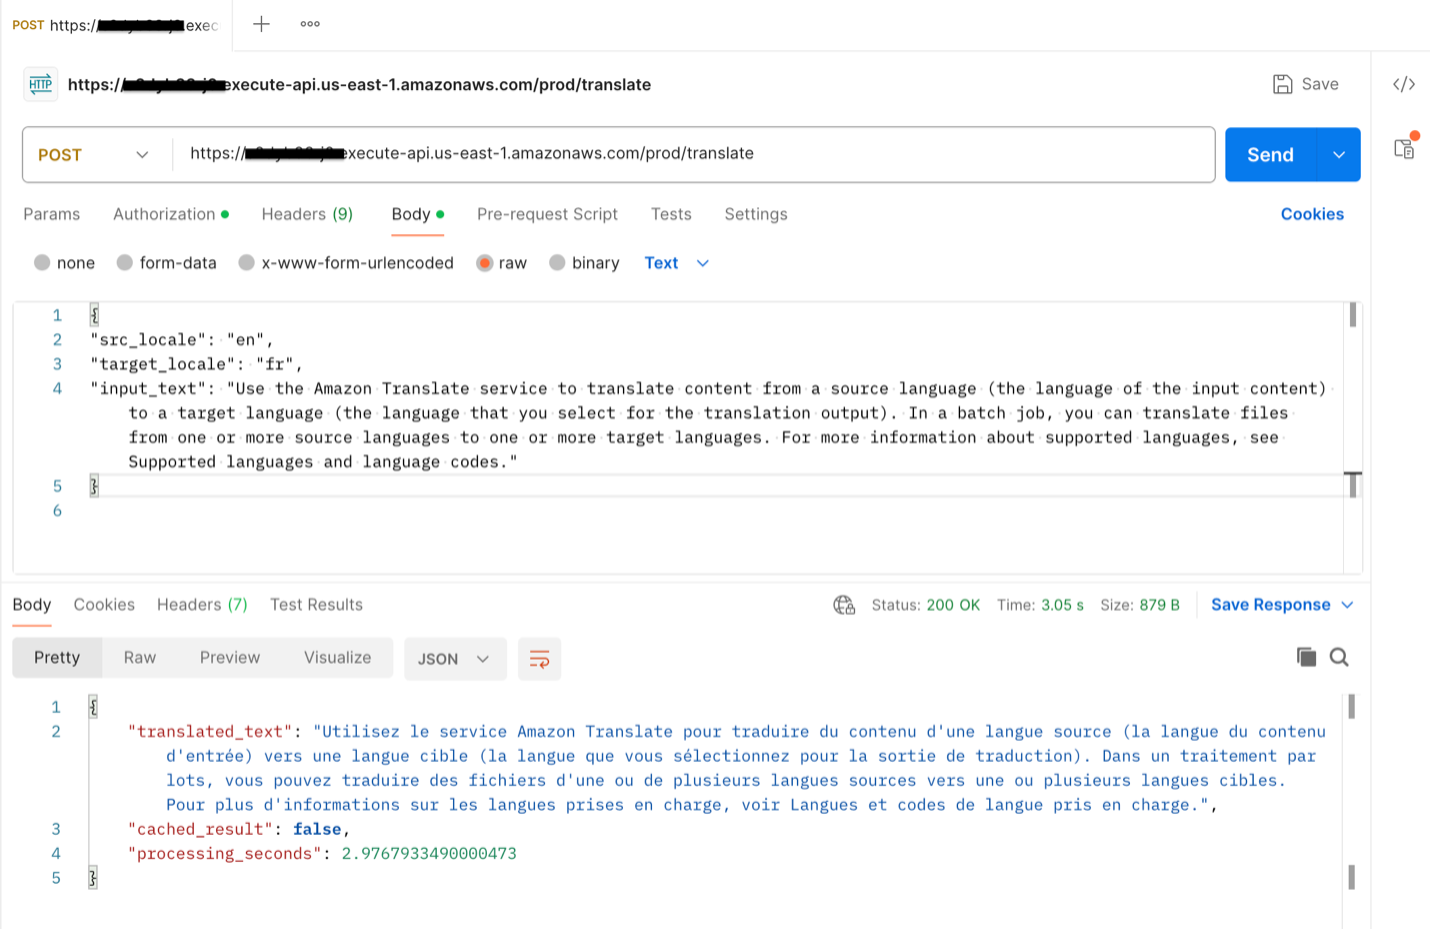
Examining the processing_seconds value reveals that this initial request took approximately 2.97 seconds to complete.
Subsequent translations requests to the API
After the first request, the input text and translated output are now stored in the DynamoDB table. On subsequent requests with the same input text, the Lambda function will first check DynamoDB for a cache hit. Because the table now contains the input text from the first request, the Lambda function will find it there and retrieve the translation from DynamoDB instead of calling Amazon Translate again.
Storing requests in a cache allows subsequent requests for the same translation to skip the Amazon Translate call, which is usually the most time-consuming part of the process. Retrieving the translation from DynamoDB is much faster than calling Amazon Translate to translate the text each time.
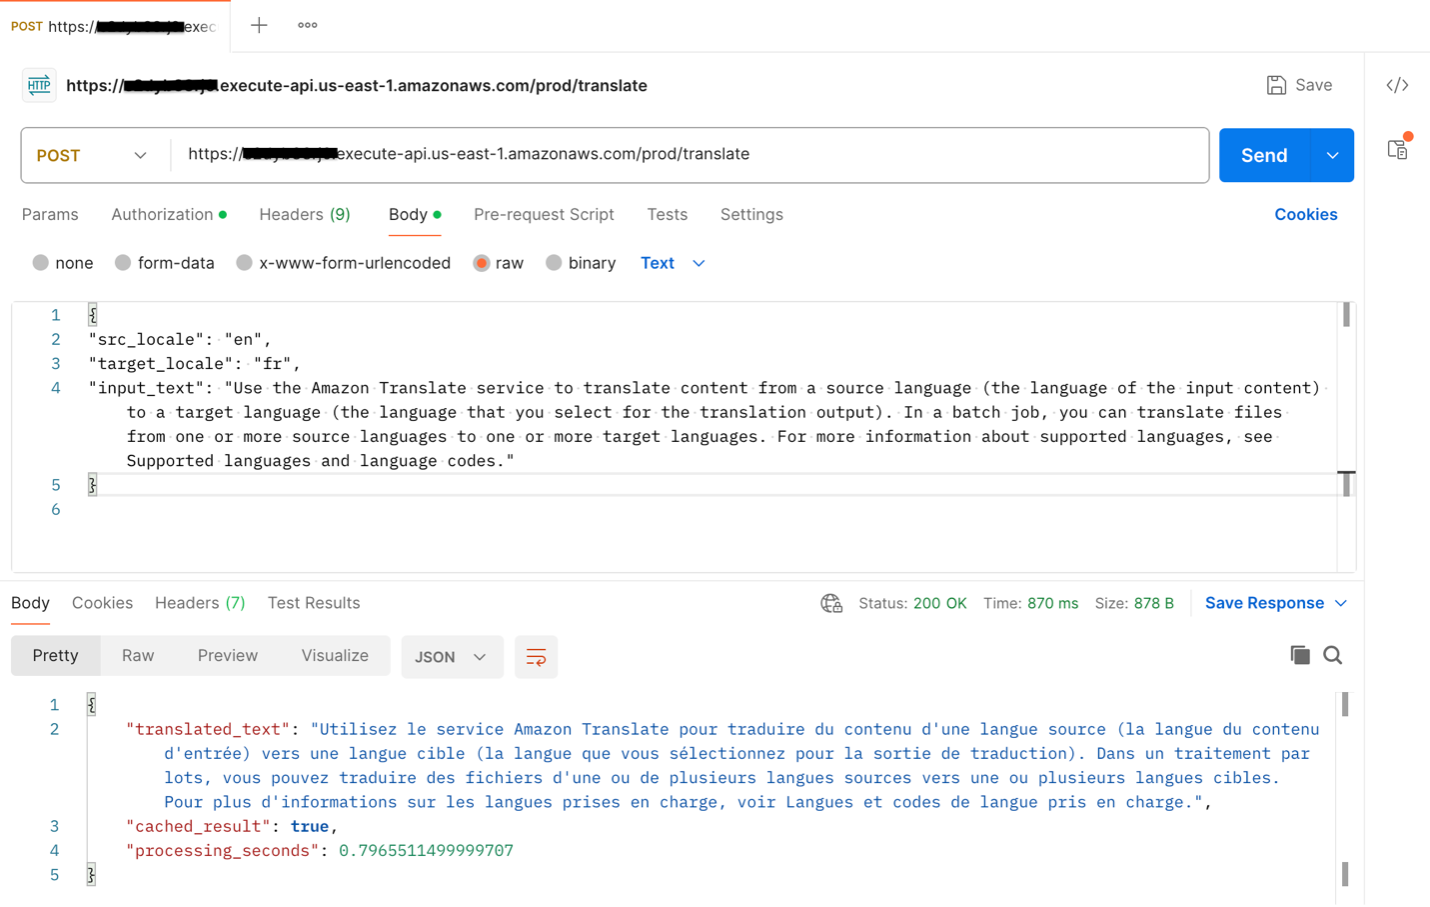
The second request has a processing time of approximately 0.79 seconds, about 3 times faster than the first request which took 2.97 seconds to complete.
Cache purge
Amazon Translate continuously improves its translation models over time. To benefit from these improvements, you need to periodically purge translations from your DynamoDB cache and fetch fresh translations from Amazon Translate.
DynamoDB provides a Time-to-Live (TTL) feature that can automatically delete items after a specified expiry timestamp. You can use this capability to implement cache purging. When a translation is stored in DynamoDB, a purge_date attribute set to 30 days in the future is added. DynamoDB will automatically delete items shortly after the purge_date timestamp is reached. This ensures cached translations older than 30 days are removed from the table. When these expired entries are accessed again, a cache miss occurs and Amazon Translate is called to retrieve an updated translation.
The TTL-based cache expiration allows you to efficiently purge older translations on an ongoing basis. This ensures your applications can benefit from the continuous improvements to the machine learning models used by Amazon Translate while minimizing costs by still using caching for repeated translations within a 30-day period.
Clean up
When deleting a stack, most resources will be deleted upon stack deletion, however that’s not the case for all resources. The DynamoDB table will be retained by default. If you don’t want to retain this table, you can set this in the AWS CDK code by using RemovalPolicy.
Additionally, the Lambda function will generate Amazon CloudWatch logs that are permanently retained. These won’t be tracked by CloudFormation because they’re not part of the stack, so the logs will persist. Use the Cloudwatch console to manually delete any logs that you don’t want to retain.
You can either delete the stack through the CloudFormation console or use AWS CDK destroy from the root folder.
Conclusion
The solution outlined in this post provides an effective way to implement a caching layer for Amazon Translate to improve translation performance and reduce costs. Using a cache-aside pattern with DynamoDB allows frequently accessed translations to be served from the cache instead of calling Amazon Translate each time.
The caching architecture is scalable, secure, and cost-optimized. Additional enhancements such as setting TTLs, adding eviction policies, and encrypting cache entries can further customize the architecture to your specific use case.
Translations stored in the cache can also be post-edited and used as parallel data to train Amazon Translate. This creates a feedback loop that continuously improves translation quality over time.
By implementing a caching layer, enterprises can deliver fast, high-quality translations tailored to their business needs at reduced costs. Caching provides a way to scale Amazon Translate efficiently while optimizing performance and cost.
Additional resources
About the authors
 Praneeth Reddy Tekula is a Senior Solutions Architect focusing on EdTech at AWS. He provides architectural guidance and best practices to customers in building resilient, secure and scalable systems on AWS. He is passionate about observability and has a strong networking background.
 Reagan Rosario is a Solutions Architect at AWS, specializing in building scalable, highly available, and secure cloud solutions for education technology companies. With over 10 years of experience in software engineering and architecture roles, Reagan loves using his technical knowledge to help AWS customers architect robust cloud solutions that leverage the breadth and depth of AWS.
- SEO Powered Content & PR Distribution. Get Amplified Today.
- PlatoData.Network Vertical Generative Ai. Empower Yourself. Access Here.
- PlatoAiStream. Web3 Intelligence. Knowledge Amplified. Access Here.
- PlatoESG. Carbon, CleanTech, Energy, Environment, Solar, Waste Management. Access Here.
- PlatoHealth. Biotech and Clinical Trials Intelligence. Access Here.
- Source: https://aws.amazon.com/blogs/machine-learning/maximize-your-amazon-translate-architecture-using-strategic-caching-layers/


