Introduction
In today’s fast-paced world, customer service is a crucial aspect of any business. A Zendesk Answer Bot, powered by Large Language Models (LLMs) like GPT-4, can significantly enhance the efficiency and quality of customer support by automating responses. This blog post will guide you through building and deploying your own Zendesk Auto Responder using LLMs and implementing RAG-based workflows in GenAI to streamline the process.

What are RAG based workflows in GenAI
RAG (Retrieval Augmented Generation) based workflows in GenAI (Generative AI) combine the benefits of retrieval and generation to enhance the AI system’s capabilities, particularly in handling real-world, domain-specific data. In simple terms, RAG enables the AI to pull in relevant information from a database or other sources to support the generation of more accurate and informed responses. This is particularly beneficial in business settings where accuracy and context are critical.
What are the components in an RAG based workflow
- Knowledge base: The knowledge base is a centralized repository of information that the system refers to when answering queries. It can include FAQs, manuals, and other relevant documents.
- Trigger/Query: This component is responsible for initiating the workflow. It is usually a customer’s question or request that needs a response or action.
- Task/Action: Based on the analysis of the trigger/query, the system performs a specific task or action, such as generating a response or performing a backend operation.
Few examples of RAG based workflows
- Customer Interaction Workflow in Banking:
- Chatbots powered by GenAI and RAG can significantly improve engagement rates in the banking industry by personalizing interactions.
- Through RAG, the chatbots can retrieve and utilize relevant information from a database to generate personalized responses to customer inquiries.
- For instance, during a chat session, a RAG-based GenAI system could pull in the customer’s transaction history or account information from a database to provide more informed and personalized responses.
- This workflow not only enhances customer satisfaction but also potentially increases the retention rate by providing a more personalized and informative interaction experience.
- Email Campaigns Workflow:
- In marketing and sales, creating targeted campaigns is crucial.
- RAG can be employed to pull in the latest product information, customer feedback, or market trends from external sources to help generate more informed and effective marketing / sales material.
- For example, when crafting an email campaign, a RAG-based workflow could retrieve recent positive reviews or new product features to include in the campaign content, thus potentially improving engagement rates and sales outcomes.
- Automated Code Documentation and Modification Workflow:
- Initially, a RAG system can pull existing code documentation, codebase, and coding standards from the project repository.
- When a developer needs to add a new feature, RAG can generate a code snippet following the project’s coding standards by referencing the retrieved information.
- If a modification is needed in the code, the RAG system can propose changes by analyzing the existing code and documentation, ensuring consistency and adherence to coding standards.
- Post code modification or addition, RAG can automatically update the code documentation to reflect the changes, pulling in necessary information from the codebase and existing documentation.
How to download and index all Zendesk tickets for retrieval
Let us now get started with the tutorial. We will build a bot to answer incoming Zendesk tickets while using a custom database of past Zendesk tickets and responses to generate the answer with the help of LLMs.
- Access Zendesk API: Use Zendesk API to access and download all the tickets. Ensure you have the necessary permissions and API keys to access the data.
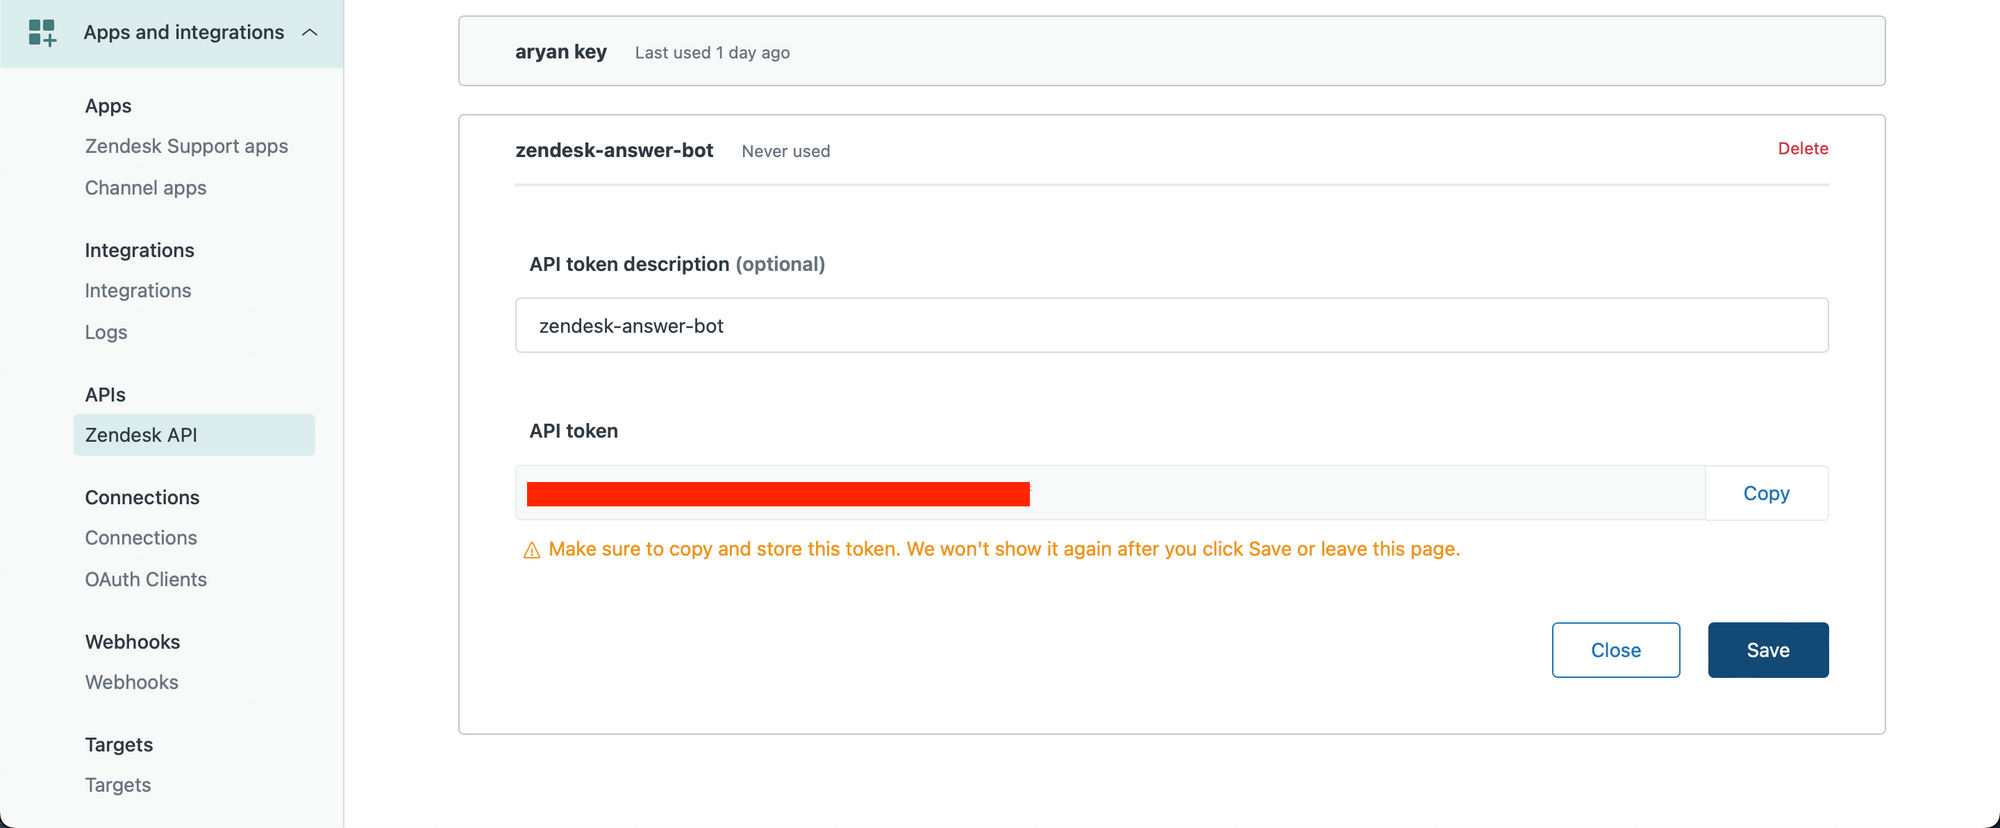
We first create our Zendesk API key. Make sure you are an Admin user and visit the following link to create your API key – https://YOUR_SUBDOMAIN.zendesk.com/admin/apps-integrations/apis/zendesk-api/settings/tokens
Create an API key and copy it to your clipboard.
Let us now get started in a python notebook.
We input our Zendesk credentials, including the API key we just obtained.
subdomain = YOUR_SUBDOMAIN
username = ZENDESK_USERNAME
password = ZENDESK_API_KEY
username = '{}/token'.format(username)
We now retrieve ticket data. In the below code, we have retrieved queries and replies from each ticket, and are storing each set [query, array of replies] representing a ticket into an array called ticketdata.
We are only fetching the latest 1000 tickets. You can modify this as required.
import requests ticketdata = []
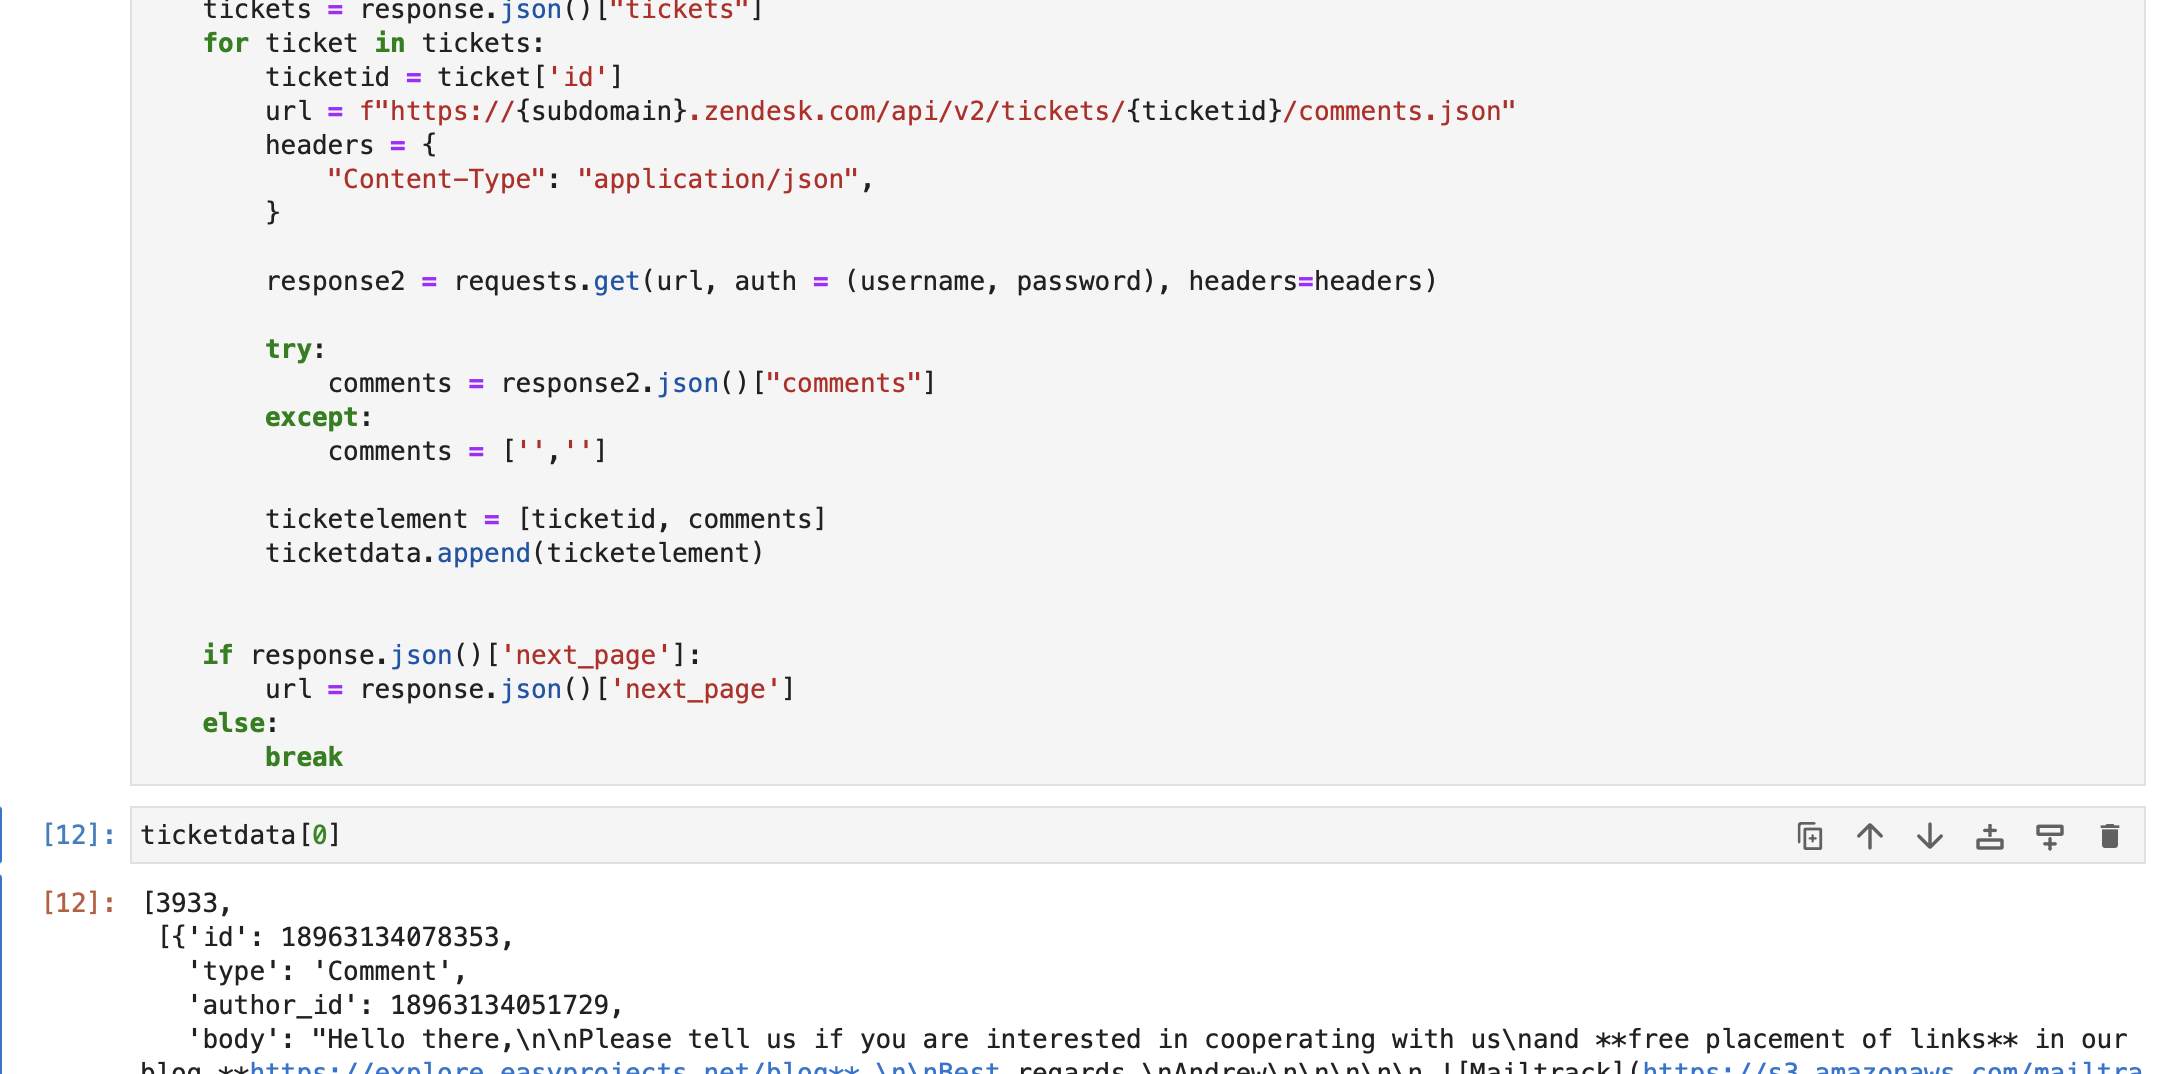
url = f"https://{subdomain}.zendesk.com/api/v2/tickets.json" params = {"sort_by": "created_at", "sort_order": "desc"} headers = {"Content-Type": "application/json"} tickettext = "" while len(ticketdata) <= 1000: response = requests.get( url, auth=(username, password), params=params, headers=headers ) tickets = response.json()["tickets"] for ticket in tickets: ticketid = ticket["id"] url = f"https://{subdomain}.zendesk.com/api/v2/tickets/{ticketid}/comments.json" headers = { "Content-Type": "application/json", } response2 = requests.get(url, auth=(username, password), headers=headers) try: comments = response2.json()["comments"] except: comments = ["", ""] ticketelement = [ticketid, comments] ticketdata.append(ticketelement) if response.json()["next_page"]: url = response.json()["next_page"] else: breakAs you can see below, we have retrieved ticket data from the Zendesk db. Each element in ticketdata contains –
a. Ticket ID
b. All comments / replies in the ticket.
We then move on to create a text based string having the queries and first responses from all retrieved tickets, using the ticketdata array.
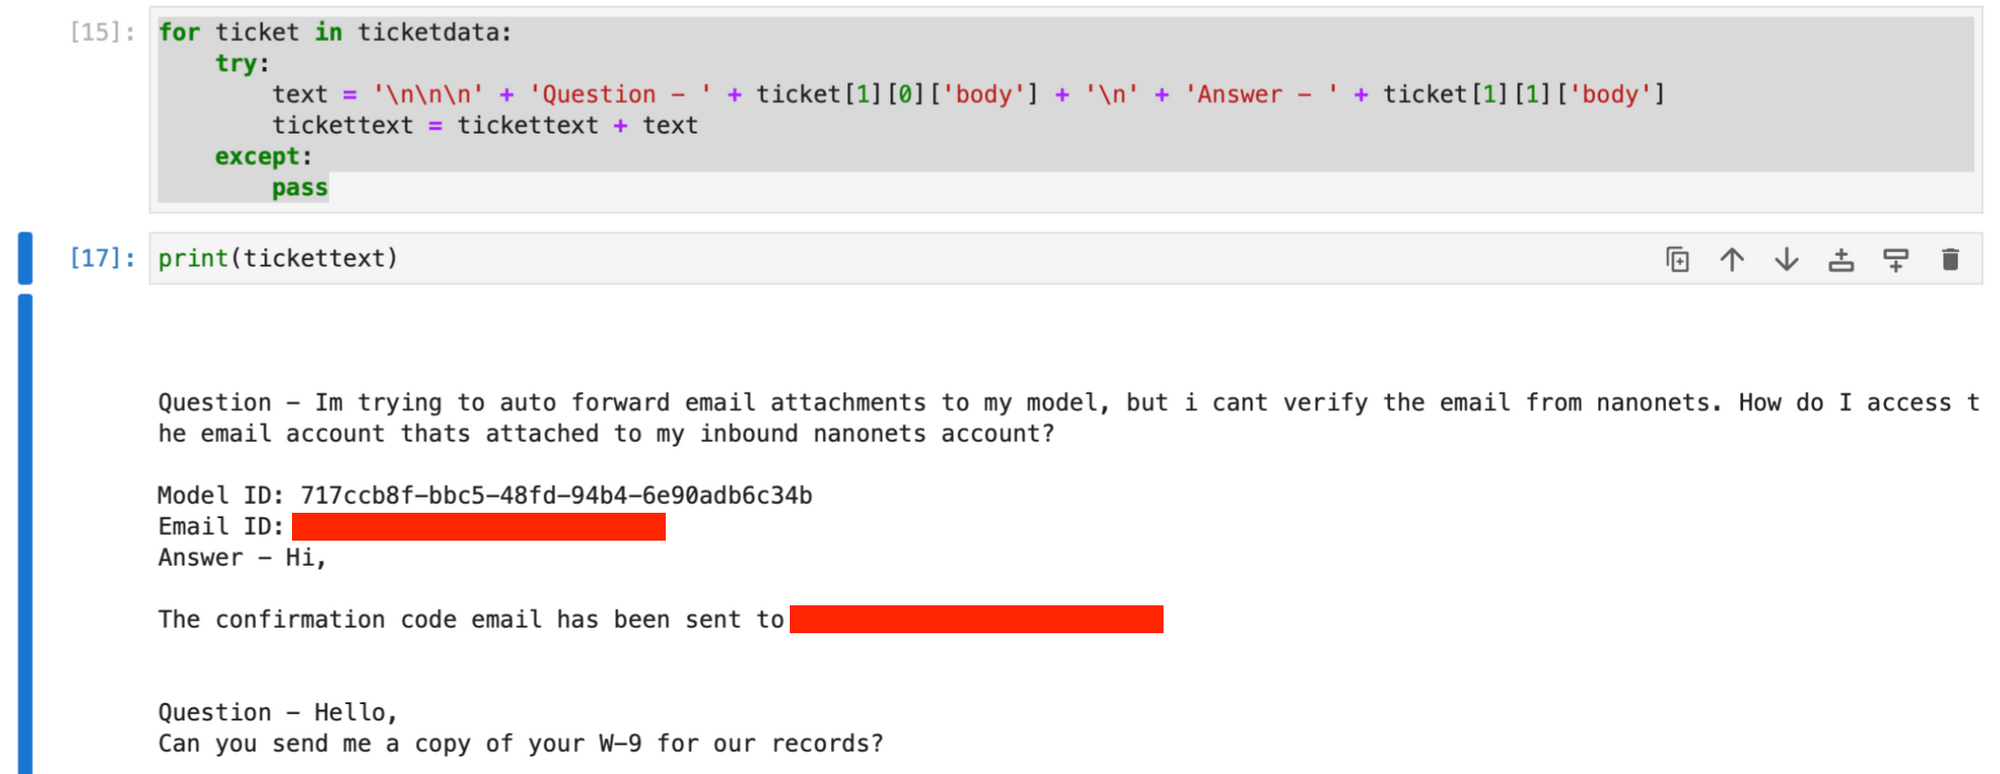
for ticket in ticketdata: try: text = ( "nnn" + "Question - " + ticket[1][0]["body"] + "n" + "Answer - " + ticket[1][1]["body"] ) tickettext = tickettext + text except: passThe tickettext string now contains all tickets and first responses, with each ticket’s data separated by newline characters.
Optional : You can also fetch data from your Zendesk Support articles to expand the knowledge base further, by running the below code.
import re def remove_tags(text): clean = re.compile("<.*?>") return re.sub(clean, "", text) articletext = ""
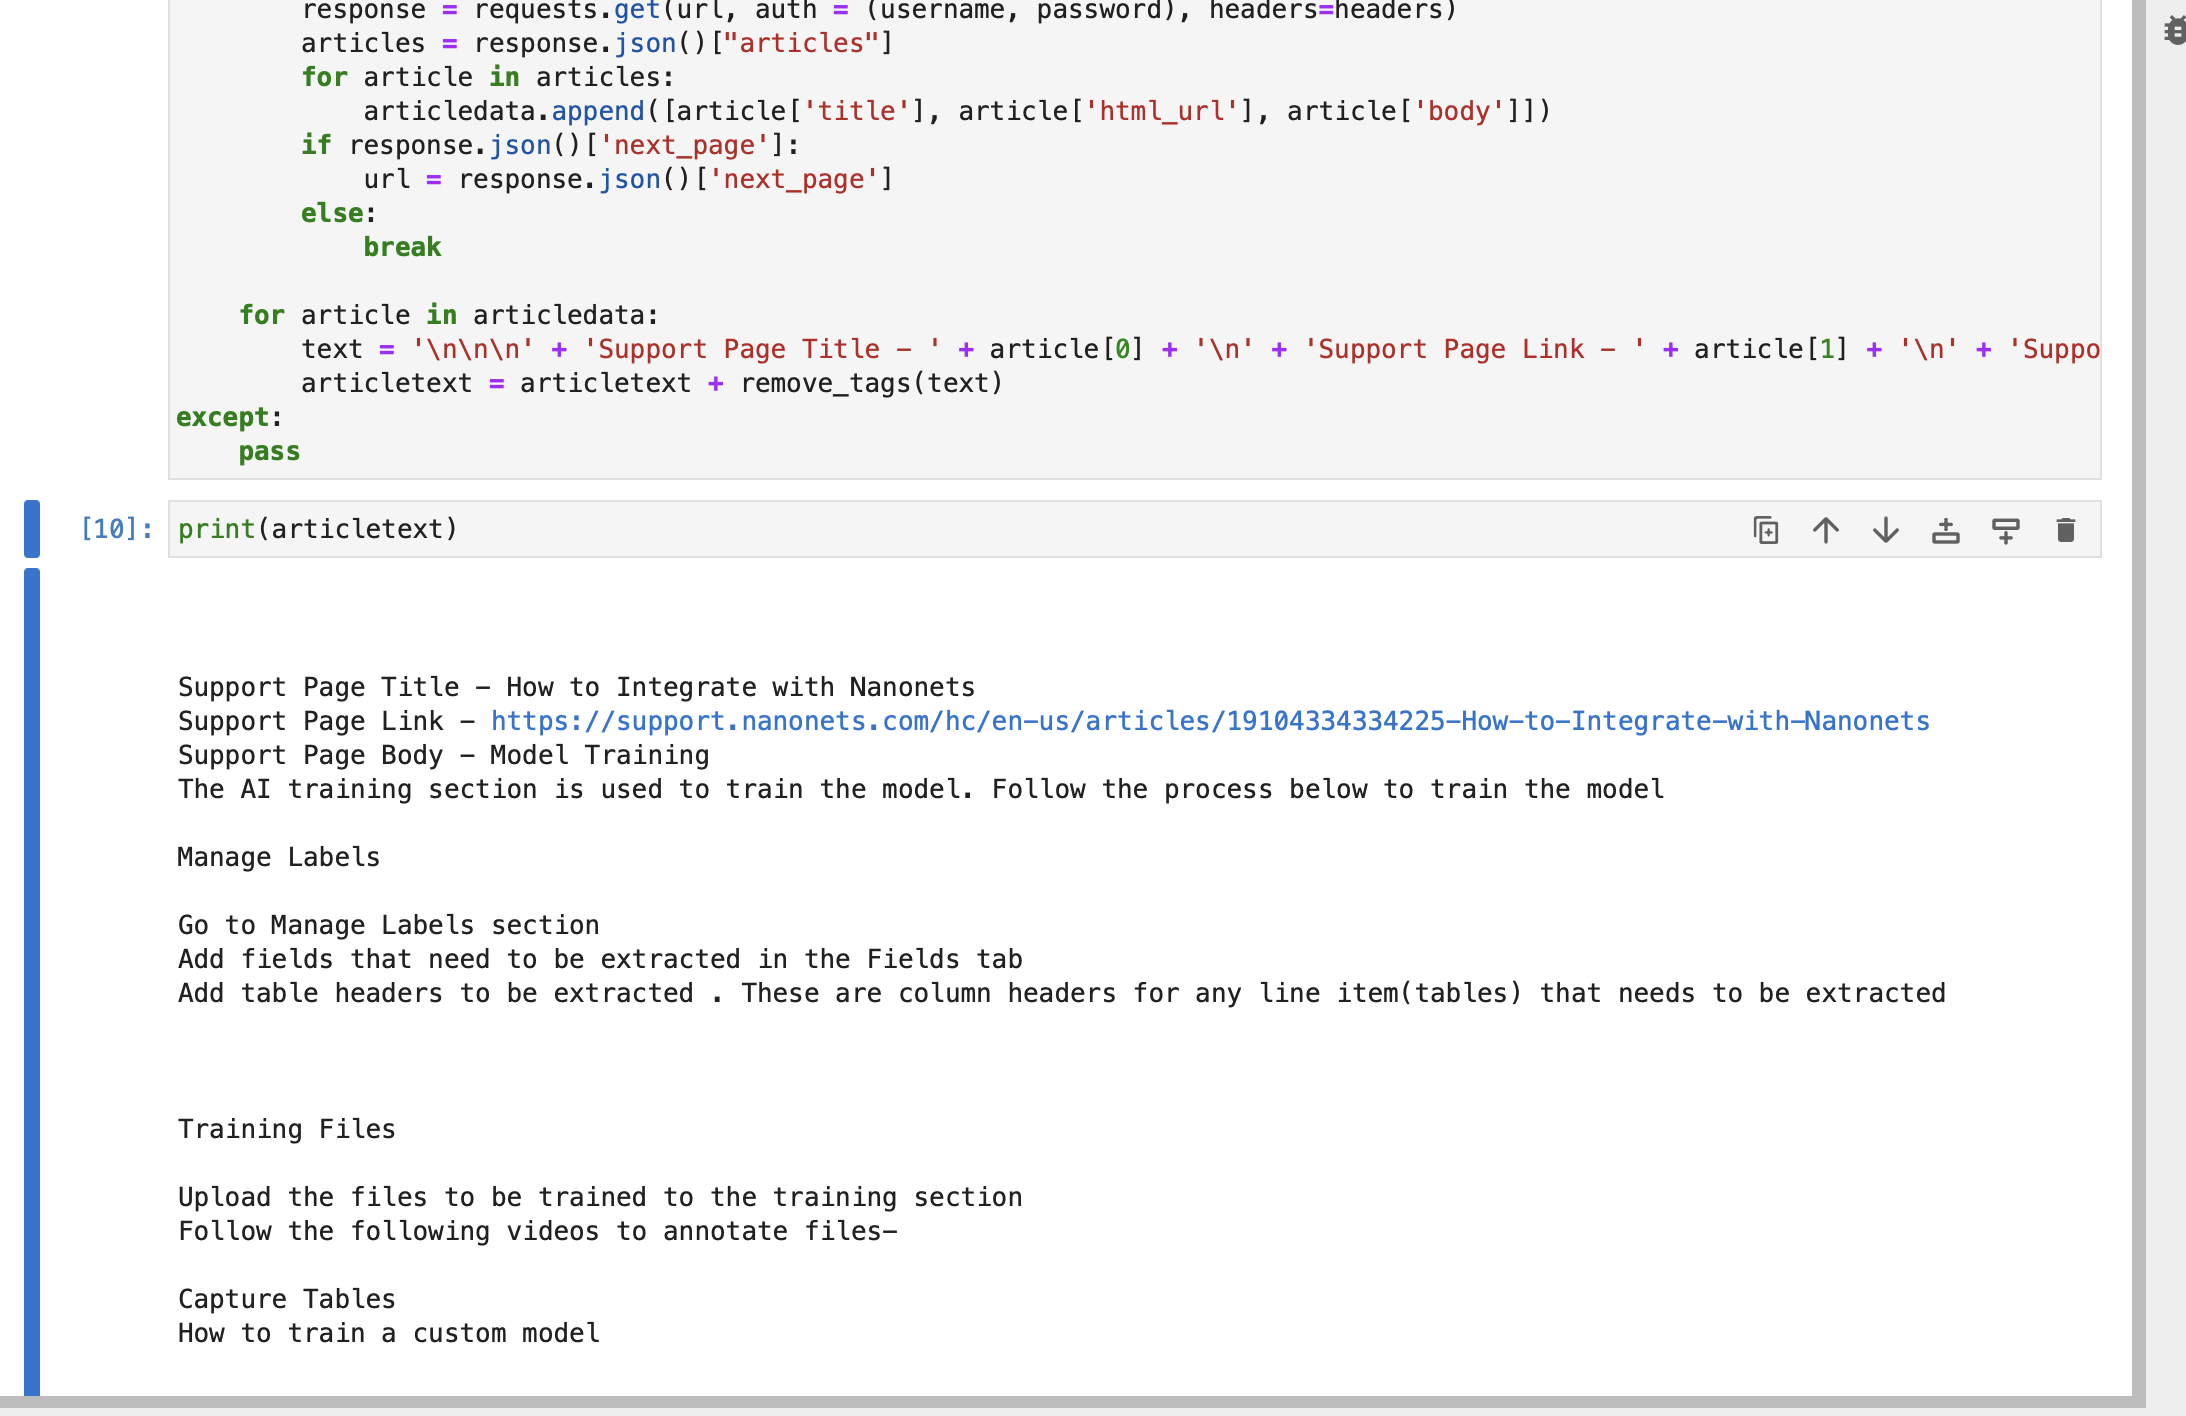
try: articledata = [] url = f"https://{subdomain}.zendesk.com/api/v2/help_center/en-us/articles.json" headers = {"Content-Type": "application/json"} while True: response = requests.get(url, auth=(username, password), headers=headers) articles = response.json()["articles"] for article in articles: articledata.append([article["title"], article["html_url"], article["body"]]) if response.json()["next_page"]: url = response.json()["next_page"] else: break for article in articledata: text = ( "nnn" + "Support Page Title - " + article[0] + "n" + "Support Page Link - " + article[1] + "n" + "Support Page Body - " + article[2] ) articletext = articletext + remove_tags(text)
except: passThe string articletext contains title, link and body of each article part of your Zendesk support pages.
Optional : You can connect your customer database or any other relevant database, and then use it while creating the index store.
Combine the fetched data.
knowledge = tickettext + "nnn" + articletext- Index Tickets: Once downloaded, index the tickets using a suitable indexing method to facilitate quick and efficient retrieval.
To do this, we first install the dependencies required for creating the vector store.
pip install langchain openai pypdf faiss-cpuCreate an index store using the fetched data. This will act as our knowledge base when we attempt to answer new tickets via GPT.
os.environ["OPENAI_API_KEY"] = "YOUR_OPENAI_API_KEY" from langchain.document_loaders import PyPDFLoader
from langchain.vectorstores import FAISS
from langchain.chat_models import ChatOpenAI
from langchain.embeddings.openai import OpenAIEmbeddings
from langchain.text_splitter import RecursiveCharacterTextSplitter
from langchain.chains import RetrievalQA, ConversationalRetrievalChain
from transformers import GPT2TokenizerFast
import os
import pandas as pd
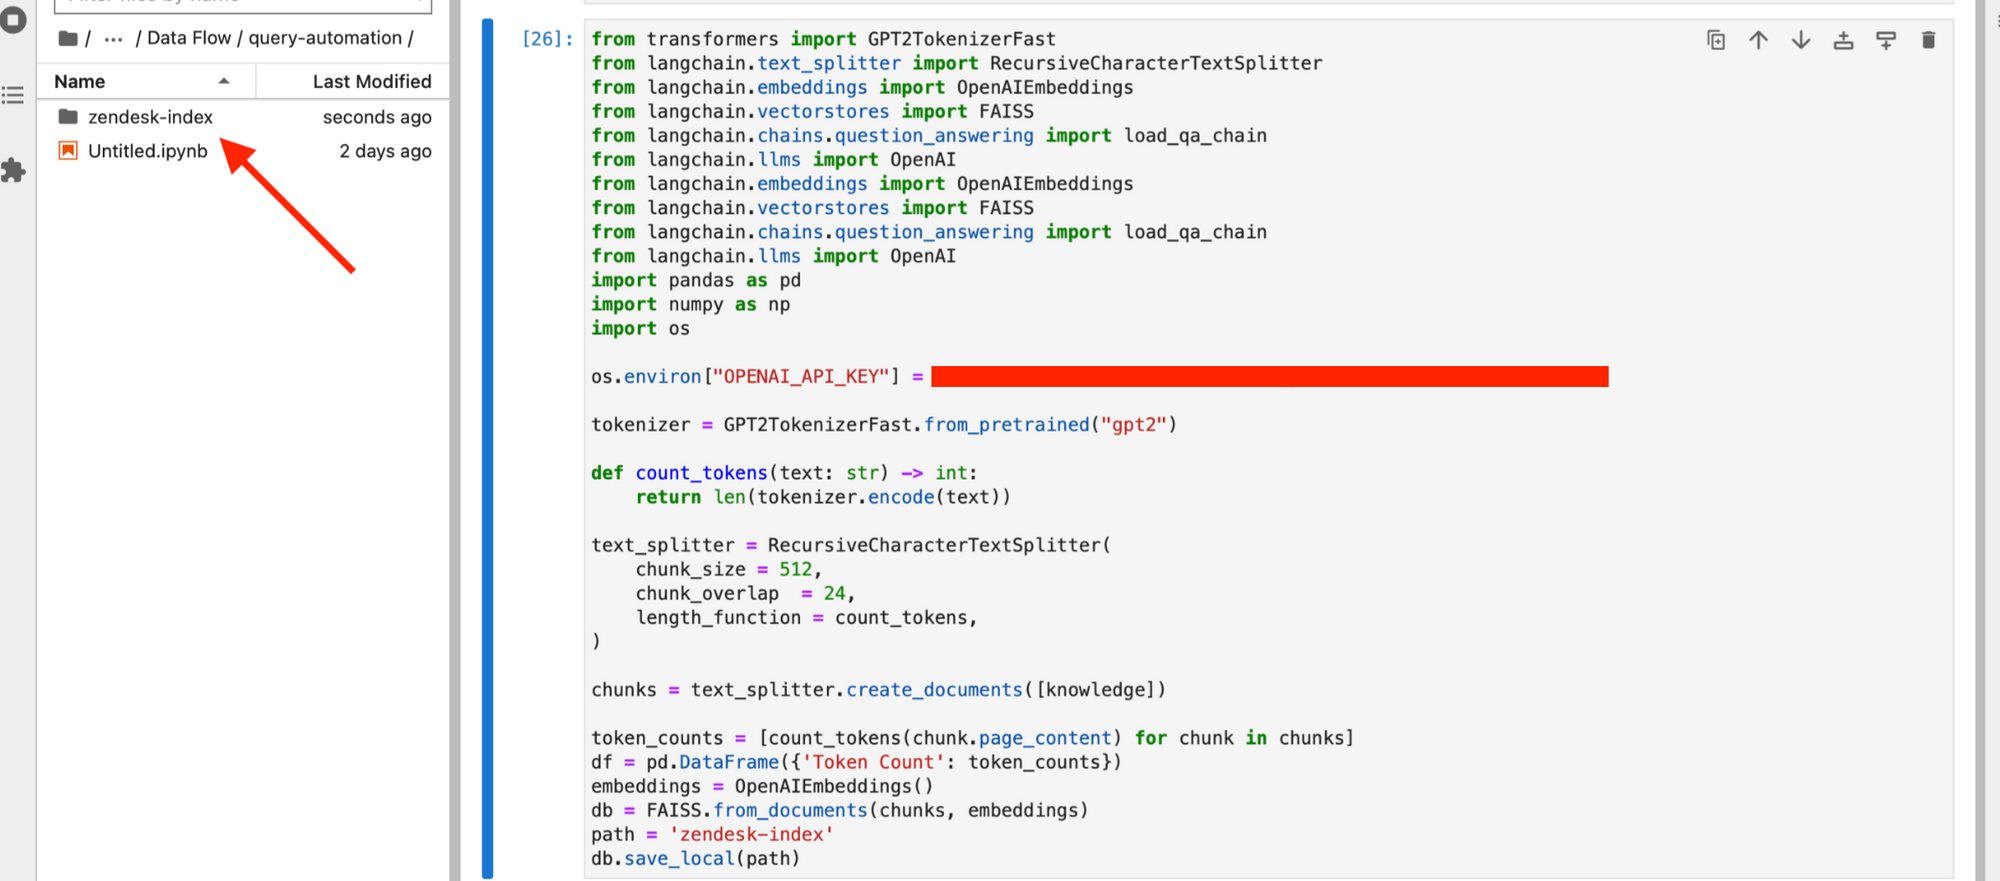
import numpy as np tokenizer = GPT2TokenizerFast.from_pretrained("gpt2") def count_tokens(text: str) -> int: return len(tokenizer.encode(text)) text_splitter = RecursiveCharacterTextSplitter( chunk_size=512, chunk_overlap=24, length_function=count_tokens,
) chunks = text_splitter.create_documents([knowledge]) token_counts = [count_tokens(chunk.page_content) for chunk in chunks]
df = pd.DataFrame({"Token Count": token_counts})
embeddings = OpenAIEmbeddings()
db = FAISS.from_documents(chunks, embeddings)
path = "zendesk-index"
db.save_local(path)
Your index gets saved on your local system.
- Update Index Regularly: Regularly update the index to include new tickets and modifications to existing ones, ensuring the system has access to the most current data.
We can schedule the above script to run every week, and update our ‘zendesk-index’ or any other desired frequency.
How to perform retrieval when a new ticket comes in
- Monitor for New Tickets: Set up a system to monitor Zendesk for new tickets continuously.
We will create a basic Flask API and host it. To get started,
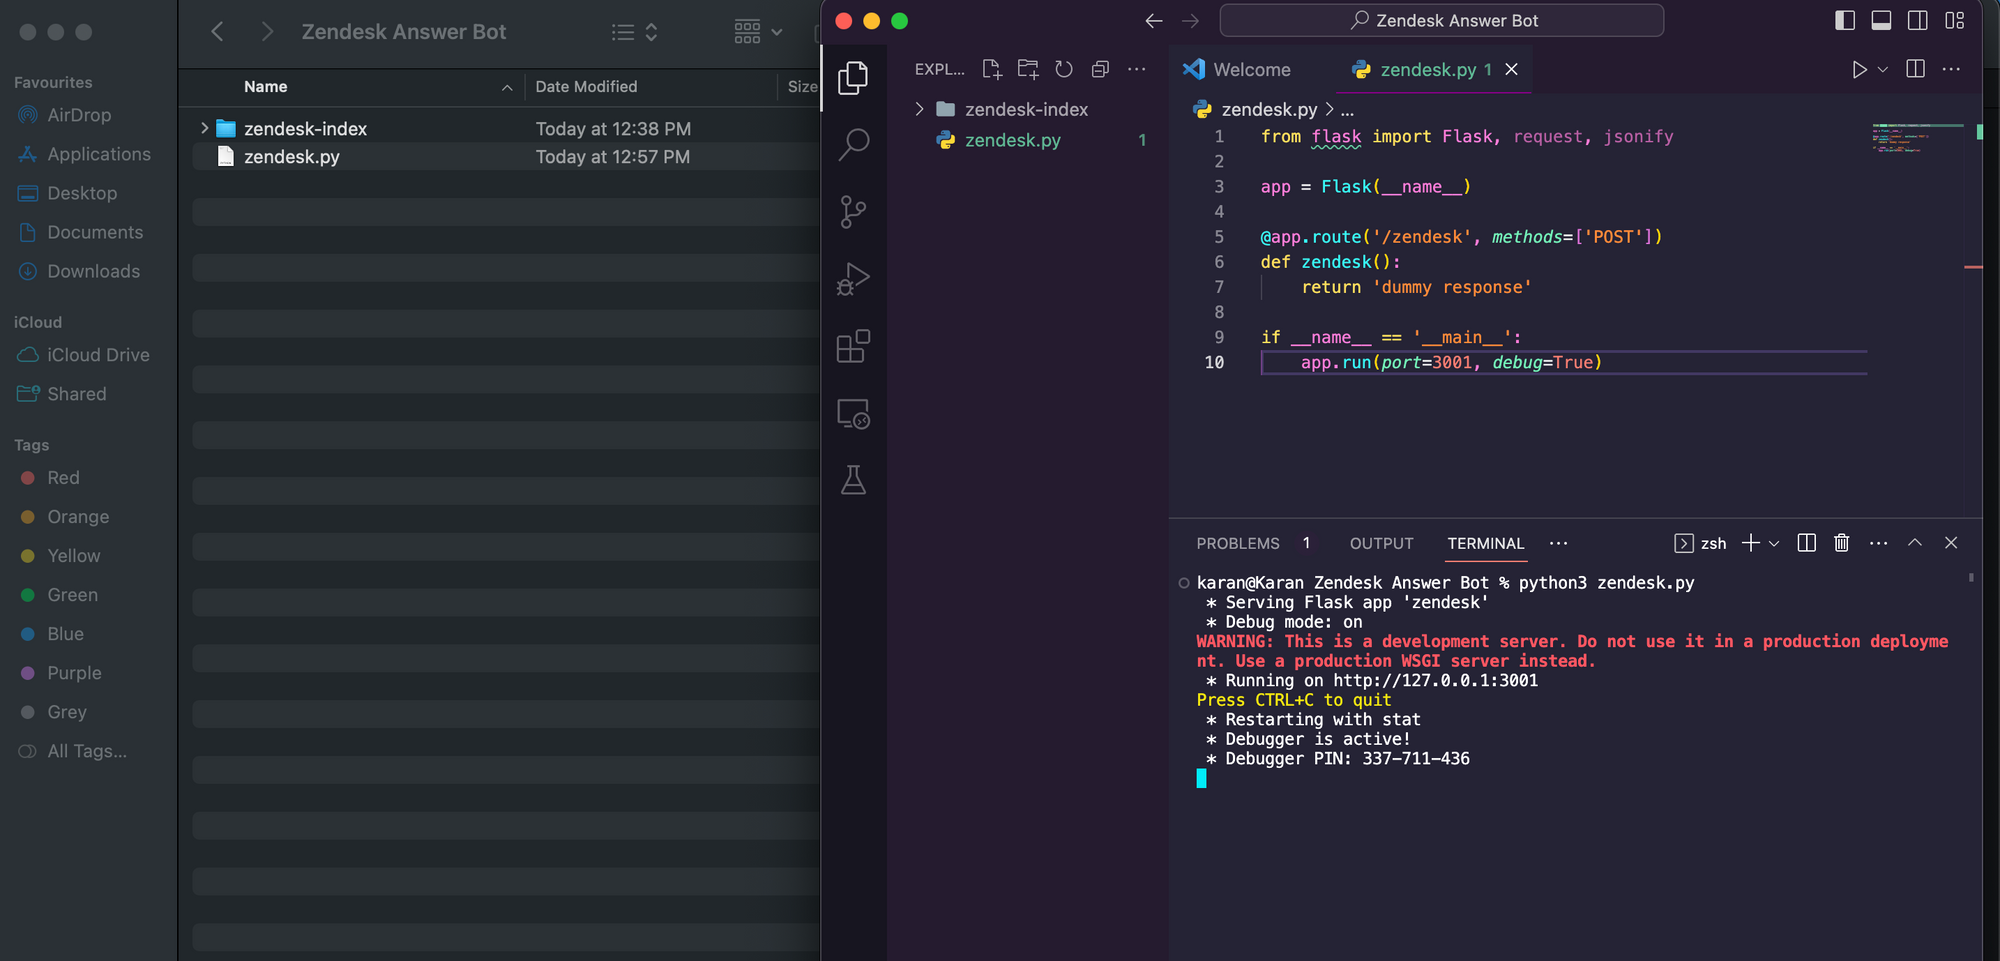
- Create a new folder called ‘Zendesk Answer Bot’.
- Add your FAISS db folder ‘zendesk-index’ to the ‘Zendesk Answer Bot’ folder.
- Create a new python file zendesk.py and copy the below code into it.
from flask import Flask, request, jsonify app = Flask(__name__) @app.route('/zendesk', methods=['POST'])
def zendesk(): return 'dummy response' if __name__ == '__main__': app.run(port=3001, debug=True)- Run the python code.
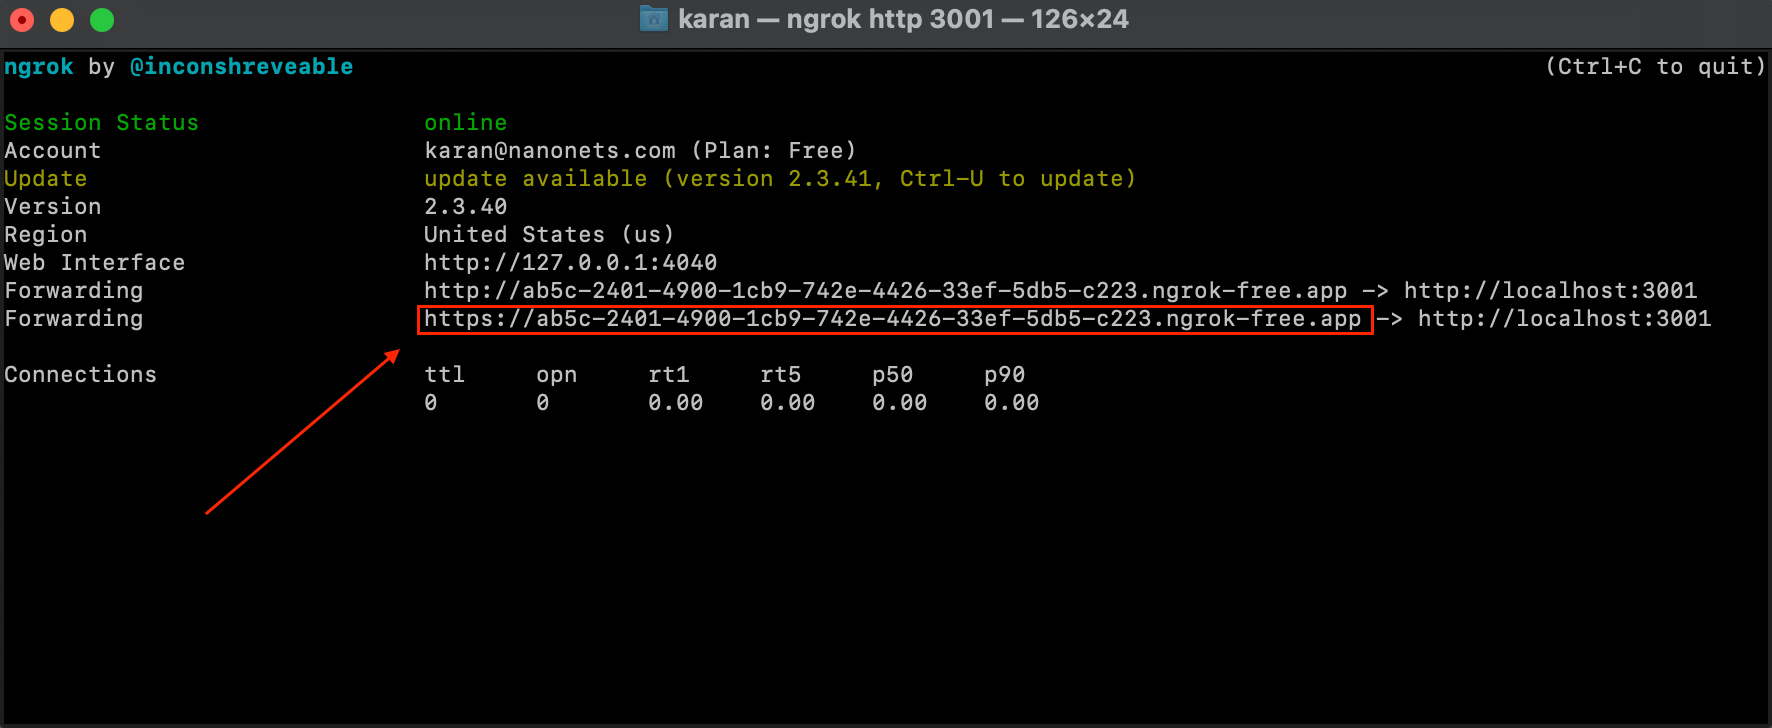
- Download and configure ngrok using the instructions here. Make sure to configure the ngrok authtoken in your terminal as directed on the link.
- Open a new terminal instance and run below command.
ngrok http 3001- We now have our Flask Service exposed over an external IP using which we can make API calls to our service from anywhere.
- We then set up a Zendesk Webhook, by either visiting the following link – https://YOUR_SUBDOMAIN.zendesk.com/admin/apps-integrations/webhooks/webhooks OR directly running the below code in our original Jupyter notebook.
NOTE : It is important to note that while using ngrok is good for testing purposes, it is strongly recommended to shift the Flask API service to a server instance. In that case, the static IP of the server becomes the Zendesk Webhook endpoint and you will need to configure the endpoint in your Zendesk Webhook to point towards this address – https://YOUR_SERVER_STATIC_IP:3001/zendesk
zendesk_workflow_endpoint = "HTTPS_NGROK_FORWARDING_ADDRESS" url = "https://" + subdomain + ".zendesk.com/api/v2/webhooks"
payload = { "webhook": { "endpoint": zendesk_workflow_endpoint, "http_method": "POST", "name": "Nanonets Workflows Webhook v1", "status": "active", "request_format": "json", "subscriptions": ["conditional_ticket_events"], }
}
headers = {"Content-Type": "application/json"} auth = (username, password) response = requests.post(url, json=payload, headers=headers, auth=auth)
webhook = response.json() webhookid = webhook["webhook"]["id"]
- We now set up a Zendesk Trigger, which will trigger the above webhook we just created to run whenever a new ticket appears. We can set up the Zendesk trigger by either visiting the following link – https://YOUR_SUBDOMAIN.zendesk.com/admin/objects-rules/rules/triggers OR by directly running the below code in our original Jupyter notebook.
url = "https://" + subdomain + ".zendesk.com/api/v2/triggers.json" trigger_payload = { "trigger": { "title": "Nanonets Workflows Trigger v1", "active": True, "conditions": {"all": [{"field": "update_type", "value": "Create"}]}, "actions": [ { "field": "notification_webhook", "value": [ webhookid, json.dumps( { "ticket_id": "{{ticket.id}}", "org_id": "{{ticket.url}}", "subject": "{{ticket.title}}", "body": "{{ticket.description}}", } ), ], } ], }
} response = requests.post(url, auth=(username, password), json=trigger_payload)
trigger = response.json()
- Retrieve Relevant Information: When a new ticket comes in, use the indexed knowledge base to retrieve relevant information and past tickets that can help in generating a response.
After the trigger and webhook has been set up, Zendesk will ensure that our currently running Flask service will get an API call at the /zendesk route with the ticket ID, subject and body whenever a new ticket arrives.
We now have to configure our Flask Service to
a. generate a response using our vector store ‘zendesk-index’.
b. update the ticket with the generated response.
We replace our current flask service code in zendesk.py with the code below –
from flask import Flask, request, jsonify
from langchain.document_loaders import PyPDFLoader
from langchain.vectorstores import FAISS
from langchain.chat_models import ChatOpenAI
from langchain.embeddings.openai import OpenAIEmbeddings
from langchain.text_splitter import RecursiveCharacterTextSplitter
from langchain.chains import RetrievalQA, ConversationalRetrievalChain
from transformers import GPT2TokenizerFast
import os
import pandas as pd
import numpy as np app = Flask(__name__) @app.route('/zendesk', methods=['POST'])
def zendesk(): updatedticketjson = request.get_json() zenembeddings = OpenAIEmbeddings() query = updatedticketjson['body'] zendb = FAISS.load_local('zendesk-index', zenembeddings) docs = zendb.similarity_search(query) if __name__ == '__main__': app.run(port=3001, debug=True)
As you can see, we have run a similarity search on our vector index and retrieved the most relevant tickets and articles to help generate a response.
How to generate a response and post to Zendesk
- Generate Response: Utilize the LLM to generate a coherent and accurate response based on the retrieved information and analyzed context.
Let us now continue setting up our API endpoint. We further modify the code as shown below to generate a response based on the relevant information retrieved.
@app.route("/zendesk", methods=["POST"])
def zendesk(): updatedticketjson = request.get_json() zenembeddings = OpenAIEmbeddings() query = updatedticketjson["body"] zendb = FAISS.load_local("zendesk-index", zenembeddings) docs = zendb.similarity_search(query) zenchain = load_qa_chain(OpenAI(temperature=0.7), chain_type="stuff") answer = zenchain.run(input_documents=docs, question=query)
The answer variable will contain the generated response.
- Review Response: Optionally, have a human agent review the generated response for accuracy and appropriateness before posting.
The way we are ensuring this is by NOT posting the response generated by GPT directly as the Zendesk reply. Instead, we will create a function to update new tickets with an internal note containing the GPT generated response.
Add the following function to the zendesk.py flask service –
def update_ticket_with_internal_note( subdomain, ticket_id, username, password, comment_body
): url = f"https://{subdomain}.zendesk.com/api/v2/tickets/{ticket_id}.json" email = username headers = {"Content-Type": "application/json"} comment_body = "Suggested Response - " + comment_body data = {"ticket": {"comment": {"body": comment_body, "public": False}}} response = requests.put(url, json=data, headers=headers, auth=(email, password))
- Post to Zendesk: Use the Zendesk API to post the generated response to the corresponding ticket, ensuring timely communication with the customer.
Let us now incorporate the internal note creation function into our API endpoint.
@app.route("/zendesk", methods=["POST"])
def zendesk(): updatedticketjson = request.get_json() zenembeddings = OpenAIEmbeddings() query = updatedticketjson["body"] zendb = FAISS.load_local("zendesk-index", zenembeddings) docs = zendb.similarity_search(query) zenchain = load_qa_chain(OpenAI(temperature=0.7), chain_type="stuff") answer = zenchain.run(input_documents=docs, question=query) update_ticket_with_internal_note(subdomain, ticket, username, password, answer) return answer
This completes our workflow!
Let us revise the workflow we have set up –
- Our Zendesk Trigger starts the workflow when a new Zendesk ticket appears.
- The trigger sends the new ticket’s data to our Webhook.
- Our Webhook sends a request to our Flask Service.
- Our Flask Service queries the vector store created using past Zendesk data to retrieve relevant past tickets and articles to answer the new ticket.
- The relevant past tickets and articles are passed to GPT along with the new ticket’s data to generate a response.
- The new ticket is updated with an internal note containing the GPT generated response.
We can test this manually –
- We create a ticket on Zendesk manually to test the flow.
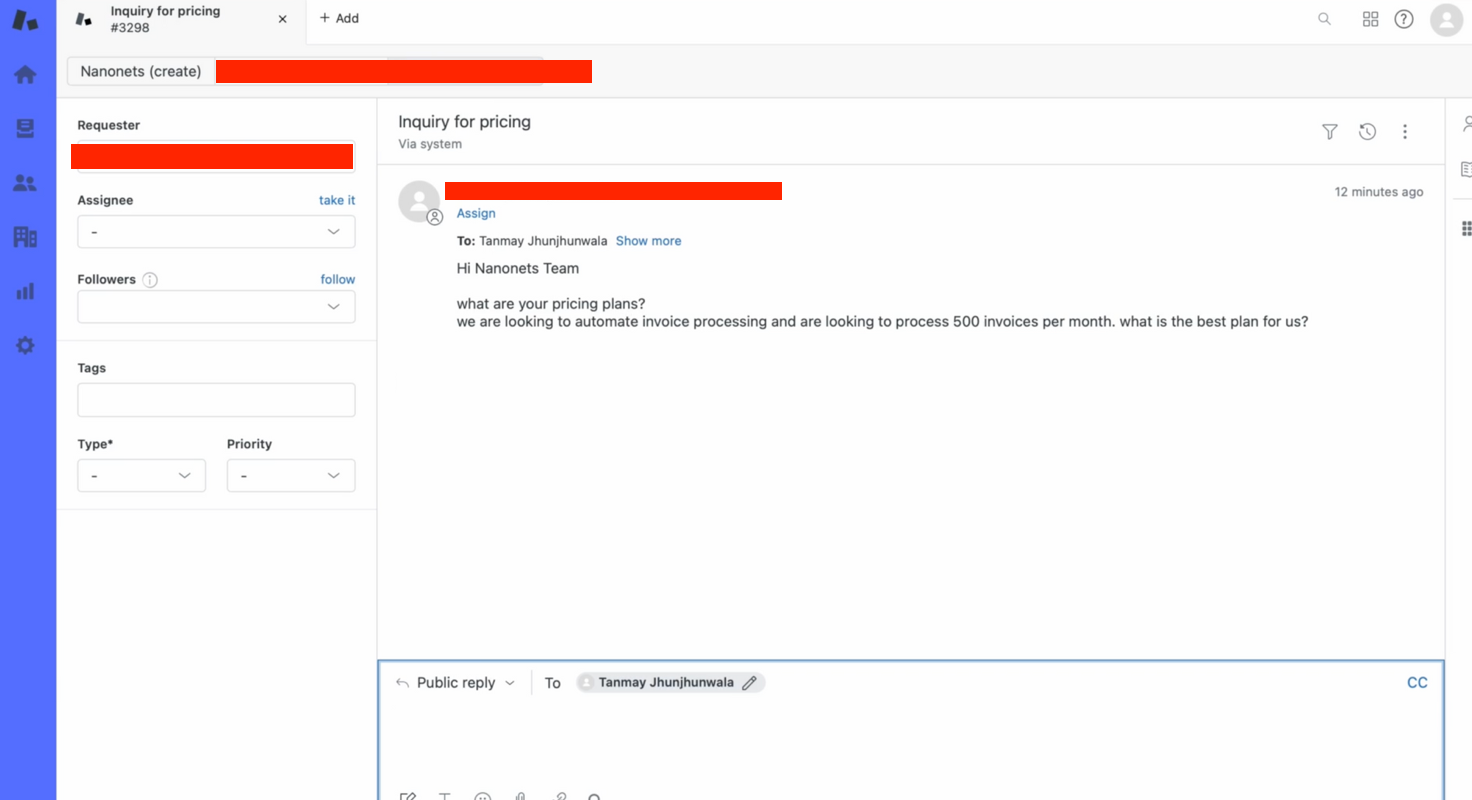
- Within seconds, our bot provides a relevant answer to the ticket query!

How to do this entire workflow with Nanonets
Nanonets offers a powerful platform to implement and manage RAG-based workflows seamlessly. Here’s how you can leverage Nanonets for this workflow:
- Integrate with Zendesk: Connect Nanonets with Zendesk to monitor and retrieve tickets efficiently.
- Build and Train Models: Use Nanonets to build and train LLMs to generate accurate and coherent responses based on the knowledge base and analyzed context.
- Automate Responses: Set up automation rules in Nanonets to automatically post generated responses to Zendesk or forward them to human agents for review.
- Monitor and Optimize: Continuously monitor the performance of the workflow and optimize the models and rules to improve accuracy and efficiency.
By integrating LLMs with RAG-based workflows in GenAI and leveraging the capabilities of Nanonets, businesses can significantly enhance their customer support operations, providing swift and accurate responses to customer queries on Zendesk.
- SEO Powered Content & PR Distribution. Get Amplified Today.
- PlatoData.Network Vertical Generative Ai. Empower Yourself. Access Here.
- PlatoAiStream. Web3 Intelligence. Knowledge Amplified. Access Here.
- PlatoESG. Carbon, CleanTech, Energy, Environment, Solar, Waste Management. Access Here.
- PlatoHealth. Biotech and Clinical Trials Intelligence. Access Here.
- Source: https://nanonets.com/blog/build-your-own-zendesk-answer-bot-with-llms/

