Amazon Relational Database Service (Amazon RDS) for MySQL zero-ETL integration with Amazon Redshift was announced in preview at AWS re:Invent 2023 for Amazon RDS for MySQL version 8.0.28 or higher. In this post, we provide step-by-step guidance on how to get started with near real-time operational analytics using this feature. This post is a continuation of the zero-ETL series that started with Getting started guide for near-real time operational analytics using Amazon Aurora zero-ETL integration with Amazon Redshift.
Challenges
Customers across industries today are looking to use data to their competitive advantage and increase revenue and customer engagement by implementing near real time analytics use cases like personalization strategies, fraud detection, inventory monitoring, and many more. There are two broad approaches to analyzing operational data for these use cases:
- Analyze the data in-place in the operational database (such as read replicas, federated query, and analytics accelerators)
- Move the data to a data store optimized for running use case-specific queries such as a data warehouse
The zero-ETL integration is focused on simplifying the latter approach.
The extract, transform, and load (ETL) process has been a common pattern for moving data from an operational database to an analytics data warehouse. ELT is where the extracted data is loaded as is into the target first and then transformed. ETL and ELT pipelines can be expensive to build and complex to manage. With multiple touchpoints, intermittent errors in ETL and ELT pipelines can lead to long delays, leaving data warehouse applications with stale or missing data, further leading to missed business opportunities.
Alternatively, solutions that analyze data in-place may work great for accelerating queries on a single database, but such solutions aren’t able to aggregate data from multiple operational databases for customers that need to run unified analytics.
Zero-ETL
Unlike the traditional systems where data is siloed in one database and the user has to make a trade-off between unified analysis and performance, data engineers can now replicate data from multiple RDS for MySQL databases into a single Redshift data warehouse to derive holistic insights across many applications or partitions. Updates in transactional databases are automatically and continuously propagated to Amazon Redshift so data engineers have the most recent information in near real time. There is no infrastructure to manage and the integration can automatically scale up and down based on the data volume.
At AWS, we have been making steady progress towards bringing our zero-ETL vision to life. The following sources are currently supported for zero-ETL integrations:
When you create a zero-ETL integration for Amazon Redshift, you continue to pay for underlying source database and target Redshift database usage. Refer to Zero-ETL integration costs (Preview) for further details.
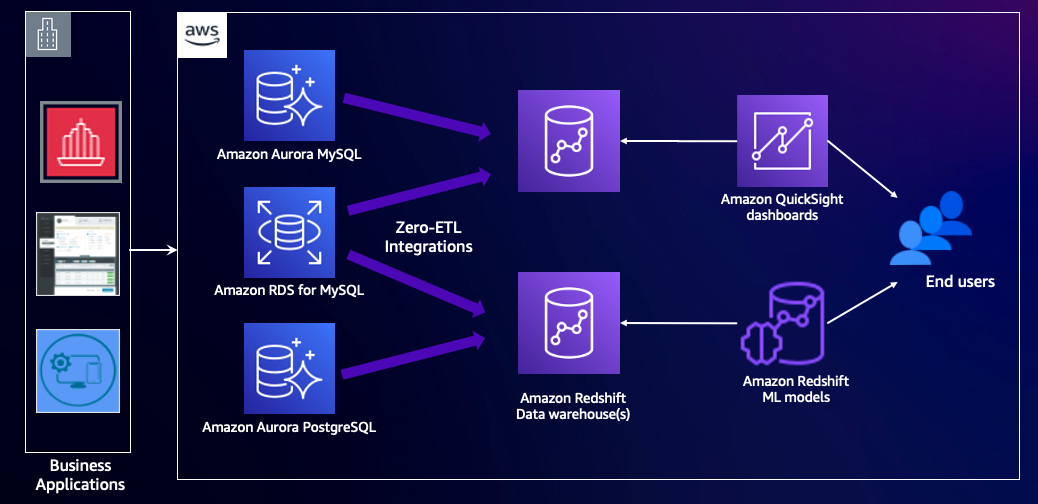
With zero-ETL integration with Amazon Redshift, the integration replicates data from the source database into the target data warehouse. The data becomes available in Amazon Redshift within seconds, allowing you to use the analytics features of Amazon Redshift and capabilities like data sharing, workload optimization autonomics, concurrency scaling, machine learning, and many more. You can continue with your transaction processing on Amazon RDS or Amazon Aurora while simultaneously using Amazon Redshift for analytics workloads such as reporting and dashboards.
The following diagram illustrates this architecture.
Solution overview
Let’s consider TICKIT, a fictional website where users buy and sell tickets online for sporting events, shows, and concerts. The transactional data from this website is loaded into an Amazon RDS for MySQL 8.0.28 (or higher version) database. The company’s business analysts want to generate metrics to identify ticket movement over time, success rates for sellers, and the best-selling events, venues, and seasons. They would like to get these metrics in near real time using a zero-ETL integration.
The integration is set up between Amazon RDS for MySQL (source) and Amazon Redshift (destination). The transactional data from the source gets refreshed in near real time on the destination, which processes analytical queries.
You can use either the serverless option or an encrypted RA3 cluster for Amazon Redshift. For this post, we use a provisioned RDS database and a Redshift provisioned data warehouse.
The following diagram illustrates the high-level architecture.
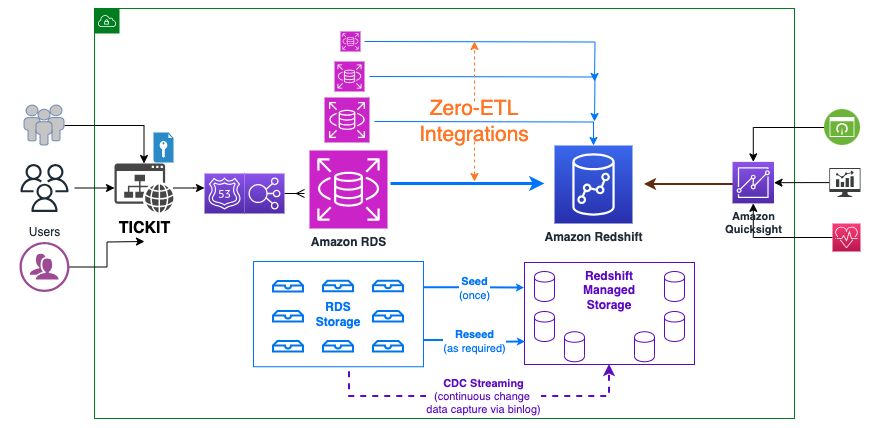
The following are the steps needed to set up zero-ETL integration. These steps can be done automatically by the zero-ETL wizard, but you will require a restart if the wizard changes the setting for Amazon RDS or Amazon Redshift. You could do these steps manually, if not already configured, and perform the restarts at your convenience. For the complete getting started guides, refer to Working with Amazon RDS zero-ETL integrations with Amazon Redshift (preview) and Working with zero-ETL integrations.
- Configure the RDS for MySQL source with a custom DB parameter group.
- Configure the Redshift cluster to enable case-sensitive identifiers.
- Configure the required permissions.
- Create the zero-ETL integration.
- Create a database from the integration in Amazon Redshift.
Configure the RDS for MySQL source with a customized DB parameter group
To create an RDS for MySQL database, complete the following steps:
- On the Amazon RDS console, create a DB parameter group called
zero-etl-custom-pg.
Zero-ETL integration works by using binary logs (binlogs) generated by MySQL database. To enable binlogs on Amazon RDS for MySQL, a specific set of parameters must be enabled.
- Set the following binlog cluster parameter settings:
binlog_format = ROWbinlog_row_image = FULLbinlog_checksum = NONE
In addition, make sure that the binlog_row_value_options parameter is not set to PARTIAL_JSON. By default, this parameter is not set.
- Choose Databases in the navigation pane, then choose Create database.
- For Engine Version, choose MySQL 8.0.28 (or higher).

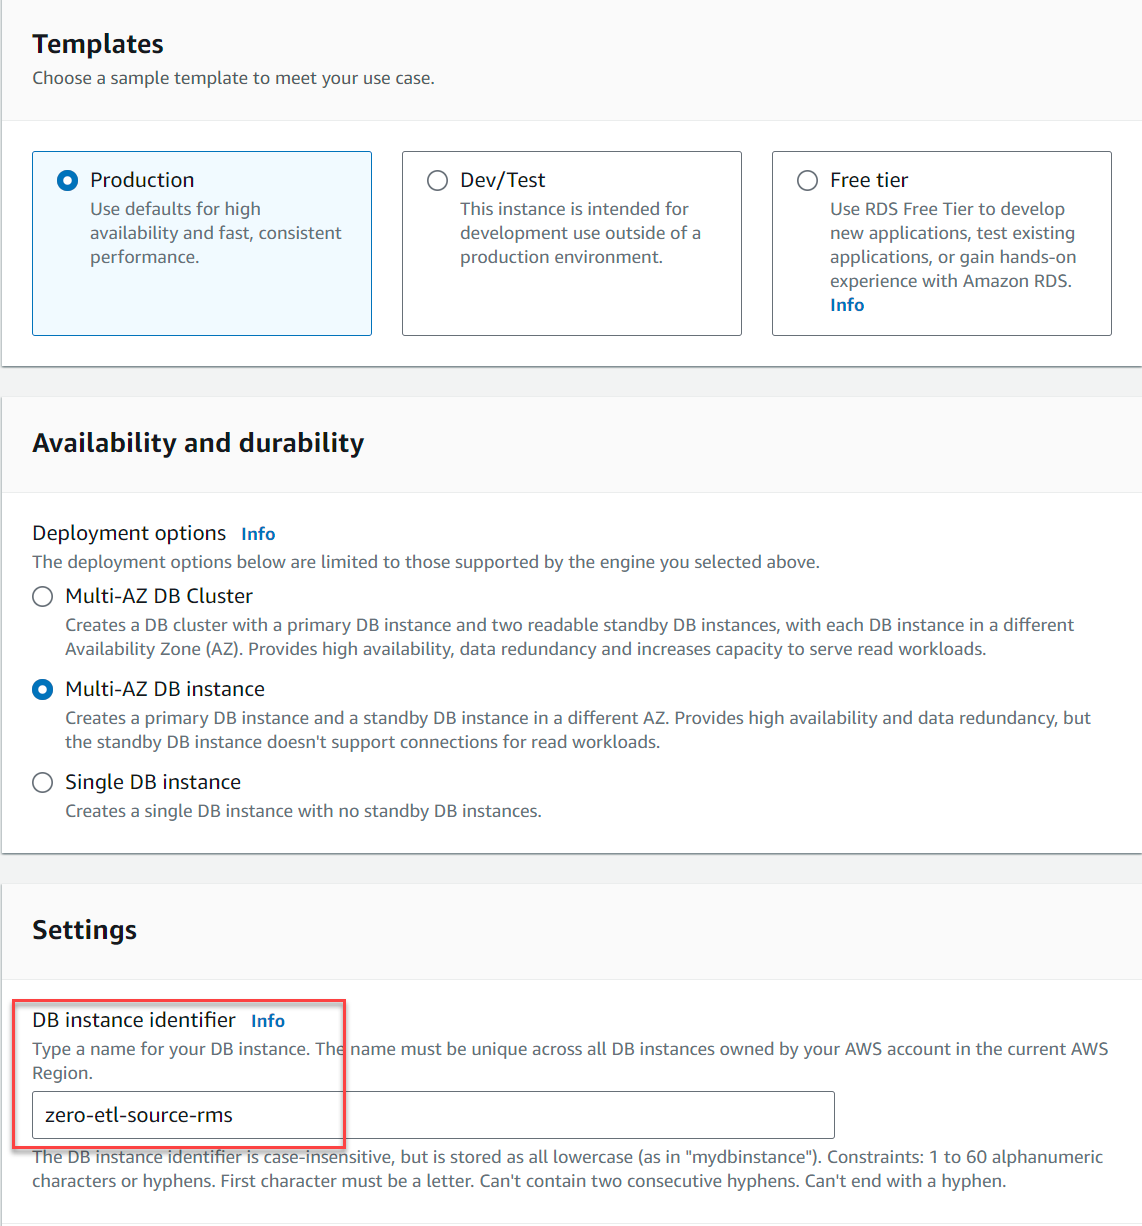
- For Templates, select Production.
- For Availability and durability, select either Multi-AZ DB instance or Single DB instance (Multi-AZ DB clusters are not supported, as of this writing).
- For DB instance identifier, enter
zero-etl-source-rms.
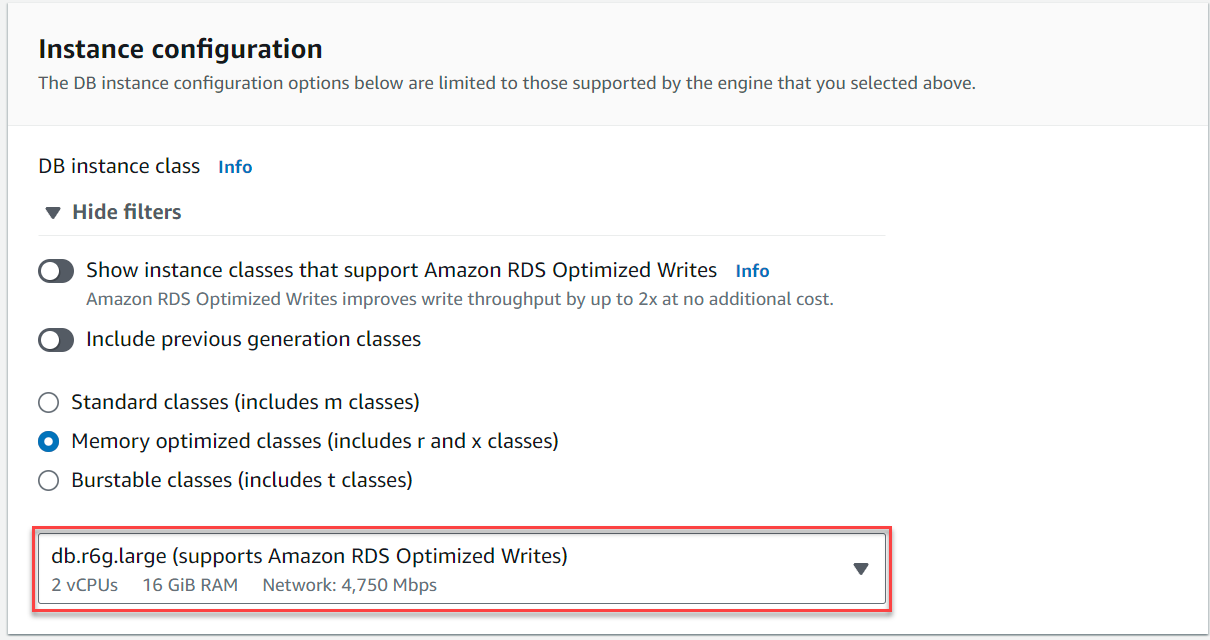
- Under Instance configuration, select Memory optimized classes and choose the instance
db.r6g.large, which should be sufficient for TICKIT use case.
- Under Additional configuration, for DB cluster parameter group, choose the parameter group you created earlier (
zero-etl-custom-pg).
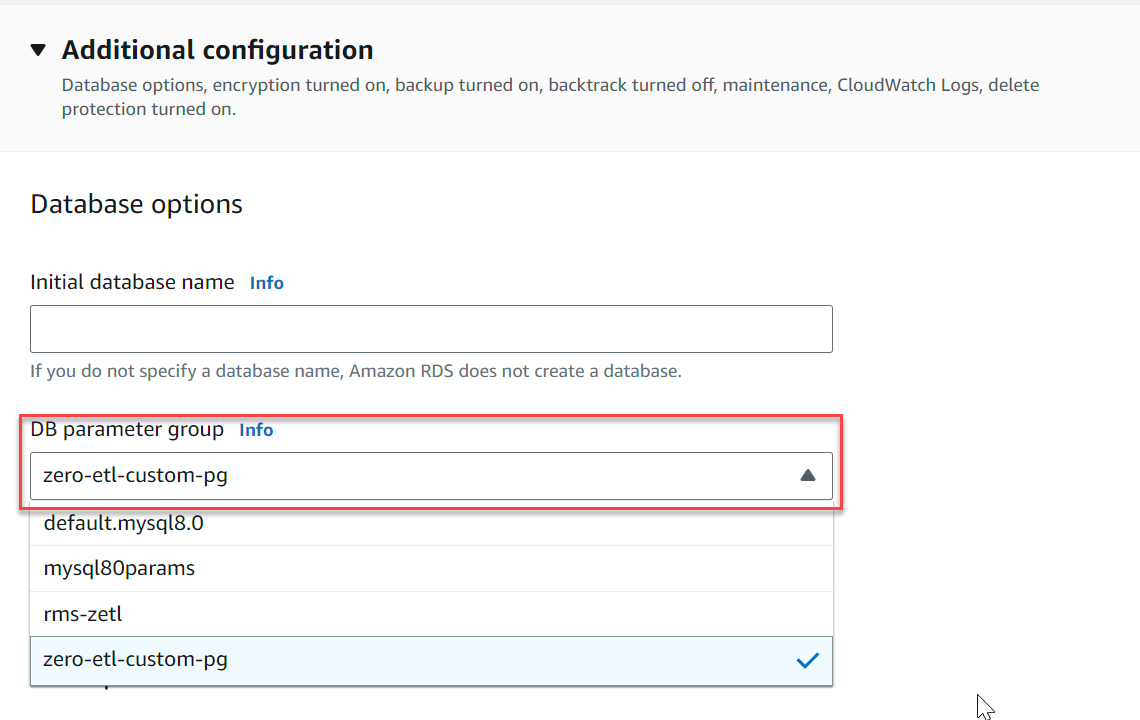
- Choose Create database.
In a couple of minutes, it should spin up an RDS for MySQL database as the source for zero-ETL integration.

Configure the Redshift destination
After you create your source DB cluster, you must create and configure a target data warehouse in Amazon Redshift. The data warehouse must meet the following requirements:
- Using an RA3 node type (
ra3.16xlarge,ra3.4xlarge, orra3.xlplus) or Amazon Redshift Serverless - Encrypted (if using a provisioned cluster)
For our use case, create a Redshift cluster by completing the following steps:
- On the Amazon Redshift console, choose Configurations and then choose Workload management.
- In the parameter group section, choose Create.
- Create a new parameter group named
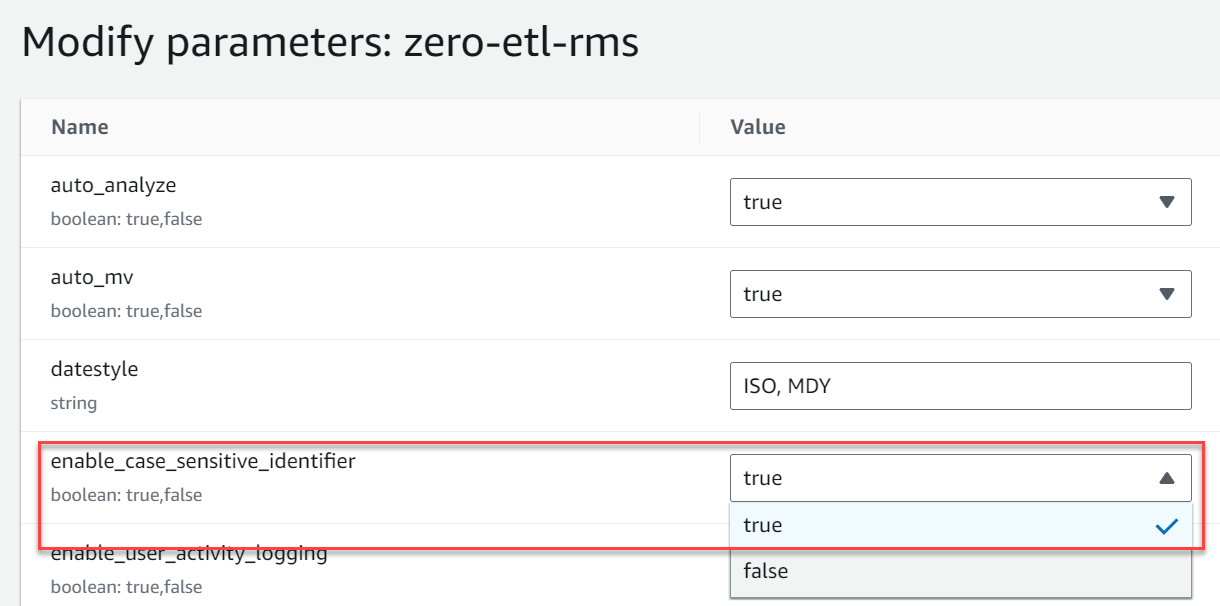
zero-etl-rms. - Choose Edit parameters and change the value of
enable_case_sensitive_identifiertoTrue. - Choose Save.
You can also use the AWS Command Line Interface (AWS CLI) command update-workgroup for Redshift Serverless:
- Choose Provisioned clusters dashboard.
At the top of you console window, you will see a Try new Amazon Redshift features in preview banner.
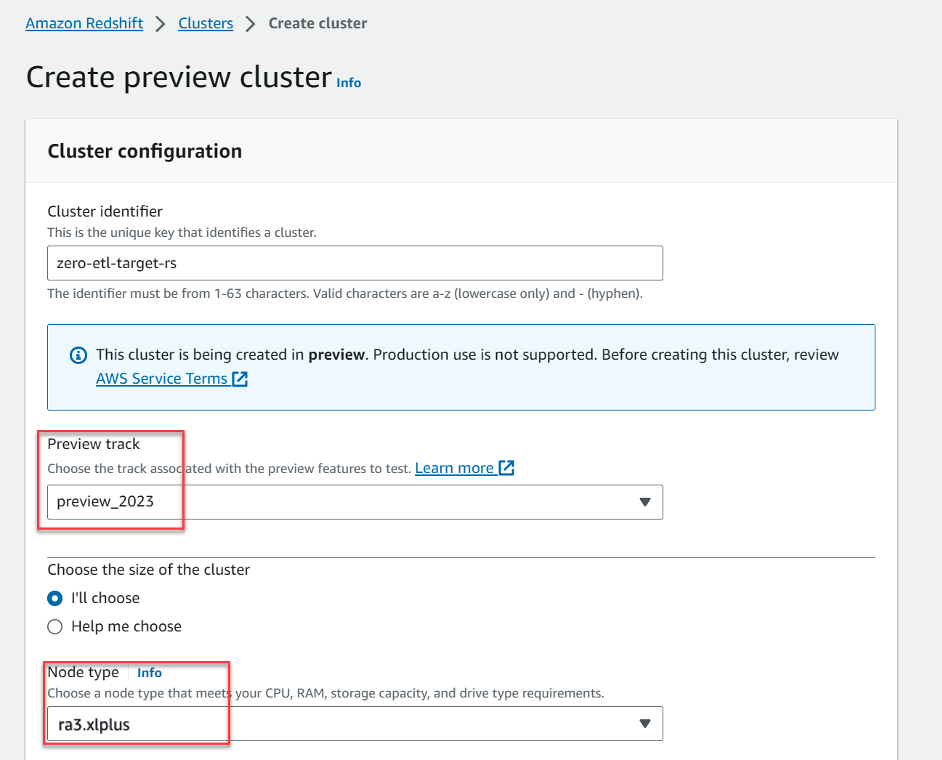
- Choose Create preview cluster.

- For Preview track, chose
preview_2023. - For Node type, choose one of the supported node types (for this post, we use
ra3.xlplus).
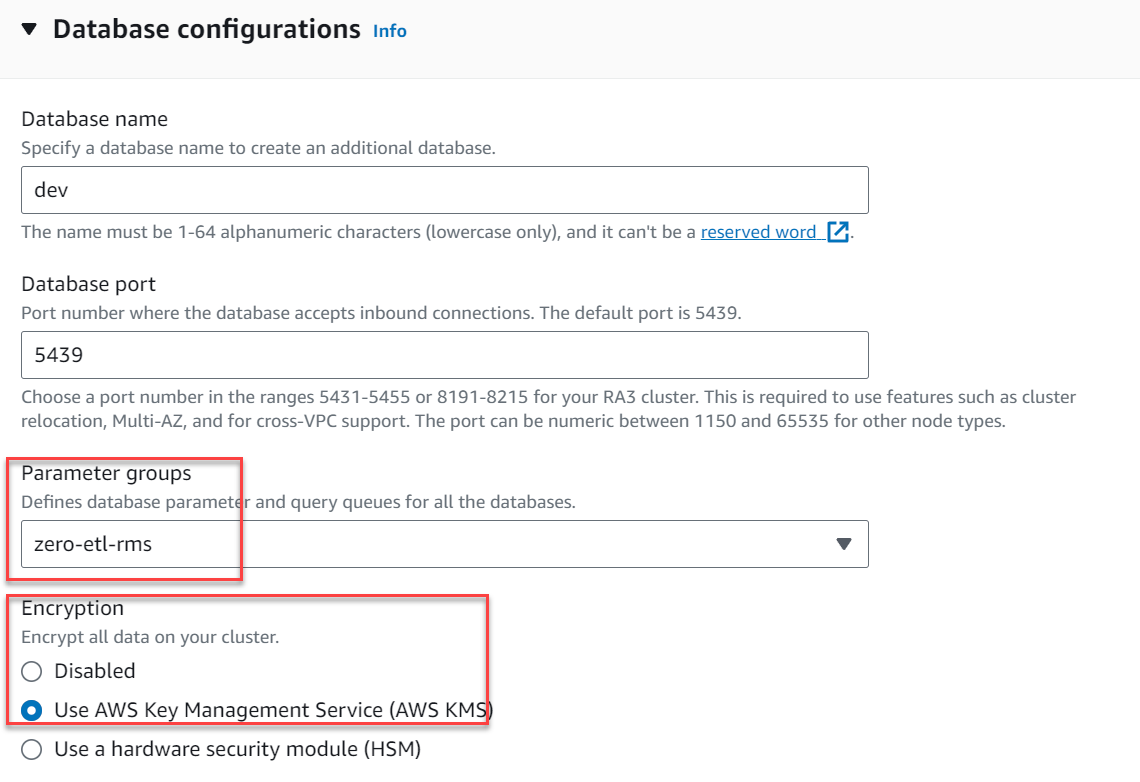
- Under Additional configurations, expand Database configurations.
- For Parameter groups, choose
zero-etl-rms. - For Encryption, select Use AWS Key Management Service.
- Choose Create cluster.
The cluster should become Available in a few minutes.

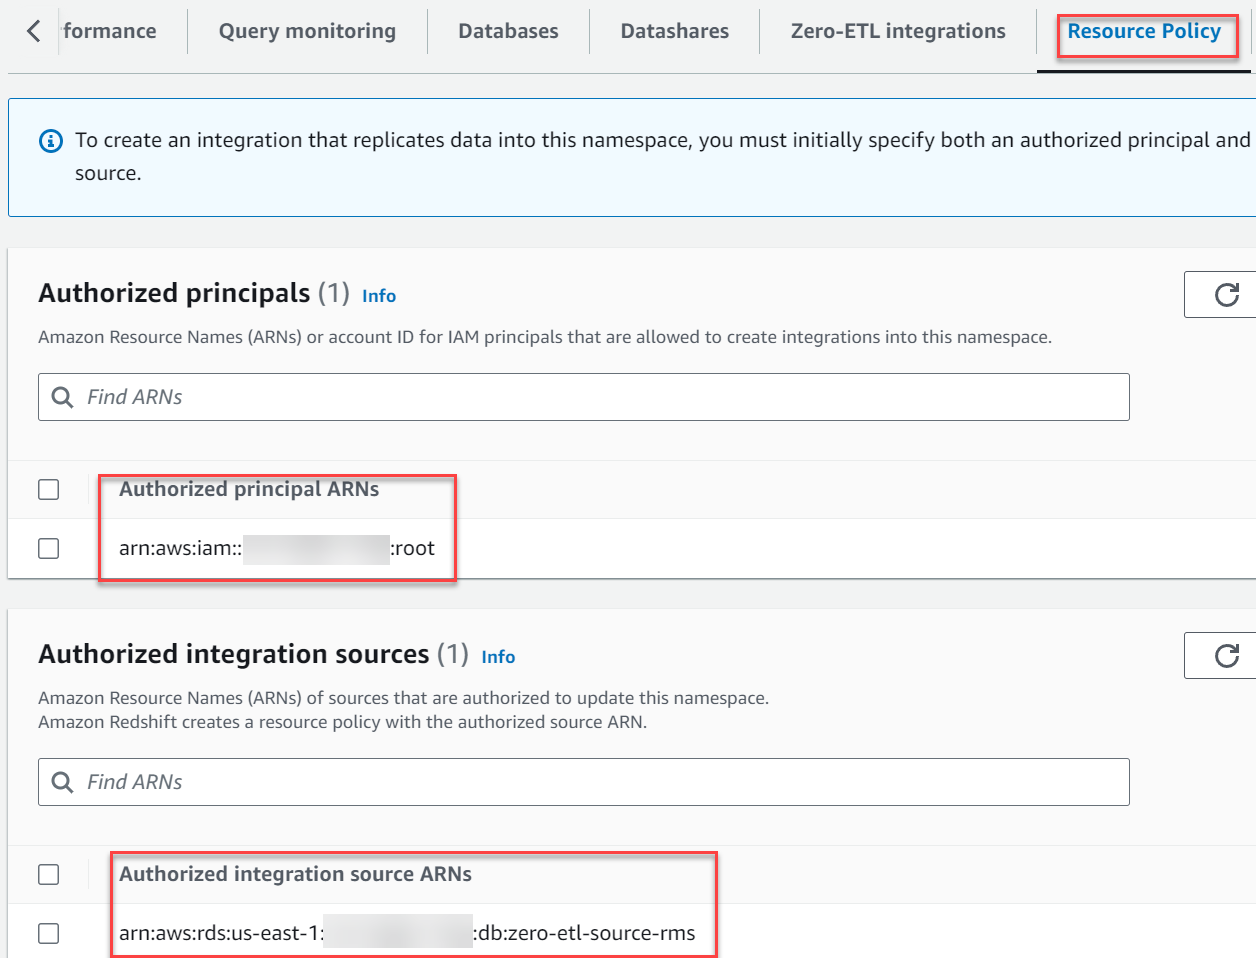
- Navigate to the namespace
zero-etl-target-rs-nsand choose the Resource policy tab. - Choose Add authorized principals.
- Enter either the Amazon Resource Name (ARN) of the AWS user or role, or the AWS account ID (IAM principals) that are allowed to create integrations.
An account ID is stored as an ARN with root user.

- In the Authorized integration sources section, choose Add authorized integration source to add the ARN of the RDS for MySQL DB instance that’s the data source for the zero-ETL integration.
You can find this value by going to the Amazon RDS console and navigating to the Configuration tab of the zero-etl-source-rms DB instance.

Your resource policy should resemble the following screenshot.
Configure required permissions
To create a zero-ETL integration, your user or role must have an attached identity-based policy with the appropriate AWS Identity and Access Management (IAM) permissions. An AWS account owner can configure required permissions for users or roles who may create zero-ETL integrations. The sample policy allows the associated principal to perform the following actions:
- Create zero-ETL integrations for the source RDS for MySQL DB instance.
- View and delete all zero-ETL integrations.
- Create inbound integrations into the target data warehouse. This permission is not required if the same account owns the Redshift data warehouse and this account is an authorized principal for that data warehouse. Also note that Amazon Redshift has a different ARN format for provisioned and serverless clusters:
- Provisioned –
arn:aws:redshift:{region}:{account-id}:namespace:namespace-uuid - Serverless –
arn:aws:redshift-serverless:{region}:{account-id}:namespace/namespace-uuid
- Provisioned –
Complete the following steps to configure the permissions:
- On the IAM console, choose Policies in the navigation pane.
- Choose Create policy.
- Create a new policy called
rds-integrationsusing the following JSON (replaceregionandaccount-idwith your actual values):
{
    "Version": "2012-10-17",
    "Statement": [{
        "Effect": "Allow",
        "Action": [
            "rds:CreateIntegration"
        ],
        "Resource": [
            "arn:aws:rds:{region}:{account-id}:db:source-instancename",
            "arn:aws:rds:{region}:{account-id}:integration:*"
        ]
    },
    {
        "Effect": "Allow",
        "Action": [
            "rds:DescribeIntegration"
        ],
        "Resource": ["*"]
    },
    {
        "Effect": "Allow",
        "Action": [
            "rds:DeleteIntegration"
        ],
        "Resource": [
            "arn:aws:rds:{region}:{account-id}:integration:*"
        ]
    },
    {
        "Effect": "Allow",
        "Action": [
            "redshift:CreateInboundIntegration"
        ],
        "Resource": [
            "arn:aws:redshift:{region}:{account-id}:cluster:namespace-uuid"
        ]
    }]
}
- Attach the policy you created to your IAM user or role permissions.
Create the zero-ETL integration
To create the zero-ETL integration, complete the following steps:
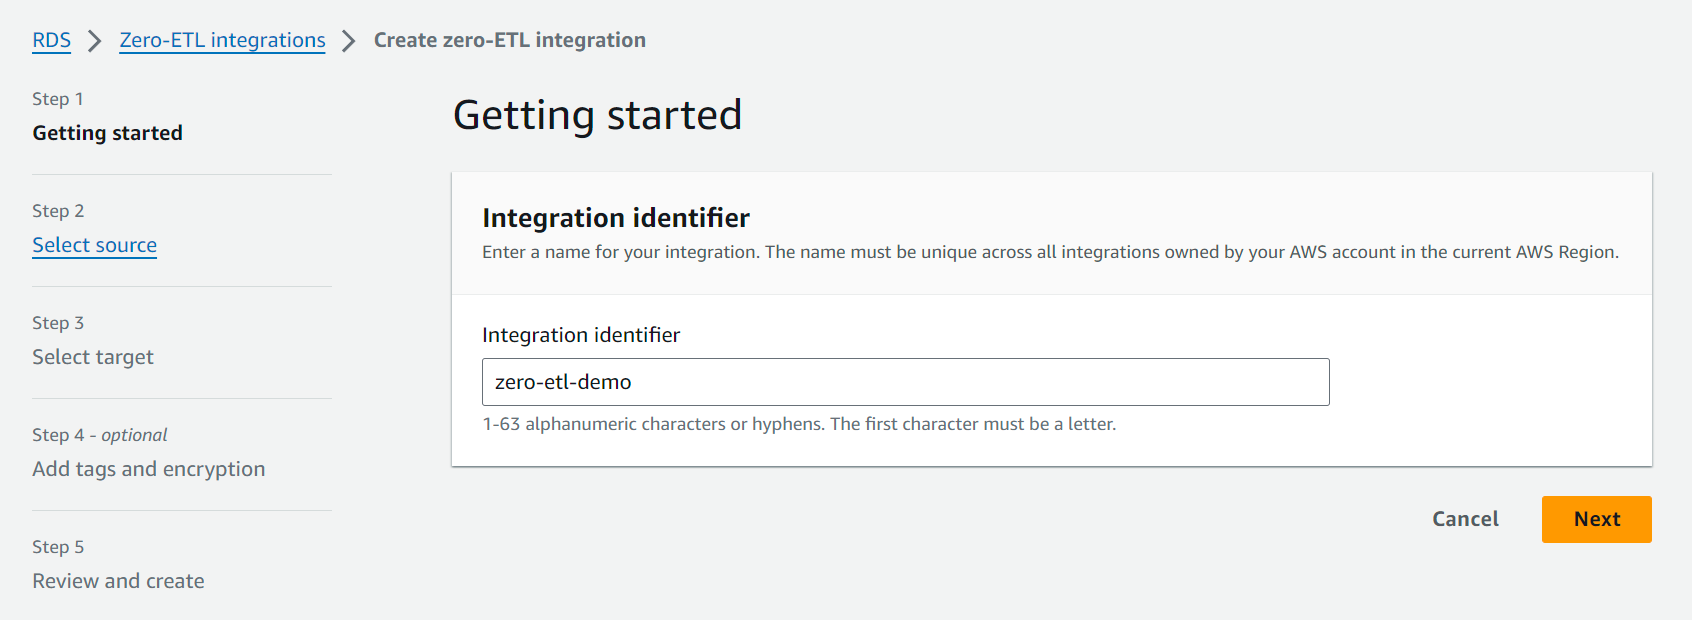
- On the Amazon RDS console, choose Zero-ETL integrations in the navigation pane.
- Choose Create zero-ETL integration.

- For Integration identifier, enter a name, for example
zero-etl-demo.
- For Source database, choose Browse RDS databases and choose the source cluster
zero-etl-source-rms. - Choose Next.

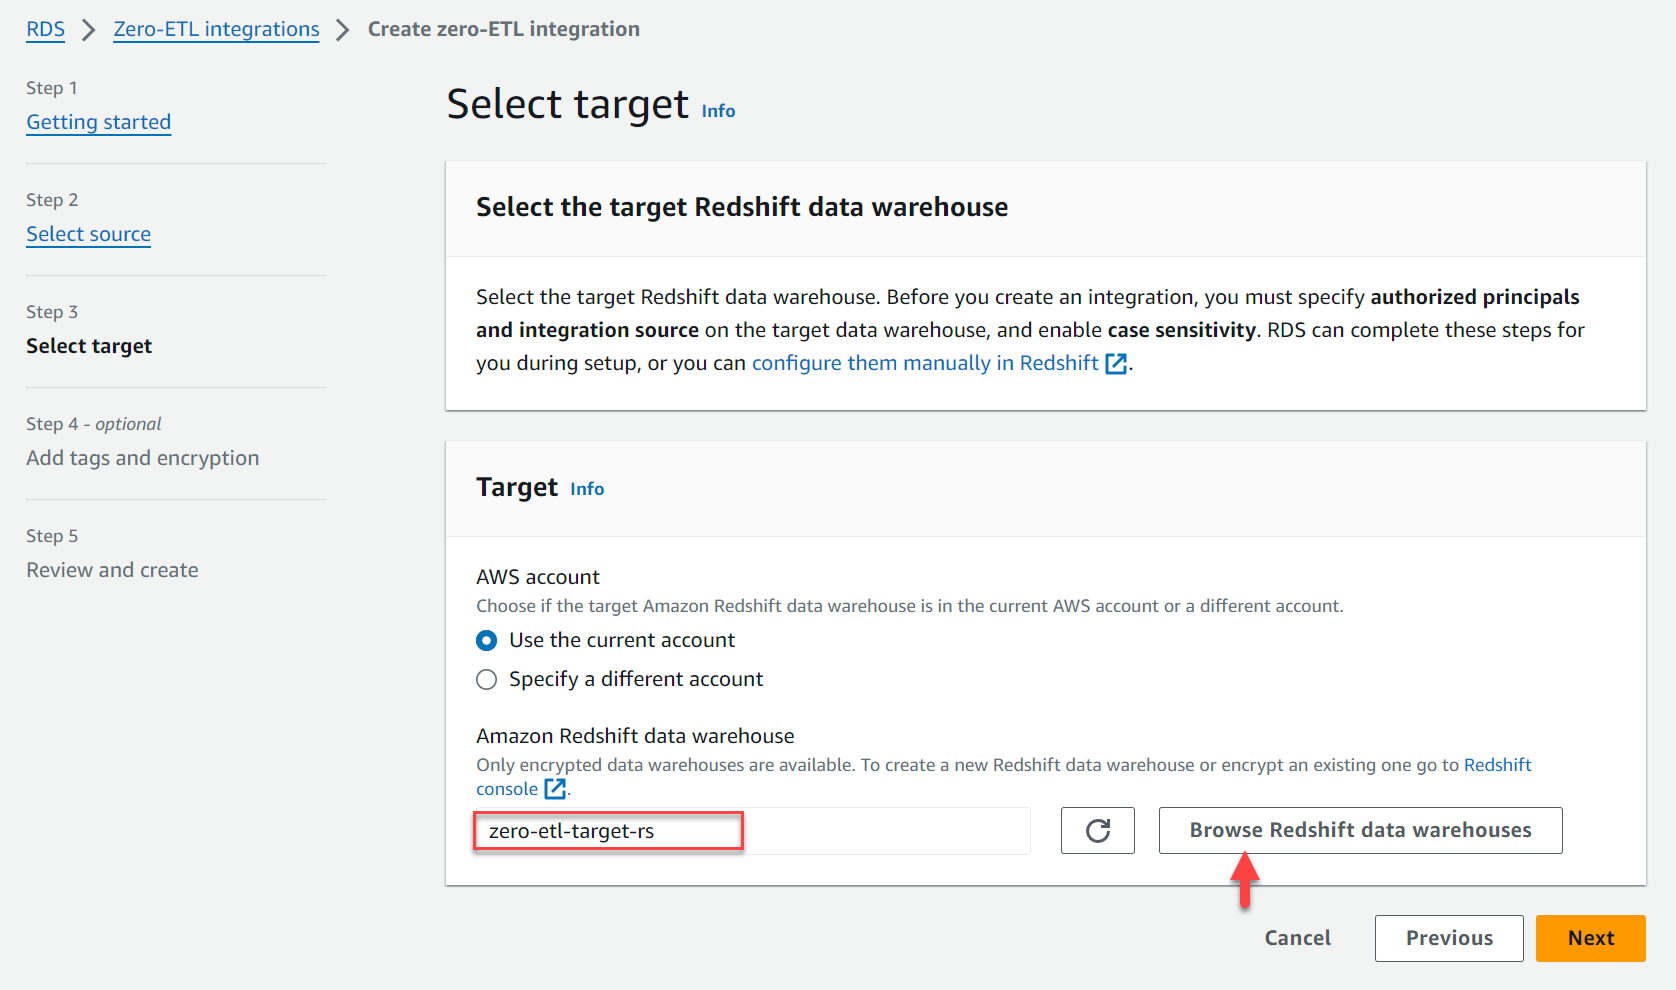
- Under Target, for Amazon Redshift data warehouse, choose Browse Redshift data warehouses and choose the Redshift data warehouse (
zero-etl-target-rs). - Choose Next.
- Add tags and encryption, if applicable.
- Choose Next.
- Verify the integration name, source, target, and other settings.
- Choose Create zero-ETL integration.
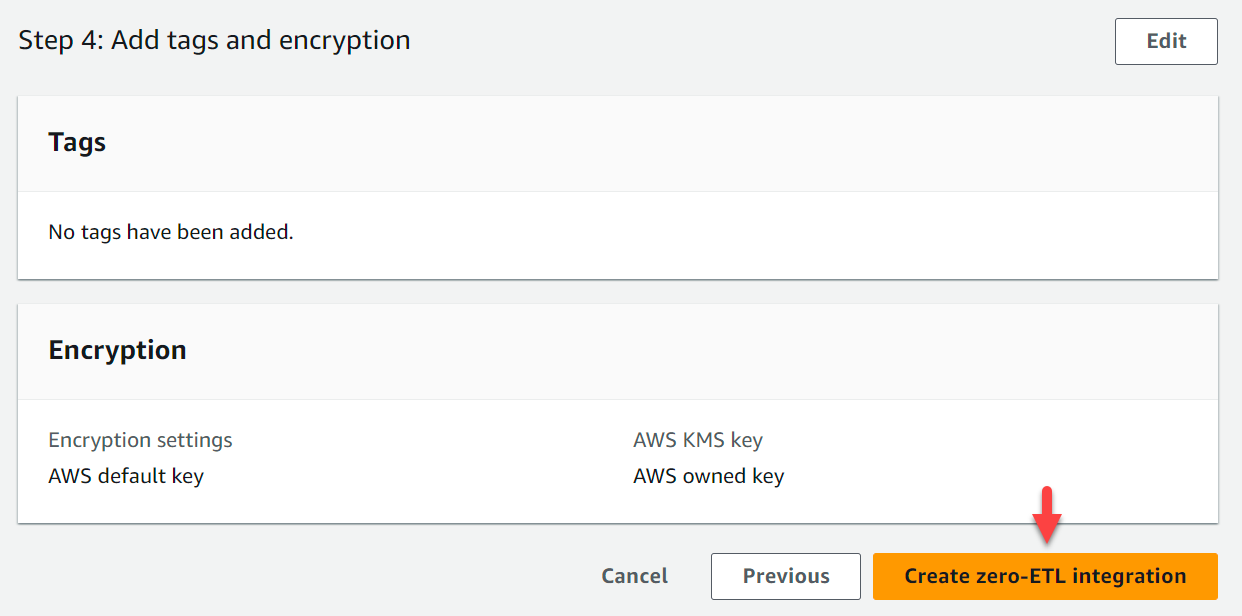
You can choose the integration to view the details and monitor its progress. It took about 30 minutes for the status to change from Creating to Active.

The time will vary depending on the size of your dataset in the source.
Create a database from the integration in Amazon Redshift
To create your database from the zero-ETL integration, complete the following steps:
- On the Amazon Redshift console, choose Clusters in the navigation pane.
- Open the
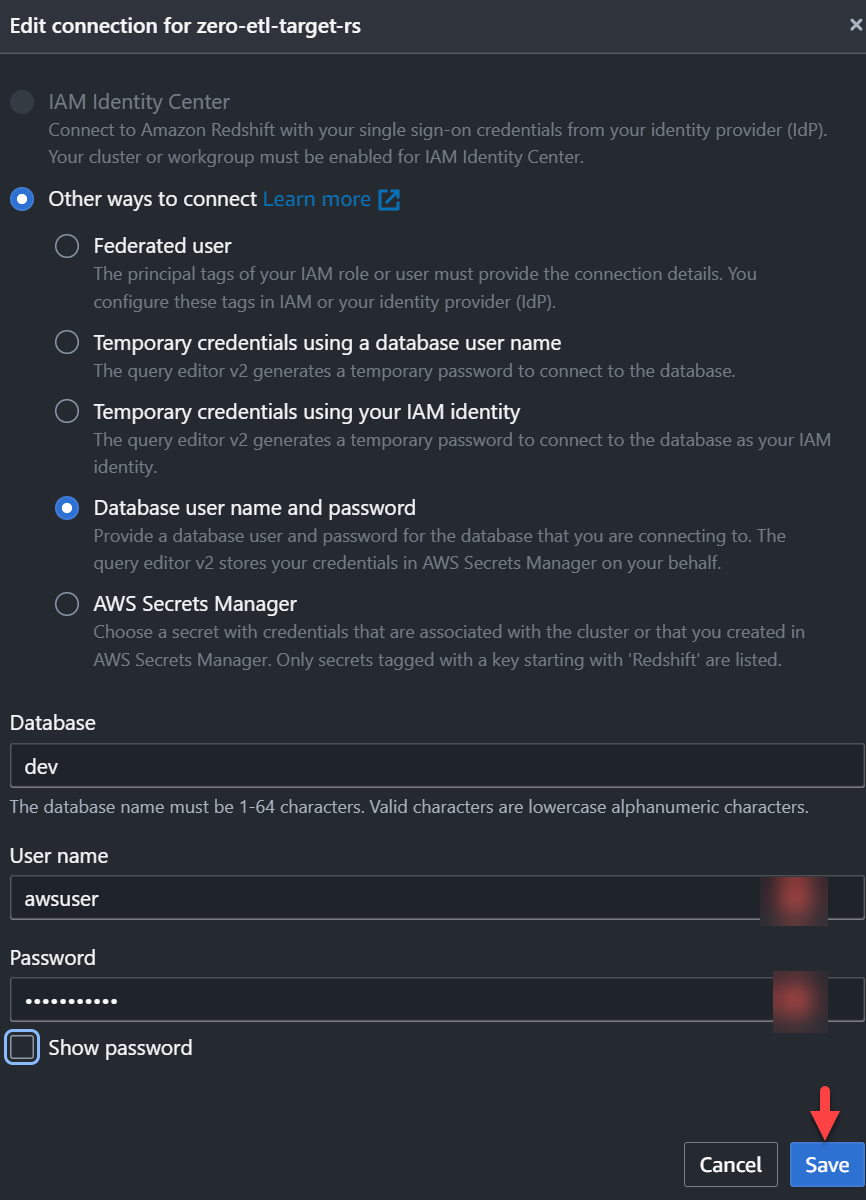
zero-etl-target-rscluster. - Choose Query data to open the query editor v2.

- Connect to the Redshift data warehouse by choosing Save.
- Obtain the
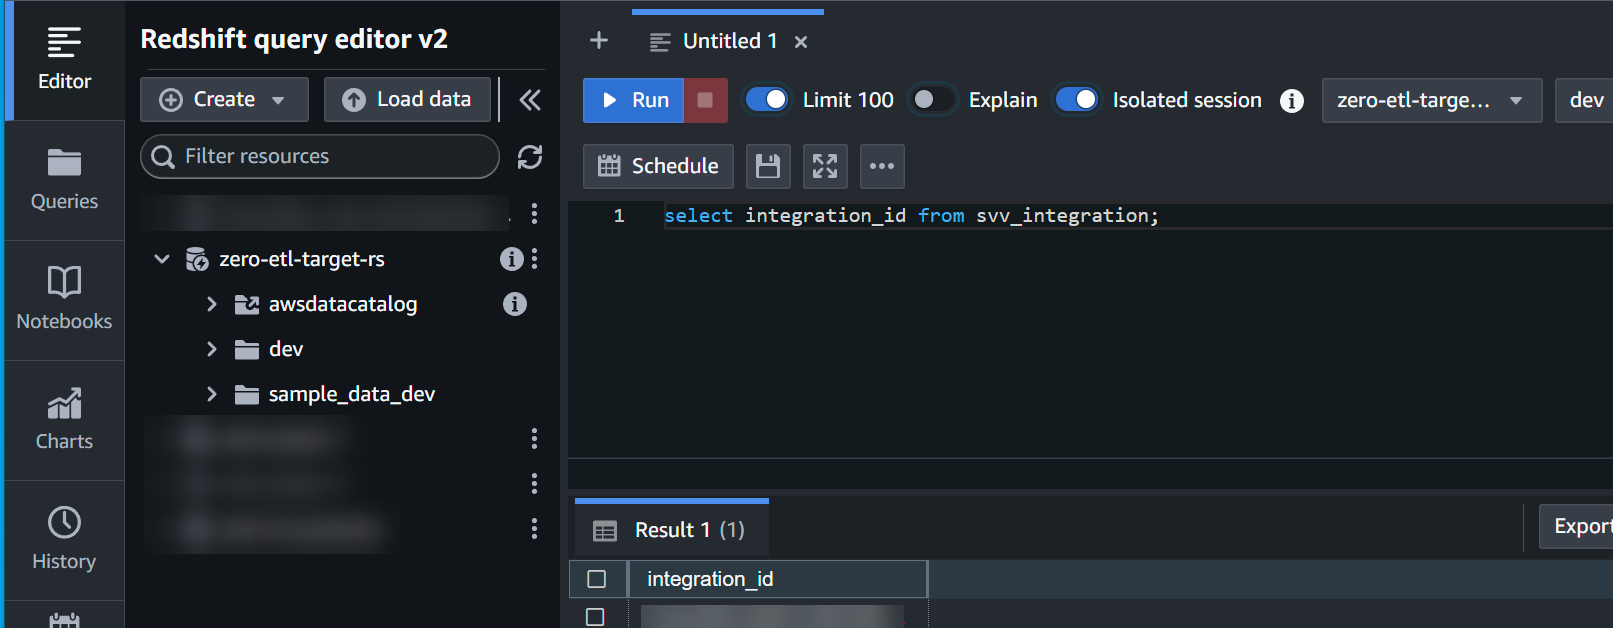
integration_idfrom thesvv_integrationsystem table:
select integration_id from svv_integration; -- copy this result, use in the next sql
- Use the
integration_idfrom the previous step to create a new database from the integration:
CREATE DATABASE zetl_source FROM INTEGRATION '<result from above>';
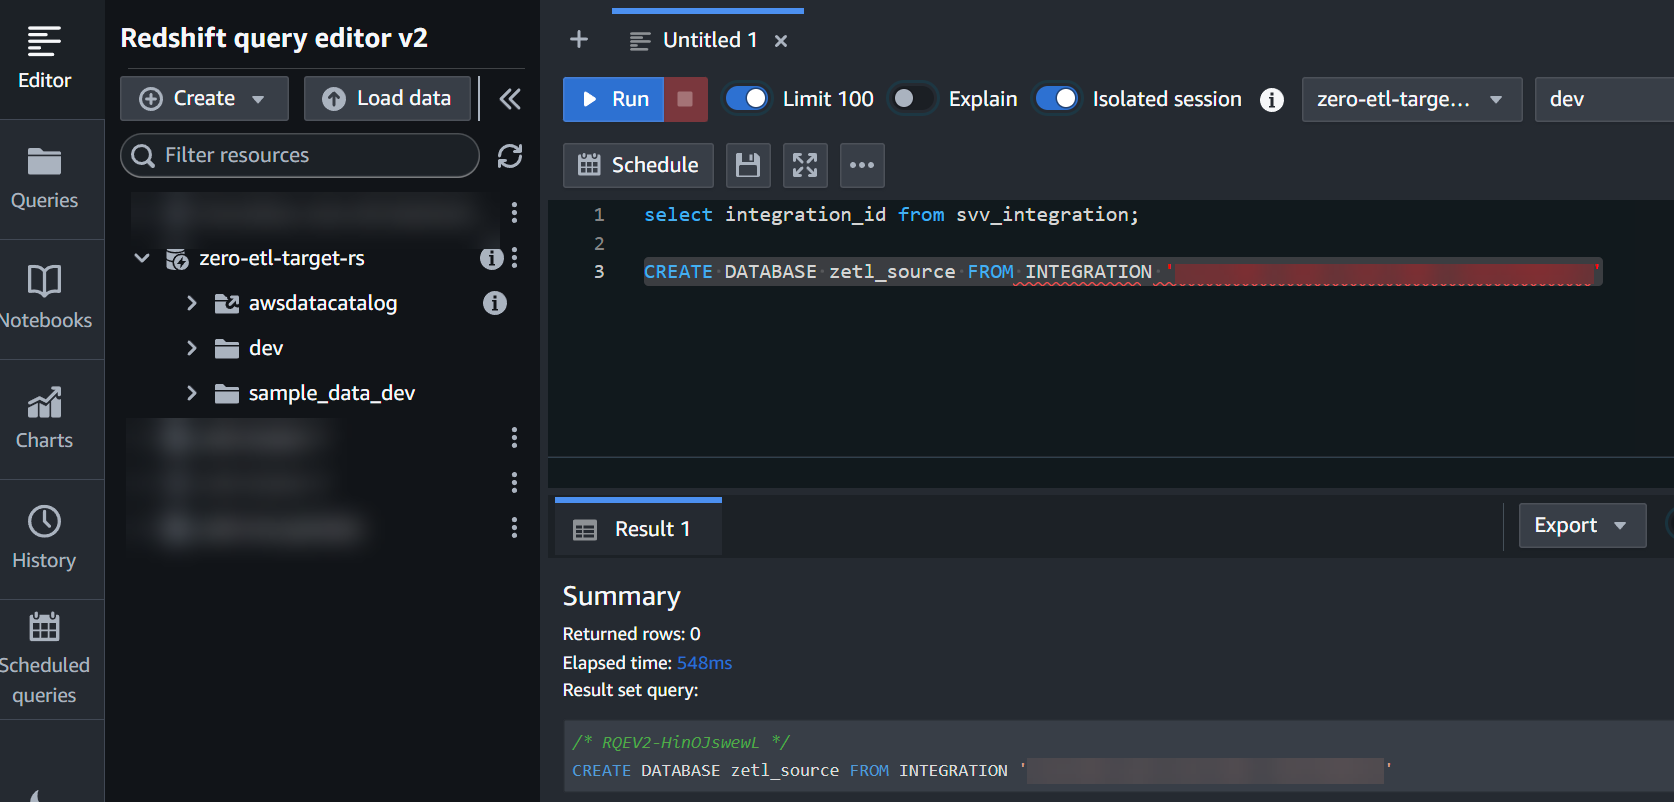
The integration is now complete, and an entire snapshot of the source will reflect as is in the destination. Ongoing changes will be synced in near real time.
Analyze the near real time transactional data
Now we can run analytics on TICKIT’s operational data.
Populate the source TICKIT data
To populate the source data, complete the following steps:
- Copy the CSV input data files into a local directory. The following is an example command:
aws s3 cp 's3://redshift-blogs/zero-etl-integration/data/tickit' . --recursive
- Connect to your RDS for MySQL cluster and create a database or schema for the TICKIT data model, verify that the tables in that schema have a primary key, and initiate the load process:
mysql -h <rds_db_instance_endpoint> -u admin -p password --local-infile=1

- Use the following CREATE TABLE commands.
- Load the data from local files using the LOAD DATA command.
The following is an example. Note that the input CSV file is broken into several files. This command must be run for every file if you would like to load all data. For demo purposes, a partial data load should work as well.

Analyze the source TICKIT data in the destination
On the Amazon Redshift console, open the query editor v2 using the database you created as part of the integration setup. Use the following code to validate the seed or CDC activity:

You can now apply your business logic for transformations directly on the data that has been replicated to the data warehouse. You can also use performance optimization techniques like creating a Redshift materialized view that joins the replicated tables and other local tables to improve query performance for your analytical queries.
Monitoring
You can query the following system views and tables in Amazon Redshift to get information about your zero-ETL integrations with Amazon Redshift:
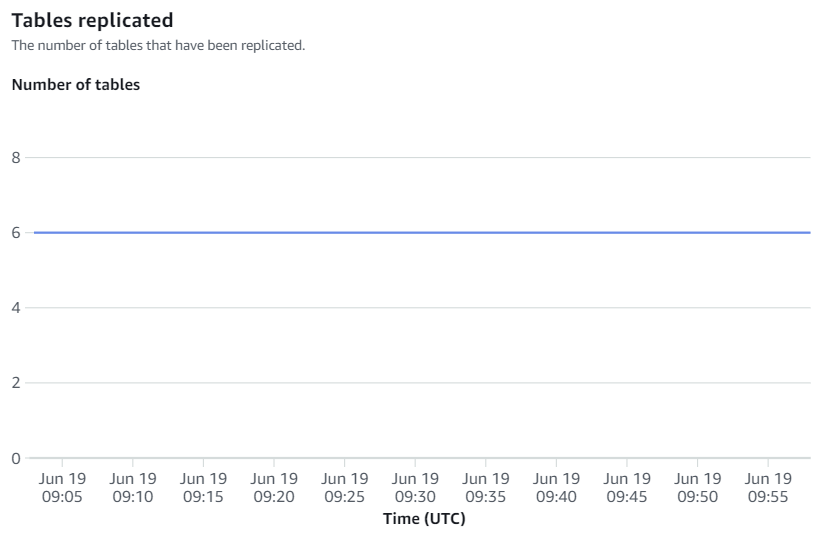
To view the integration-related metrics published to Amazon CloudWatch, open the Amazon Redshift console. Choose Zero-ETL integrations in the navigation pane and choose the integration to display activity metrics.

Available metrics on the Amazon Redshift console are integration metrics and table statistics, with table statistics providing details of each table replicated from Amazon RDS for MySQL to Amazon Redshift.

Integration metrics contain table replication success and failure counts and lag details.
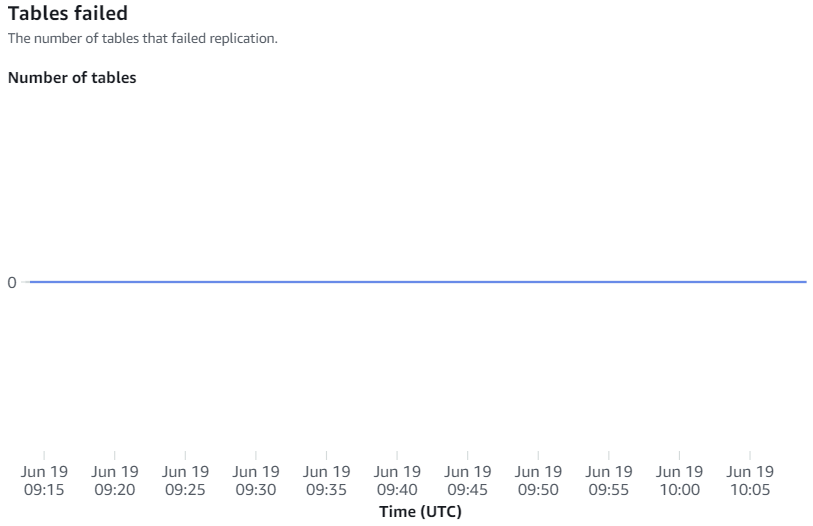
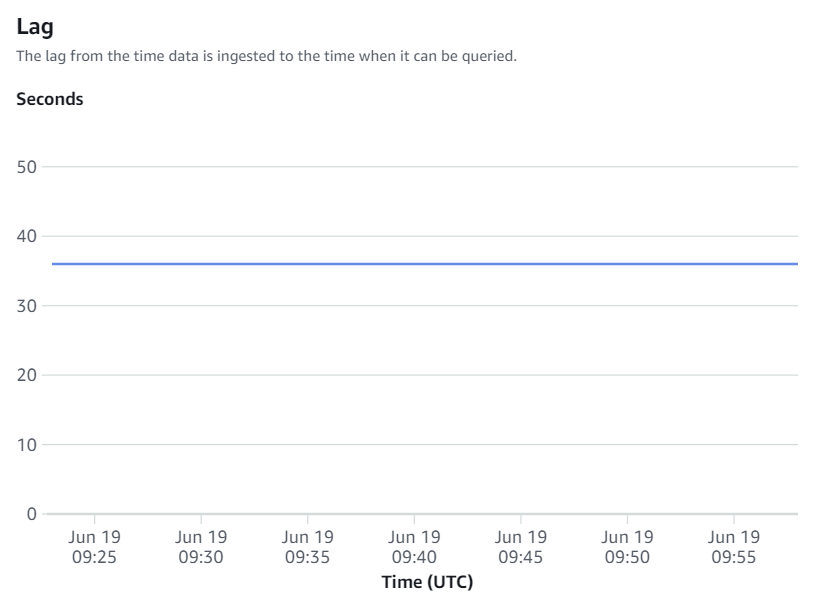
Manual resyncs
The zero-ETL integration will automatically initiate a resync if a table sync state shows as failed or resync required. But in case the auto resync fails, you can initiate a resync at table-level granularity:
ALTER DATABASE zetl_source INTEGRATION REFRESH TABLES tbl1, tbl2;
A table can enter a failed state for multiple reasons:
- The primary key was removed from the table. In such cases, you need to re-add the primary key and perform the previously mentioned ALTER command.
- An invalid value is encountered during replication or a new column is added to the table with an unsupported data type. In such cases, you need to remove the column with the unsupported data type and perform the previously mentioned ALTER command.
- An internal error, in rare cases, can cause table failure. The ALTER command should fix it.
Clean up
When you delete a zero-ETL integration, your transactional data isn’t deleted from the source RDS or the target Redshift databases, but Amazon RDS doesn’t send any new changes to Amazon Redshift.
To delete a zero-ETL integration, complete the following steps:
- On the Amazon RDS console, choose Zero-ETL integrations in the navigation pane.
- Select the zero-ETL integration that you want to delete and choose Delete.
- To confirm the deletion, choose Delete.

Conclusion
In this post, we showed you how to set up a zero-ETL integration from Amazon RDS for MySQL to Amazon Redshift. This minimizes the need to maintain complex data pipelines and enables near real time analytics on transactional and operational data.
To learn more about Amazon RDS zero-ETL integration with Amazon Redshift, refer to Working with Amazon RDS zero-ETL integrations with Amazon Redshift (preview).
About the Authors
 Milind Oke is a senior Redshift specialist solutions architect who has worked at Amazon Web Services for three years. He is an AWS-certified SA Associate, Security Specialty and Analytics Specialty certification holder, based out of Queens, New York.
 Aditya Samant is a relational database industry veteran with over 2 decades of experience working with commercial and open-source databases. He currently works at Amazon Web Services as a Principal Database Specialist Solutions Architect. In his role, he spends time working with customers designing scalable, secure and robust cloud native architectures. Aditya works closely with the service teams and collaborates on designing and delivery of the new features for Amazon’s managed databases.
- SEO Powered Content & PR Distribution. Get Amplified Today.
- PlatoData.Network Vertical Generative Ai. Empower Yourself. Access Here.
- PlatoAiStream. Web3 Intelligence. Knowledge Amplified. Access Here.
- PlatoESG. Carbon, CleanTech, Energy, Environment, Solar, Waste Management. Access Here.
- PlatoHealth. Biotech and Clinical Trials Intelligence. Access Here.
- Source: https://aws.amazon.com/blogs/big-data/unlock-insights-on-amazon-rds-for-mysql-data-with-zero-etl-integration-to-amazon-redshift/


