The Marimbatron is [Leo Kuipers] ‘s final project as part of the MIT “Fabacademy program” supervised by [Prof. Neil Gershenfeld] of the Center for Bits and Atoms. The course aims to learn how to leverage all the fab lab skills to create unique prototypes using the materials at hand.
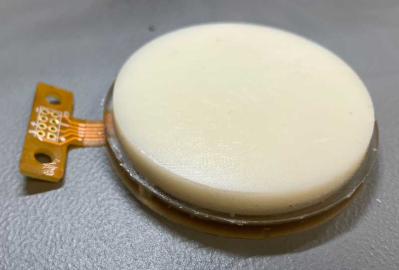
Fortunately, one of the main topics covered in the course is documentation, and [Leo] has provided ample material for review. The marimba consists of a horizontal series of wooden bars, each mounted over a metal resonator tube. It is played similarly to the xylophone, with a piano-type note arrangement, covering about five octaves but with a lower range than the xylophone. [Leo] converted this piano-type layout into a more logical grid arrangement. The individual pads are 3D printed in PETG and attached to a DIY piezoresistive pressure sensor made from a graphite-sprayed PET sheet laid upon a DIY flexible PCB. A central addressable LED was also included for indication purposes. The base layer is made of cast polyurethane, formed inside a 3D-printed rigid mould. This absorbs impact and prevents crosstalk to nearby sensors. The sensor PCB was initially prototyped by adhering a layer of copper tape to a layer of Kapton tape and cutting it out using a desktop vinyl cutter. While this method worked for the proof of concept, [Leo] ultimately outsourced the final version to a PCB manufacturer. The description of prototyping the sensor and dealing with over-moulding was particularly fascinating.
For the electronics, a modular approach was needed. Each row of ten sensors was daisy-chained to connect the LEDs, with an individual sense line passed down for each sensor to a common sensor PCB. This uses a SAMD21-series microcontroller with enough ADC channels to handle the task. This was initially prototyped using a micro-milled PCB and a laser-cut PET solder stencil. Once that was proven to work well, the sensible thing was done, and the final PCBs were ordered from a proper fab. Additionally, a user interface PCB was created to host a few pushbuttons and a Waveshare round LCD display. Finally, a main control PCB routes I2C to the sensor boards and interfaces to the SPI LCD. It also handles sending MIDI data over USB for playback on an external MIDI device.
Documentation and design data can both be found on the project fabcloud page. To dig into the Fab Academy courses, wander over to the course archive and get cracking.
This is the first marimba we’ve covered, so here’s a mechanical xylophone instead. Whilst we’re on the subject of mechanical music, here’s a fun one to go back over.
[embedded content]
- SEO Powered Content & PR Distribution. Get Amplified Today.
- PlatoData.Network Vertical Generative Ai. Empower Yourself. Access Here.
- PlatoAiStream. Web3 Intelligence. Knowledge Amplified. Access Here.
- PlatoESG. Carbon, CleanTech, Energy, Environment, Solar, Waste Management. Access Here.
- PlatoHealth. Biotech and Clinical Trials Intelligence. Access Here.
- Source: https://hackaday.com/2024/06/13/marimbatron-a-digital-marimba-prototyping-project/

