
記事はストーリーの続きです Python で音声を書き起こし、要約する Web アプリを作成する方法. 前回の投稿では、お気に入りの Spotify Podcast のコンテンツを文字起こしして要約するアプリを作成する方法を示しました。 テキストの要約は、リスナーがエピソードを聞く前にそのエピソードが興味深いかどうかを判断するのに役立ちます。
しかし、オーディオから抽出できる特徴は他にもあります。 トピック。 トピック モデリングは、ホテルのレビュー、求人情報、ソーシャル メディアの投稿など、さまざまな種類のソースからトピックを自動的に抽出できるようにする多くの自然言語処理の XNUMX つです。
この投稿では、Python を使用してポッドキャスト エピソードからトピックを収集し、優れたデータ視覚化で抽出された各トピックの重要性を分析するアプリを構築します。 最後に、Web アプリを無料で Heroku にデプロイします。
要件
- 作る GitHubリポジトリ、これは、Web アプリケーションを本番環境に Heroku にデプロイするために必要です!
- ローカル PC でリポジトリをクローンします。
git clone <name-repository>.git. 私の場合、VS コードを使用します。これは、Python スクリプトを操作するのに非常に効率的な IDE であり、Git サポートを含み、ターミナルを統合します。 ターミナルで次のコマンドをコピーします。
git init
git commit -m "first commit"
git branch -M master
git remote add origin https://github.com//.git
git push -u origin master
- Python で仮想環境を作成します。
このチュートリアルは、XNUMX つの主要部分に分かれています。 最初の部分では、ポッドキャストからトピックを抽出する単純な Web アプリケーションを作成します。 残りの部分では、アプリのデプロイに焦点を当てます。これは、アプリをいつでも世界中と共有するための重要なステップです。 始めましょう!
1. Listen Notes からエピソードの URL を抽出する
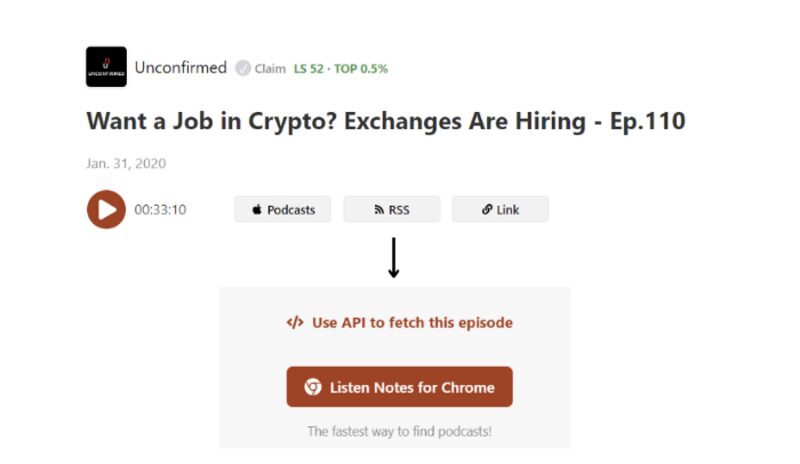
クリプトで仕事がしたいですか? 取引所が採用しています — Ep。 110.エピソードへのリンクを見つけることができます こちら. テレビや新聞のニュースでご存知かもしれませんが、ブロックチェーン業界は爆発的に拡大しており、その分野での求人を常に最新の状態に保つ必要があります。 確かに、データを管理し、これらの膨大な量のデータから値を抽出するには、データ エンジニアとデータ サイエンティストが必要になります。
Listen Notes はポッドキャストの検索エンジンであり、オンラインのデータベースであり、API を介してポッドキャストの音声にアクセスできます。 Web ページからエピソードの URL を抽出する関数を定義する必要があります。 まず、データを取得して購読するためのアカウントを作成する必要があります 無料プラン Listen Notes API を使用します。
次に、興味のあるエピソードをクリックし、ページの右側にある [API を使用してこのエピソードをフェッチする] オプションを選択します。 それを押したら、デフォルトのコーディング言語を Python に変更し、要求オプションをクリックしてその python パッケージを使用できます。 その後、コードをコピーして関数に適合させます。
import streamlit as st
import requests
import zipfile import json
from time import sleep
import yaml def retrieve_url_podcast(parameters,episode_id): url_episodes_endpoint = 'https://listen-api.listennotes.com/api/v2/episodes' headers = { 'X-ListenAPI-Key': parameters["api_key_listennotes"], } url = f"{url_episodes_endpoint}/{episode_id}" response = requests.request('GET', url, headers=headers) print(response.json()) data = response.json() audio_url = data['audio'] return audio_url
別のファイルから資格情報を取得し、 秘密.yaml、辞書のようなキーと値のペアのコレクションで構成されています。
api_key:{your-api-key-assemblyai}
api_key_listennotes:{your-api-key-listennotes}
2.音声から文字起こしとトピックを取得する
トピックを抽出するには、まず、前の手順で取得した音声 URL を入力して、AssemblyAI のトランスクリプト エンドポイントに投稿要求を送信する必要があります。 に GET リクエストを送信して、ポッドキャストの文字起こしとトピックを取得した後 アセンブリAI.
## send transcription request
def send_transc_request(headers, audio_url): transcript_endpoint = "https://api.assemblyai.com/v2/transcript" transcript_request = { "audio_url": audio_url, "iab_categories": True, } transcript_response = requests.post( transcript_endpoint, json=transcript_request, headers=headers ) transcript_id = transcript_response.json()["id"] return transcript_id ##retrieve transcription and topics
def obtain_polling_response(headers, transcript_id): polling_endpoint = ( f"https://api.assemblyai.com/v2/transcript/{transcript_id}" ) polling_response = requests.get(polling_endpoint, headers=headers) i = 0 while polling_response.json()["status"] != "completed": sleep(5) polling_response = requests.get( polling_endpoint, headers=headers ) return polling_response
結果は XNUMX つの異なるファイルに保存されます。
def save_files(polling_response): with open("transcript.txt", 'w') as f: f.write(polling_response.json()['text']) f.close() with open('only_topics.json', 'w') as f: topics = polling_response.json()['iab_categories_result'] json.dump(topics, f, indent=4) def save_zip(): list_files = ['transcript.txt','only_topics.json','barplot.html'] with zipfile.ZipFile('final.zip', 'w') as zipF: for file in list_files: zipF.write(file, compress_type=zipfile.ZIP_DEFLATED) zipF.close()
以下に、転写の例を示します。
Hi everyone. Welcome to Unconfirmed, the podcast that reveals how the marketing names and crypto are reacting to the week's top headlines and gets the insights you on what they see on the horizon. I'm your host, Laura Shin. Crypto, aka Kelman Law, is a New York law firm run by some of the first lawyers to enter crypto in 2013 with expertise in litigation, dispute resolution and anti money laundering. Email them at info at kelman law. ....
次に、ポッドキャストのエピソードから抽出されたトピックの出力を示します。
{ "status": "success", "results": [ { "text": "Hi everyone. Welcome to Unconfirmed, the podcast that reveals how the marketing names and crypto are reacting to the week's top headlines and gets the insights you on what they see on the horizon. I'm your host, Laura Shin. Crypto, aka Kelman Law, is a New York law firm run by some of the first lawyers to enter crypto in 2013 with expertise in litigation, dispute resolution and anti money laundering. Email them at info at kelman law.", "labels": [ { "relevance": 0.015229620970785618, "label": "PersonalFinance>PersonalInvesting" }, { "relevance": 0.007826927118003368, "label": "BusinessAndFinance>Industries>FinancialIndustry" }, { "relevance": 0.007203377783298492, "label": "BusinessAndFinance>Business>BusinessBanking&Finance>AngelInvestment" }, { "relevance": 0.006419596262276173, "label": "PersonalFinance>PersonalInvesting>HedgeFunds" }, { "relevance": 0.0057992455549538136, "label": "Hobbies&Interests>ContentProduction" }, { "relevance": 0.005361487623304129, "label": "BusinessAndFinance>Economy>Currencies" }, { "relevance": 0.004509655758738518, "label": "BusinessAndFinance>Industries>LegalServicesIndustry" }, { "relevance": 0.004465851932764053, "label": "Technology&Computing>Computing>Internet>InternetForBeginners" }, { "relevance": 0.0021628723479807377, "label": "BusinessAndFinance>Economy>Commodities" }, { "relevance": 0.0017050291644409299, "label": "PersonalFinance>PersonalInvesting>StocksAndBonds" } ], "timestamp": { "start": 4090, "end": 26670 } },...], "summary": { "Careers>JobSearch": 1.0, "BusinessAndFinance>Business>BusinessBanking&Finance>VentureCapital": 0.9733043313026428, "BusinessAndFinance>Business>Startups": 0.9268804788589478, "BusinessAndFinance>Economy>JobMarket": 0.7761372327804565, "BusinessAndFinance>Business>BusinessBanking&Finance>AngelInvestment": 0.6847236156463623, "PersonalFinance>PersonalInvesting>StocksAndBonds": 0.6514145135879517, "BusinessAndFinance>Business>BusinessBanking&Finance>PrivateEquity": 0.3943130075931549, "BusinessAndFinance>Industries>FinancialIndustry": 0.3717447817325592, "PersonalFinance>PersonalInvesting": 0.3703657388687134, "BusinessAndFinance>Industries": 0.29375147819519043, "BusinessAndFinance>Economy>Currencies": 0.27661699056625366, "BusinessAndFinance": 0.1965470314025879, "Hobbies&Interests>ContentProduction": 0.1607944369316101, "BusinessAndFinance>Economy>FinancialRegulation": 0.1570006012916565, "Technology&Computing": 0.13974210619926453, "Technology&Computing>Computing>ComputerSoftwareAndApplications>SharewareAndFreeware": 0.13566900789737701, "BusinessAndFinance>Industries>TechnologyIndustry": 0.13414880633354187, "BusinessAndFinance>Industries>InformationServicesIndustry": 0.12478621304035187, "BusinessAndFinance>Economy>FinancialReform": 0.12252965569496155, "BusinessAndFinance>Business>BusinessBanking&Finance>MergersAndAcquisitions": 0.11304120719432831 }
}
AssemblyAI によって検出されたすべてのトピックを含む JSON ファイルを取得しました。 基本的に、ポッドキャストをテキストに書き起こし、それをさまざまな文とそれに対応する関連性に分割しました。 各文には、トピックのリストがあります。 この大辞典の最後には、すべての文章から抽出されたトピックの要約があります。
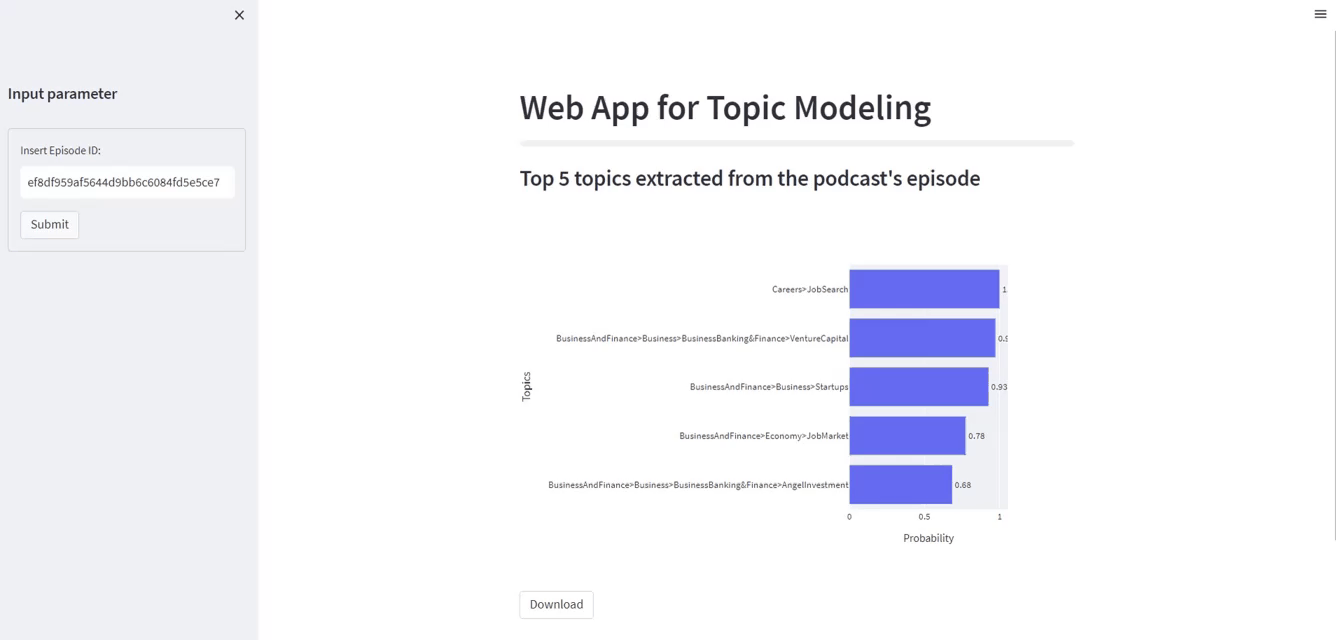
Careers と JobSearch が最も関連性の高いトピックであることに注意してください。 上位 XNUMX つのラベルには、ビジネスと金融、スタートアップ、経済、ビジネスと銀行、ベンチャー キャピタル、およびその他の同様のトピックも含まれています。
3. Streamlit で Web アプリケーションを構築する
展開されたアプリへのリンクは こちら
次に、前の手順で定義したすべての関数をメイン ブロックに配置します。このブロックでは、Python を使用して数行のコードでアプリケーションを構築できる無料のオープン ソース フレームワークである Streamlit を使用して Web アプリケーションを構築します。
- アプリのメインタイトルは
st.markdown. - 左パネルのサイドバーは次を使用して作成されます
st.sidebar. ポッドキャストのエピソード ID を挿入するために必要です。 - 「送信」ボタンを押すと、棒グラフが表示され、最も関連性の高い 5 つのトピックが抽出されて表示されます。
- 文字起こし、トピック、およびデータの視覚化をダウンロードする場合は、[ダウンロード] ボタンがあります。
st.markdown("# **Web App for Topic Modeling**")
bar = st.progress(0)
st.sidebar.header("Input parameter")
with st.sidebar.form(key="my_form"): episode_id = st.text_input("Insert Episode ID:") # 7b23aaaaf1344501bdbe97141d5250ff submit_button = st.form_submit_button(label="Submit")
if submit_button: f = open("secrets.yaml", "rb") parameters = yaml.load(f, Loader=yaml.FullLoader) f.close() # step 1 - Extract episode's url from listen notes audio_url = retrieve_url_podcast(parameters, episode_id) # bar.progress(30) api_key = parameters["api_key"] headers = { "authorization": api_key, "content-type": "application/json", } # step 2 - retrieve id of transcription response from AssemblyAI transcript_id = send_transc_request(headers, audio_url) # bar.progress(70) # step 3 - topics polling_response = obtain_polling_response(headers, transcript_id) save_files(polling_response) df = create_df_topics() import plotly.express as px st.subheader("Top 5 topics extracted from the podcast's episode") fig = px.bar( df.iloc[:5, :].sort_values( by=["Probability"], ascending=True ), x="Probability", y="Topics", text="Probability", ) fig.update_traces( texttemplate="%{text:.2f}", textposition="outside" ) fig.write_html("barplot.html") st.plotly_chart(fig) save_zip() with open("final.zip", "rb") as zip_download: btn = st.download_button( label="Download", data=zip_download, file_name="final.zip", mime="application/zip", )
Web アプリケーションを実行するには、ターミナルで次のコマンド ラインを記述する必要があります。
streamlit run topic_app.py
すばらしい! XNUMX つの URL が表示されるはずです。これらのいずれかをクリックすると、Web アプリケーションを使用する準備が整います。
Web アプリケーションのコードが完成し、正常に動作することを確認したら、次のステップはインターネット上の Heroku にデプロイすることです。
あなたはおそらく何を疑問に思っています ヘロク は。 これは、さまざまなコーディング言語を使用して Web アプリケーションの開発と展開を可能にするクラウド プラットフォームです。
1. requirements.txt、Procfile、および setup.sh を作成します。
その後、ファイルを作成します Requirements.txt、スクリプトによって要求されたすべての python パッケージが含まれています。 この素晴らしいpythonライブラリを使用して、次のコマンドラインを使用して自動的に作成できます ピプレックス.
それは魔法のように Requirements.txt ファイル:
pandas==1.4.3
plotly==5.10.0
PyYAML==6.0
requests==2.28.1
streamlit==1.12.2
コマンドラインの使用を避ける pip freeze > requirements ような この記事 提案した。 問題は、その特定のプロジェクトから必要とされなかったより多くの python パッケージを返すことです。
に加えて Requirements.txt、Web アプリケーションの実行に必要なコマンドを指定する Procfile も必要です。
web: sh setup.sh && streamlit run topic_app.py
最後の要件は、 セットアップ.sh 次のコードを含むファイル:
mkdir -p ~/.streamlit/
echo "
[server]n
port = $PORTn
enableCORS = falsen
headless = truen
n " > ~/.streamlit/config.toml
2.Herokuに接続
まだ登録していない場合 ヘロクの Web サイトで、そのサービスを利用するには無料のアカウントを作成する必要があります。 また、ローカル PC に Heroku をインストールする必要があります。 この XNUMX つの要件を満たせば、楽しいパートを始めることができます。 ターミナルで次のコマンド ラインをコピーします。
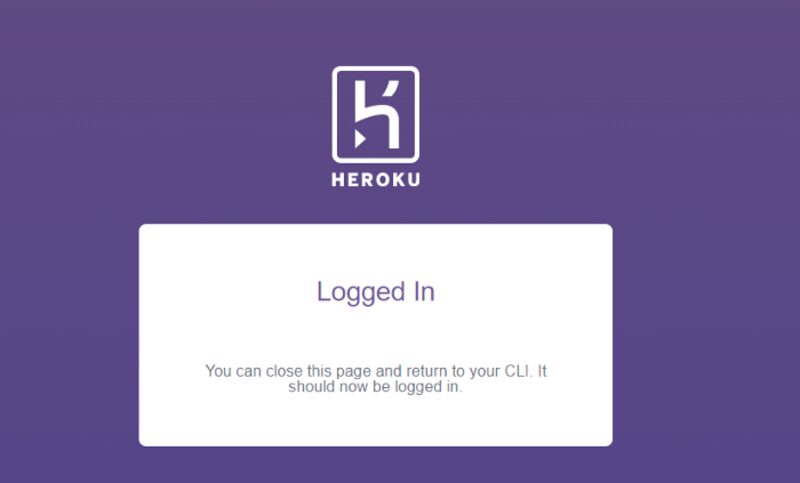
heroku login
コマンドを押すと、ブラウザに Heroku のウィンドウが表示され、アカウントのメールアドレスとパスワードを入力する必要があります。 それが機能する場合、次の結果が得られるはずです。
したがって、VS コードに戻って、端末で Web アプリケーションを作成するコマンドを記述できます。
heroku create topic-web-app-heroku
出力:
Creating ⬢ topic-web-app-heroku... done
https://topic-web-app-heroku.herokuapp.com/ | https://git.heroku.com/topic-web-app-heroku.git
アプリを Heroku にデプロイするには、次のコマンド ラインが必要です。
git push heroku master
コードをローカル リポジトリのメイン ブランチから heroku リモートにプッシュするために使用されます。 他のコマンドを使用してリポジトリに変更をプッシュした後:
git add -A
git commit -m "App over!"
git push
ついに完成! これで、最終的にデプロイされたアプリが表示されるはずです!
このミニプロジェクトを高く評価していただければ幸いです。 アプリを作成してデプロイするのはとても楽しいものです。 初めてはちょっと怖いかもしれませんが、終わったら後悔はありません! また、メモリ要件が低い小規模なプロジェクトで作業している場合は、Web アプリケーションを Heroku にデプロイする方がよいことも強調したいと思います。 AWS Lambda や Google Cloud など、より大規模なクラウド プラットフォーム フレームワークは、他の代替手段となる可能性があります。 GitHub コードは こちら. 読んでくれてありがとう。 良い1日を!
ユージニア・アネロ 現在、イタリアのパドバ大学の情報工学科の研究員です。 彼女の研究プロジェクトは、異常検出と組み合わせた継続的学習に焦点を当てています。
元の。 許可を得て転載。
- SEO を活用したコンテンツと PR 配信。 今日増幅されます。
- Platoblockchain。 Web3メタバースインテリジェンス。 知識の増幅。 こちらからアクセスしてください。
- 情報源: https://www.kdnuggets.com/2023/01/creating-web-application-extract-topics-audio-python.html?utm_source=rss&utm_medium=rss&utm_campaign=creating-a-web-application-to-extract-topics-from-audio-with-python

