Introduction
In today’s digital landscape, adhering to Know Your Customer (KYC) regulations is paramount for businesses operating within financial services, online marketplaces, and other sectors requiring user identification. Traditionally, KYC processes have relied on manual document verification, a time-consuming and error-prone approach. This guide delves into how Amazon Rekognition, a powerful cloud-based AI service by AWS, specializing in facial recognition and analysis, can revolutionize your online KYC strategy, transforming it into a streamlined, secure, and cost-effective process.

Learning Objectives
- Understand the importance of Know Your Customer (KYC) regulations in various industries and the challenges associated with manual verification processes.
- Explore the capabilities of Amazon Rekognition as a cloud-based AI service specializing in facial recognition and analysis.
- Learn the steps involved in implementing identity verification using Amazon Rekognition, including user onboarding, text extraction, liveness detection, facial analysis, and face matching.
- Understand the significance of leveraging AI-driven identity verification for enhancing security measures, streamlining user authentication processes, and improving user experiences.
This article was published as a part of the Data Science Blogathon.
Table of Contents
Understanding KYC Challenges
KYC regulations mandate that businesses verify the identity of their users to mitigate fraud, money laundering, and other financial crimes. This verification typically involves collecting and validating government-issued identification documents. While these regulations are essential for maintaining a secure financial ecosystem, manual verification processes create challenges:
- Pandemic Impact: During the pandemic, the financial sector faced significant challenges in onboarding new customers as movement was restricted. Therefore, manual verification in bulk is not possible. So by implementing online KYC, your business is ready for such future events.
- Human Errors: Manual verification is susceptible to errors, potentially allowing fraudulent registrations to slip through the cracks.
- Managing IDs: Since the documentation is a printed copy managing the same is a growing challenge. The copies can get lost, burnt, stolen, misused, etc.
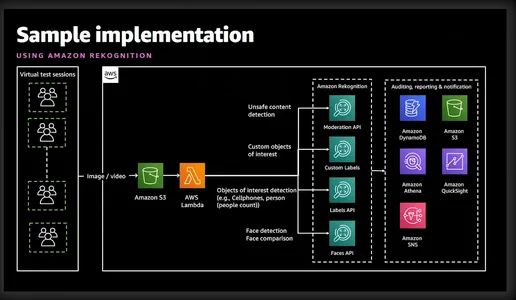
What is Amazon Rekognition?
Amazon Rekognition is a powerful image and video analysis service offered by Amazon Web Services (AWS). It utilizes advanced machine learning algorithms to analyze visual content in images and videos, enabling developers to extract valuable insights and perform various tasks such as object detection, facial recognition, and identity verification. The below simplistic diagram gives a good idea of the features and services involved.
Identity Verification with Amazon Rekognition
Before I take you to the implementation, let me give you a high-level idea and steps involved in implementing identity verification for our Online KYC.
- User Onboarding: This process will be specific to the business. However, at a minimum, the business will need First Name, Middle Name, Last Name, Date of Birth, Expiry Date of ID Card, and Passport size Photo. All this information can be collected by asking the user to upload an image of a National ID card.
- Extract Text: AWS Textract service can neatly extract all the above information from the uploaded ID card. Not just this we can also query Textract to fetch specific information from the ID card.
- Liveness and Facial Recognition: To make sure that the user trying to do his KYC is active on the screen and is live when the liveness session starts. Amazon Rekognition can accurately detect and compare faces within images or video streams.
- Facial Analysis: Once a face is captured, it provides detailed insights into facial attributes such as age, gender, emotions, and facial landmarks. Not just this, it will also validate if the user has sunglasses or if their face is covered by other objects.
- Face Matching: After verifying the Liveness, we can perform face matching to verify the identity of individuals based on reference images extracted from the National ID card and the current image from the Liveness session.
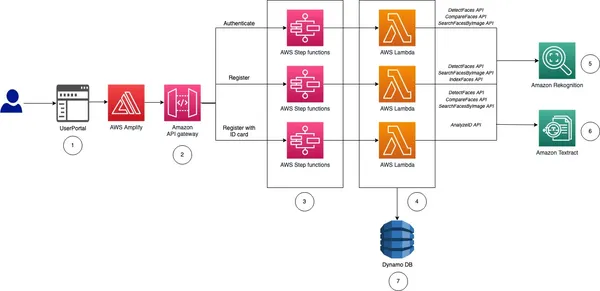
As you can see Rekognition facilitates rapid user registration by analyzing a captured selfie and comparing it to a government-issued ID uploaded by the user. Liveness detection capabilities within Rekognition help thwart spoofing attempts by prompting users to perform specific actions like blinking or turning their heads. This ensures the user registering is a real person and not a cleverly disguised photo or deep fake. This automated process significantly reduces onboarding times, enhancing user experience. Rekognition eliminates the potential for human error inherent in manual verification. Moreover, Facial recognition algorithms achieve high accuracy rates, ensuring reliable identity verification.
I know you are now very excited to see it in action, so let’s straight away head on to it.
Implementing Identity Verification: The Automated KYC Solution
Step 1: Setting Up the AWS Account
Before getting started, ensure that you have an active AWS account. You can sign up for an AWS account on the AWS website if you haven’t already. Once signed up, activate Rekognition services. AWS provides comprehensive documentation and tutorials to facilitate this process.
Step 2: Setting Up IAM permissions
If you want to use Python or AWS CLI then this step is required. You need to provide permission to access Rekognition, S3, and Textract. This can be done from the console.
Step 3: Upload User National ID
I will demonstrate this through CLI, Python, and a graphical interface. If you are looking for a code for a graphical interface then AWS has uploaded a nice example on git. This article has deployed the same code to show a graphical interface.
aws textract analyze-id --document-pages
'{"S3Object":{"Bucket":"bucketARN","Name":"id.jpg"}}'
"IdentityDocuments": [
{
"DocumentIndex": 1,
"IdentityDocumentFields": [
{
"Type": {
"Text": "FIRST_NAME"
},
"ValueDetection": {
"Text": "xyz",
"Confidence": 93.61839294433594
}
},
{
"Type": {
"Text": "LAST_NAME"
},
"ValueDetection": {
"Text": "abc",
"Confidence": 96.3537826538086
}
},
{
"Type": {
"Text": "MIDDLE_NAME"
},
"ValueDetection": {
"Text": "",
"Confidence": 99.16631317138672
}
},
{
"Type": {
"Text": "SUFFIX"
},
"ValueDetection": {
"Text": "",
"Confidence": 99.16964721679688
}
},
{
"Type": {
"Text": "CITY_IN_ADDRESS"
},
"ValueDetection": {
"Text": "",
"Confidence": 99.17261505126953
}
},
{
"Type": {
"Text": "ZIP_CODE_IN_ADDRESS"
},
"ValueDetection": {
"Text": "",
"Confidence": 99.17854309082031
}
},
{
"Type": {
"Text": "STATE_IN_ADDRESS"
},
"ValueDetection": {
"Text": "",
"Confidence": 99.15782165527344
}
},
{
"Type": {
"Text": "STATE_NAME"
},
"ValueDetection": {
"Text": "",
"Confidence": 99.16664123535156
}
},
{
"Type": {
"Text": "DOCUMENT_NUMBER"
},
"ValueDetection": {
"Text": "123456",
"Confidence": 95.29527282714844
}
},
{
"Type": {
"Text": "EXPIRATION_DATE"
},
"ValueDetection": {
"Text": "22 OCT 2024",
"NormalizedValue": {
"Value": "2024-10-22T00:00:00",
"ValueType": "Date"
},
"Confidence": 95.7198486328125
}
},
{
"Type": {
"Text": "DATE_OF_BIRTH"
},
"ValueDetection": {
"Text": "1 SEP 1994",
"NormalizedValue": {
"Value": "1994-09-01T00:00:00",
"ValueType": "Date"
},
"Confidence": 97.41930389404297
}
},
{
"Type": {
"Text": "DATE_OF_ISSUE"
},
"ValueDetection": {
"Text": "23 OCT 2004",
"NormalizedValue": {
"Value": "2004-10-23T00:00:00",
"ValueType": "Date"
},
"Confidence": 96.1384506225586
}
},
{
"Type": {
"Text": "ID_TYPE"
},
"ValueDetection": {
"Text": "PASSPORT",
"Confidence": 98.65157318115234
}
}The above command uses the AWS Textract analyze-id command to extract information from the image already uploaded in S3. The output JSON contains bounding boxes as well so I have truncated to show just the key information. As you can see it has extracted all the required information along with the confidence level of the text value.
Using Python functions
textract_client = boto3.client('textract', region_name='us-east-1')

def analyze_id(document_file_name)->dict:

  if document_file_name is not None:
       with open(document_file_name, "rb") as document_file:
            idcard_bytes = document_file.read()
  '''
  Analyze the image using Amazon Textract.
  '''
  try:
    response = textract_client.analyze_id(
      DocumentPages=[
        {'Bytes': idcard_bytes},
      ])

    return response
  except textract_client.exceptions.UnsupportedDocumentException:
    logger.error('User %s provided an invalid document.' % inputRequest.user_id)
    raise InvalidImageError('UnsupportedDocument')
  except textract_client.exceptions.DocumentTooLargeException:
    logger.error('User %s provided document too large.' % inputRequest.user_id)
    raise InvalidImageError('DocumentTooLarge')
  except textract_client.exceptions.ProvisionedThroughputExceededException:
    logger.error('Textract throughput exceeded.')
    raise InvalidImageError('ProvisionedThroughputExceeded')
  except textract_client.exceptions.ThrottlingException:
    logger.error('Textract throughput exceeded.')
    raise InvalidImageError('ThrottlingException')
  except textract_client.exceptions.InternalServerError:
    logger.error('Textract Internal Server Error.')
    raise InvalidImageError('ProvisionedThroughputExceeded')

result = analyze_id('id.jpeg')
print(result) # print raw output
Using Graphical Interface
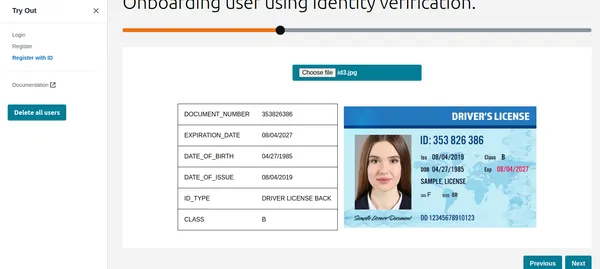
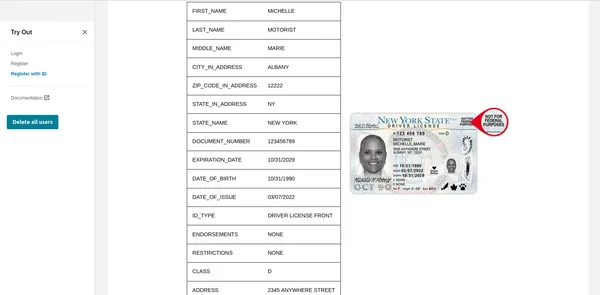
As you can see Textract has fetched all the relevant information and also shows the ID type. This information can be used to register the customer or user. But before that let us do a Liveness check to verify that it is a real person.
Liveness Check
Once the user clicks on begin check in the image below, it will first detect the face, and if only one face is on the screen then it will start the Liveness session. For privacy reasons, I can’t show the full Liveness session. However, you can check this demo video link. The Liveness session will provide results in % confidence. We can also set a threshold below which the Liveness session will fail. For critical applications like this, one should keep the threshold to 95%.
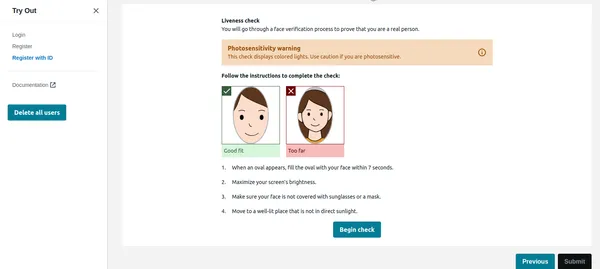
Apart from the confidence, the Liveness session will also provide emotions and foreign objects detected on the face. If the user has sunglasses or showing expressions like anger etc. the application can reject the image.
Python Code
rek_client = boto3.client('rekognition', region_name='us-east-1')
sessionid = rek_client.create_face_liveness_session(Settings={'AuditImagesLimit':1,
           'OutputConfig': {"S3Bucket": 'IMAGE_BUCKET_NAME'}})

session = rek_client.get_face_liveness_session_results(
            SessionId=sessionid)
Face Comparison
Once the user has successfully completed the Liveness session the application has to compare the face with the face detected from the ID. This is the most critical part of our application. We do not want to register a user whose face doesn’t matches with ID. The face detected from the uploaded ID is already stored in S3 by the code which will act as a reference image. Similarly face from the liveness session is also stored in S3. Let us check the CLI implementation first.
CLI command
aws rekognition compare-faces
      --source-image '{"S3Object":{"Bucket":"imagebucket","Name":"reference.jpg"}}'
      --target-image '{"S3Object":{"Bucket":"imagebucket","Name":"liveness.jpg"}}'
      --similarity-threshold 0.9
Output
{
              "UnmatchedFaces": [],
              "FaceMatches": [
                  {
                      "Face": {
                          "BoundingBox": {
                              "Width": 0.12368916720151901,
                              "Top": 0.16007372736930847,
                              "Left": 0.5901257991790771,
                              "Height": 0.25140416622161865
                          },
                          "Confidence": 99.0,
                          "Pose": {
                              "Yaw": -3.7351467609405518,
                              "Roll": -0.10309021919965744,
                              "Pitch": 0.8637830018997192
                          },
                          "Quality": {
                              "Sharpness": 95.51618957519531,
                              "Brightness": 65.29893493652344
                          },
                          "Landmarks": [
                              {
                                  "Y": 0.26721030473709106,
                                  "X": 0.6204193830490112,
                                  "Type": "eyeLeft"
                              },
                              {
                                  "Y": 0.26831310987472534,
                                  "X": 0.6776827573776245,
                                  "Type": "eyeRight"
                              },
                              {
                                  "Y": 0.3514654338359833,
                                  "X": 0.6241428852081299,
                                  "Type": "mouthLeft"
                              },
                              {
                                  "Y": 0.35258132219314575,
                                  "X": 0.6713621020317078,
                                  "Type": "mouthRight"
                              },
                              {
                                  "Y": 0.3140771687030792,
                                  "X": 0.6428444981575012,
                                  "Type": "nose"
                              }
                          ]
                      },
                      "Similarity": 100.0
                  }
              ],
              "SourceImageFace": {
                  "BoundingBox": {
                      "Width": 0.12368916720151901,
                      "Top": 0.16007372736930847,
                      "Left": 0.5901257991790771,
                      "Height": 0.25140416622161865
                  },
                  "Confidence": 99.0
              }
          }
As you can see above it has shown there is no unmatched face and the face matches with 99% confidence level. It has also returned bounding boxes as an extra output. Now let us see Python implementation.
Python Code
rek_client = boto3.client('rekognition', region_name='us-east-1')

response = rek_client.compare_faces(
      SimilarityThreshold=0.9,
      SourceImage={
            'S3Object': {
              'Bucket': bucket,
              'Name': idcard_name
          }
      },
      TargetImage={
          'S3Object': {
              'Bucket': bucket,
              'Name': name
          }
      })

if len(response['FaceMatches']) == 0:
      IsMatch = 'False'
      Reason = 'Property FaceMatches is empty.'

facenotMatch = False
for match in response['FaceMatches']:
    similarity:float = match['Similarity']
    if similarity > 0.9:
        IsMatch = True,
        Reason = 'All checks passed.'
    else:
        facenotMatch = True
The above code will compare the face detected from the ID card and Liveness session keeping the threshold to 90%. If the face matches then it will set the IsMatch variable to True. So with just one function call, we can compare the two faces, both of them are already uploaded in the S3 bucket.
So finally, we can register the valid user and complete his KYC. As you can see this is fully automated and user-initiated, and no other person is involved. The process has also shortened the user onboarding as compared to the current manual process.
Step 4: Query Document like GPT
I liked one of the very useful features of Textract you can ask specific questions say “What is the Identity No”. Let me show you how to do this using AWS CLI.
aws textract analyze-document --document '{"S3Object":{"Bucket":"ARN","Name":"id.jpg"}}'
--feature-types '["QUERIES"]' --queries-config '{"Queries":[{"Text":"What is the Identity No"}]}'
Please note that earlier, I used the analyze-id function while now I have used analyze-document to query the document. This is very useful if there are specific fields in the ID card that are not extracted by the analyze-id function. The analyze-id function works well for all US ID cards however, it works well with Indian government ID cards as well. Still, if some of the fields are not extracted then the query feature can be used.
AWS uses cognito service for managing User identity, user ID, and face IDs stored in DynamoDB. AWS sample code also compares the images from the existing database so that the same user can not re-register using a different ID or user name. This kind of validation is a must for a robust automated KYC system.
Conclusion
By embracing AWS Rekognition for Automated Self KYC, you can transform your user onboarding process from a laborious hurdle into a smooth and secure experience. Amazon Rekognition provides a robust solution for implementing identity verification systems with advanced facial recognition capabilities. By leveraging its features, developers can enhance security measures, streamline user authentication processes, and deliver seamless user experiences across various applications and industries.
With the comprehensive guide outlined above, you are well-equipped to embark on your journey to implement identity verification using Amazon Rekognition effectively. Embrace the power of AI-driven identity verification and unlock new possibilities in the realm of digital identity management.
Key Takeaways
- Amazon Rekognition offers advanced facial recognition and analysis capabilities, facilitating streamlined and secure identity verification processes.
- It enables automated user onboarding by extracting essential information from government-issued ID cards and performing liveness checks.
- Implementation steps include setting up AWS services, configuring IAM permissions, and utilizing Python functions or graphical interfaces for text extraction and facial comparisons.
- Real-time liveness checks enhance security by ensuring users are present during verification, while facial comparisons validate identities against reference images.
The media shown in this article is not owned by Analytics Vidhya and is used at the Author’s discretion.
- SEO Powered Content & PR Distribution. Get Amplified Today.
- PlatoData.Network Vertical Generative Ai. Empower Yourself. Access Here.
- PlatoAiStream. Web3 Intelligence. Knowledge Amplified. Access Here.
- PlatoESG. Carbon, CleanTech, Energy, Environment, Solar, Waste Management. Access Here.
- PlatoHealth. Biotech and Clinical Trials Intelligence. Access Here.
- Source: https://www.analyticsvidhya.com/blog/2024/03/how-to-implement-identity-verification-using-amazon-rekognition/

