As customers seek to incorporate their corpus of knowledge into their generative artificial intelligence (AI) applications, or to build domain-specific models, their data science teams often want to conduct A/B testing and have repeatable experiments. In this post, we discuss a solution that uses infrastructure as code (IaC) to define the process of retrieving and formatting data for model customization and initiating the model customization. This enables you to version and iterate as needed.
With Amazon Bedrock, you can privately and securely customize foundation models (FMs) with your own data to build applications that are specific to your domain, organization, and use case. With custom models, you can create unique user experiences that reflect your company’s style, voice, and services.
Amazon Bedrock supports two methods of model customization:
- Fine-tuning allows you to increase model accuracy by providing your own task-specific labeled training dataset and further specialize your FMs.
- Continued pre-training allows you to train models using your own unlabeled data in a secure and managed environment and supports customer-managed keys. Continued pre-training helps models become more domain-specific by accumulating more robust knowledge and adaptability—beyond their original training.
In this post, we provide guidance on how to create an Amazon Bedrock custom model using HashiCorp Terraform that allows you to automate the process, including preparing datasets used for customization.
Terraform is an IaC tool that allows you to manage AWS resources, software as a service (SaaS) resources, datasets, and more, using declarative configuration. Terraform provides the benefits of automation, versioning, and repeatability.
Solution overview
We use Terraform to download a public dataset from the Hugging Face Hub, convert it to JSONL format, and upload it to an Amazon Simple Storage Service (Amazon S3) bucket with a versioned prefix. We then create an Amazon Bedrock custom model using fine-tuning, and create a second model using continued pre-training. Lastly, we configure Provisioned Throughput for our new models so we can test and deploy the custom models for wider usage.
The following diagram illustrates the solution architecture.
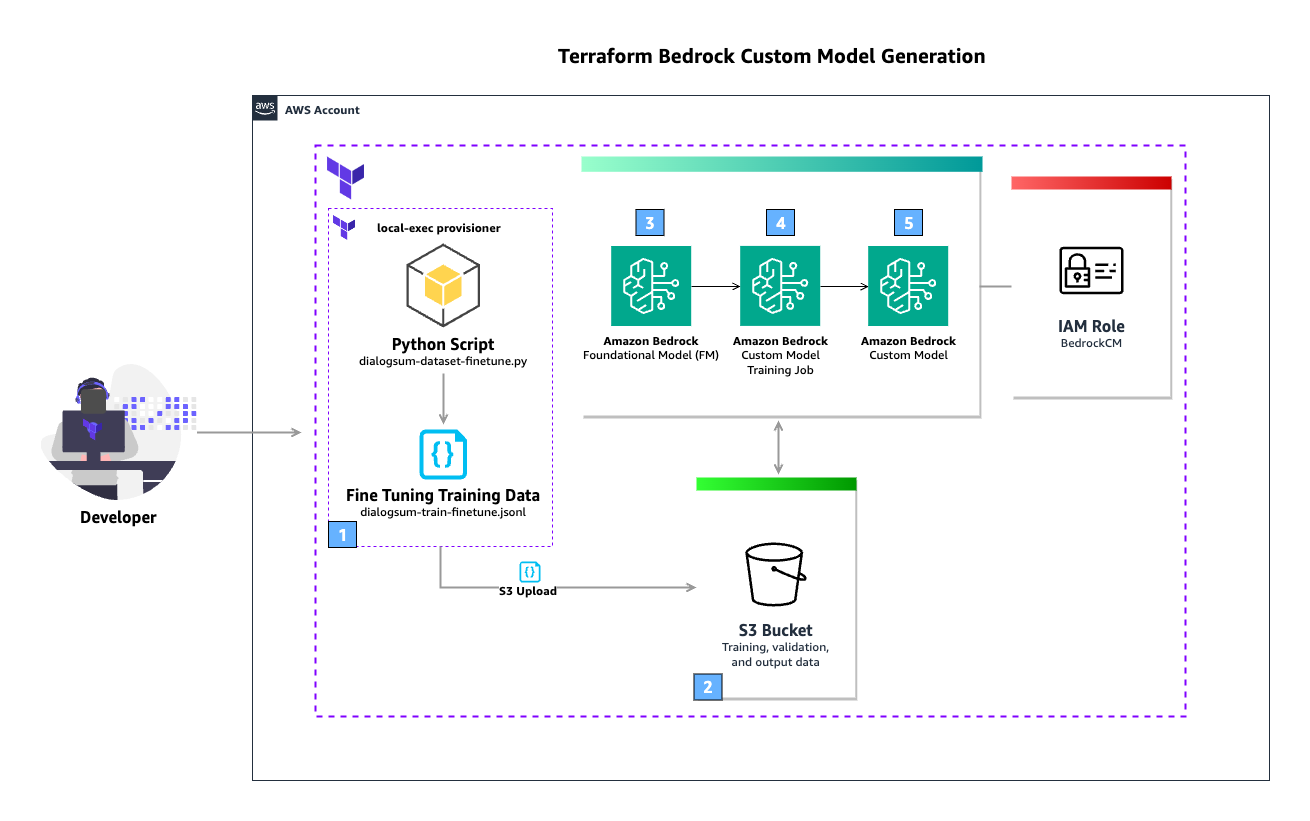
The workflow includes the following steps:
- The user runs the
terraform applyThe Terraformlocal-execprovisioner is used to run a Python script that downloads the public dataset DialogSum from the Hugging Face Hub. This is then used to create a fine-tuning training JSONL file. - An S3 bucket stores training, validation, and output data. The generated JSONL file is uploaded to the S3 bucket.
- The FM defined in the Terraform configuration is used as the source for the custom model training job.
- The custom model training job uses the fine-tuning training data stored in the S3 bucket to enrich the FM. Amazon Bedrock is able to access the data in the S3 bucket (including output data) due to the AWS Identity and Access Management (IAM) role defined in the Terraform configuration, which grants access to the S3 bucket.
- When the custom model training job is complete, the new custom model is available for use.
The high-level steps to implement this solution are as follows:
- Create and initialize a Terraform project.
- Create data sources for context lookup.
- Create an S3 bucket to store training, validation, and output data.
- Create an IAM service role that allows Amazon Bedrock to run a model customization job, access your training and validation data, and write your output data to your S3 bucket.
- Configure your local Python virtual environment.
- Download the DialogSum public dataset and convert it to JSONL.
- Upload the converted dataset to Amazon S3.
- Create an Amazon Bedrock custom model using fine-tuning.
- Configure custom model Provisioned Throughput for your models.
Prerequisites
This solution requires the following prerequisites:
Create and initialize a Terraform project
Complete the following steps to create a new Terraform project and initialize it. You can work in a local folder of your choosing.
- In your preferred terminal, create a new folder named
bedrockcmand change to that folder:- If on Windows, use the following code:
- If on Mac or Linux, use the following code:
Now you can work in a text editor and enter in code.
- In your preferred text editor, add a new file with the following Terraform code:
- Save the file in the root of the
bedrockcmfolder and name itmain.tf. - In your terminal, run the following command to initialize the Terraform working directory:
The output will contain a successful message like the following:
“Terraform has been successfully initialized”
- In your terminal, validate the syntax for your Terraform files:
Create data sources for context lookup
The next step is to add configurations that define data sources that look up information about the context Terraform is currently operating in. These data sources are used when defining the IAM role and policies and when creating the S3 bucket. More information can be found in the Terraform documentation for aws_caller_identity, aws_partition, and aws_region.
- In your text editor, add the following Terraform code to your
main.tffile:
- Save the file.
Create an S3 bucket
In this step, you use Terraform to create an S3 bucket to use during model customization and associated outputs. S3 bucket names are globally unique, so you use the Terraform data source aws_caller_identity, which allows you to look up the current AWS account ID, and use string interpolation to include the account ID in the bucket name. Complete the following steps:
- Add the following Terraform code to your
main.tffile:
- Save the file.
Create an IAM service role for Amazon Bedrock
Now you create the service role that Amazon Bedrock will assume to operate the model customization jobs.
You first create a policy document, assume_role_policy, which defines the trust relationship for the IAM role. The policy allows the bedrock.amazonaws.com service to assume this role. You use global condition context keys for cross-service confused deputy prevention. There are also two conditions you specify: the source account must match the current account, and the source ARN must be an Amazon Bedrock model customization job operating from the current partition, AWS Region, and current account.
Complete the following steps:
- Add the following Terraform code to your
main.tffile:
The second policy document, bedrock_custom_policy, defines permissions for accessing the S3 bucket you created for model training, validation, and output. The policy allows the actions GetObject, PutObject, and ListBucket on the resources specified, which are the ARN of the model_training S3 bucket and all of the buckets contents. You will then create an aws_iam_policy resource, which creates the policy in AWS.
- Add the following Terraform code to your
main.tffile:
Finally, the aws_iam_role resource, bedrock_custom_role, creates an IAM role with a name prefix of BedrockCM- and a description. The role uses assume_role_policy as its trust policy and bedrock_custom_policy as a managed policy to allow the actions specified.
- Add the following Terraform code to your
main.tffile:
- Save the file.
Configure your local Python virtual environment
Python supports creating lightweight virtual environments, each with their own independent set of Python packages installed. You create and activate a virtual environment, and then install the datasets package.
- In your terminal, in the root of the
bedrockcmfolder, run the following command to create a virtual environment:
- Activate the virtual environment:
- If on Windows, use the following command:
- If on Mac or Linux, use the following command:
Now you install the datasets package via pip.
- In your terminal, run the following command to install the datasets package:
Download the public dataset
You now use Terraform’s local-exec provisioner to invoke a local Python script that will download the public dataset DialogSum from the Hugging Face Hub. The dataset is already divided into training, validation, and testing splits. This example uses just the training split.
You prepare the data for training by removing the id and topic columns, renaming the dialogue and summary columns, and truncating the dataset to 10,000 records. You then save the dataset in JSONL format. You could also use your own internal private datasets; we use a public dataset for example purposes.
You first create the local Python script named dialogsum-dataset-finetune.py, which is used to download the dataset and save it to disk.
- In your text editor, add a new file with the following Python code:
- Save the file in the root of the
bedrockcmfolder and name itdialogsum-dataset-finetune.py.
Next, you edit the main.tf file you have been working in and add the terraform_data resource type, uses a local provisioner to invoke your Python script.
- In your text editor, edit the
main.tffile and add the following Terraform code:
Upload the converted dataset to Amazon S3
Terraform provides the aws_s3_object resource type, which allows you to create and manage objects in S3 buckets. In this step, you reference the S3 bucket you created earlier and the terraform_data resource’s output attribute. This output attribute is how you instruct the Terraform resource graph that these resources need to be created with a dependency order.
- In your text editor, edit the
main.tffile and add the following Terraform code:
Create an Amazon Bedrock custom model using fine-tuning
Amazon Bedrock has multiple FMs that support customization with fine-tuning. To see a list of the models available, use the following AWS Command Line Interface (AWS CLI) command:
- In your terminal, run the following command to list the FMs that support customization by fine-tuning:
You use the Cohere Command-Light FM for this model customization. You add a Terraform data source to query the foundation model ARN using the model name. You then create the Terraform resource definition for aws_bedrock_custom_model, which creates a model customization job, and immediately returns.
The time it takes for model customization is non-deterministic, and is based on the input parameters, model used, and other factors.
- In your text editor, edit the
main.tffile and add the following Terraform code:
- Save the file.
Now you use Terraform to create the data sources and resources defined in your main.tf file, which will start a model customization job.
- In your terminal, run the following command to validate the syntax for your Terraform files:
- Run the following command to apply the configuration you created. Before creating the resources, Terraform will describe all the resources that will be created so you can verify your configuration:
Terraform will generate a plan and ask you to approve the actions, which will look similar to the following code:
- Enter
yesto approve the changes.
Terraform will now apply your configuration. This process runs for a few minutes. At this time, your custom model is not yet ready for use; it will be in a Training state. Wait for training to finish before continuing. You can review the status on the Amazon Bedrock console on the Custom models page.
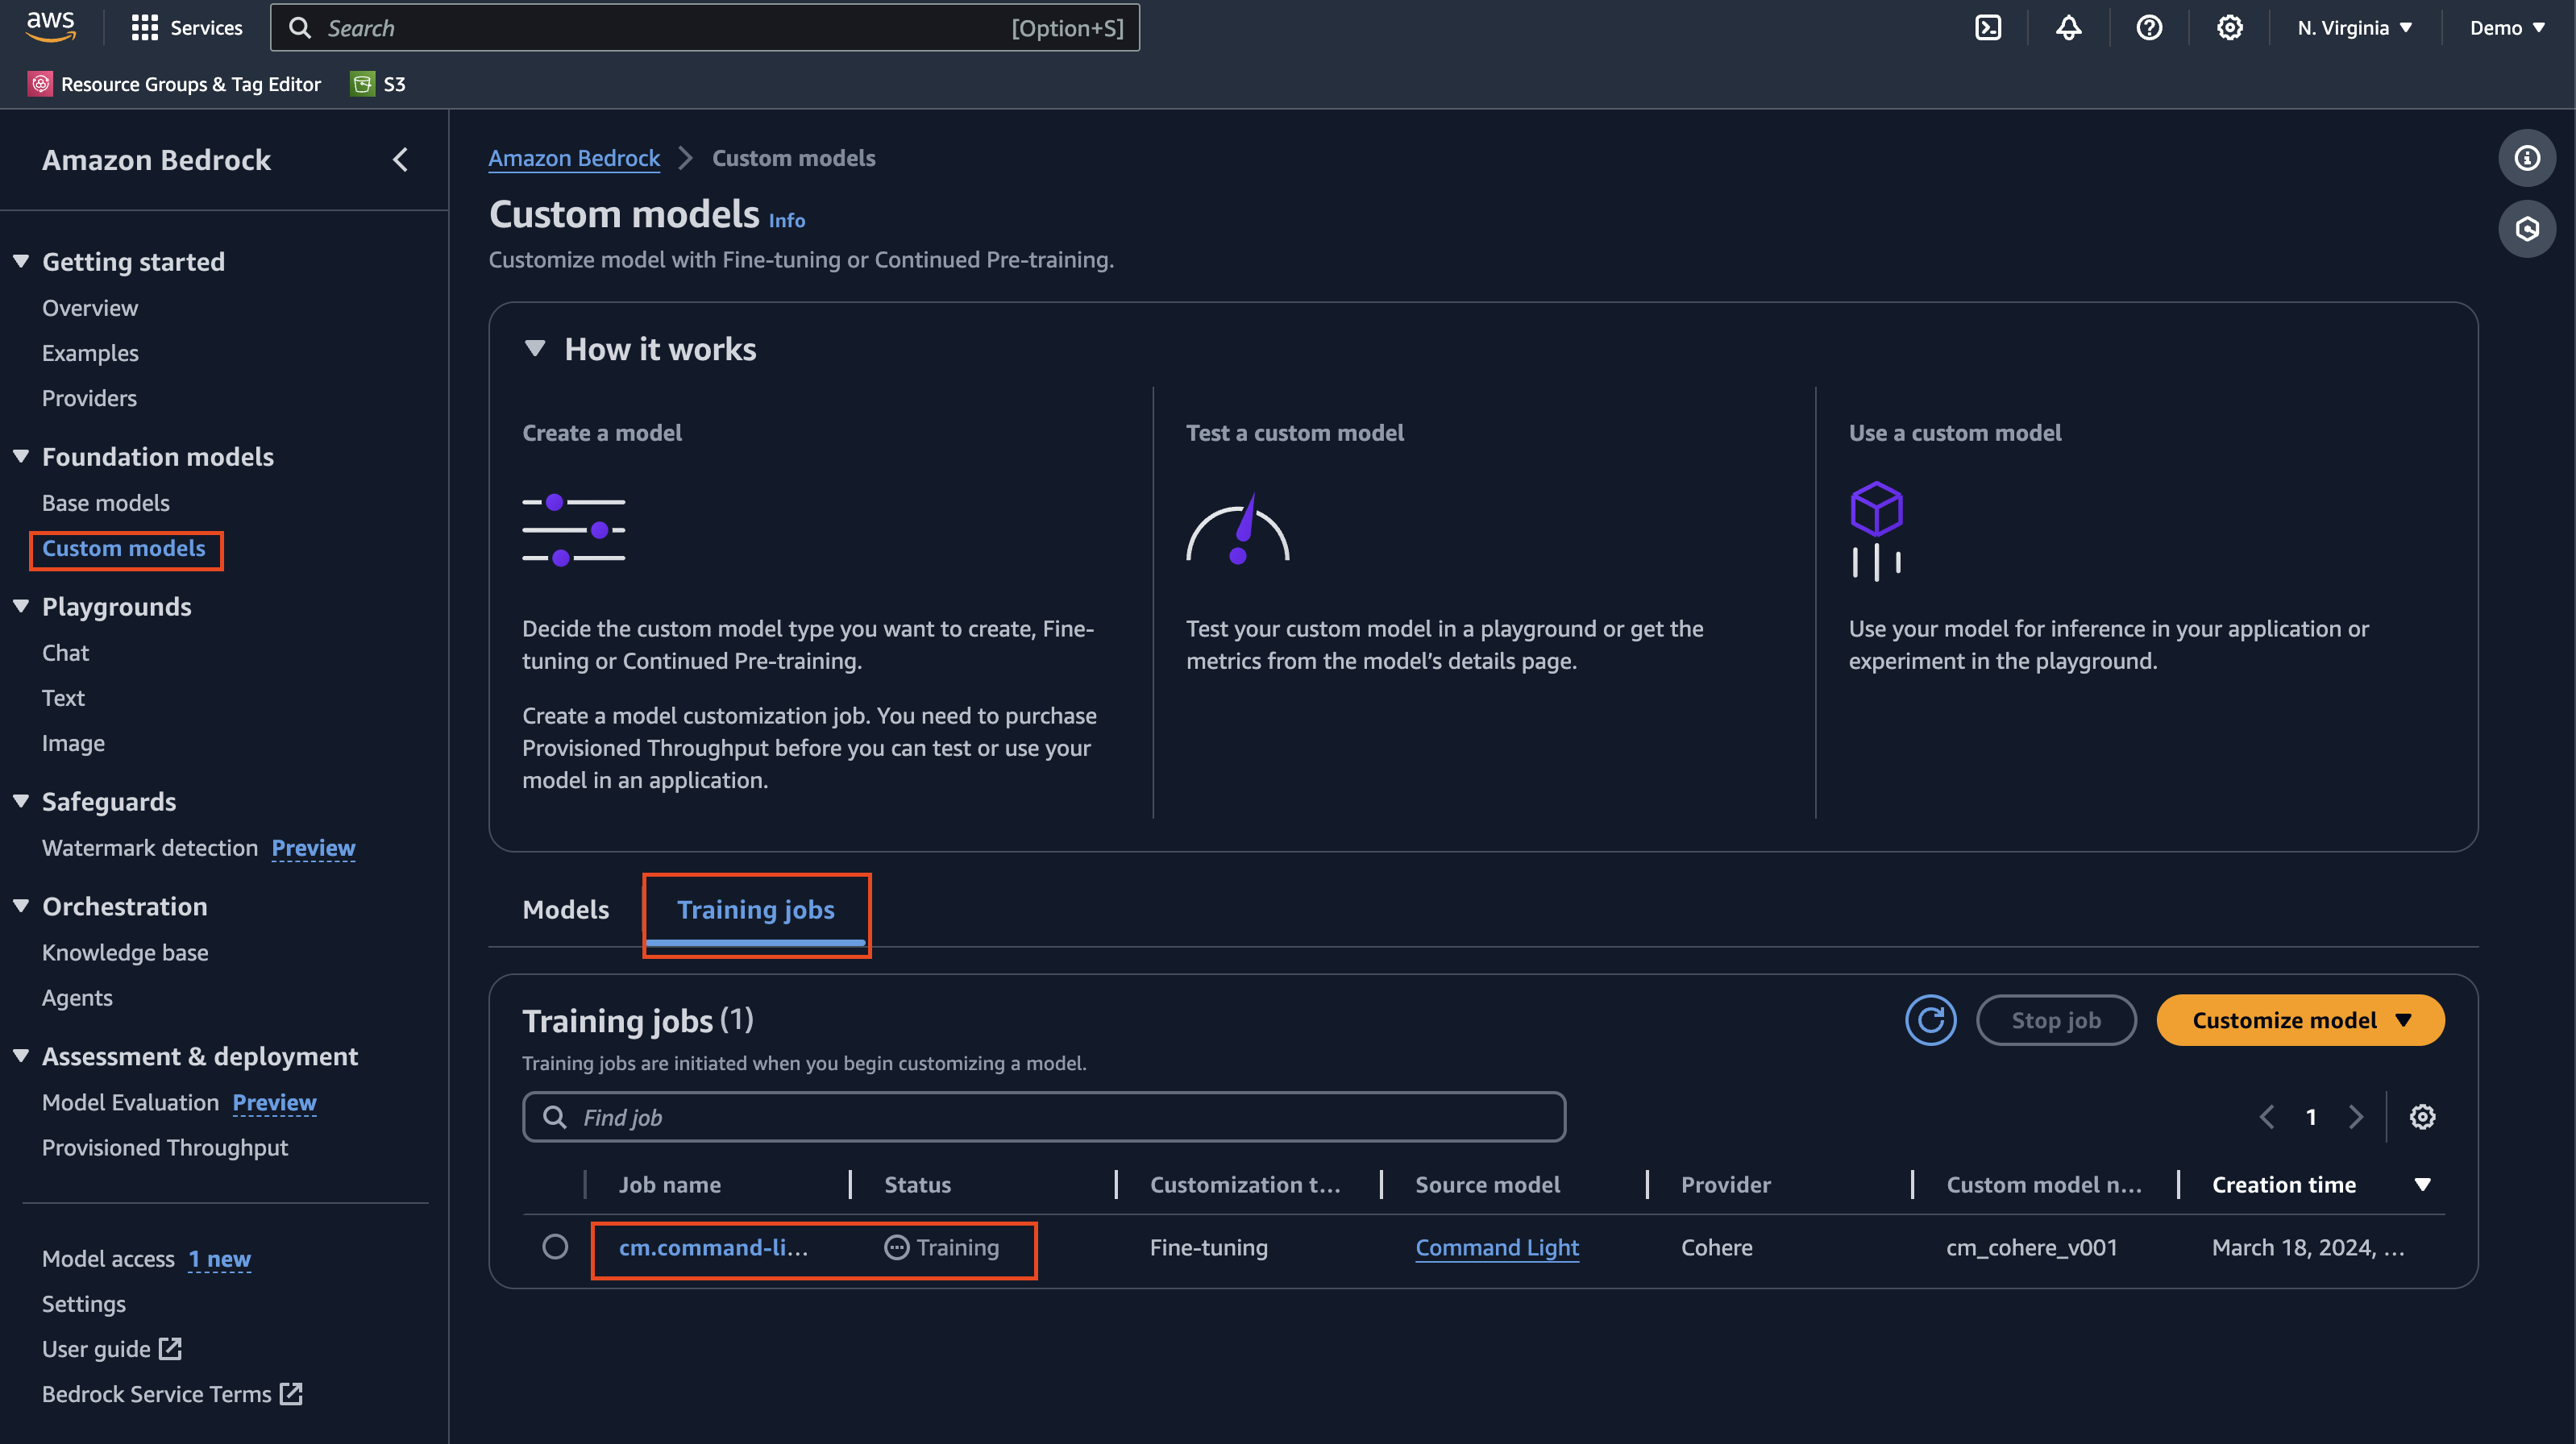
When the process is complete, you receive a message like the following:
You can also view the status on the Amazon Bedrock console.
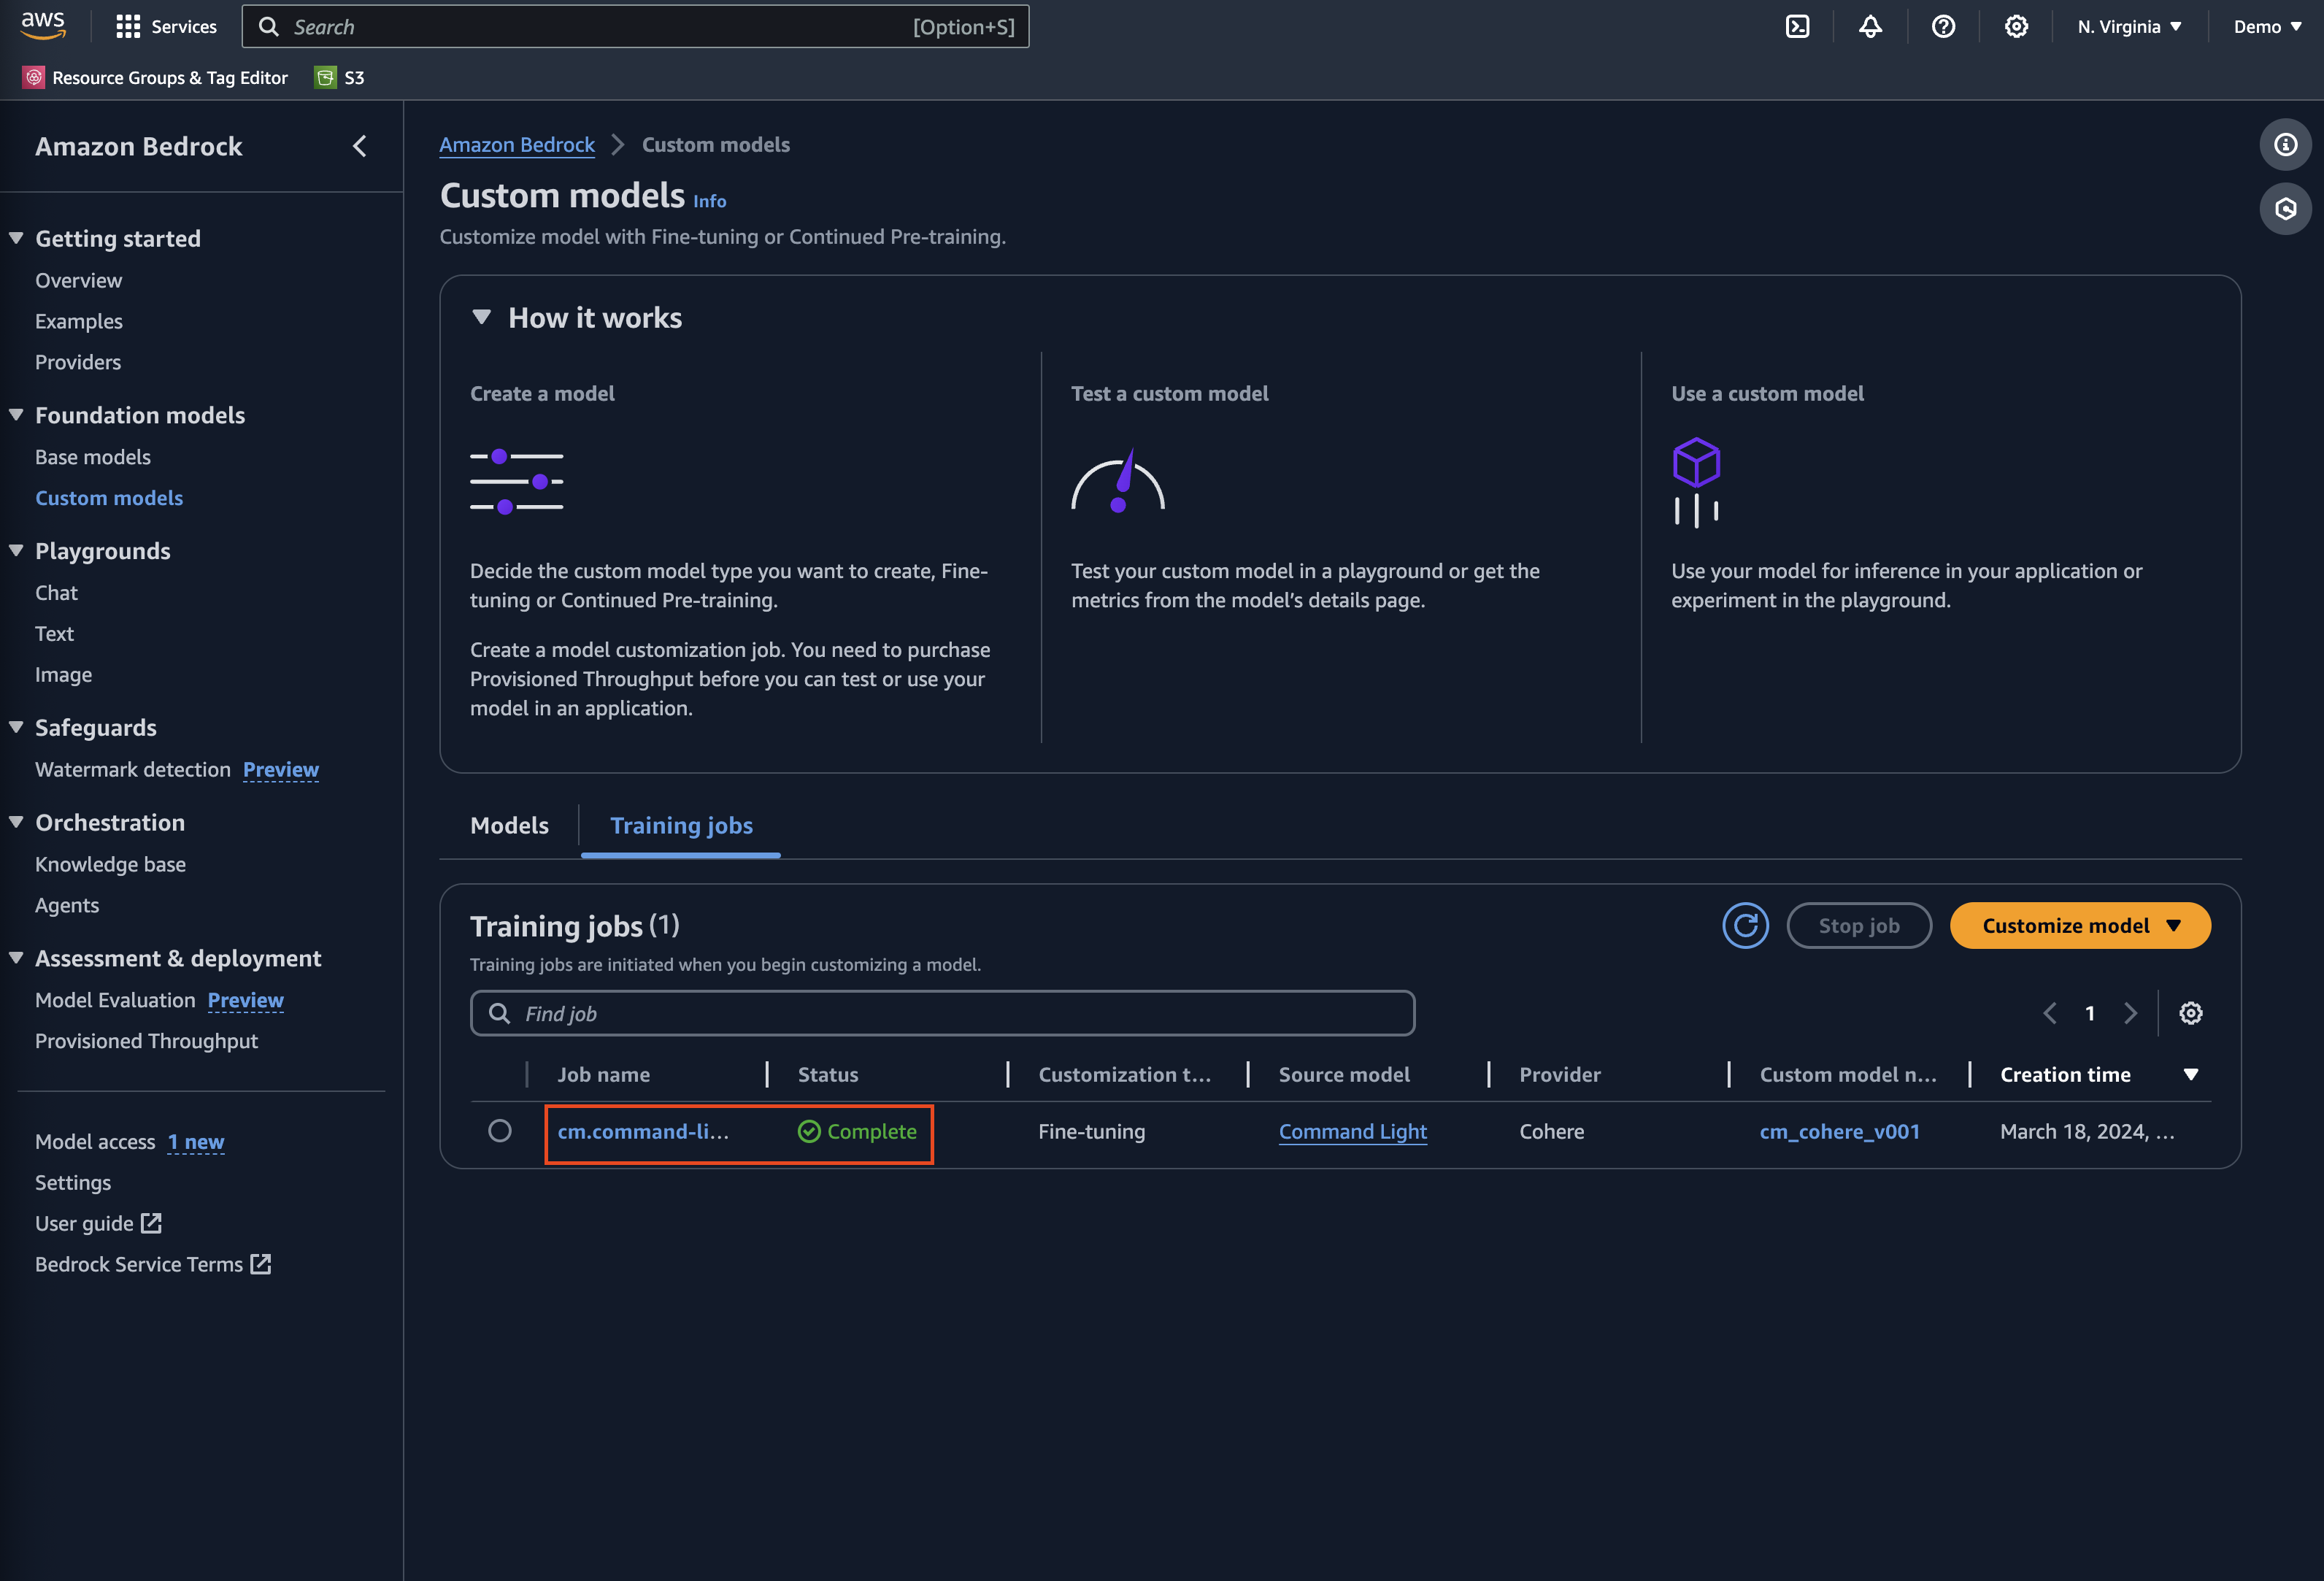
You have now created an Amazon Bedrock custom model using fine-tuning.
Configure custom model Provisioned Throughput
Amazon Bedrock allows you to run inference on custom models by purchasing Provisioned Throughput. This guarantees a consistent level of throughput in exchange for a term commitment. You specify the number of model units needed to meet your application’s performance needs. For evaluating custom models initially, you can purchase Provisioned Throughput hourly (on-demand) with no long-term commitment. With no commitment, a quota of one model unit is available per Provisioned Throughput.
You create a new resource for Provisioned Throughput, associate one of your custom models, and provide a name. You omit the commitment_duration attribute to use on-demand.
- In your text editor, edit the
main.tffile and add the following Terraform code:
- Save the file.
Now you use Terraform to create the resources defined in your main.tf file.
- In your terminal, run the following command to re-initialize the Terraform working directory:
The output will contain a successful message like the following:
- Validate the syntax for your Terraform files:
- Run the following command to apply the configuration you created:
Best practices and considerations
Note the following best practices when using this solution:
- Data and model versioning – You can version your datasets and models by using version identifiers in your S3 bucket prefixes. This allows you to compare model efficacy and outputs. You could even operate a new model in a shadow deployment so that your team can evaluate the output relative to your models being used in production.
- Data privacy and network security – With Amazon Bedrock, you are in control of your data, and all your inputs and customizations remain private to your AWS account. Your data, such as prompts, completions, custom models, and data used for fine-tuning or continued pre-training, is not used for service improvement and is never shared with third-party model providers. Your data remains in the Region where the API call is processed. All data is encrypted in transit and at rest. You can use AWS PrivateLink to create a private connection between your VPC and Amazon Bedrock.
- Billing – Amazon Bedrock charges for model customization, storage, and inference. Model customization is charged per tokens processed. This is the number of tokens in the training dataset multiplied by the number of training epochs. An epoch is one full pass through the training data during customization. Model storage is charged per month, per model. Inference is charged hourly per model unit using Provisioned Throughput. For detailed pricing information, see Amazon Bedrock Pricing.
- Custom models and Provisioned Throughput – Amazon Bedrock allows you to run inference on custom models by purchasing Provisioned Throughput. This guarantees a consistent level of throughput in exchange for a term commitment. You specify the number of model units needed to meet your application’s performance needs. For evaluating custom models initially, you can purchase Provisioned Throughput hourly with no long-term commitment. With no commitment, a quota of one model unit is available per Provisioned Throughput. You can create up to two Provisioned Throughputs per account.
- Availability – Fine-tuning support on Meta Llama 2, Cohere Command Light, and Amazon Titan Text FMs is available today in Regions US East (N. Virginia) and US West (Oregon). Continued pre-training is available today in public preview in Regions US East (N. Virginia) and US West (Oregon). To learn more, visit the Amazon Bedrock Developer Experience and check out Custom models.
Clean up
When you no longer need the resources created as part of this post, clean up those resources to save associated costs. You can clean up the AWS resources created in this post using Terraform with the terraform destroy command.
First, you need to modify the configuration of the S3 bucket in the main.tf file to enable force destroy so the contents of the bucket will be deleted, so the bucket itself can be deleted. This will remove all of the sample data contained in the S3 bucket as well as the bucket itself. Make sure there is no data you want to retain in the bucket before proceeding.
- Modify the declaration of your S3 bucket to set the
force_destroyattribute of the S3 bucket:
- Run the terraform apply command to update the S3 bucket with this new configuration:
- Run the terraform destroy command to delete all resources created as part of this post:
Conclusion
In this post, we demonstrated how to create Amazon Bedrock custom models using Terraform. We introduced GitOps to manage model configuration and data associated with your custom models.
We recommend testing the code and examples in your development environment, and making appropriate changes as required to use them in production. Consider your model consumption requirements when defining your Provisioned Throughput.
We welcome your feedback! If you have questions or suggestions, leave them in the comments section.
About the Authors
 Josh Famestad is a Solutions Architect at AWS helping public sector customers accelerate growth, add agility, and reduce risk with cloud-based solutions.
 Kevon Mayers is a Solutions Architect at AWS. Kevon is a Core Contributor for Terraform and has led multiple Terraform initiatives within AWS. Prior to joining AWS, he was working as a DevOps engineer and developer, and before that was working with the GRAMMYs/The Recording Academy as a studio manager, music producer, and audio engineer.
 Tyler Lynch is a Principal Solution Architect at AWS. Tyler leads Terraform provider engineering at AWS and is a Core Contributor for Terraform.
- SEO Powered Content & PR Distribution. Get Amplified Today.
- PlatoData.Network Vertical Generative Ai. Empower Yourself. Access Here.
- PlatoAiStream. Web3 Intelligence. Knowledge Amplified. Access Here.
- PlatoESG. Carbon, CleanTech, Energy, Environment, Solar, Waste Management. Access Here.
- PlatoHealth. Biotech and Clinical Trials Intelligence. Access Here.
- Source: https://aws.amazon.com/blogs/machine-learning/streamline-custom-model-creation-and-deployment-for-amazon-bedrock-with-provisioned-throughput-using-terraform/

