Introduction
With the advent of Large Language Models (LLMs), they have permeated numerous applications, supplanting smaller transformer models like BERT or Rule Based Models in many Natural Language Processing (NLP) tasks. LLMs are versatile, capable of handling tasks such as Text Classification, Summarization, Sentiment Analysis, and Topic Modelling, owing to their extensive pre-training. However, despite their broad capabilities, LLMs often lag in accuracy compared to their smaller counterparts.
To address this limitation, one effective strategy is fine-tuning pre-trained LLMs to excel in specific tasks. Fine-tuning large models frequently yields optimal results. Notably, Google’s Gemini, among other large models, now offers users the ability to fine-tune these models with their own training data. In this guide, we will walk through the process of fine-tuning Gemini models for specific problems, as well as how to curate a dataset using resources from HuggingFace.
Learning Objectives
- Understand the performance of Google’s Gemini models.
- Learn Dataset Preparation for Gemini model finetuning.
- Configure parameters for Gemini model finetuning.
- Monitor finetuning progress and metrics.
- Test Gemini model performance on new data.
- Explore Gemini model applications for PII masking.
This article was published as a part of the Data Science Blogathon.
Table of contents
Google Announces to Tuning Gemini
Gemini comes in two versions: Pro and Ultra. In the Pro version, there are Gemini 1.0 Pro and the new Gemini 1.5 Pro. These models from Google compete with other advanced models like ChatGPT and Claude. Gemini models are easy to access for everyone through AI Studio UI and a free API.
Recently, Google announced a new feature for Gemini models: fine-tuning. This means anyone can adjust the Gemini model to suit their needs. You can fine-tune Gemini using either the AI Studio UI or their API. Fine-tuning is when we give our own data to Gemini so it can behave the way we want. Google uses Parameter Efficient Tuning (PET) to quickly adjust a few important parts of the Gemini model, making it useful for different tasks.
Preparing the Dataset
Before we begin finetuning the model, we will start with installing the necessary libraries. By the way, we will be working with Colab for this guide.
Installing Necessary Libraries
The following are the Python modules necessary to get started:
!pip install -q google-generativeai datasets- google-generativeai: It is a library from the Google team that lets us access the Google Gemini Model. The same library can be worked with to finetune the Gemini Model.
- datasets: This is a library from HuggingFace that we can work with to download a variety of datasets from the HuggingFace hub. We will work with this datasets library to download the PII(Personal Identifiable Information) dataset and give it to the Gemini Model for Fine-Tuning.
Running the following code will download and install the Google Generative AI and the Datasets library in our Python Environment.
Setting-up OAuth
In the next step, we need to set up an OAuth for this tutorial. The OAuth is necessary so that the data we are sending to Google for Fine-Tuning Gemini is safe. To get the OAuth follow this link. Then download the client_secret.json after creating the OAuth. Save the contents of the client_secrent.json in the Colab Secrets under the CLIENT_SECRET name and run the below code:
import os
if 'COLAB_RELEASE_TAG' in os.environ:
  from google.colab import userdata
  import pathlib
  pathlib.Path('client_secret.json').write_text(userdata.get('CLIENT_SECRET'))

  # Use `--no-browser` in colab
  !gcloud auth application-default login --no-browser
  --client-id-file client_secret.json --scopes=
  'https://www.googleapis.com/auth/cloud-platform,
  https://www.googleapis.com/auth/generative-language.tuning'
else:
  !gcloud auth application-default login --client-id-file
  client_secret.json --scopes=
  'https://www.googleapis.com/auth/cloud-platform,
  https://www.googleapis.com/auth/generative-language.tuning'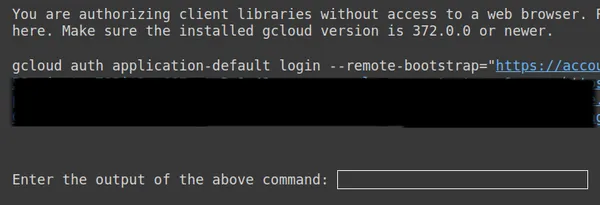
Above, copy the second link and paste it into your CMD local system and run it.
Then you will be redirected to the Web Browser to log in with the email that you have set up OAuth with. After logging in, in the CMD, we get a URL, now paste that URL into the 3rd line and press enter. Now we are done performing the OAuth with Google.
Downloading and Preparing the Dataset
Firstly, we will start by downloading the dataset that we will work with to finetune it to the Gemini Model. For this, we work with the datasets library. The code for this will be:
from datasets import load_dataset

dataset = load_dataset("ai4privacy/pii-masking-200k")
print(dataset)- Here we start by importing the load_dataset function from the datasets library.
- To this load_dataset() function, we pass in the dataset that we wish to download. Here in our example it is “ai4privacy/pii-masking-200k”, which contains 200k rows of masked and unmasked PII data.
- Then we print the dataset.

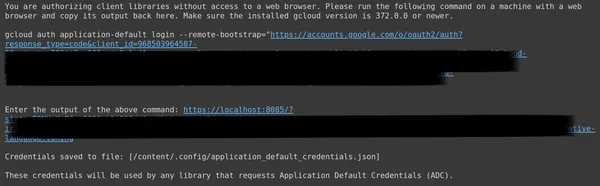
We see that the dataset contains 209261 rows of training data and no test data. And each row contains different columns like masked_text, unmasked_text, privacy_mask, span_labels, bio_labels, and tokenised_text. The sample data is mentioned below:
In the displayed image, we observe both masked and unmasked sentences. Specifically, in the masked sentence, certain elements such as the person’s name and vehicle number are obscured by specific tags. To prepare the data for further processing, we now need to undertake some data preprocessing. Below is the code for this preprocessing step:
df = dataset['train'].to_pandas()
df = df[['unmasked_text','masked_text']][:2000]
df.columns = ['input','output']
- Firstly, we take the training part of the data from the dataset(the dataset we have downloaded contains only the training part). Then we convert this to Pandas Dataframe.
- Here to fine-tune Gemini, we only need the unmasked_text and the masked_text columns, so we take only these two.
- Then we get the first 2000 rows of the data. We will work with the first 2000 rows to fine-tune Gemini.
- We then edit the column names from unmasked_text and masked_text to input and output columns, because, when we give the input text data containing the PII(Personal Identifiable Information) to the Gemini Model, we expect it to generate the output text data where the PII is masked.
Formatting Data for Fine-Tuning Gemini
The next step is to format our data. To do this, we will be creating a formatter function:
def formatter(x):
 text = f"""
Given the information below, mask the personal identifiable information.


Input:
{x['input']}


Output:
 """
 return text


df['text_input'] = df.apply(formatter,axis=1)
print(df['text_input'][0])- Here we define a function formatter, which takes in x, a row of our data.
- Then it defines a variable text with f-strings, where we provide the context, followed by the input data from the dataframe.
- Finally, we return the formatted text.
- The last line applies the formatter function to each row of the dataframe that we have created through the apply() function.
- The axis=1 tells that the function will be applied to each row of the dataframe.
Running the code will result in the creation of a new column called “train” that contains the formatted text for each row including the input field. Let’s try observing one of the elements of the dataframe:
Dividing Data into Train and Test Sets
We can see that the text_input contains the data where each row contains the context at the start of the data telling to mask the PII and then followed by the input data and followed by the word output, where the model needs to generate the output. Now we need to divide the dataframe into train and test:
df = df[['text_input','output']]
df_train = df.iloc[:1900,:]
df_test = df.iloc[1900:,:]- We start by filtering the data so that it contains the text_input and the output columns. These are the columns expected by the Google Fine-Tune library to train the Gemini
- The Gemini will get the text_input and learn to write the output
- We divide the the data into df_train which contains the 1900 rows of our original data
- And a df_test which contains about 100 rows of the original data
- We train the Gemini on df_train and then test it by taking 3-4 examples from the df_test to see the output generated by it
So running the code will filter our data and divide it into train and test. Finally, we are done with the data pre-processing part.
Fine-tuning Gemini Model
Follow the steps mentioned below to fine-tune your Gemini Model:
Setting-up Tuning Parameters
In this section, we will go through the process of Tuning the Gemini Model. For this, we will work with the following code:
import google.generativeai as genai


bm_name = "models/gemini-1.0-pro-001"
name = 'pii-model'
operation = genai.create_tuned_model(
   source_model=bm_name,
   training_data=df_train,
   id = name,
   epoch_count = 2,
   batch_size=4,
   learning_rate=0.001,
)
- Import the google.generativeai library: This library provides APIs for interacting with Google’s Generative AI services.
- Provide the Base Model Name: This is the name of the pre-trained model that we want to work with for the starting point for our finetuned model. Right now, the only tunable model is models/gemini-1.0-pro-001, we store this in the variable bm_name.
- Provide the name of the finetuned model: This is the name that we want to give to our finetuned model. Here we give it the name “pii-model”.
- Create a Tuned Model Operation object: This object represents the operation of creating a finetuned model. It takes the following arguments:
- source_model: The name of the Base Model
- training_data: The training data for the finetuned model that we have just created which is df_train
- id: The ID/name of the finetuned model
- epoch_count: The number of training epochs. For this example, we will with 2 epochs
- batch_size: The batch size for training. For this example, we will go with the value of 4
- learning_rate: The Learning Rate for training. Here we are providing it with a value of 0.001
- We are done providing the parameters. Running this code will create a finetuned model object. Now we need to start the process of training the Gemini LLM. For this, we work with the following code.
We are done setting up the parameters. Running this code will create a tuned model object. Now we need to start the process of training the Gemini LLM. For this, we work with the following code:
model = genai.get_tuned_model(f'tunedModels/{name}')
print(model)
Creating a Tuned Model
Here, we use the .get_tuned_model() function from the genai library, passing our defined model’s name, starting the training process. Then, we print the model, as shown in the image below:
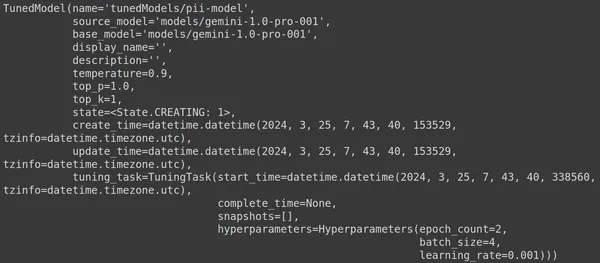
The model is of type TunedModel. Here we can observe different parameters for the model that we have defined. They are:
- name: This variable contains the name that we have provided for our tuned model
- source_model: This is the source model that we are fine-tuning, which in our example is models/gemini-1.0-pro
- base_model: This is again the base model that we are fine-tuning, which in our example is models/Gemini-1.0-pro. The base model can even be a previously fine-tuned model. Here we are it same for both
- display_name: The display name for the tuned model
- description: It contains any description of our model and what the model is about
- temperature: The higher the value, the more creative the answers are generated from the Large Language Model. Here it is set to 0.9 by default
- top_p: Defines the top probability for the token selection while generating text. The more the top_p more tokens get selected, i.e. tokens are selected from a larger sample of data
- top_k: It tells to sample from the k most likely next tokens at each step. Here top_k is 1, which implies that the most probable next token is the one that will be selected, i.e. the token with the highest probability will always be selected
- state: The state is creating, it implies that the model is currently being fine-tuned
- create_time: The time when the model was created
- update_time: It is the time when the model was last tuned
- tuning_task: Contains the parameters that we have defined for tuning, which include temperature, epochs, and batch size
Initiating Training Process
We can even get the state and the metadata of the tuned model through the following code:
print(operation.metadata)
Here it displays the total steps, that is 950, which is predictable. Because in our example we have 1900 rows of training data. In each step, we take in a batch of 4, i.e. 4 rows, so for one complete epoch we have 1900/4 i.e. 475 steps. We have set 2 epochs for training, which implies that 2*475 = 950 steps.
Monitoring Training Progress
The code below creates a status bar telling how much percentage of the training has finished and the time that it will take to complete the entire training process:
import time


for status in operation.wait_bar():
 time.sleep(30)
The above code creates a progress bar, when completed implies that our tuning process has ended.
Visualizing Training Performance
The operation object even contains the snapshots of training. That it will contain the evaluation metrics like the mean_loss per epoch. We can visualize this with the following code:
import pandas as pd
import seaborn as sns


model = operation.result()


snapshots = pd.DataFrame(model.tuning_task.snapshots)


sns.lineplot(data=snapshots, x = 'epoch', y='mean_loss')- Here we get the final tuned model from the operation.result()
- When we train the model, the model takes snapshots at frequent intervals. These snapshots contain data like the mean_loss. Hence we extract the snapshots of the tuned model by calling the model.tuning_task.snapshots
- We create a dataframe from these snapshots by passing the snapshots to the pd.DataFrame and storing them in snapshots variable
- Finally, we create a line plot from the extracted snapshot data
Running the code will result in the following graph:
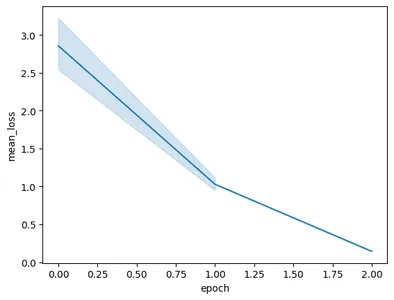
In this image, we can see that we have reduced the loss from 3 to less than 0.5 in just 2 epochs of training. Finally, we are done with the training of the Gemini Model
Testing the Fine-tuned Gemini Model
In this section, we will test our model on the test data. Now to work with the tuned model, we work with the following code:
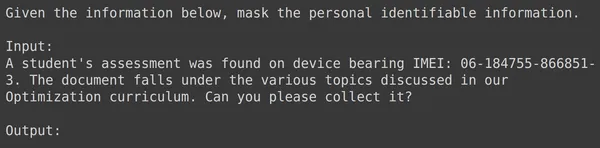
model = genai.GenerativeModel(model_name=f'tunedModels/{name}')The above code will load the tuned model that we have just trained with the Personal Identifiable Information data. Now we will test this model with some examples from the test data that we have put aside. For this let’s print the random text_input and its corresponding output from the test set:
print(df_test['text_input'][1900])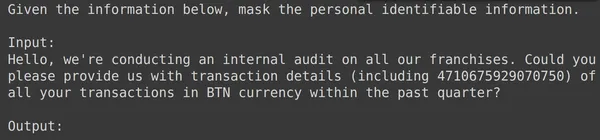
df_test['output'][1900]
Above we can see a random text_input and the output taken from the test set. Now we will pass this text_input to the model and observe the output generated:
text = df_test['text_input'][1900]

res = model.generate_content(text)

print(res.text)
We see that the model was successful in masking the Personal Identifiable Information for the given text_input and the output generated by the model exactly matches the output from the test set. Now let us try this out with a few more examples:
print(df_test['text_input'][1969])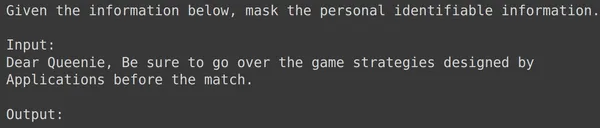
print(df_test['output'][1969])
text = df_test['text_input'][1969]

res = model.generate_content(text)

print(res.text)
print(df_test['text_input'][1987])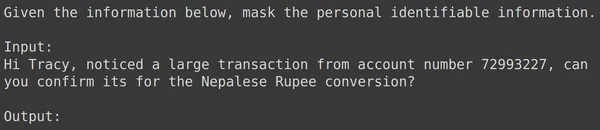
print(df_test['output'][1987])
text = df_test['text_input'][1987]

res = model.generate_content(text)

print(res.text)
print(df_test['text_input'][1933])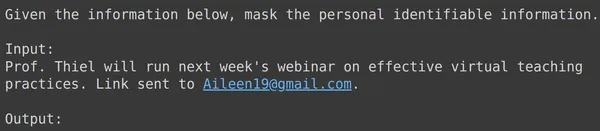
print(df_test['output'][1933])
text = df_test['text_input'][1933]

res = model.generate_content(text)

print(res.text)
For all the examples above, we see that our fine-tuned model performance is good. The model was able to learn from the given training data and apply the masking correctly to hide sensitive personal information. So we have seen from start to end how to create a dataset for finetuning and how to fine-tune the Gemini Model on a dataset and the results we see look very promising for a finetuned model
Conclusion
In conclusion, this guide has provided a comprehensive walkthrough on finetuning Google’s flagship Gemini models for masking personal identifiable information (PII). We began by exploring Google’s blog post of the finetuning capability for Gemini models, highlighting the need of finetuning these models to achieve task-specific accuracy. Through practical steps outlined in the guide, including Dataset Preparation, finetuning the Gemini model, and testing its performance, users can harness the power of large language models for PII masking tasks.
Here are the key takeaways from this guide:
- Gemini models provide a powerful library for fine-tuning, allowing users to tailor them to specific tasks, which include PII masking, through Parameter-Efficient Tuning (PET)
- Dataset preparation is a crucial step, involving the installation of necessary modules, initiating the OAuth for data security, and formatting the data for training
- The finetuning process includes providing parameters like the Base Model, epoch count, batch size, and Learning Rate to train the Gemini model on the Prepared Dataset
- Monitoring the training progress is facilitated through status updates and visualizations of metrics like mean loss per epoch
- Testing the finetuned model on a separate test dataset verifies its performance in accurately masking PII while maintaining the integrity of the data
- The provided examples showcase the effectiveness of the finetuned Gemini model in successfully masking sensitive personal information, indicating promising results for real-world applications
Frequently Asked Questions
A. Parameter Efficient Tuning (PET) is one of the finetuning techniques that only finetunes a small set of parameters of the model. This is employed by Google to quickly fine-tune important layers in the Gemini model. It efficiently adapts the model to the user’s data, improving its performance for specific tasks
A. Tuning a Gemini model involves providing parameters like the Base Model name, Epoch Count, Batch Size, and Learning Rate. These parameters influence the training process and ultimately affect the model’s performance
A. Users can monitor the training progress of a finetuned Gemini model through status updates, visualizations of metrics like mean loss per epoch, and by observing snapshots of the training process
A. Before finetuning a Gemini model, users need to install necessary libraries like google-generativeai and datasets. Additionally, initiating OAuth for data security and formatting the dataset for training are important steps
A. A finetuned Gemini model can be applied in different domains where PII masking is necessary, like data anonymization, privacy preservation in NLP applications, and compliance with data protection regulations like the GDPR
The media shown in this article is not owned by Analytics Vidhya and is used at the Author’s discretion.
- SEO Powered Content & PR Distribution. Get Amplified Today.
- PlatoData.Network Vertical Generative Ai. Empower Yourself. Access Here.
- PlatoAiStream. Web3 Intelligence. Knowledge Amplified. Access Here.
- PlatoESG. Carbon, CleanTech, Energy, Environment, Solar, Waste Management. Access Here.
- PlatoHealth. Biotech and Clinical Trials Intelligence. Access Here.
- Source: https://www.analyticsvidhya.com/blog/2024/03/guide-to-fine-tuning-gemini-for-masking-pii-data/

