This article was published as a part of the Data Science Blogathon.
Introduction
The AWS Command Line Interface (CLI) is a centralized management tool for managing AWS services. Through CLI, users can control services manually or automate them with powerful scripts. With this one tool, it can handle multiplervices from tcommand line. Usstomization for several services. This article covers how the AWS NoSQL database, DynamoDB, can be managed through AWS CLI, including creating and managing DynamoDB tables.
Overview of
Key features:
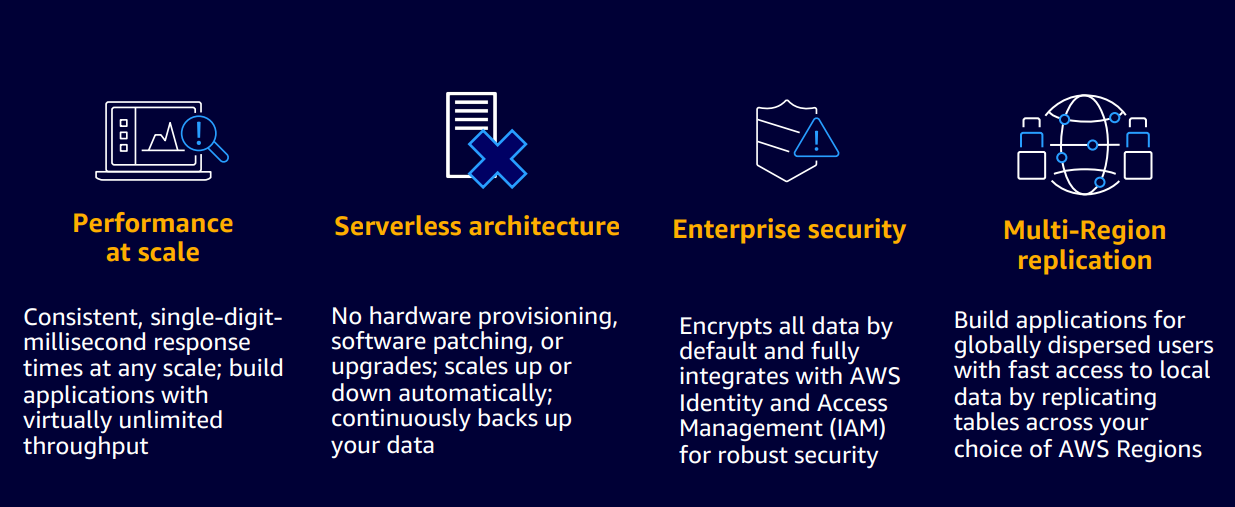
Source: https://www.cloudinfonow.com/amazon-dynamodb-pricing/
Why DynamoDB?
- Automatic partitioning and SSD-based storage.
- No need to worry about patching and updating databases.
- Supports cross-region replication, which helps to access data globally.
- Offers on-demand backup features with long-term retention and archiving.
Use cases:
- Analytics:
It stores metrics from multiple data sources, like IoT Sensors, Web Applications, etc. The Time to Live (TTL) feature allows users to control data efficiently.
- Media and Entertainment:
It processes and performs complex analytics to identify the likes and dislikes of its customers and other users’ preferences in combination with big data. Also, it scales throughput and concurrency for media and entertainment workloads like real-time video streaming and interactive content,
- Online Gaming:
It helps to store and maintain Analytical Data, Player Data, Leaderboards, and Player Session Records with ease while providing better performance.
Steps for the Creation and Management of DynamoDB Tables using AWS CLI
To create and manage tables in DynamoDB, users have to follow the following steps:
1. AWS CLI Installation
2. Configure and Set CLI credentials
3. Creation of tables in the CLI using the cble command
4. Management of Tables and Attributes
Step 1: AWS CLI Installation
AWS CLI can be installed on Windows, macOS, or Linux operating systems. Amazon Linux AMI does not need manual installati it already includes AWS CLI in its OS distribution.
Linux OS :
Use the following commands to install the latest version of AWS CLI on Linux x86 (64-bit).
curl "https://awscli.amazonaws.com/awscli-exe-linux-x86_64.zip" -o "awscliv2.zip"
unzip awscliv2.zip
sudo ./aws/install
macOS:
First, Install Homebrew on macOS, and then use the following commands to install the latest version of AWS CLI.
brew install awscli
To verify credentials, the user can use the following command:
aws sts get-caller-identity
Windows:
The latest Windows installation package can be downloaded and installed from the following website:
Another way to install CLI is by running the following command:
msiexec.exe /i https://awscli.amazonaws.com/AWSCLIV2.msi
To confirm CLI installation, the user can run the following command:
aws --version
Step 2: Configure and Set CLI credentials
After installation, configure it with your credentials through the following command:
aws configure
This command asks you to enter details, including the Access Key, Secret Key, Region, etc.
Step 3: Creation of tables in the CLI using the create-table command
To create a table in DynamoDB, use the create-table command with four arguments:
- –table-name – It denotes the table name to be created by the user.
- –attribute-definitions – Denotes a list of attributes and their types that the user will use in the table and indexes.
- –key-schema – Denotes the attributes that make up the Primary Key for the table or an index.
- –billing-mode – Controls how users are charged for read and write throughput, and its value can be either PROVISIONED or PAY_PER_REQUEST.
Let’s create a table with the following details:
- Table Name: Employee_Data
- AttributeNames: Emp_Id, Name, Salary, Department, Position
- Range Key: Department
- Partition Key: Emp_Id
- Billing Mode: PAY_PER_REQUEST
CLI command to create a table based on the above details will be:
aws dynamodb create-table --table-name Employee_Data --attribute-definitions AttributeName=Emp_Id,AttributeType=S AttributeName=Name,AttributeType=S AttributeName=Salary,AttributeType=N AttributeName=Department,AttributeType=S AttributeName=Position,AttributeType=S --key-schema AttributeName=Emp_Id,KeyType=HASH AttributeName=Department,KeyType=RANGE --billing-mode PAY_PER_REQUEST
To confirm successful table creation, the user can check by clicking “Database” under the AWS console, then selecting “DynamoDB”, and finally clicking on “Tables” to view the created table.
Step 4: Management of and Attributes
The tables and associated attributes can be managed through specific AWS CLI commands. Such commands, along with their functions, include the following :
List Tables
To list all the created DynamoDB tables using CLI, use the following command:
aws dynamodb list-tables
Describe Table
To describe the DynamoDB table using CLI, use the aws dynamodb describe-table command. It returns detailed information about the table, including table key schema, provisioned WCU, RCU, table status, etc.
aws dynamodb describe-table --table-name Employee_Data
Delete Table
To delete the DynamoDB table using CLI, use the aws dynamodb delete-table command given below.
aws dynamodb delete-table --table-name Employee_Data
Backup Table
To backup all the DynamoDB table data on demand, use the following command:
aws dynamodb create-backup --table-name Employee_Data --backup-name Employee_Data -backup-$(date +"%m-%d-%Y")
Put Item
To insert a new record to the DynamoDB table, use the following command:
aws dynamodb put-item --table-name Employee_Data --item '{"Emp_Id": {"S": "110"}, "Name": {"S": "Teena"},"Salary": {"N": "65000"},"Department": {"S": "Sales"},"Position": {"S": "Manager"}}'
Get Item
To get a particular Table Item by its key or combination of keys, use the following command:
aws dynamodb get-item --table-name Employee_Data --key '{"Emp_Id": {"S": "115"}}' --consistent-read
Get All Items / Scan
To run a scan operation or get all Items from the DynamoDB table using CLI, use the following command:
aws dynamodb scan --table-name Employee_Data
Delete Item
Table Item deletion can be only made using its Primary Key by using the following command:
aws dynamodb delete-item --table-name Employee_Data --key '{"Emp_Id": {"S": "111"}}'
Conclusion
Users can use the AWS Management Console or the AWS CLI to manage the AWS services. A developer prefers AWS CLI over other techniques because it provides more accurate control over other services and helps in script automation. Hence, table creation and management in DynamoDB are made easy using a particular set of CLI commands.
Key Takeaways:
- AWS Command Line Interface (CLI) is a centralized management tool for managing AWS services.
- Amazon DynamoDB is a fully managed AWS NoSQL database service best suited for high-performance queries on large datasets.
- Creating a table is done through the aws dynamodb create-table command.
- To get general information about the table, use the aws dynamodb describe-table command.
- To insert a new record, use the aws dynamodb put-item command.
- The aws dynamodb scan command will get the entire Table Items or perform a scan operation.
- Table Items can be deleted using the aws dynamodb delete-item command.
The media shown in this article is not owned by Analytics Vidhya and is used at the Author’s discretion.
Related
- Coinsmart. Europe’s Best Bitcoin and Crypto Exchange.Click Here
- Platoblockchain. Web3 Metaverse Intelligence. Knowledge Amplified. Access Here.
- Source: https://www.analyticsvidhya.com/blog/2022/11/creating-and-managing-dynamodb-tables-using-aws-cli/

