As the volume and complexity of analytics workloads continue to grow, customers are looking for more efficient and cost-effective ways to ingest and analyse data. Data is stored from online systems such as the databases, CRMs, and marketing systems to data stores such as data lakes on Amazon Simple Storage Service (Amazon S3), data warehouses in Amazon Redshift, and purpose-built stores such as Amazon OpenSearch Service, Amazon Neptune, and Amazon Timestream.
OpenSearch Service is used for multiple purposes, such as observability, search analytics, consolidation, cost savings, compliance, and integration. OpenSearch Service also has vector database capabilities that let you implement semantic search and Retrieval Augmented Generation (RAG) with large language models (LLMs) to build recommendation and media search engines. Previously, to integrate with OpenSearch Service, you could use open source clients for specific programming languages such as Java, Python, or JavaScript or use REST APIs provided by OpenSearch Service.
Movement of data across data lakes, data warehouses, and purpose-built stores is achieved by extract, transform, and load (ETL) processes using data integration services such as AWS Glue. AWS Glue is a serverless data integration service that makes it straightforward to discover, prepare, and combine data for analytics, machine learning (ML), and application development. AWS Glue provides both visual and code-based interfaces to make data integration effortless. Using a native AWS Glue connector increases agility, simplifies data movement, and improves data quality.
In this post, we explore the AWS Glue native connector to OpenSearch Service and discover how it eliminates the need to build and maintain custom code or third-party tools to integrate with OpenSearch Service. This accelerates analytics pipelines and search use cases, providing instant access to your data in OpenSearch Service. You can now use data stored in OpenSearch Service indexes as a source or target within the AWS Glue Studio no-code, drag-and-drop visual interface or directly in an AWS Glue ETL job script. When combined with AWS Glue ETL capabilities, this new connector simplifies the creation of ETL pipelines, enabling ETL developers to save time building and maintaining data pipelines.
Solution overview
The new native OpenSearch Service connector is a powerful tool that can help organizations unlock the full potential of their data. It enables you to efficiently read and write data from OpenSearch Service without needing to install or manage OpenSearch Service connector libraries.
In this post, we demonstrate exporting the New York City Taxi and Limousine Commission (TLC) Trip Record Data dataset into OpenSearch Service using the AWS Glue native connector. The following diagram illustrates the solution architecture.

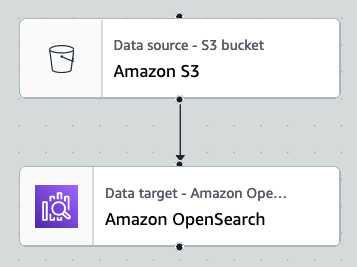
By the end of this post, your visual ETL job will resemble the following screenshot.
Prerequisites
To follow along with this post, you need a running OpenSearch Service domain. For setup instructions, refer to Getting started with Amazon OpenSearch Service. Ensure it is public, for simplicity, and note the primary user and password for later use.
Note that as of this writing, the AWS Glue OpenSearch Service connector doesn’t support Amazon OpenSearch Serverless, so you need to set up a provisioned domain.
Create an S3 bucket
We use an AWS CloudFormation template to create an S3 bucket to store the sample data. Complete the following steps:
- Choose Launch Stack.

- On the Specify stack details page, enter a name for the stack.
- Choose Next.
- On the Configure stack options page, choose Next.
- On the Review page, select I acknowledge that AWS CloudFormation might create IAM resources.
- Choose Submit.
The stack takes about 2 minutes to deploy.
Create an index in the OpenSearch Service domain
To create an index in the OpenSearch service domain, complete the following steps:
- On the OpenSearch Service console, choose Domains in the navigation pane.
- Open the domain you created as a prerequisite.
- Choose the link under OpenSearch Dashboards URL.

- On the navigation menu, choose Dev Tools.
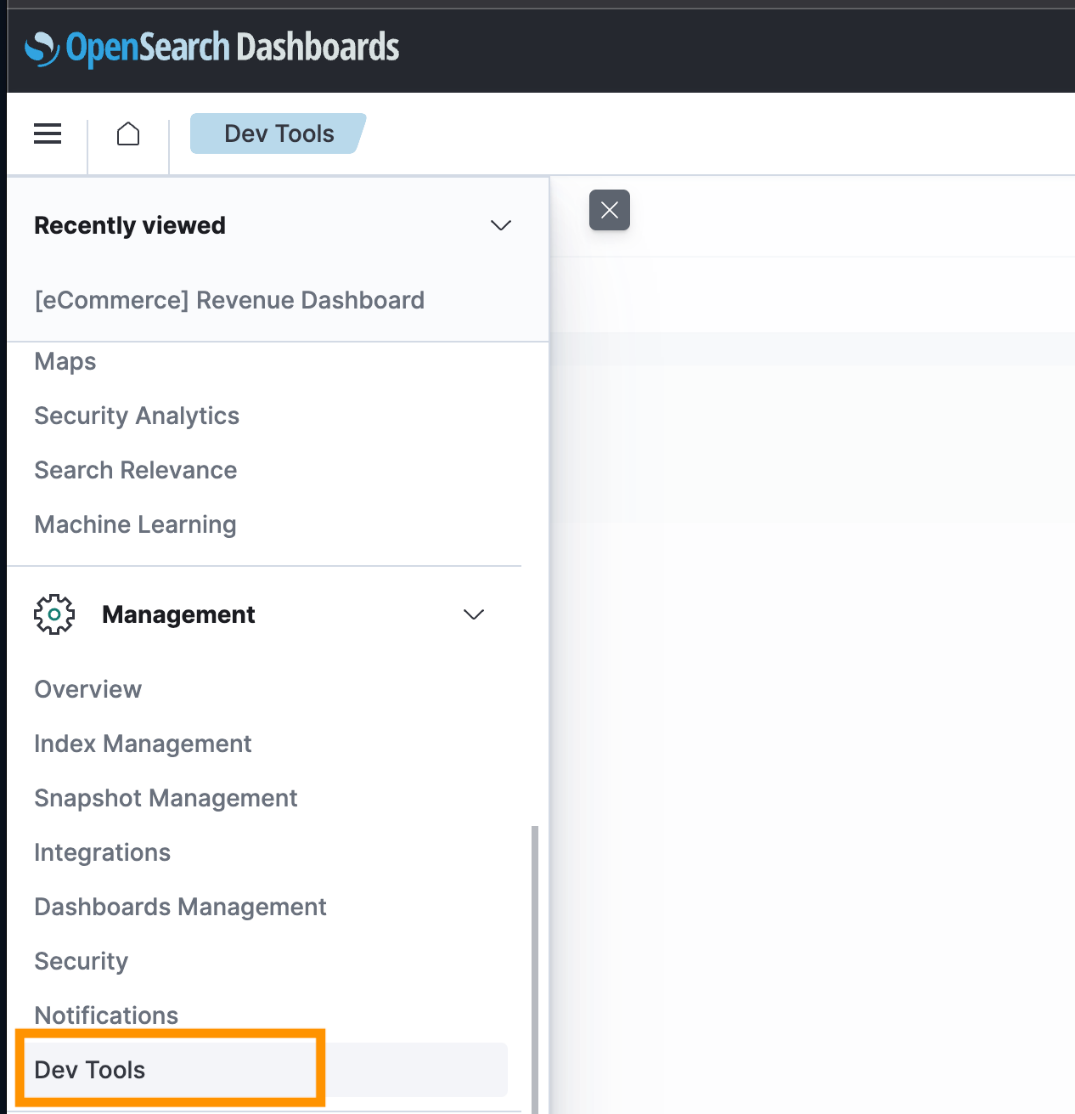
- Enter the following code to create the index:
Create a secret for OpenSearch Service credentials
In this post, we use basic authentication and store our authentication credentials securely using AWS Secrets Manager. Complete the following steps to create a Secrets Manager secret:
- On the Secrets Manager console, choose Secrets in the navigation pane.
- Choose Store a new secret.
- For Secret type, select Other type of secret.
- For Key/value pairs, enter the user name
opensearch.net.http.auth.userand the passwordopensearch.net.http.auth.pass. - Choose Next.
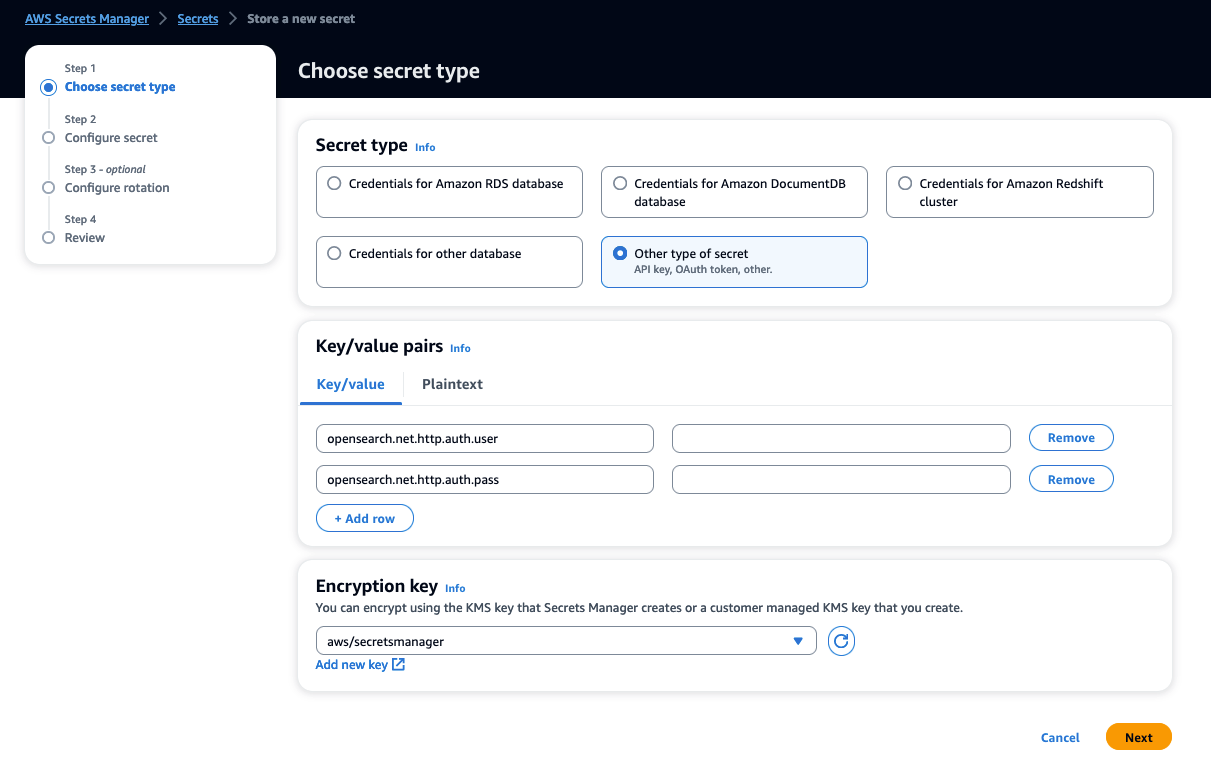
- Complete the remaining steps to create your secret.
Create an IAM role for the AWS Glue job
Complete the following steps to configure an AWS Identity and Access Management (IAM) role for the AWS Glue job:
- On the IAM console, create a new role.
- Attach the AWS managed policy GlueServiceRole.
- Attach the following policy to the role. Replace each ARN with the corresponding ARN of the OpenSearch Service domain, Secrets Manager secret, and S3 bucket.
Create an AWS Glue connection
Before you can use the OpenSearch Service connector, you need to create an AWS Glue connection for connecting to OpenSearch Service. Complete the following steps:
- On the AWS Glue console, choose Connections in the navigation pane.
- Choose Create connection.
- For Name, enter
opensearch-connection. - For Connection type, choose Amazon OpenSearch.
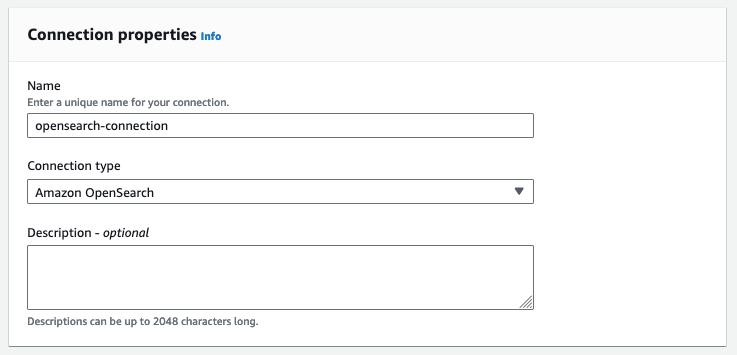
- For Domain endpoint, enter the domain endpoint of OpenSearch Service.
- For Port, enter HTTPS port 443.
- For Resource, enter
yellow-taxi-index.
In this context, resource means the index of OpenSearch Service where the data is read from or written to.
- Select Wan only enabled.
- For AWS Secret, choose the secret you created earlier.
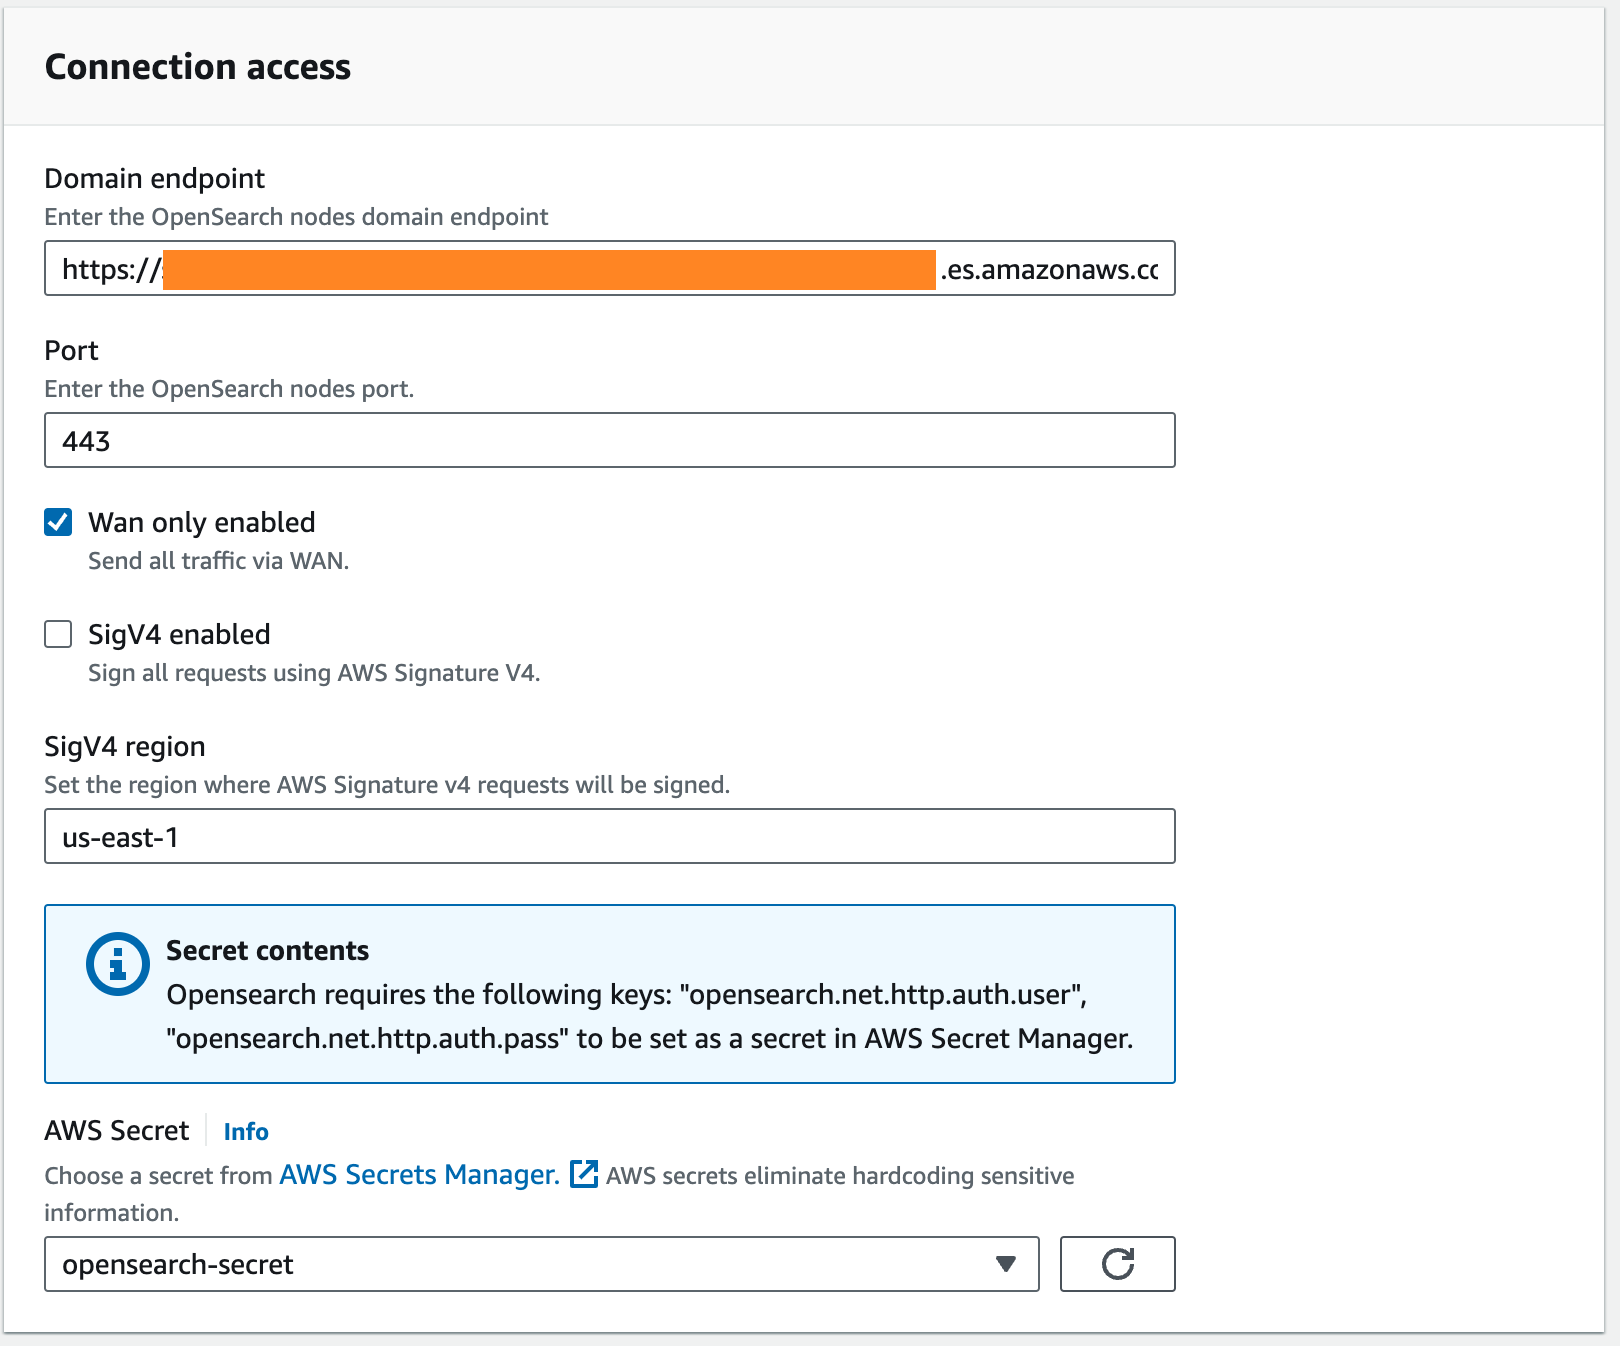
- Optionally, if you’re connecting to an OpenSearch Service domain in a VPC, specify a VPC, subnet, and security group to run AWS Glue jobs inside the VPC. For security groups, a self-referencing inbound rule is required. For more information, see Setting up networking for development for AWS Glue.

- Choose Create connection.
Create an ETL job using AWS Glue Studio
Complete the following steps to create your AWS Glue ETL job:
- On the AWS Glue console, choose Visual ETL in the navigation pane.
- Choose Create job and Visual ETL.
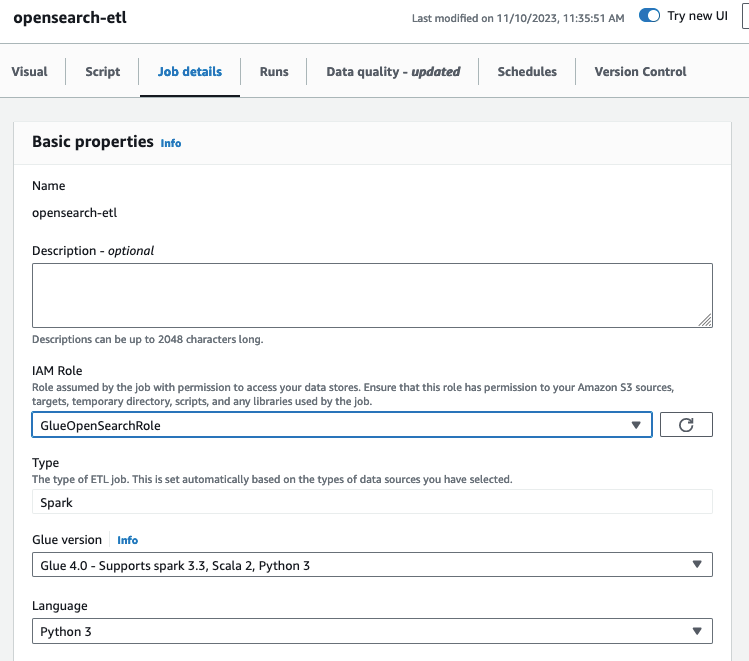
- On the AWS Glue Studio console, change the job name to
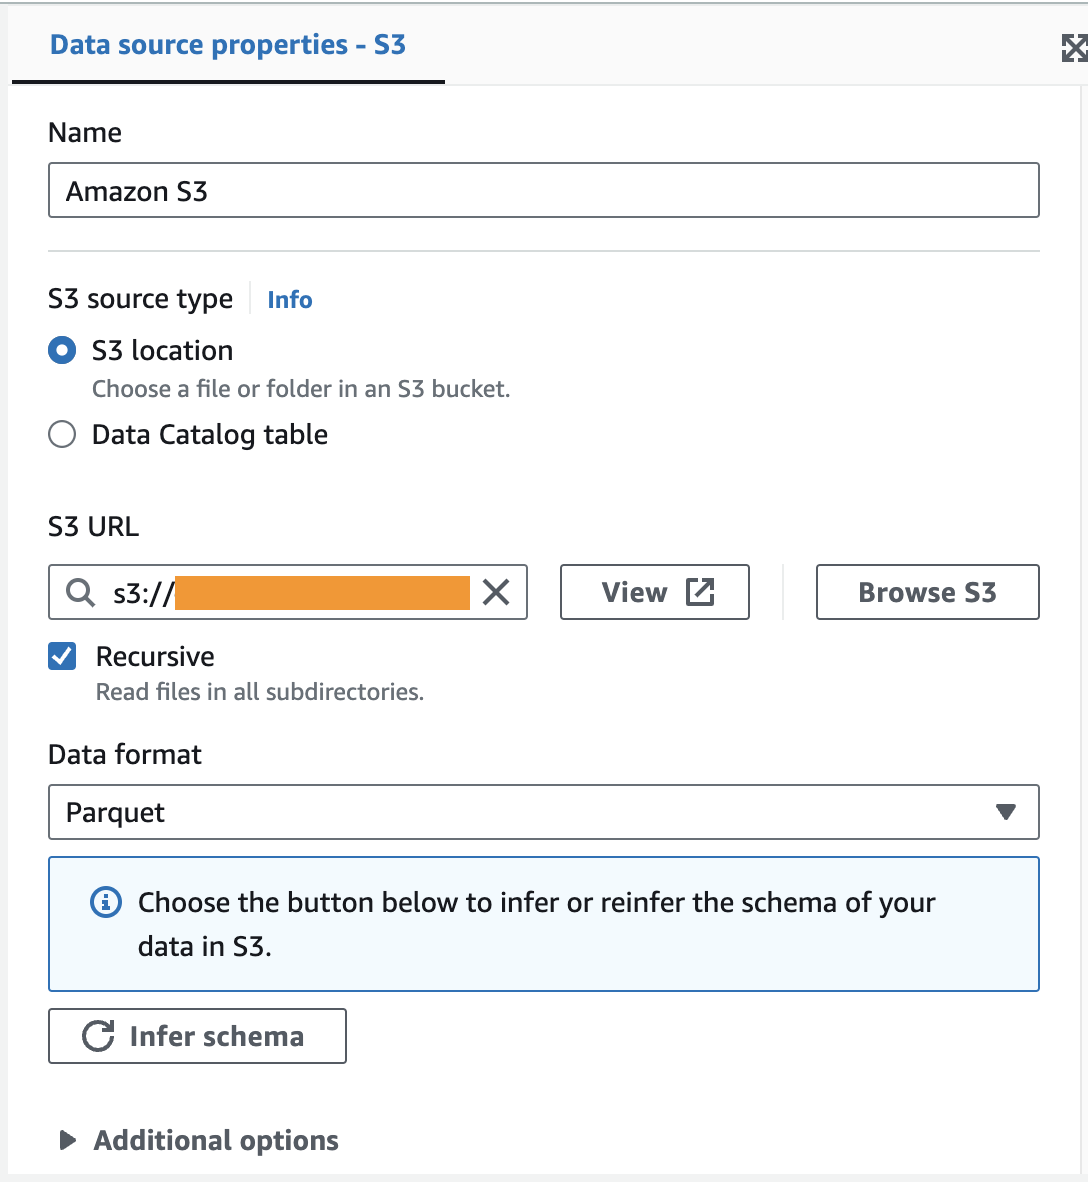
opensearch-etl. - Choose Amazon S3 for the data source and Amazon OpenSearch for the data target.
Between the source and target, you can optionally insert transform nodes. In this solution, we create a job that has only source and target nodes for simplicity.

- In the Data source properties section, specify the S3 bucket where the sample data is located, and choose Parquet as the data format.
- In the Data sink properties section, specify the connection you created in the previous section (
opensearch-connection).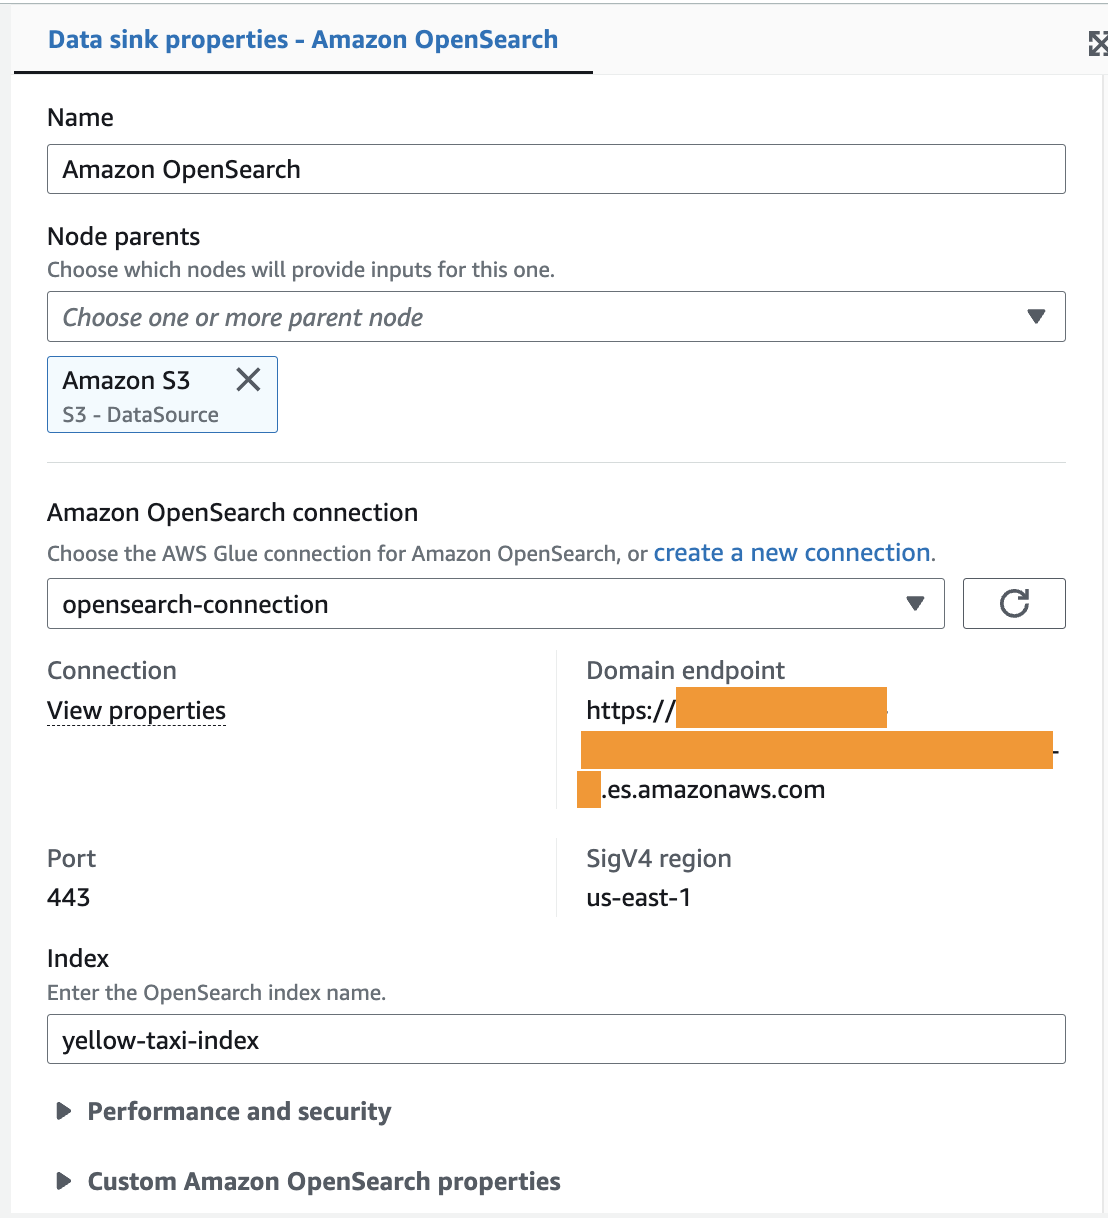
- Choose the Job details tab, and in the Basic properties section, specify the IAM role you created earlier.
- Choose Save to save your job, and choose Run to run the job.
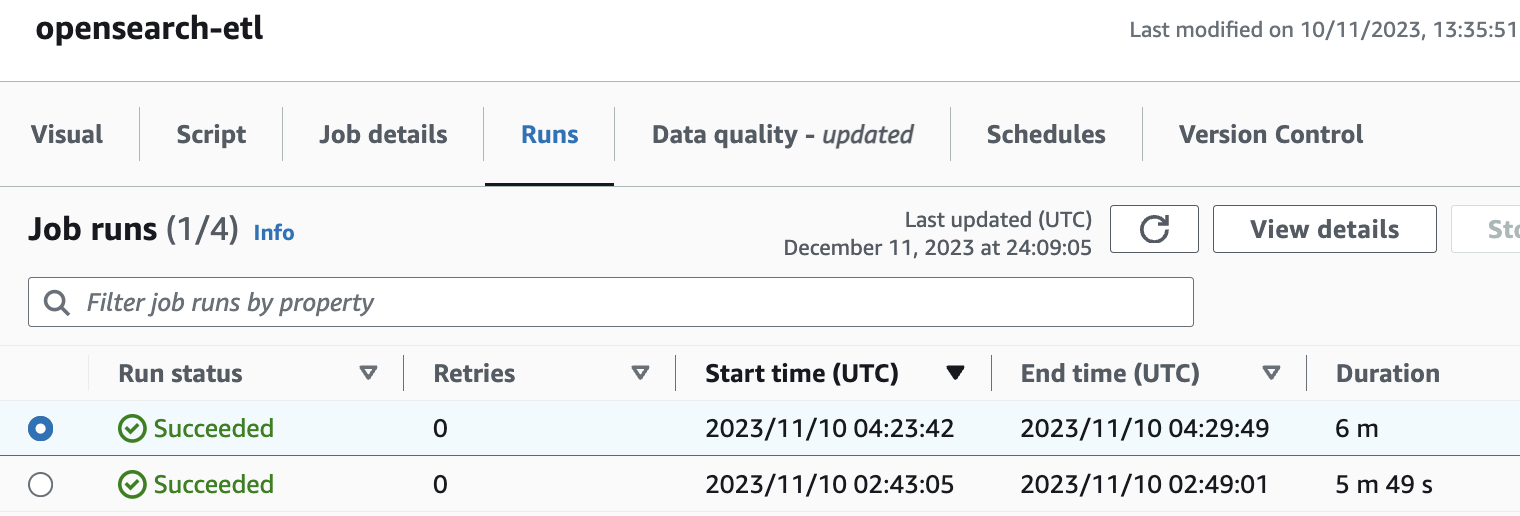
- Navigate to the Runs tab to check the status of the job. When it is successful, the run status should be Succeeded.
- After the job runs successfully, navigate to OpenSearch Dashboards, and log in to the dashboard.
- Choose Dashboards Management on the navigation menu.
- Choose Index patterns, and choose Create index pattern.
- Enter
yellow-taxi-indexfor Index pattern name. - Choose
tpep_pickup_datetimefor Time. - Choose Create index pattern. This index pattern will be used to visualize the index.
- Choose Discover on the navigation menu, and choose
yellow-taxi-index.
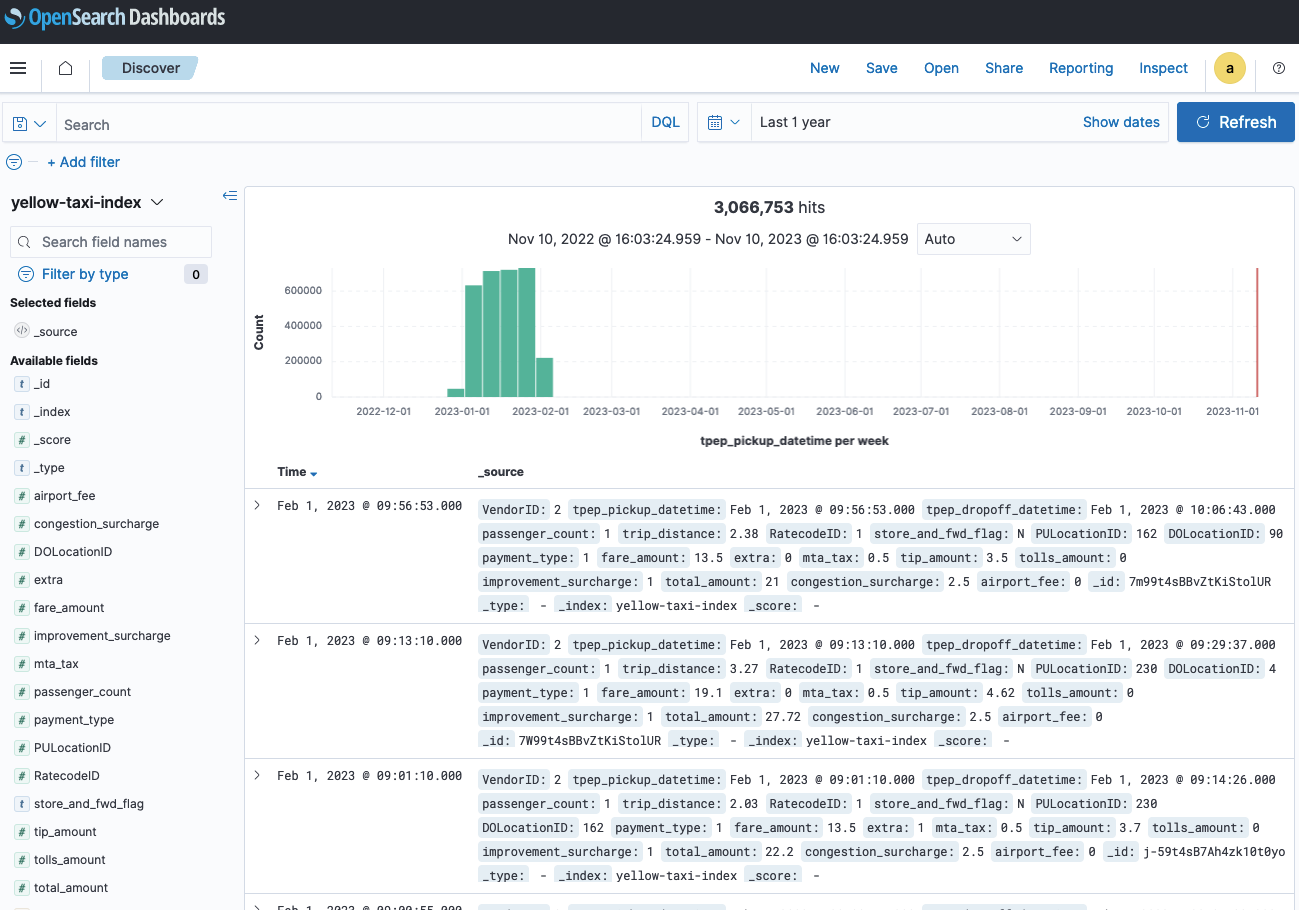
You have now created an index in OpenSearch Service and loaded data into it from Amazon S3 in just a few steps using the AWS Glue OpenSearch Service native connector.
Clean up
To avoid incurring charges, clean up the resources in your AWS account by completing the following steps:
- On the AWS Glue console, choose ETL jobs in the navigation pane.
- From the list of jobs, select the job
opensearch-etl, and on the Actions menu, choose Delete. - On the AWS Glue console, choose Data connections in the navigation pane.
- Select
opensearch-connectionfrom the list of connectors, and on the Actions menu, choose Delete. - On the IAM console, choose Roles in the navigation page.
- Select the role you created for the AWS Glue job and delete it.
- On the CloudFormation console, choose Stacks in the navigation pane.
- Select the stack you created for the S3 bucket and sample data and delete it.
- On the Secrets Manager console, choose Secrets in the navigation pane.
- Select the secret you created, and on the Actions menu, choose Delete.
- Reduce the waiting period to 7 days and schedule the deletion.
Conclusion
The integration of AWS Glue with OpenSearch Service adds the powerful ability to perform data transformation when integrating with OpenSearch Service for analytics use cases. This enables organizations to streamline data integration and analytics with OpenSearch Service. The serverless nature of AWS Glue means no infrastructure management, and you pay only for the resources consumed while your jobs are running. As organizations increasingly rely on data for decision-making, this native Spark connector provides an efficient, cost-effective, and agile solution to swiftly meet data analytics needs.
About the authors
 Basheer Sheriff is a Senior Solutions Architect at AWS. He loves to help customers solve interesting problems leveraging new technology. He is based in Melbourne, Australia, and likes to play sports such as football and cricket.
 Shunsuke Goto is a Prototyping Engineer working at AWS. He works closely with customers to build their prototypes and also helps customers build analytics systems.
- SEO Powered Content & PR Distribution. Get Amplified Today.
- PlatoData.Network Vertical Generative Ai. Empower Yourself. Access Here.
- PlatoAiStream. Web3 Intelligence. Knowledge Amplified. Access Here.
- PlatoESG. Carbon, CleanTech, Energy, Environment, Solar, Waste Management. Access Here.
- PlatoHealth. Biotech and Clinical Trials Intelligence. Access Here.
- Source: https://aws.amazon.com/blogs/big-data/accelerate-analytics-on-amazon-opensearch-service-with-aws-glue-through-its-native-connector/

