Amazon SageMaker Studio is a web-based, integrated development environment (IDE) for machine learning (ML) that lets you build, train, debug, deploy, and monitor your ML models. SageMaker Studio provides all the tools you need to take your models from data preparation to experimentation to production while boosting your productivity.
Amazon SageMaker Canvas is a powerful no-code ML tool designed for business and data teams to generate accurate predictions without writing code or having extensive ML experience. With its intuitive visual interface, SageMaker Canvas simplifies the process of loading, cleansing, and transforming datasets, and building ML models, making it accessible to a broader audience.
However, as your ML needs evolve, or if you require more advanced customization and control, you may want to transition from a no-code environment to a code-first approach. This is where the seamless integration between SageMaker Canvas and SageMaker Studio comes into play.
In this post, we present a solution for the following types of users:
- Non-ML experts such as business analysts, data engineers, or developers, who are domain experts and are interested in low-code no-code (LCNC) tools to guide them in preparing data for ML and building ML models. This persona typically is only a SageMaker Canvas user and often relies on ML experts in their organization to review and approve their work.
- ML experts who are interested in how LCNC tools can accelerate parts of the ML lifecycle (such as data prep), but are also likely to take a high-code approach to certain parts of the ML lifecycle (such as model building). This persona is typically a SageMaker Studio user who might also be a SageMaker Canvas user. ML experts also often play a role in reviewing and approving the work of non-ML experts for production use cases.
The utility of the solutions proposed in this post is two-fold. Firstly, by demonstrating how you can share models across SageMaker Canvas and SageMaker Studio, non-ML and ML experts can collaborate across their preferred environments, which might be a no-code environment (SageMaker Canvas) for non-experts and a high-code environment (SageMaker Studio) for experts. Secondly, by demonstrating how to share a model from SageMaker Canvas to SageMaker Studio, we show how ML experts who want to pivot from a LCNC approach for development to a high-code approach for production can do so across SageMaker environments. The solution outlined in this post is for users of the new SageMaker Studio. For users of SageMaker Studio Classic, see Collaborate with data scientists for how you can seamlessly transition between SageMaker Canvas and SageMaker Studio Classic.
Solution overview
To seamlessly transition between no-code and code-first ML with SageMaker Canvas and SageMaker Studio, we have outlined two options. You can choose the option based on your requirements. In some cases, you might decide to use both options in parallel.
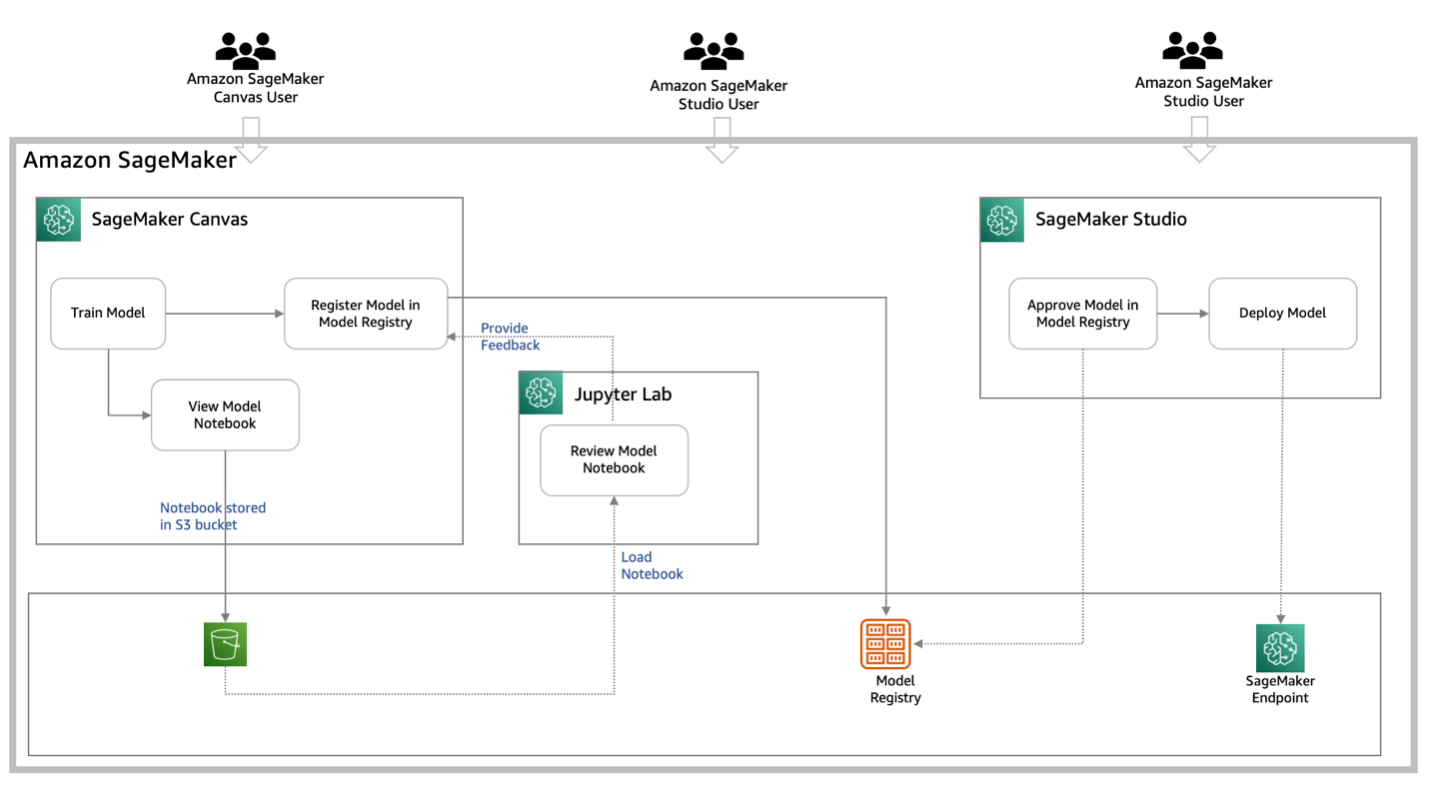
- Option 1: SageMaker Model Registry – A SageMaker Canvas user registers their model in the Amazon SageMaker Model Registry, invoking a governance workflow for ML experts to review model details and metrics, then approve or reject it, after which the user can deploy the approved model from SageMaker Canvas. This option is an automated sharing process providing you with built-in governance and approval tracking. You can view the model metrics; however, there is limited visibility on the model code and architecture. The following diagram illustrates the architecture.

- Option 2: Notebook export – In this option, the SageMaker Canvas user exports the full notebook from SageMaker Canvas to Amazon Simple Storage Service (Amazon S3), then shares it with ML experts to import into SageMaker Studio, enabling complete visibility and customization of the model code and logic before the ML expert deploys the enhanced model. In this option, there is complete visibility of the model code and architecture with the ability for the ML expert to customize and enhance the model in SageMaker Studio. However, this option demands a manual export and import of the model notebook into the IDE. The following diagram illustrates this architecture.
The following phases describe the steps for collaboration:
- Share – The SageMaker Canvas user registers the model from SageMaker Canvas or downloads the notebook from SageMaker Canvas
- Review – The SageMaker Studio user accesses the model through the model registry to review and run the exported notebook through JupyterLab to validate the model
- Approval – The SageMaker Studio user approves the model from the model registry
- Deploy – The SageMaker Studio user can deploy the model from JupyterLab, or the SageMaker Canvas user can deploy the model from SageMaker Canvas
Let’s look at the two options (model registry and notebook export) within each step in detail.
Prerequisites
Before you dive into the solution, make sure you have signed up for and created an AWS account. Then you need to create an administrative user and a group. For instructions on both steps, refer to Set Up Amazon SageMaker Prerequisites. You can skip this step if you already have your own version of SageMaker Studio running.
Complete the prerequisites for setting up SageMaker Canvas and create the model of your choice for your use case.
Share the model
The SageMaker Canvas user shares the model with the SageMaker Studio user by either registering it in SageMaker Model Registry, which triggers a governance workflow, or by downloading the full notebook from SageMaker Canvas and providing it to the SageMaker Studio user.
SageMaker Model Registry
To deploy using SageMaker Model Registry, complete the following steps:
- After a model is created in SageMaker Canvas, choose the options menu (three vertical dots) and choose Add to Model Registry.
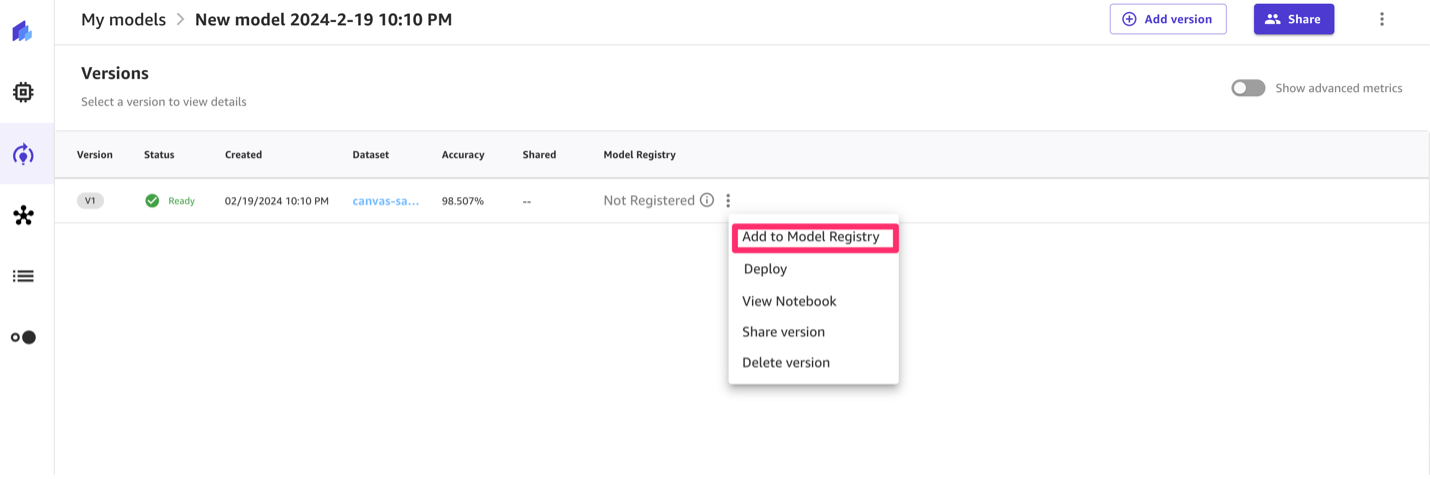
- Enter a name for the model group.
- Choose Add.

You can now see the model is registered.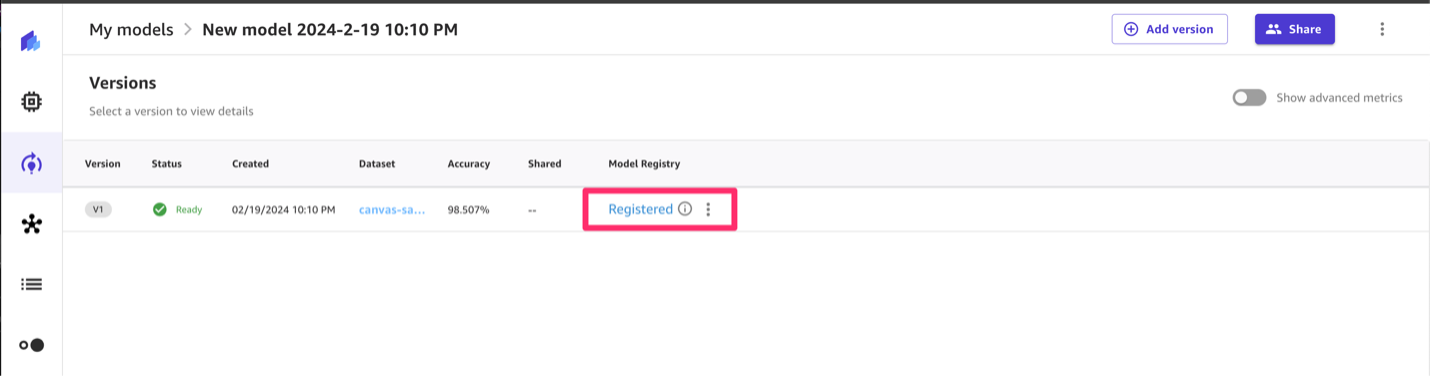
You can also see the model is pending approval.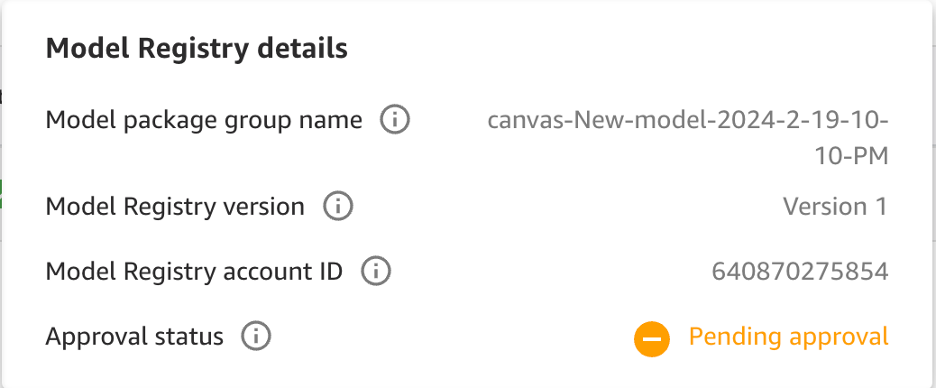
SageMaker notebook export
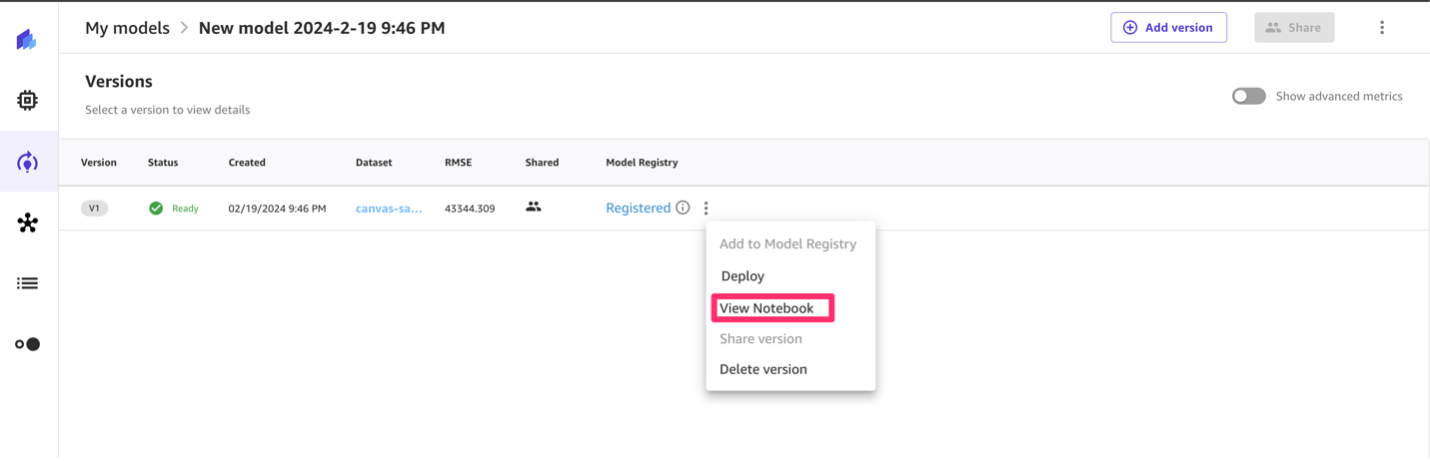
To deploy using a SageMaker notebook, complete the following steps:
- On the options menu, choose View Notebook.
- Choose Copy S3 URI.
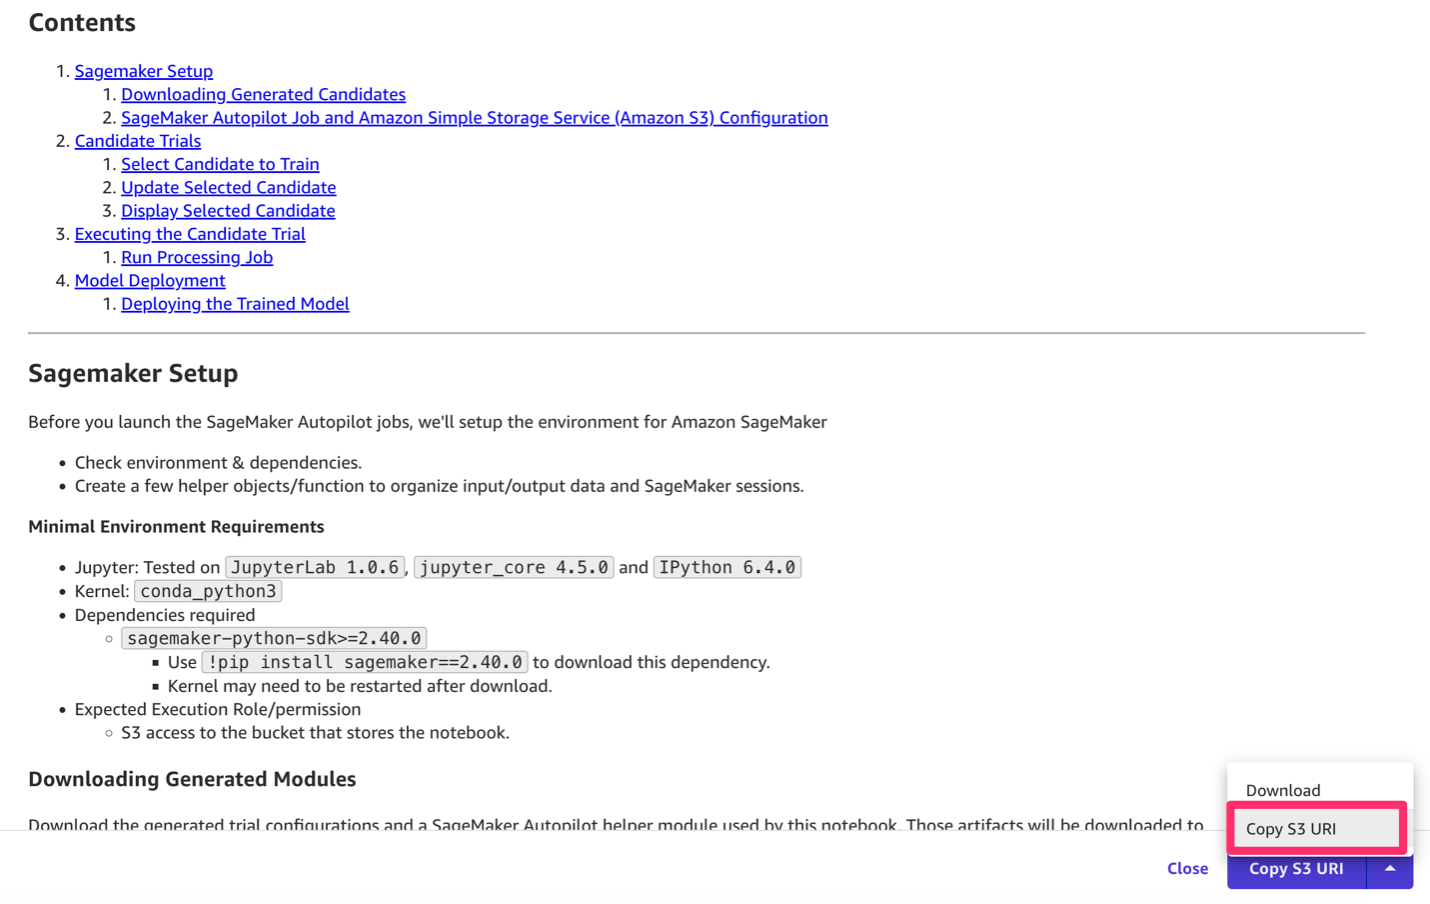
You can now share the S3 URI with the SageMaker Studio user.
Review the model
The SageMaker Studio user accesses the shared model through the model registry to review its details and metrics, or they can import the exported notebook into SageMaker Studio and use Jupyter notebooks to thoroughly validate the model’s code, logic, and performance.
SageMaker Model Registry
To use the model registry, complete the following steps:
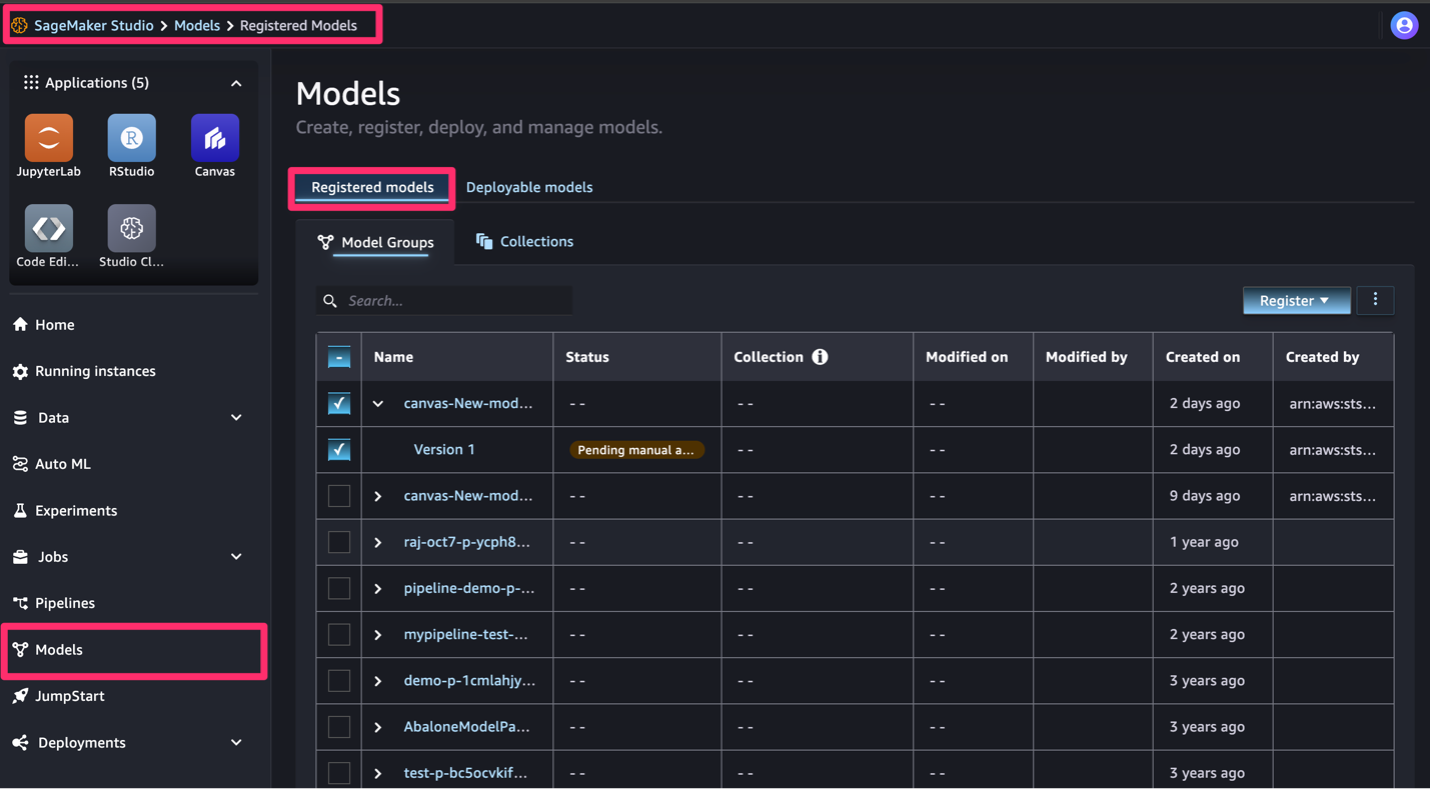
- On the SageMaker Studio console, choose Models in the navigation pane.
- Choose Registered models.
- Choose your model.
You can review the model details and see that the status is pending.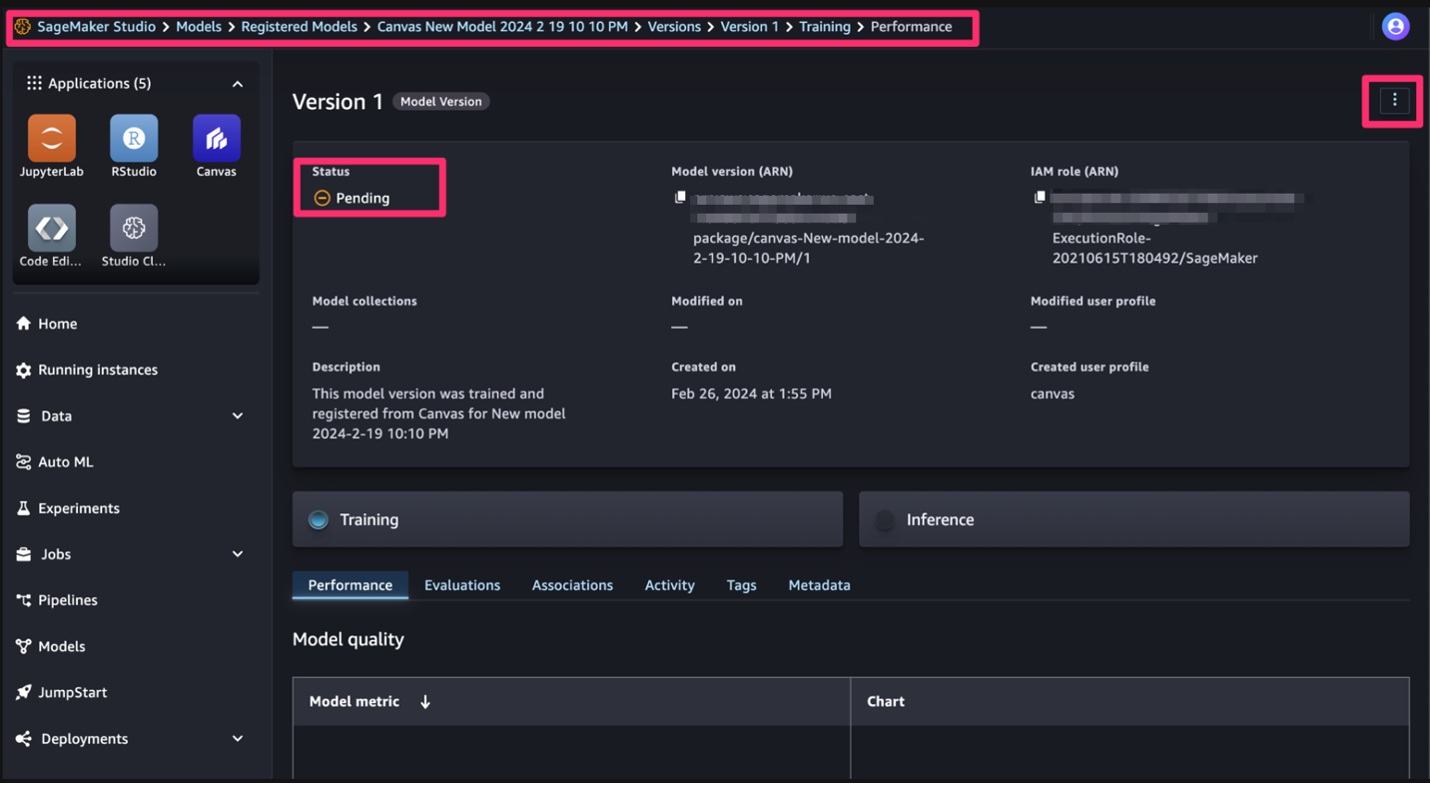
You can also review the different metrics to check on the model performance.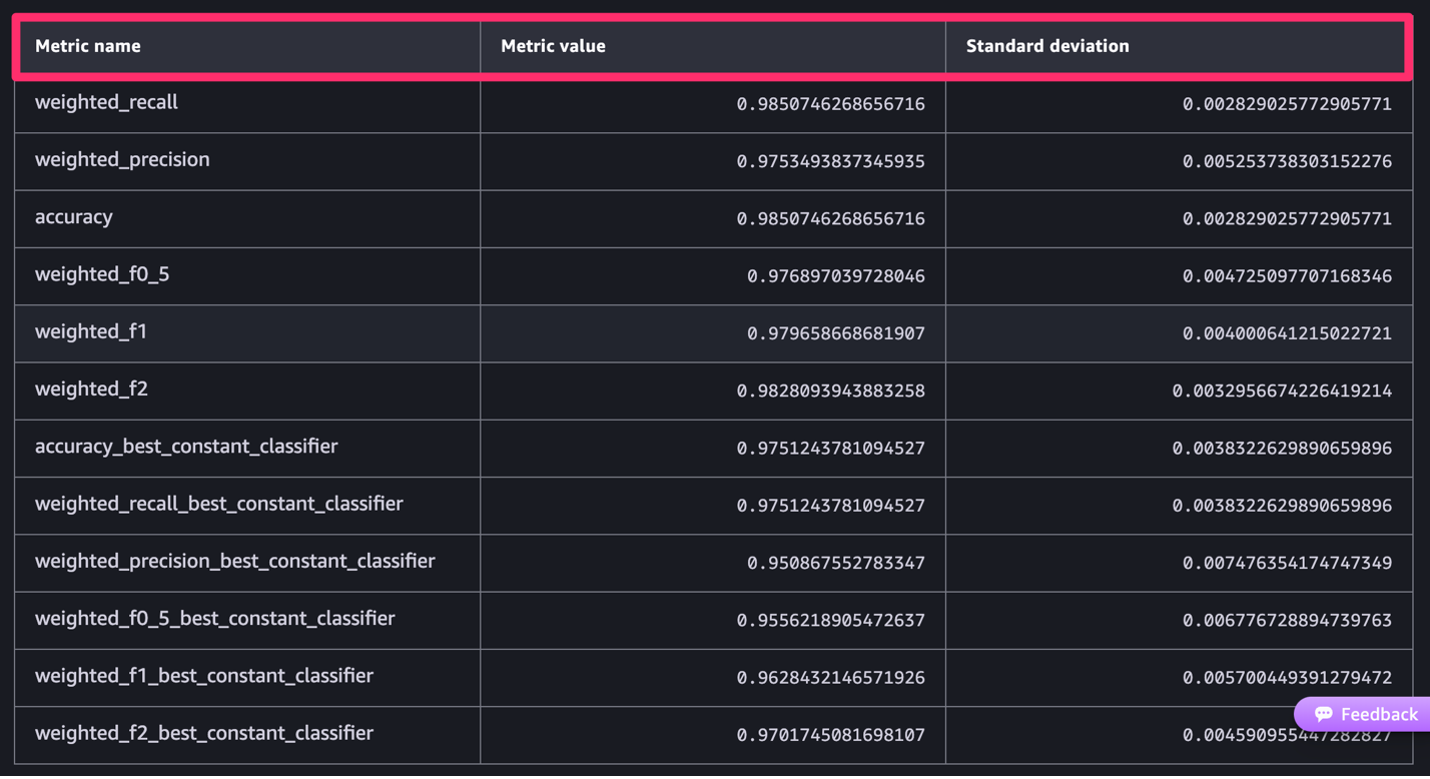
You can view the model metrics; however, there is limited visibility on the model code and architecture. If you want complete visibility of the model code and architecture with the ability to customize and enhance the model, use the notebook export option.
SageMaker notebook export
To use the notebook export option as the SageMaker Studio user, complete the following steps.
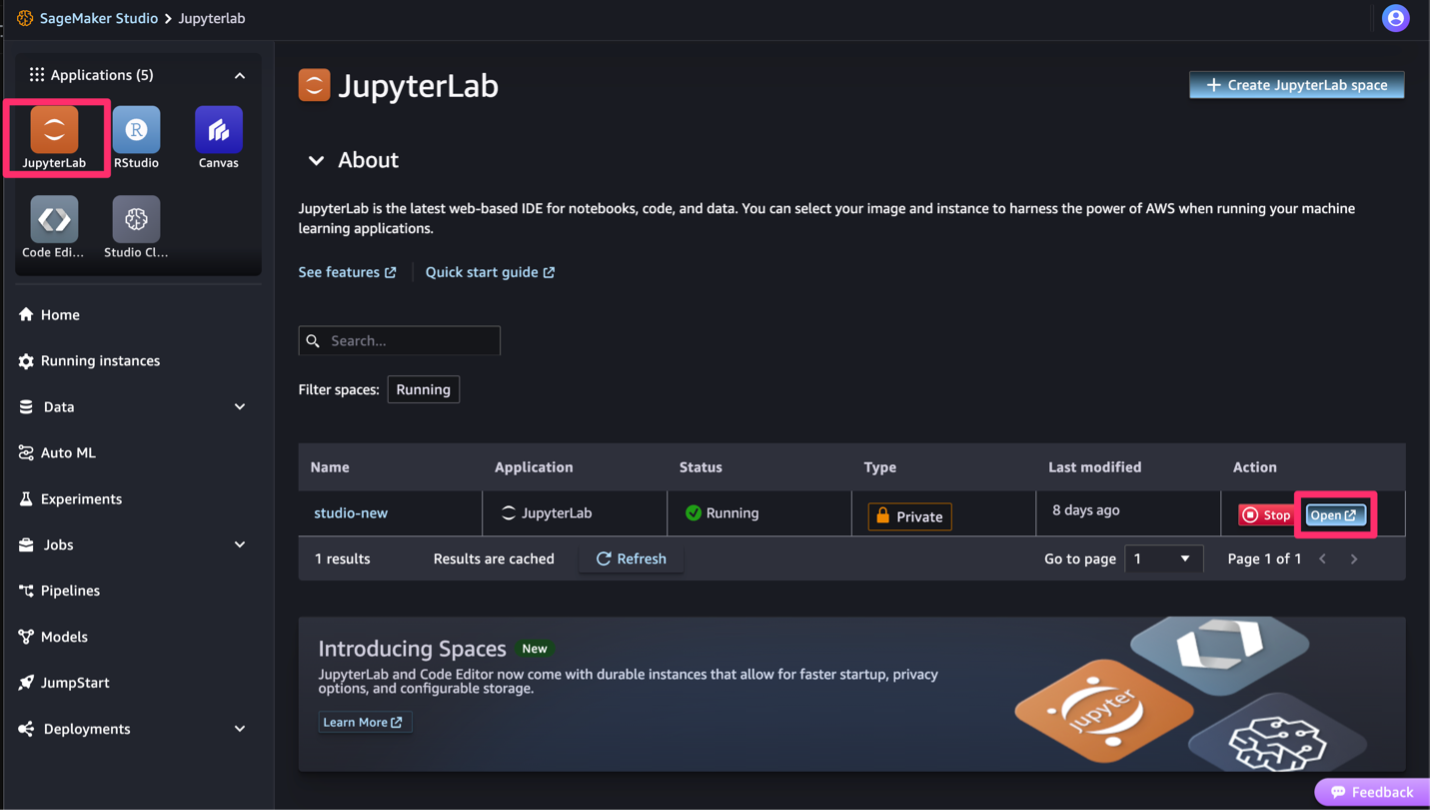
- Launch SageMaker Studio and choose JupyterLab under Applications.
- Open the JupyterLab space.If you don’t have a JupyterLab space, you can create one.
- Open a terminal and run the following command to copy the notebook from Amazon S3 to SageMaker Studio (the account number in the following example is changed to
awsaccountnumber):
- After the notebook is downloaded, you can open the notebook and run the notebook to evaluate further.

Approve the model
After a comprehensive review, the SageMaker Studio user can make an informed decision to either approve or reject the model in the model registry based on their assessment of its quality, accuracy, and suitability for the intended use case.
For users who registered their model via the Canvas UI, please follow the below steps to approve the model. For users who exported the model notebook from the Canvas UI, you may register and approve the model using SageMaker model registry, however, these steps are not required.
SageMaker Model Registry
As the SageMaker Studio user, when you’re comfortable with the model, you can update the status to approved. Approval happens only in SageMaker Model Registry. Complete the following steps:
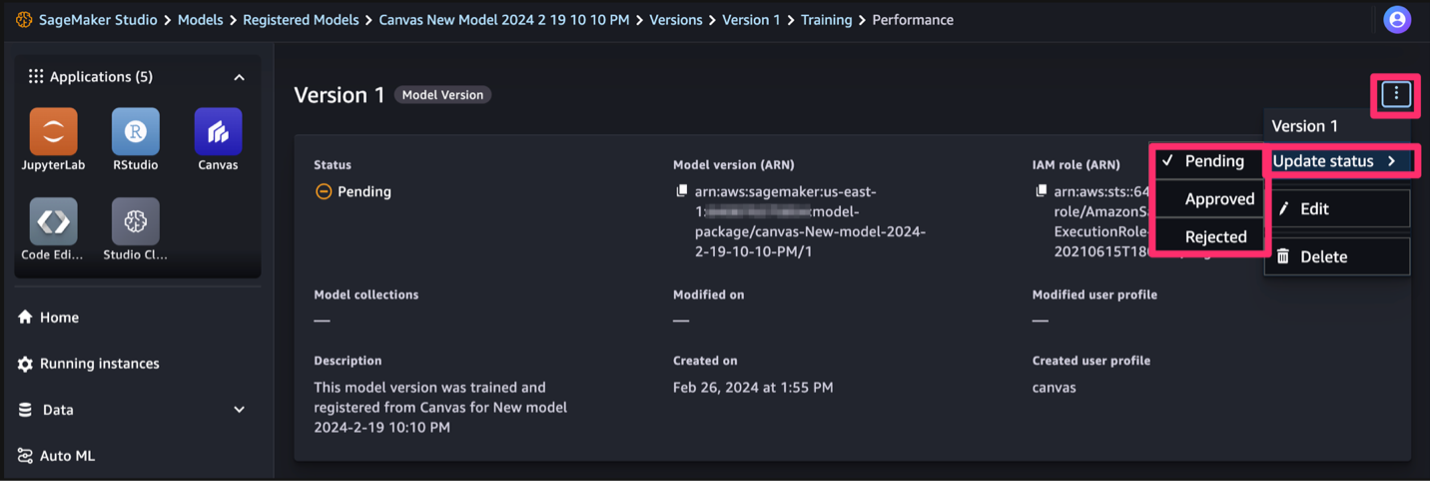
- In SageMaker Studio, navigate to the version of the model.
- On the options menu, choose Update status and Approved.
- Enter an optional comment and choose Save and update.
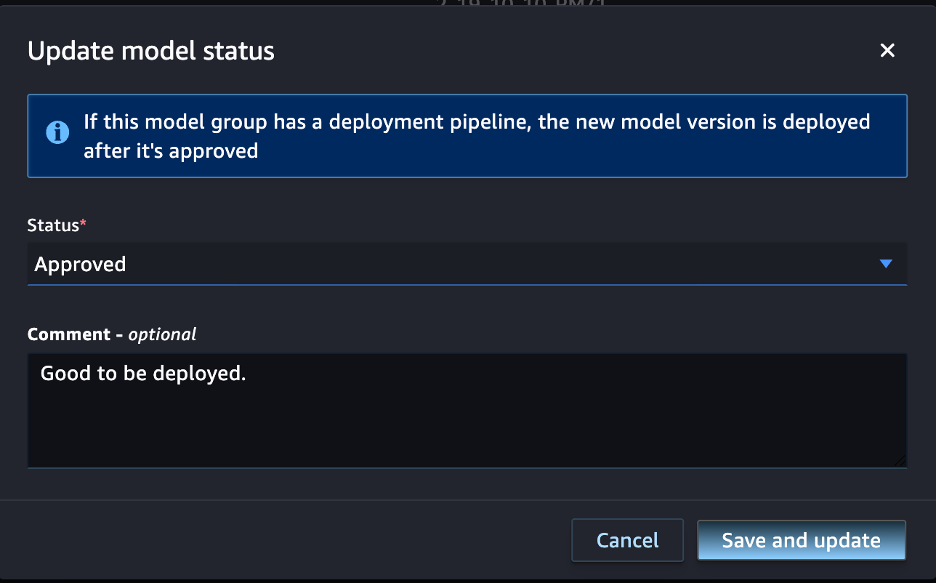
Now you can see the model is approved.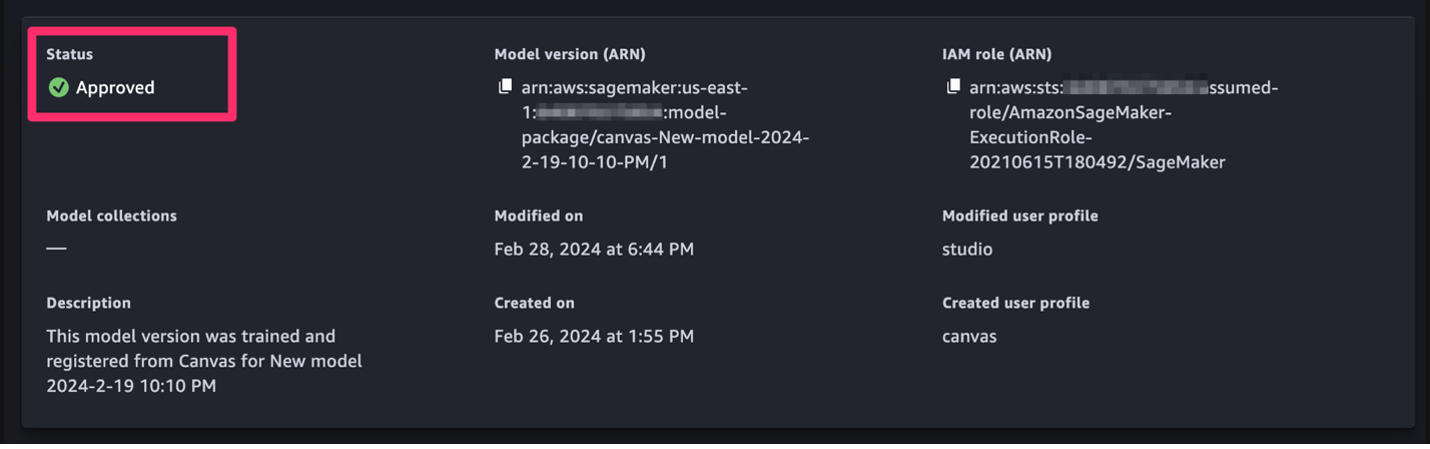
Deploy the model
Once the model is ready to deploy (it has received necessary reviews and approvals), users have two options. For users who took the model registry approach, they can deploy from either SageMaker Studio or from SageMaker Canvas. For users who took the model notebook export approach, they can deploy from SageMaker Studio. Both deployment options are detailed below.
Deploy via SageMaker Studio
The SageMaker Studio user can deploy the model from the JupyterLab space.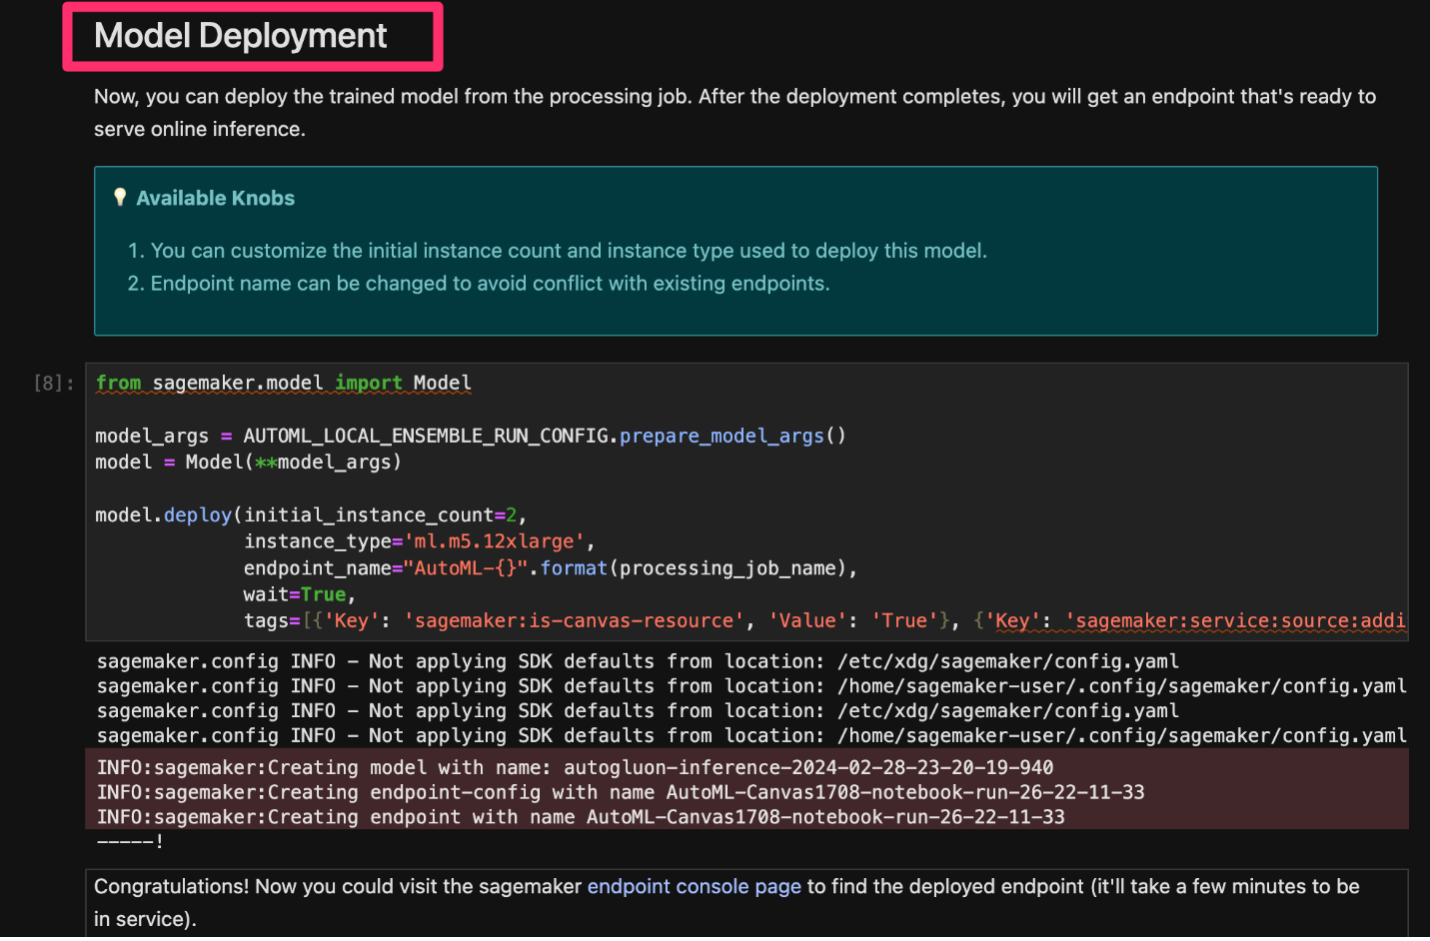
After the model is deployed, you can navigate to the SageMaker console, choose Endpoints under Inference in the navigation pane, and view the model.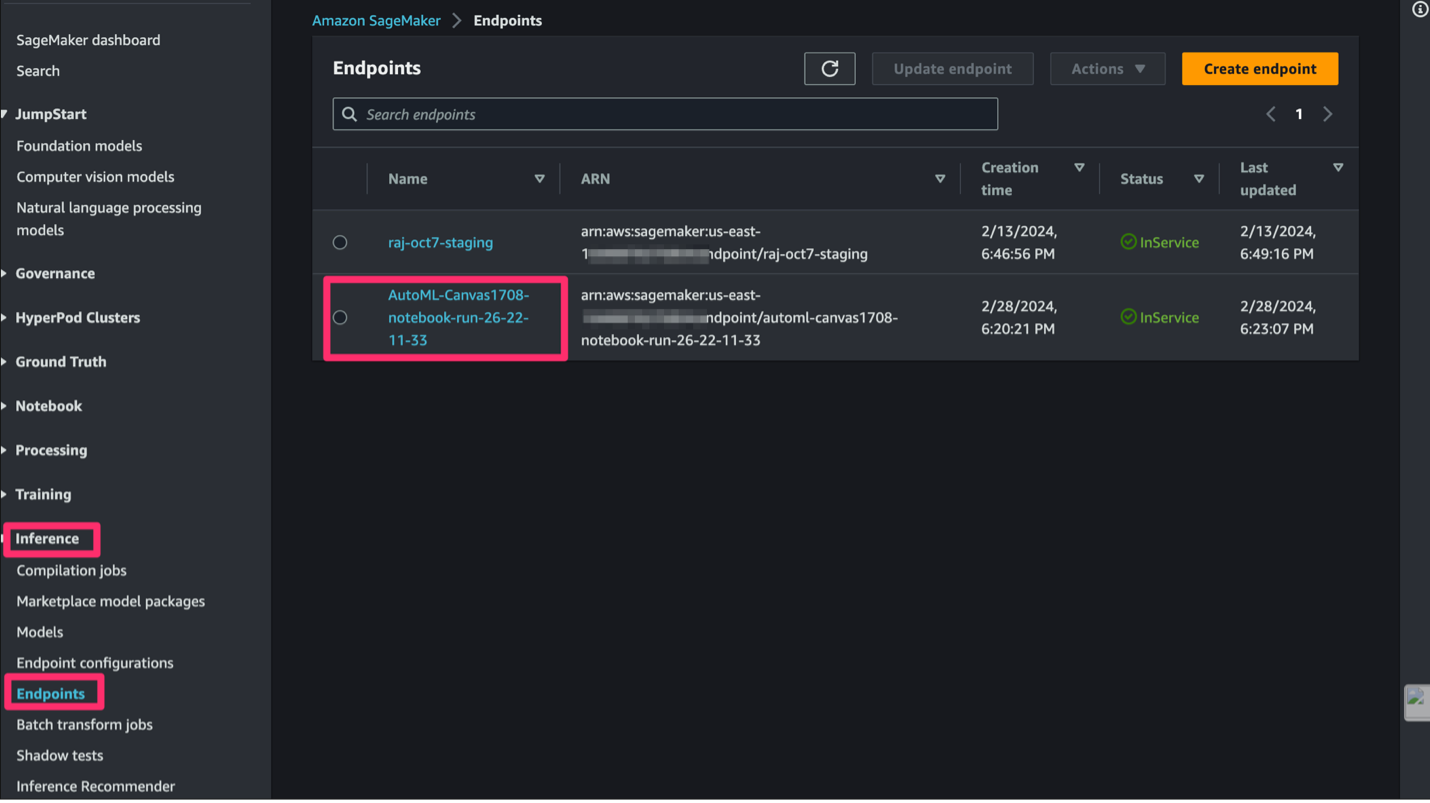
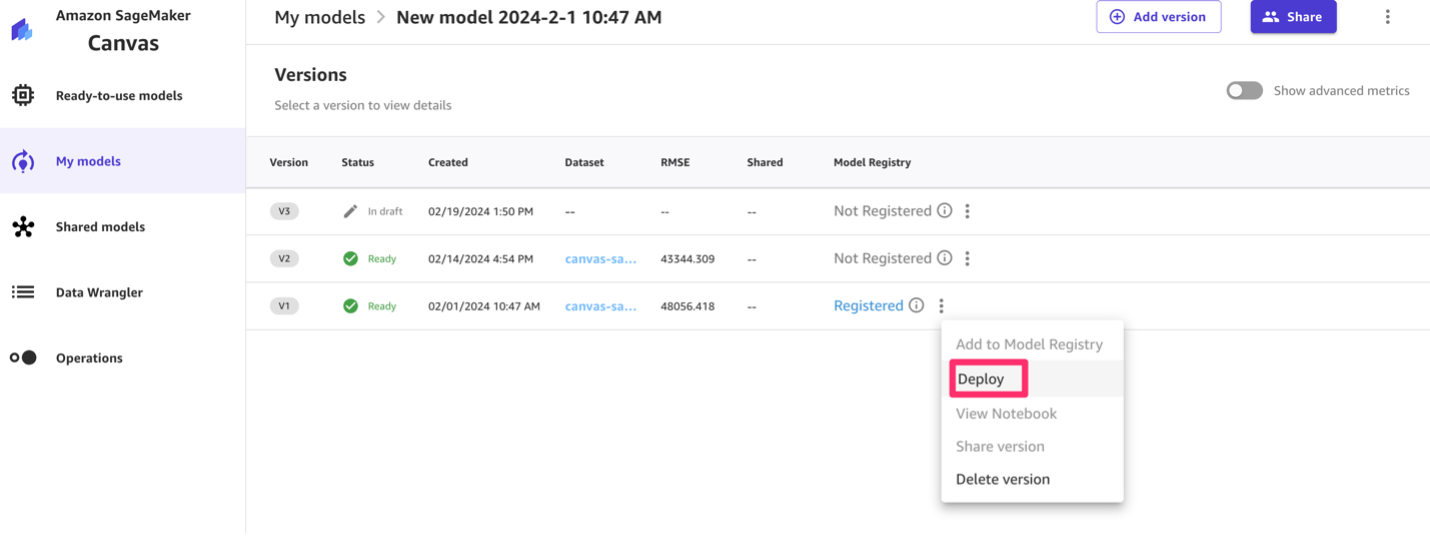
Deploy via SageMaker Canvas
Alternatively, if the deployment is handled by the SageMaker Canvas user, you can deploy the model from SageMaker Canvas.
After the model is deployed, you can navigate to the Endpoints page on the SageMaker console to view the model.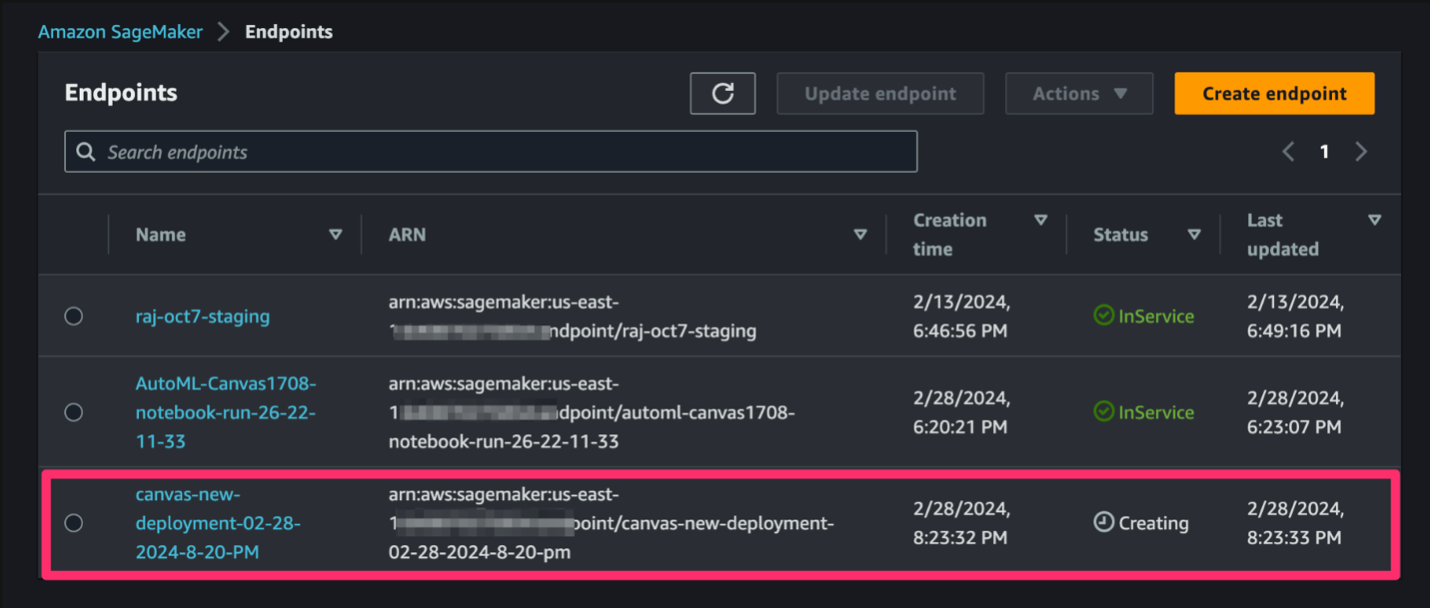
Clean up
To avoid incurring future session charges, log out of SageMaker Canvas.
To avoid ongoing charges, delete the SageMaker inference endpoints. You can delete the endpoints via the SageMaker console or from the SageMaker Studio notebook using the following commands:
Conclusion
Previously, you could only share models to SageMaker Canvas (or view shared SageMaker Canvas models) in SageMaker Studio Classic. In this post, we showed how to share models built in SageMaker Canvas with SageMaker Studio so that different teams can collaborate and you can pivot from a no-code to a high-code deployment path. By either using SageMaker Model Registry or exporting notebooks, ML experts and non-experts can collaborate, review, and enhance models across these platforms, enabling a smooth workflow from data preparation to production deployment.
For more information about collaborating on models using SageMaker Canvas, refer to Build, Share, Deploy: how business analysts and data scientists achieve faster time-to-market using no-code ML and Amazon SageMaker Canvas.
About the Authors
![]() Rajakumar Sampathkumar is a Principal Technical Account Manager at AWS, providing customer guidance on business-technology alignment and supporting the reinvention of their cloud operation models and processes. He is passionate about cloud and machine learning. Raj is also a machine learning specialist and works with AWS customers to design, deploy, and manage their AWS workloads and architectures.
Rajakumar Sampathkumar is a Principal Technical Account Manager at AWS, providing customer guidance on business-technology alignment and supporting the reinvention of their cloud operation models and processes. He is passionate about cloud and machine learning. Raj is also a machine learning specialist and works with AWS customers to design, deploy, and manage their AWS workloads and architectures.
![]() Meenakshisundaram Thandavarayan works for AWS as an AI/ ML Specialist. He has a passion to design, create, and promote human-centered data and analytics experiences. Meena focusses on developing sustainable systems that deliver measurable, competitive advantages for strategic customers of AWS. Meena is a connector and design thinker, and strives to drive business to new ways of working through innovation, incubation, and democratization.
Meenakshisundaram Thandavarayan works for AWS as an AI/ ML Specialist. He has a passion to design, create, and promote human-centered data and analytics experiences. Meena focusses on developing sustainable systems that deliver measurable, competitive advantages for strategic customers of AWS. Meena is a connector and design thinker, and strives to drive business to new ways of working through innovation, incubation, and democratization.
![]() Claire O’Brien Rajkumar is a Sr. Product Manager on the Amazon SageMaker team focused on SageMaker Canvas, the SageMaker low-code no-code workspace for ML and generative AI. SageMaker Canvas helps democratize ML and generative AI by lowering barriers to adoption for those new to ML and accelerating workflows for advanced practitioners.
Claire O’Brien Rajkumar is a Sr. Product Manager on the Amazon SageMaker team focused on SageMaker Canvas, the SageMaker low-code no-code workspace for ML and generative AI. SageMaker Canvas helps democratize ML and generative AI by lowering barriers to adoption for those new to ML and accelerating workflows for advanced practitioners.
- SEO Powered Content & PR Distribution. Get Amplified Today.
- PlatoData.Network Vertical Generative Ai. Empower Yourself. Access Here.
- PlatoAiStream. Web3 Intelligence. Knowledge Amplified. Access Here.
- PlatoESG. Carbon, CleanTech, Energy, Environment, Solar, Waste Management. Access Here.
- PlatoHealth. Biotech and Clinical Trials Intelligence. Access Here.
- Source: https://aws.amazon.com/blogs/machine-learning/seamlessly-transition-between-no-code-and-code-first-machine-learning-with-amazon-sagemaker-canvas-and-amazon-sagemaker-studio/

