Introduction
ChatGPT
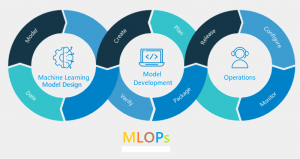
In the dynamic landscape of modern business, the intersection of machine learning and operations (MLOps) has emerged as a powerful force, reshaping traditional approaches to sales conversion optimization. The article takes you into the transformative role that MLOps strategies play in revolutionizing sales conversion success. As businesses strive for heightened efficiency and enhanced customer interactions, the integration of machine learning techniques into operations takes center stage. This exploration unveils innovative strategies that leverage MLOps to not only streamline sales processes but also to unlock unprecedented success in converting prospects into loyal customers. Join us on a journey through the intricacies of MLOps and discover how its strategic application is reshaping the landscape of sales conversion.
Learning Objectives
- Importance of Sale optimization model
- Cleaning Data, transforming datasets, and preprocessing datasets
- Building End-to-End Fraud detection using Kedro and Deepcheck
- Deploying model using streamlit and huggingface
This article was published as a part of the Data Science Blogathon.
Table of contents
What is Sale Optimization Model?
A Sale optimization model is an end-to-end machine learning model to maximize the sale of products and improve the conversion rate. The model takes several parameters as inputs such as impression, age group, gender, Click-Through Rate, and Cost Per Click. Once you train the model predicts the number of people who will buy the product after seeing the ad.
Necessary Prerequisites
1) Clone the repository
git clone https://github.com/ashishk831/Final-THC.git
cd Final-THC
2) Create and activate the virtual environment
#create a virtual environment
python3 -m venv SOP
#Activate your virtual environment in your project folder
source SOP/bin/activate
pip install -r requirements.txt
4)Install Kedro, Kedro-viz, Streamlit and Deepcheck
pip install streamlit
pip install Deepcheck
pip install Kedro
pip install Kedro-viz
Data Description
Let us perform a fundamental Data analysis using Python implementation on a dataset from Kaggle. To download the dataset, click here.
import pandas as pd
import numpy as np
df = pd.read_csv('KAG_conversion_data.csv')
df.head()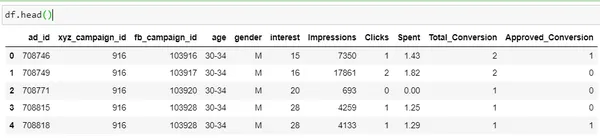
| Column | Description |
| ad_id | An unique ID for each ad |
| xyz_campaign_id | An ID associated with each ad campaign of XYZ company |
| fb_campaign_id | An ID associated with how Facebook tracks each campaign |
| age | Age of the person to whom the ad is shown |
| gender | Gender of the person to whim the add is shown |
| interest | a code specifying the category to which the person’s interest belongs (interests are as mentioned in the person’s Facebook public profile) |
| Impressions | the number of times the ad was shown. |
| Clicks | Number of clicks on for that ad. |
| Spent | Amount paid by company xyz to Facebook, to show that ad |
| Total conversion |
Total number of people who enquired about the product after seeing the ad |
| Approved conversion |
Total number of people who bought the product after seeing the ad |
Here the “Approved conversion” is the target column. Our
goal is to design a model which will increase the sale of product once people see
the ad.
Model Development Using Kedro
For building this project end-to-end, we will be using the Kedro tool. Kedro, is an open-source tool used for building a production-ready machine learning model, offering a number of benefits.
- Handles Complexity: It provides a structure to test data which can be pushed to production after successful testing.
- Standardization: It provides standard template for project. Making it easier to understand for others.
- Production-Ready: Code can be easily pushed to production with exploratory code that you can transition to reproducible, maintainable, and modular experiments.
Read More: Walkthrough of Kedro Framework
Pipeline Structure
To create a project in Kedro follow the below steps.
#create project
kedro new
#create pipeline
kedro pipeline create <pipeline-name>
#Run kedro
kedro run
#Visualizing pipeline
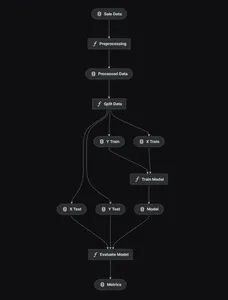
kedro vizUsing kedro we will design the end-to-end model pipeline which is shown below.
Data Preprocessing
- Check for missing values and handle them.
- Creating two new columns CTR and CPC.
- Converting column variable into numerical.
import pandas as pd
import numpy as np
from sklearn.preprocessing import LabelEncoder

def preprocessing(data: pd.DataFrame):
    data.gender = data.gender.apply(lambda x: 1 if x=="M" else 0)
    data['CTR'] = ((data['Clicks']/data['Impressions'])*100)
    data['CPC'] = data['Spent']/data['Clicks']
    data['CPC'] = data['CPC'].replace(np.nan,0)
    encoder=LabelEncoder()
    encoder.fit(data["age"])
    data["age"]=encoder.transform(data["age"])
    #data.Approved_Conversion = data.Approved_Conversion.apply(lambda x: 0 if x==0 else 1)
    preprocessed_data = data.copy()

    return preprocessed_data
Split data
import pandas as pd
from sklearn.model_selection import train_test_split

def split_data(processed_data: pd.DataFrame):
    X = processed_data[['ad_id', 'age', 'gender', 'interest', 'Spent',
    'Total_Conversion','CTR', 'CPC']]
    y = processed_data["Approved_Conversion"]
    X_train, X_test, y_train, y_test = train_test_split(X, y, test_size=0.1,
    random_state=42)
    return X_train, X_test, y_train, y_test
Above the dataset is divided into train dataset and test dataset for model training purpose.
Model Training
from sklearn.ensemble import RandomForestRegressor


def train_model(X_train, y_train):

    model = RandomForestRegressor(n_estimators = 50, random_state = 0, max_samples=0.75)

    model.fit(X_train, y_train)
    return model
We will be using the RandomForestRegressor module to train the model. Alone with RandomForestRegressor we are passing other parameter such as n_estimators random_state and max_samples.
Evaluation
import numpy as np
import logging
from sklearn.metrics import r2_score, mean_squared_error, mean_absolute_error, max_error


def evaluate_model(model, X_test, y_test):
    y_pred = model.predict(X_test)
    mae=mean_absolute_error(y_test, y_pred)
    mse=mean_squared_error(y_test, y_pred)
    rmse=np.sqrt(mse)
    r2score=r2_score(y_test, y_pred)
    me = max_error(y_test, y_pred)
    print("MAE Of Model is: ",mae)
    print("MSE Of Model is: ",mse)
    print("RMSE Of Model is: ",rmse)
    print("R2_Score Of Model is: ",r2score)
    logger = logging.getLogger(__name__)
    logger.info("Model has a coefficient R^2 of %.3f on test data.", r2score)
    return {"r2_score": r2score, "mae": mae, "max_error": me}
Once model is trained, its evaluated using number of key metrics such as MAE, MSE, RMSE and R2-score.
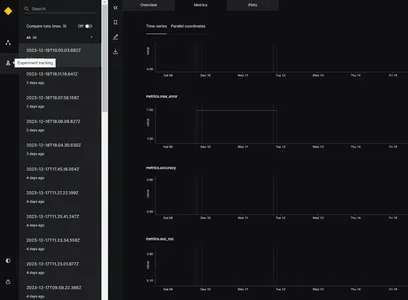
Experiment Tracker
To track the model performance and select the best model we will be using the experiment tracker. The functionality of the experiment tracker is to save all information about the experiment when the application is run. To enable the experiment tracker in Kedro we can update the catalog.xml file. The parameter versioned need to be set True. Below is the example
model:
  type: pickle.PickleDataSet
  filepath: data/06_models/model.pkl
  backend: pickle
  versioned: True
This helps in tracking the model result and saving the model version. Here, we will be using the experiment tracker at the evaluation step to track the model performance during the development phase.
When the model is executed it will generate different evaluation metrices such as MAE,MSE, RMSE and R2-score for different timestamp as show in image. On the basis of above evaluation metrices best model can be selected.
Deepcheck: For Data and Model Monitoring
When the model is deployed in production there are chances that the data quality is changed over time and due to this model performance can also change. To fix this problem we need to monitor the data in the production environment. For this, we will be using an open-source tool Deepcheck. Deepcheck has inbuilt libraries such as Label-drift and Feature-Drift which can be easily integrated with model code.
- FeatureDrift: – A drift means a change in the distribution of data over time due to which model performance degrades. FeaturDift means change has occurred in a single feature of the dataset.
- Labeldrift: – Labeldrift occurs when the ground truth labels for a dataset change over time. It mainly occur due to change in the label criteria.
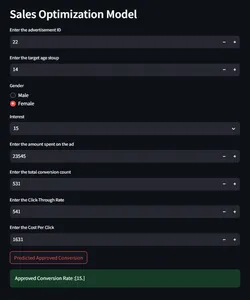
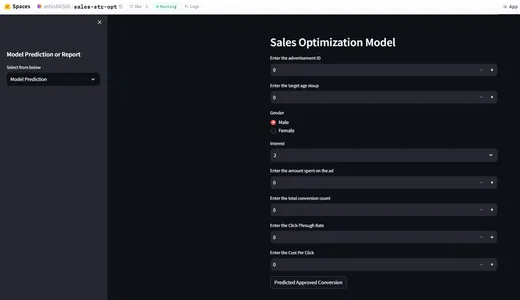
Integrating Model Prediction and Monitoring with Streamlit
Now we will build a user interface to interact with the model for making prediction on the given input parameters to check the conversion rate.
import streamlit as st
import pandas as pd
import joblib
import numpy as np

st.sidebar.header("Model Prediction or Report")

selected_report = st.sidebar.selectbox("Select from below", ["Model Prediction",
"Data Integrity","Feature Drift", "Label Drift"])

if selected_report=="Model Prediction":
        st.header("Sales Optimization Model")
        #def predict(ad_id, age, gender, interest, Impressions, Clicks, Spent,
        #Total_Conversion, CTR, CPC):
        def predict(ad_id, age, gender, interest,  Spent, Total_Conversion, CTR, CPC):
            if gender == 'Male':
                gender = 0
            else:
                gender = 1
            ad_id = int(ad_id)
            age = int(age)
            gender = int(gender)
            interest = int(interest)
            #Impressions = int(Impressions)
            #Clicks = int(Clicks)
            Spent = float(Spent)
            Total_Conversion = int(Total_Conversion)
            CTR = float(CTR*0.000001)
            CPC = float(CPC)

            input=np.array([[ad_id, age, gender, interest, Spent,
            Total_Conversion, CTR, CPC]]).astype(np.float64)


            model = joblib.load('model/model.pkl')
    # Make prediction
            prediction = model.predict(input)
            prediction= np.round(prediction)
    # Return the predicted value for Approved_Conversion
            return prediction

        ad_id = st.number_input('Enter the advertisement ID',min_value = 0)
        age = st.number_input('Enter the target age stoup',min_value = 0)
        gender = st.radio("Gender",('Male','Female'))
        interest = st.selectbox('Interest', [2, 7, 10, 15, 16, 18, 19, 20, 21, 22, 23,
         24, 25,
                        26, 27, 28, 29, 30, 31, 32, 36, 63, 64, 65, 66, 100, 101, 102,
                        103, 104, 105, 106, 107, 108, 109, 110, 111, 112, 113, 114])
        #Impressions = st.number_input('Enter the number of impressions',min_value = 0)
        #Clicks = st.number_input('Enter the number of clicks',min_value = 0)
        Spent = st.number_input('Enter the amount spent on the ad',min_value = 0)
        Total_Conversion = st.number_input('Enter the total conversion count',
        min_value = 0)
        CTR = st.number_input('Enter the Click-Through Rate',min_value = 0)
        CPC = st.number_input('Enter the Cost Per Click',min_value = 0)

        if st.button("Predicted Approved Conversion"):
             output = predict(ad_id, age, gender, interest, Spent, Total_Conversion,
             CTR, CPC)
             st.success("Approved Conversion Rate  :{}".format(output))
else:
    st.header("Sales Model Monitoring Report")
    report_file_name = "report/"+ selected_report.replace(" ", "") + ".html"
    HtmlFile = open(report_file_name, 'r', encoding='utf-8')
    source_code = HtmlFile.read()
    st.components.v1.html(source_code, width=1200, height=1500, scrolling=True)
Deployment Using HuggingFace
Now that we have build an end-to-end sale optimization model, we will deploy the model using HuggingFace. In huggingface, we need to configure the README.md file for model deployment. Huggingface take care of CI/CD. As whenever there is change in file, it will track to changes and redeploy the app. Below is the readme.md file configuration.
title: {{Sale-str-opt}}
emoji: {{Sale-str-opt}}
colorFrom: {{colorFrom}}
colorTo: {{colorTo}}
sdk: {{sdk}}
sdk_version: {{sdkVersion}}
app_file: app.py
pinned: false
HuggingFace App Demo
For cloud version click here.
Conclusion
- Machine learning apps can give the test conversion rate in unknown market helping business to know product demand.
- Using Sale optimization model business can target their right set of audience.
- This application helps is increasing the business revenue.
- Monitoring data in real time can also help in tracking model change and user behaviour change.
Frequently Asked Questions
A. The purpose of sale optimization model is to prediction the number of customers who will buy the product after seeing the ad.
A. Monitoring the data helps in tracking the dataset and model behaviour.
A. Yes, huggingface is free to use with basic feature 2 vCPU,16 GB RAM.
A. There are no strict rules for selecting reports at model monitoring stage, deepcheck have many inbuilt libraries such model drift, distribution drift.
A. Streamlit helps in local deployment, which help in fixing error during development phase.
The media shown in this article is not owned by Analytics Vidhya and is used at the Author’s discretion.
Related
- SEO Powered Content & PR Distribution. Get Amplified Today.
- PlatoData.Network Vertical Generative Ai. Empower Yourself. Access Here.
- PlatoAiStream. Web3 Intelligence. Knowledge Amplified. Access Here.
- PlatoESG. Carbon, CleanTech, Energy, Environment, Solar, Waste Management. Access Here.
- PlatoHealth. Biotech and Clinical Trials Intelligence. Access Here.
- Source: https://www.analyticsvidhya.com/blog/2024/01/mlops-strategies-for-sales-conversion-success/

