著者による画像
世界有数の AI 研究会社の 1 つである Mistral AI は、最近、 ミストラル 7B v0.2.
このオープンソース言語モデルは、23 年 2024 月 XNUMX 日に開催された同社のハッカソン イベント中に発表されました。
Mistral 7B モデルには 7.3 億のパラメーターがあり、非常に強力です。ほぼすべてのベンチマークで Llama 2 13B および Llama 1 34B を上回ります。最新の V0.2 モデルでは、特に 32k コンテキスト ウィンドウが導入され、テキストの処理と生成の機能が強化されています。
なお、今回発表されたバージョンは、昨年初めにリリースされた命令チューニング版「Mistral-7B-Instruct-V0.2」のベースモデルとなる。
このチュートリアルでは、Hugging Face でこの言語モデルにアクセスして微調整する方法を説明します。
Hugging Face の AutoTrain 機能を使用して、Mistral 7B-v0.2 ベース モデルを微調整します。
ハグ顔 は、機械学習モデルへのアクセスを民主化し、一般ユーザーが高度な AI ソリューションを開発できるようにすることで有名です。
Hugging Face の機能である AutoTrain は、モデル トレーニングのプロセスを自動化し、アクセスしやすく効率的にします。
これは、ユーザーがモデルを微調整する際に、最適なパラメーターとトレーニング手法を選択するのに役立ちます。これは、そうでなければ困難で時間のかかる作業となる可能性があります。
Mistral-5B モデルを微調整するための 7 つのステップは次のとおりです。
1.環境のセットアップ
まず、Hugging Face でアカウントを作成し、次にモデル リポジトリを作成する必要があります。
これを実現するには、この記事に記載されている手順に従ってください。 そしてこのチュートリアルに戻ってください。
Python でモデルをトレーニングします。トレーニング用のノートブック環境を選択する場合は、以下を使用できます。 Kaggleノートブック or グーグルコラボ、どちらも GPU への無料アクセスを提供します。
トレーニング プロセスに時間がかかりすぎる場合は、AWS Sagemaker や Azure ML などのクラウド プラットフォームに切り替えることをお勧めします。
最後に、このチュートリアルに沿ってコーディングを開始する前に、次の pip インストールを実行します。
!pip install -U autotrain-advanced
!pip install datasets transformers
2. データセットの準備
このチュートリアルでは、 アルパカ データセット ハグフェイスでは次のようになります。
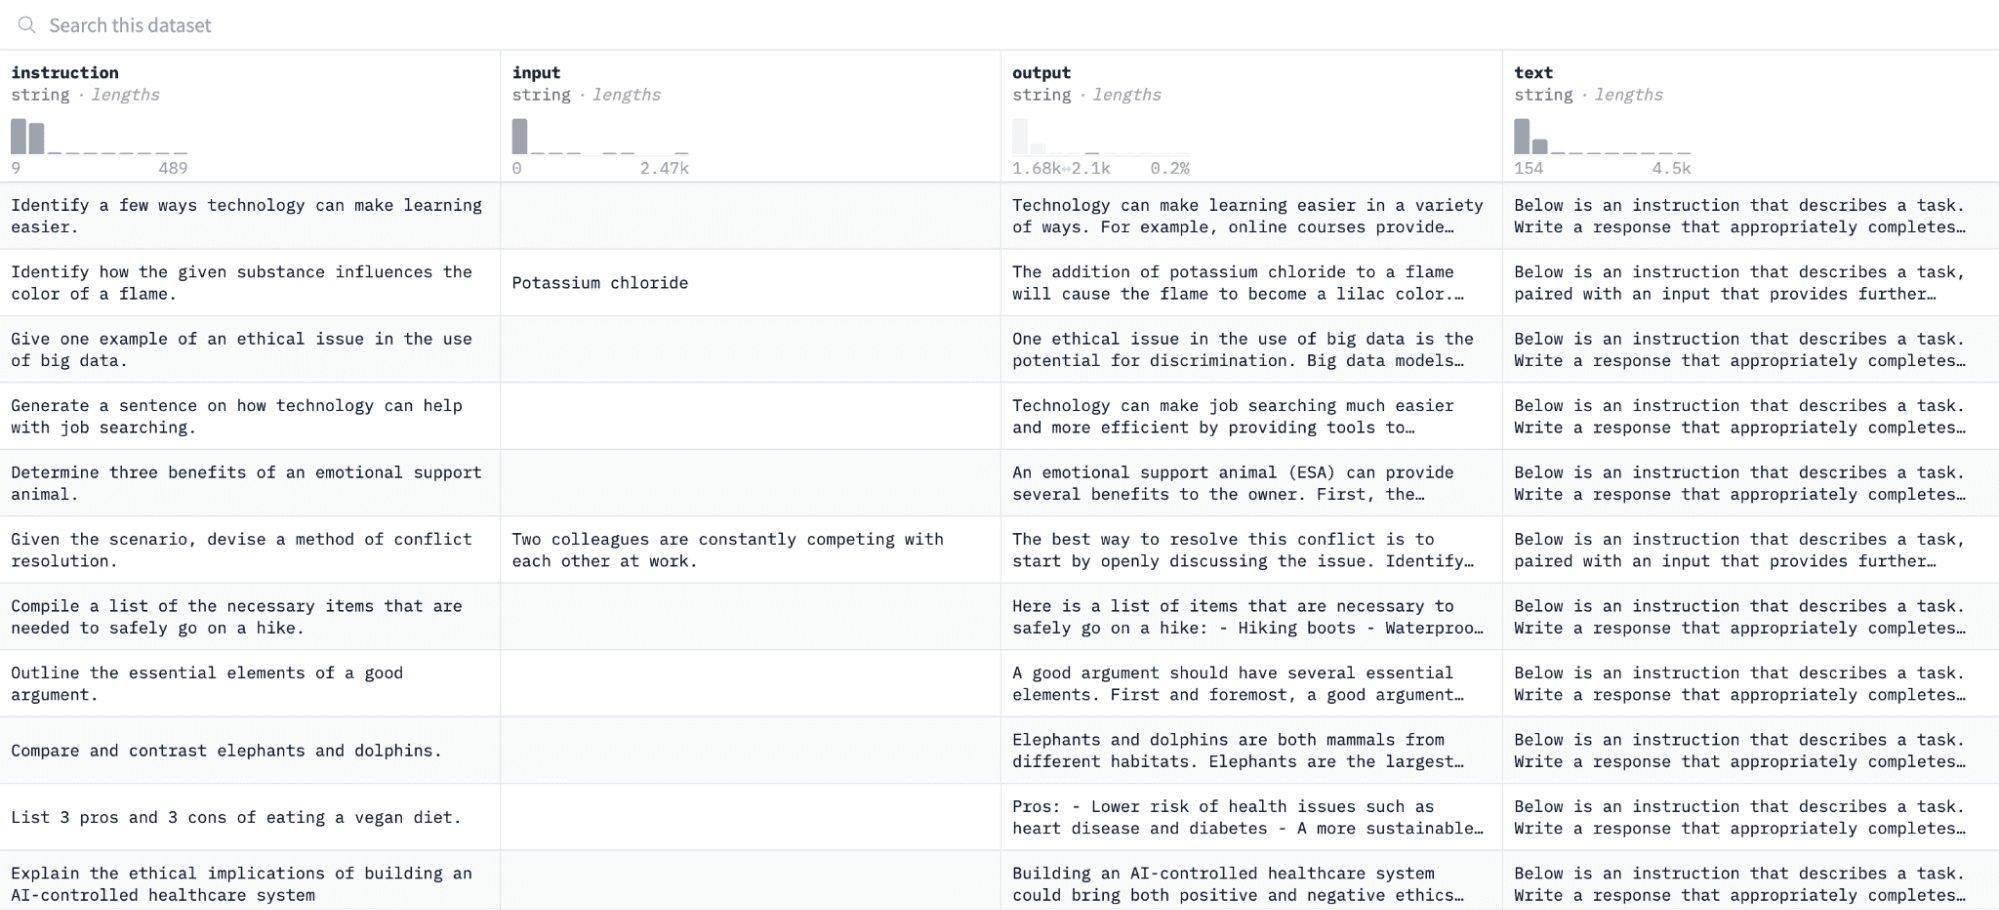
指示と出力のペアに基づいてモデルを微調整し、評価プロセスで指定された指示に応答する能力を評価します。
このデータセットにアクセスして準備するには、次のコード行を実行します。
import pandas as pd
from datasets import load_dataset

# Load and preprocess dataset
def preprocess_dataset(dataset_name, split_ratio='train[:10%]', input_col='input', output_col='output'):
   dataset = load_dataset(dataset_name, split=split_ratio)
   df = pd.DataFrame(dataset)
   chat_df = df[df[input_col] == ''].reset_index(drop=True)
   return chat_df

# Formatting according to AutoTrain requirements
def format_interaction(row):
   formatted_text = f"[Begin] {row['instruction']} [End] {row['output']} [Close]"
   return formatted_text

# Process and save the dataset
if __name__ == "__main__":
   dataset_name = "tatsu-lab/alpaca"
   processed_data = preprocess_dataset(dataset_name)
   processed_data['formatted_text'] = processed_data.apply(format_interaction, axis=1)

   save_path = 'formatted_data/training_dataset'
   os.makedirs(save_path, exist_ok=True)
   file_path = os.path.join(save_path, 'formatted_train.csv')
   processed_data[['formatted_text']].to_csv(file_path, index=False)
   print("Dataset formatted and saved.")
最初の関数は、「datasets」ライブラリを使用して Alpaca データセットをロードし、空の命令が含まれていないことを確認するためにデータセットをクリーンアップします。 2 番目の関数は、AutoTrain が理解できる形式でデータを構造化します。
上記のコードを実行すると、データセットがロードされ、フォーマットされ、指定されたパスに保存されます。書式設定されたデータセットを開くと、「formatted_text」というラベルの付いた 1 つの列が表示されるはずです。
3. トレーニング環境のセットアップ
データセットの準備が完了したので、モデル トレーニング環境のセットアップに進みましょう。
これを行うには、次のパラメータを定義する必要があります。
project_name = 'mistralai'
model_name = 'alpindale/Mistral-7B-v0.2-hf'
push_to_hub = True
hf_token = 'your_token_here'
repo_id = 'your_repo_here.'
上記の仕様の内訳は次のとおりです。
- 任意に指定できます プロジェクト名。ここに、すべてのプロジェクト ファイルとトレーニング ファイルが保存されます。
- モデル名 パラメータは微調整したいモデルです。この場合、へのパスを指定しました。 Mistral-7B v0.2 ベースモデル ハグフェイスについて。
- hf_token 変数は、Hugging Face トークンに設定する必要があります。このトークンは、に移動して取得できます。 このリンク.
- あなたの リポジトリID このチュートリアルの最初のステップで作成した Hugging Face モデル リポジトリに設定する必要があります。たとえば、私のリポジトリ ID は次のとおりです。 ナターシャS/モデル2。
4. モデルパラメータの設定
モデルを微調整する前に、トレーニング期間や正則化などのモデルの動作の側面を制御するトレーニング パラメーターを定義する必要があります。
これらのパラメーターは、モデルのトレーニング時間、データからの学習方法、過学習の回避方法などの重要な側面に影響します。
モデルに対して次のパラメータを設定できます。
use_fp16 = True
use_peft = True
use_int4 = True
learning_rate = 1e-4
num_epochs = 3
batch_size = 4
block_size = 512
warmup_ratio = 0.05
weight_decay = 0.005
lora_r = 8
lora_alpha = 16
lora_dropout = 0.01
5. 環境変数の設定
次に、いくつかの環境変数を設定してトレーニング環境を準備しましょう。
この手順により、AutoTrain 機能が、プロジェクト名やトレーニング設定など、モデルを微調整するために必要な設定を使用するようになります。
os.environ["PROJECT_NAME"] = project_name
os.environ["MODEL_NAME"] = model_name
os.environ["LEARNING_RATE"] = str(learning_rate)
os.environ["NUM_EPOCHS"] = str(num_epochs)
os.environ["BATCH_SIZE"] = str(batch_size)
os.environ["BLOCK_SIZE"] = str(block_size)
os.environ["WARMUP_RATIO"] = str(warmup_ratio)
os.environ["WEIGHT_DECAY"] = str(weight_decay)
os.environ["USE_FP16"] = str(use_fp16)
os.environ["LORA_R"] = str(lora_r)
os.environ["LORA_ALPHA"] = str(lora_alpha)
os.environ["LORA_DROPOUT"] = str(lora_dropout)
6. モデルのトレーニングを開始する
最後に、を使用してモデルのトレーニングを開始しましょう。 自動訓練 指示。このステップには、以下に示すように、モデル、データセット、トレーニング構成の指定が含まれます。
!autotrain llm
 --train
 --model "${MODEL_NAME}"
 --project-name "${PROJECT_NAME}"
 --data-path "formatted_data/training_dataset/"
 --text-column "formatted_text"
 --lr "${LEARNING_RATE}"
 --batch-size "${BATCH_SIZE}"
 --epochs "${NUM_EPOCHS}"
 --block-size "${BLOCK_SIZE}"
 --warmup-ratio "${WARMUP_RATIO}"
 --lora-r "${LORA_R}"
 --lora-alpha "${LORA_ALPHA}"
 --lora-dropout "${LORA_DROPOUT}"
 --weight-decay "${WEIGHT_DECAY}"
 $( [[ "$USE_FP16" == "True" ]] && echo "--mixed-precision fp16" )
 $( [[ "$USE_PEFT" == "True" ]] && echo "--use-peft" )
 $( [[ "$USE_INT4" == "True" ]] && echo "--quantization int4" )
 $( [[ "$PUSH_TO_HUB" == "True" ]] && echo "--push-to-hub --token ${HF_TOKEN} --repo-id ${REPO_ID}" )
必ず変更してください データ経路 トレーニング データセットがある場所に移動します。
7. モデルの評価
モデルのトレーニングが完了すると、プロジェクト名と同じタイトルのフォルダーがディレクトリに表示されるはずです。
私の場合、このフォルダーのタイトルは「ミストラライ」 以下の画像に示すように:
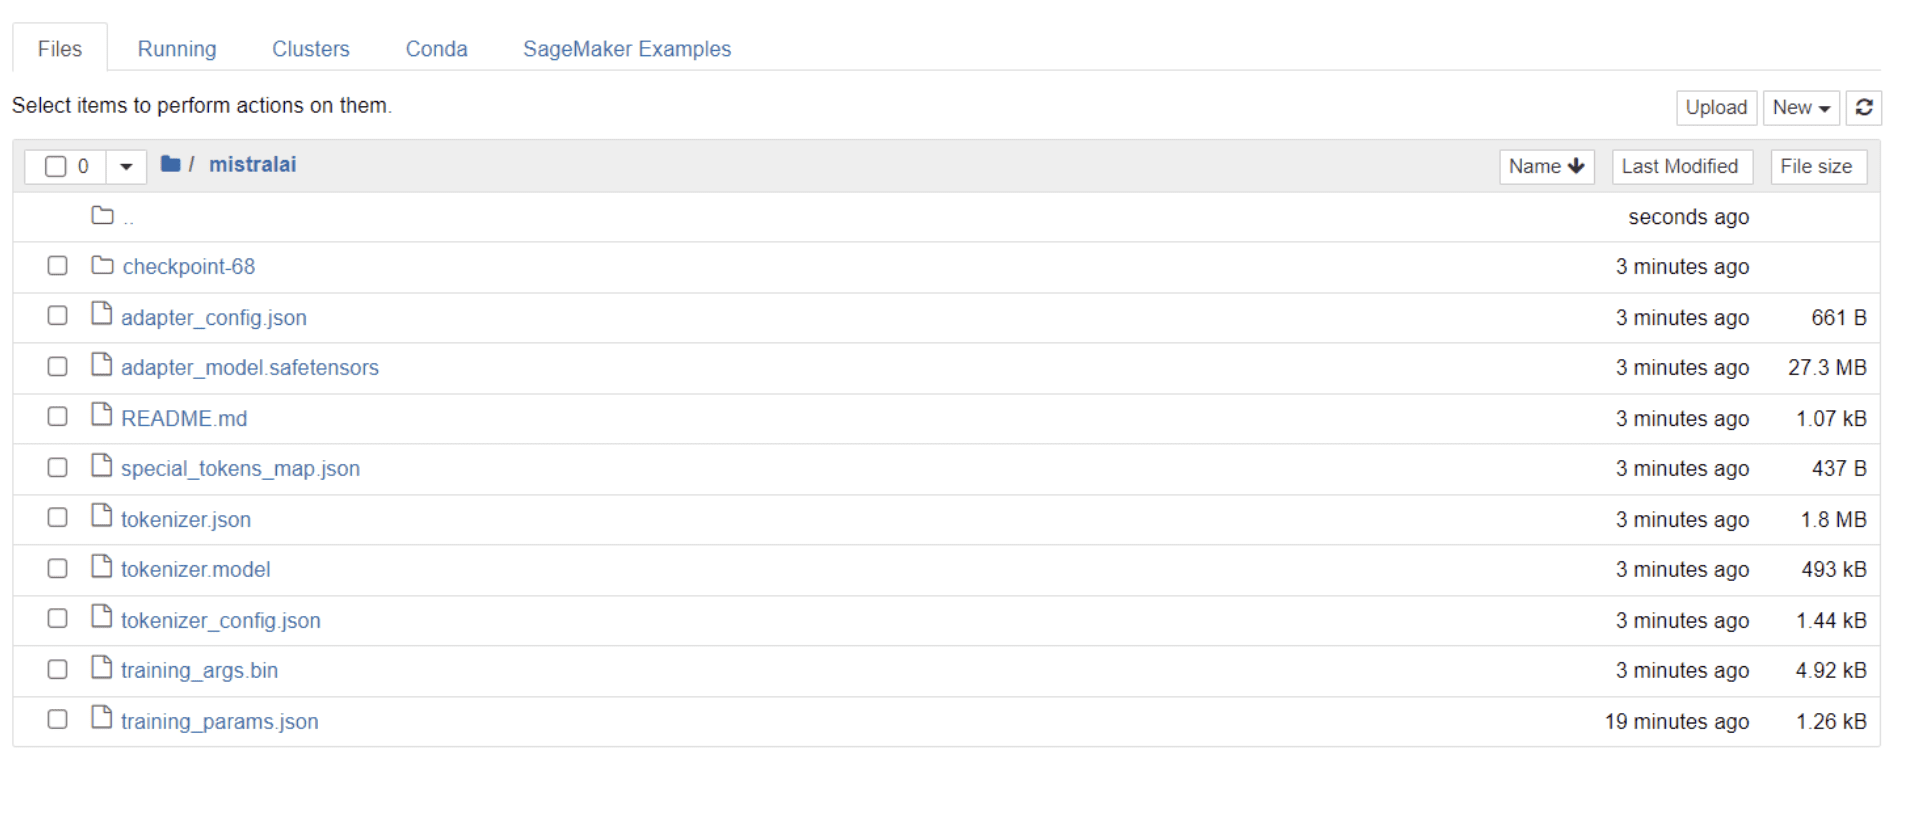
このフォルダー内には、モデルの重み、ハイパーパラメーター、アーキテクチャの詳細を含むファイルがあります。
次に、この微調整されたモデルがデータセット内の質問に正確に応答できるかどうかを確認してみましょう。これを実現するには、まず次のコード行を実行して、データセットから 5 つのサンプル入力と出力を生成する必要があります。
# Print out 5 sample inputs and outputs from our dataset
for i, example in enumerate(dataset):
   if i >= 5:
       break
   print(f"Instruction: {example['instruction']}")
   print(f"Output: {example['output']}n---")
次のような応答が表示され、5 つのサンプル データ ポイントが表示されます。
Instruction: Give three tips for staying healthy.
Output: 1.Eat a balanced diet and make sure to include plenty of fruits and vegetables.
2. Exercise regularly to keep your body active and strong.
3. Get enough sleep and maintain a consistent sleep schedule.
---
Instruction: What are the three primary colors?
Output: The three primary colors are red, blue, and yellow.
---
Instruction: Describe the structure of an atom.
Output: An atom is made up of a nucleus, which contains protons and neutrons, surrounded by electrons that travel in orbits around the nucleus. The protons and neutrons have a positive charge, while the electrons have a negative charge, resulting in an overall neutral atom. The number of each particle determines the atomic number and the type of atom.
---
Instruction: How can we reduce air pollution?
Output: There are a number of ways to reduce air pollution, such as shifting to renewable energy sources, encouraging the use of public transportation, prohibiting the burning of fossil fuels, implementing policies to reduce emissions from industrial sources, and implementing vehicle emissions standards. Additionally, individuals can do their part to reduce air pollution by reducing car use, avoiding burning materials such as wood, and changing to energy efficient appliances.
---
Instruction: Describe a time when you had to make a difficult decision.
Output: I had to make a difficult decision when I was working as a project manager at a construction company. I was in charge of a project that needed to be completed by a certain date in order to meet the client's expectations. However, due to unexpected delays, we were not able to meet the deadline and so I had to make a difficult decision. I decided to extend the deadline, but I had to stretch the team's resources even further and increase the budget. Although it was a risky decision, I ultimately decided to go ahead with it to ensure that the project was completed on time and that the client's expectations were met. The project was eventually successfully completed and this was seen as a testament to my leadership and decision-making abilities.
上記の命令のいずれかをモデルに入力し、正確な出力が生成されるかどうかを確認します。以下は、モデルに指示を与え、モデルから応答を取得する関数です。
# Function to provide an instruction
def ask(model, tokenizer, question, max_length=128):
   inputs = tokenizer.encode(question, return_tensors='pt')
   outputs = model.generate(inputs, max_length=max_length, num_return_sequences=1)
   answer = tokenizer.decode(outputs[0], skip_special_tokens=True)
   return answer
最後に、以下に示すように、この関数に質問を入力します。
question = "Describe a time when you had to make a difficult decision."
answer = ask(model, tokenizer, question)
print(answer)
以下に示すように、モデルはトレーニング データセット内の対応する出力と同一の応答を生成する必要があります。
Describe a time when you had to make a difficult decision.

What did you do? How did it turn out?

[/INST] I remember a time when I had to make a difficult decision about
my career. I had been working in the same job for several years and had
grown tired of it. I knew that I needed to make a change, but I was unsure of what to do. I weighed my options carefully and eventually decided to take a leap of faith and start my own business. It was a risky move, but it paid off in the end. I am now the owner of a successful business and
指定したトークンの数により、応答が不完全または途切れているように見える場合があることに注意してください。より長い応答を可能にするために、「max_length」値を自由に調整してください。
ここまで来たら、おめでとうございます!
Mistral 7B v-0.2 のパワーと Hugging Face の機能を活用して、最先端の言語モデルを微調整することに成功しました。
しかし、旅はここで終わりません。
次のステップとして、さまざまなデータセットを試したり、特定のトレーニング パラメーターを微調整してモデルのパフォーマンスを最適化することをお勧めします。モデルを大規模に微調整すると実用性が高まるため、より大きなデータセットや、PDF やテキスト ファイルなどのさまざまな形式を試してみてください。
組織内で、乱雑で構造化されていないことが多い現実世界のデータを扱う場合、このような経験は非常に貴重になります。
ナタシャ・セルバラジ 彼は独学のデータサイエンティストであり、執筆に情熱を持っています。ナターシャはデータ サイエンス関連のすべてについて執筆しており、すべてのデータ トピックの真の達人です。彼女とつながることができます LinkedIn または彼女をチェックアウト YouTubeチャンネル.
- SEO を活用したコンテンツと PR 配信。 今日増幅されます。
- PlatoData.Network 垂直生成 Ai。 自分自身に力を与えましょう。 こちらからアクセスしてください。
- プラトアイストリーム。 Web3 インテリジェンス。 知識増幅。 こちらからアクセスしてください。
- プラトンESG。 カーボン、 クリーンテック、 エネルギー、 環境、 太陽、 廃棄物管理。 こちらからアクセスしてください。
- プラトンヘルス。 バイオテクノロジーと臨床試験のインテリジェンス。 こちらからアクセスしてください。
- 情報源: https://www.kdnuggets.com/mistral-7b-v02-fine-tuning-mistral-new-open-source-llm-with-hugging-face?utm_source=rss&utm_medium=rss&utm_campaign=mistral-7b-v0-2-fine-tuning-mistrals-new-open-source-llm-with-hugging-face

