Many organizations use identity providers (IdPs) to authenticate users, manage their attributes, and group memberships for secure, efficient, and centralized identity management. You might be modernizing your data architecture using Amazon Redshift to enable access to your data lake and data in your data warehouse, and are looking for a centralized and scalable way to define and manage the data access based on IdP identities. AWS Lake Formation makes it straightforward to centrally govern, secure, and globally share data for analytics and machine learning (ML). Currently, you may have to map user identities and groups to AWS Identity and Access Management (IAM) roles, and data access permissions are defined at the IAM role level within Lake Formation. This setup is not efficient because setting up and maintaining IdP groups with IAM role mapping as new groups are created is time consuming and it makes it difficult to derive what data was accessed from which service at that time.
Amazon Redshift, Amazon QuickSight, and Lake Formation now integrate with the new trusted identity propagation capability in AWS IAM Identity Center to authenticate users seamlessly across services. In this post, we discuss two use cases to configure trusted identity propagation with Amazon Redshift and Lake Formation.
Solution overview
Trusted identity propagation provides a new authentication option for organizations that want to centralize data permissions management and authorize requests based on their IdP identity across service boundaries. With IAM Identity Center, you can configure an existing IdP to manage users and groups and use Lake Formation to define fine-grained access control permissions on catalog resources for these IdP identities. Amazon Redshift supports identity propagation when querying data with Amazon Redshift Spectrum and with Amazon Redshift Data Sharing, and you can use AWS CloudTrail to audit data access by IdP identities to help your organization meet their regulatory and compliance requirements.
With this new capability, users can connect to Amazon Redshift from QuickSight with a single sign-on experience and create direct query datasets. This is enabled by using IAM Identity Center as a shared identity source. With trusted identity propagation, when QuickSight assets like dashboards are shared with other users, the database permissions of each QuickSight user are applied by propagating their end-user identity from QuickSight to Amazon Redshift and enforcing their individual data permissions. Depending on the use case, the author can apply additional row-level and column-level security in QuickSight.
The following diagram illustrates an example of the solution architecture.
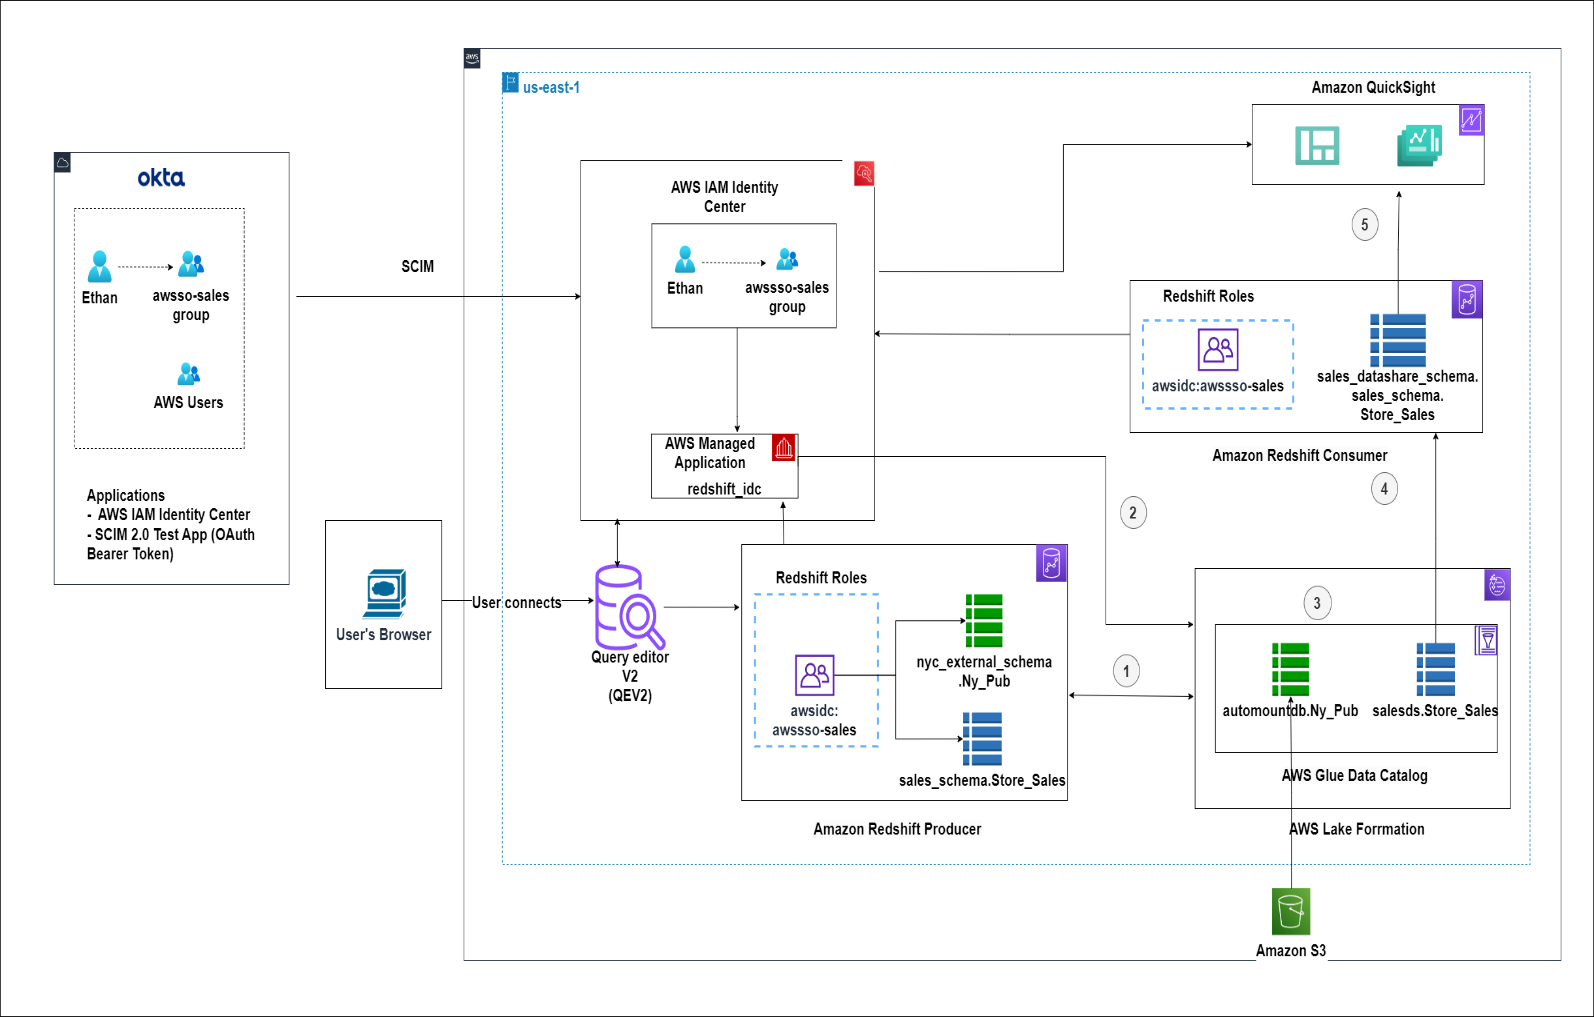
In this post, we walk through how to configure trusted identity propagation with Amazon Redshift and Lake Formation. We cover the following use cases:
- Redshift Spectrum with Lake Formation
- Redshift data sharing with Lake Formation
Prerequisites
This walkthrough assumes you have set up a Lake Formation administrator role or a similar role to follow along with the instructions in this post. To learn more about setting up permissions for a data lake administrator, see Create a data lake administrator.
Additionally, you must create the following resources as detailed in Integrate Okta with Amazon Redshift Query Editor V2 using AWS IAM Identity Center for seamless Single Sign-On:
- An Okta account integrated with IAM Identity Center to sync users and groups
- A Redshift managed application with IAM Identity Center
- A Redshift source cluster with IAM Identity Center integration enabled
- A Redshift target cluster with IAM Identity Center integration enabled (you can skip the section to set up Amazon Redshift role-based access)
- Users and groups from IAM Identity Center assigned to the Redshift application
- A permission set assigned to AWS accounts to enable Redshift Query Editor v2 access
- Add the below permission to the IAM role used in Redshift managed application for integration with IAM Identity Center.
Use case 1: Redshift Spectrum with Lake Formation
This use case assumes you have the following prerequisites:
- Log in to the AWS Management Console as an IAM administrator.
- Go to CloudShell or your AWS CLI and run the following AWS CLI command, providing your bucket name to copy the data:
In this post, we use an AWS Glue crawler to create the external table ny_pub stored in Apache Parquet format in the Amazon S3 location s3://<bucketname>/data/NY-Pub/. In the next step, we create the solution resources using AWS CloudFormation to create a stack named CrawlS3Source-NYTaxiData in us-east-1.
- Download the .yml file or launch the CloudFormation stack.
The stack creates the following resources:
- The crawler
NYTaxiCrawleralong with the new IAM roleAWSGlueServiceRole-RedshiftAutoMount - The AWS Glue database
automountdb
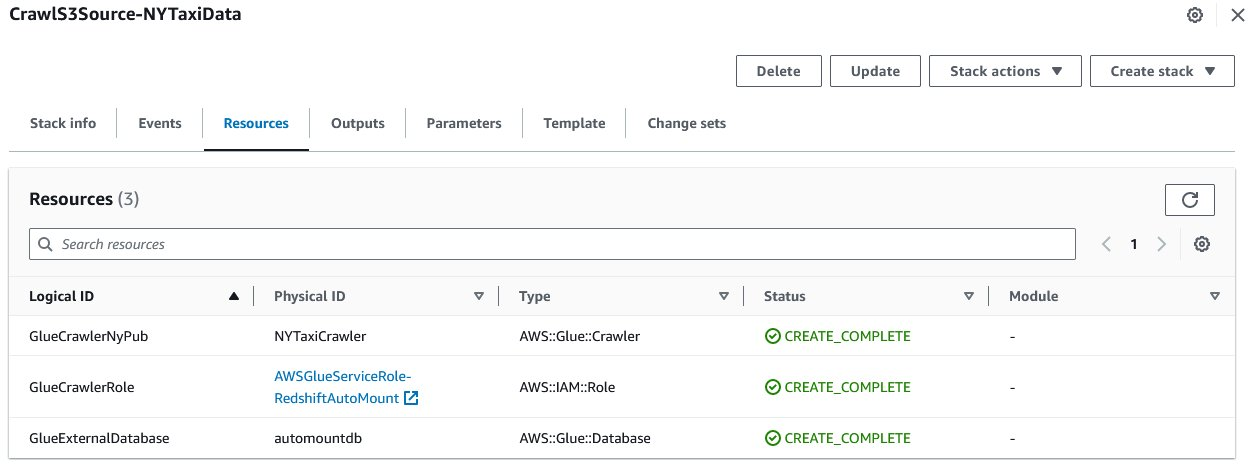
When the stack is complete, continue with the following steps to finish setting up your resources:
- On the AWS Glue console, under Data Catalog in the navigation pane, choose Crawlers.
- Open
NYTaxiCrawlerand choose Edit.
- Under Choose data sources and classifiers, choose Edit.

- For Data source, choose S3.
- For S3 path, enter
s3://<bucketname>/data/NY-Pub/. - Choose Update S3 data source.
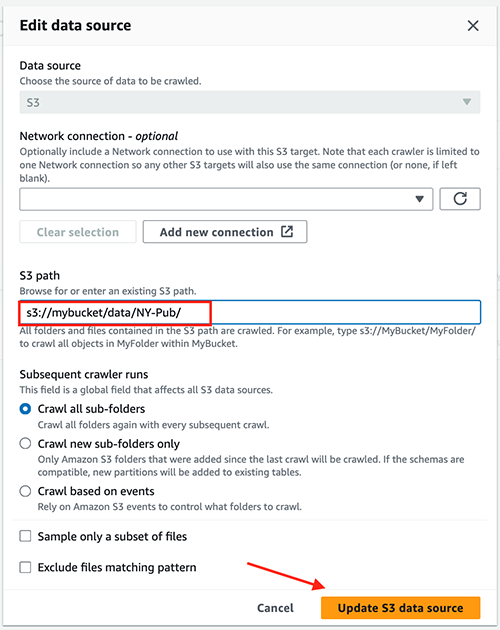
- Choose Next and choose Update.
- Choose Run crawler.

After the crawler is complete, you can see a new table called ny_pub in the Data Catalog under the automountdb database.
After you create the resources, complete the steps in the next sections to set up Lake Formation permissions on the AWS Glue table ny_pub for the sales IdP group and access them via Redshift Spectrum.
Enable Lake Formation propagation for the Redshift managed application
Complete the following steps to enable Lake Formation propagation for the Redshift managed application created in Integrate Okta with Amazon Redshift Query Editor V2 using AWS IAM Identity Center for seamless Single Sign-On:
- Log in to the console as admin.
- On the Amazon Redshift console, choose IAM Identity Center connection in the navigation pane.
- Select the managed application that starts with
redshift-iadand choose Edit.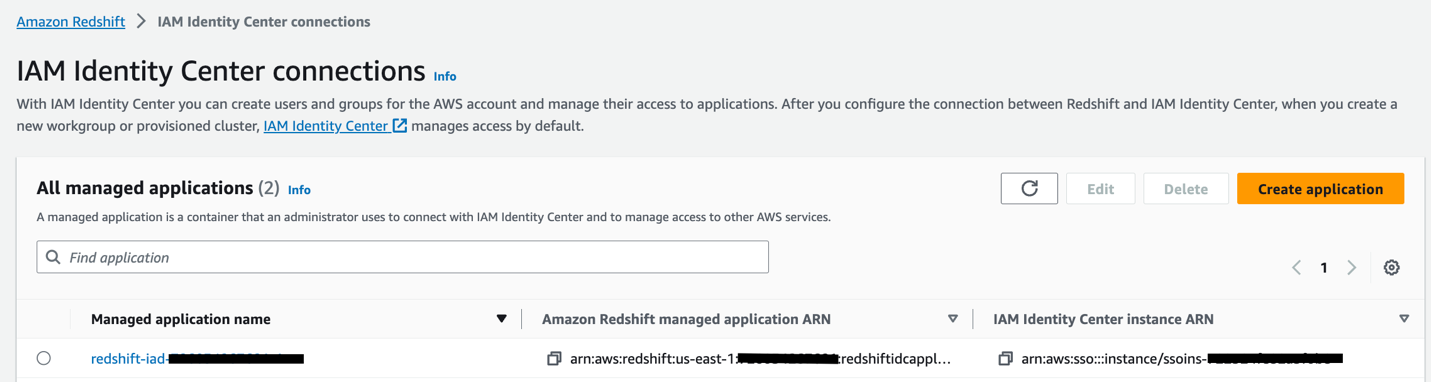
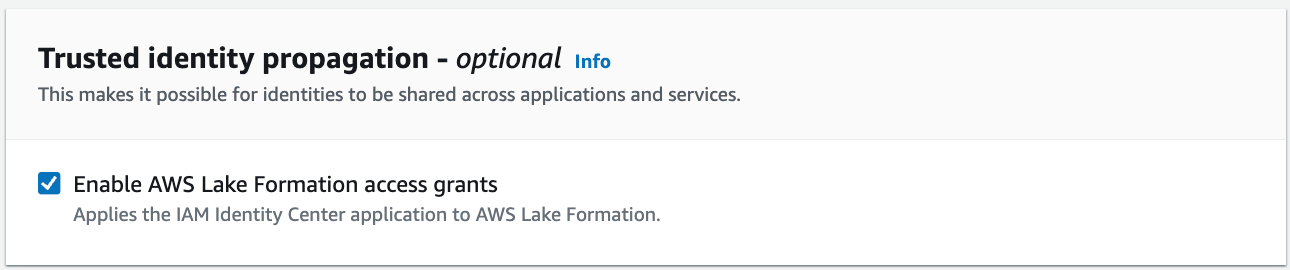
- Select Enable AWS Lake Formation access grants under Trusted identity propagation and save your changes.
Set up Lake Formation as an IAM Identity Center application
Complete the following steps to set up Lake Formation as an IAM Identity Center application:
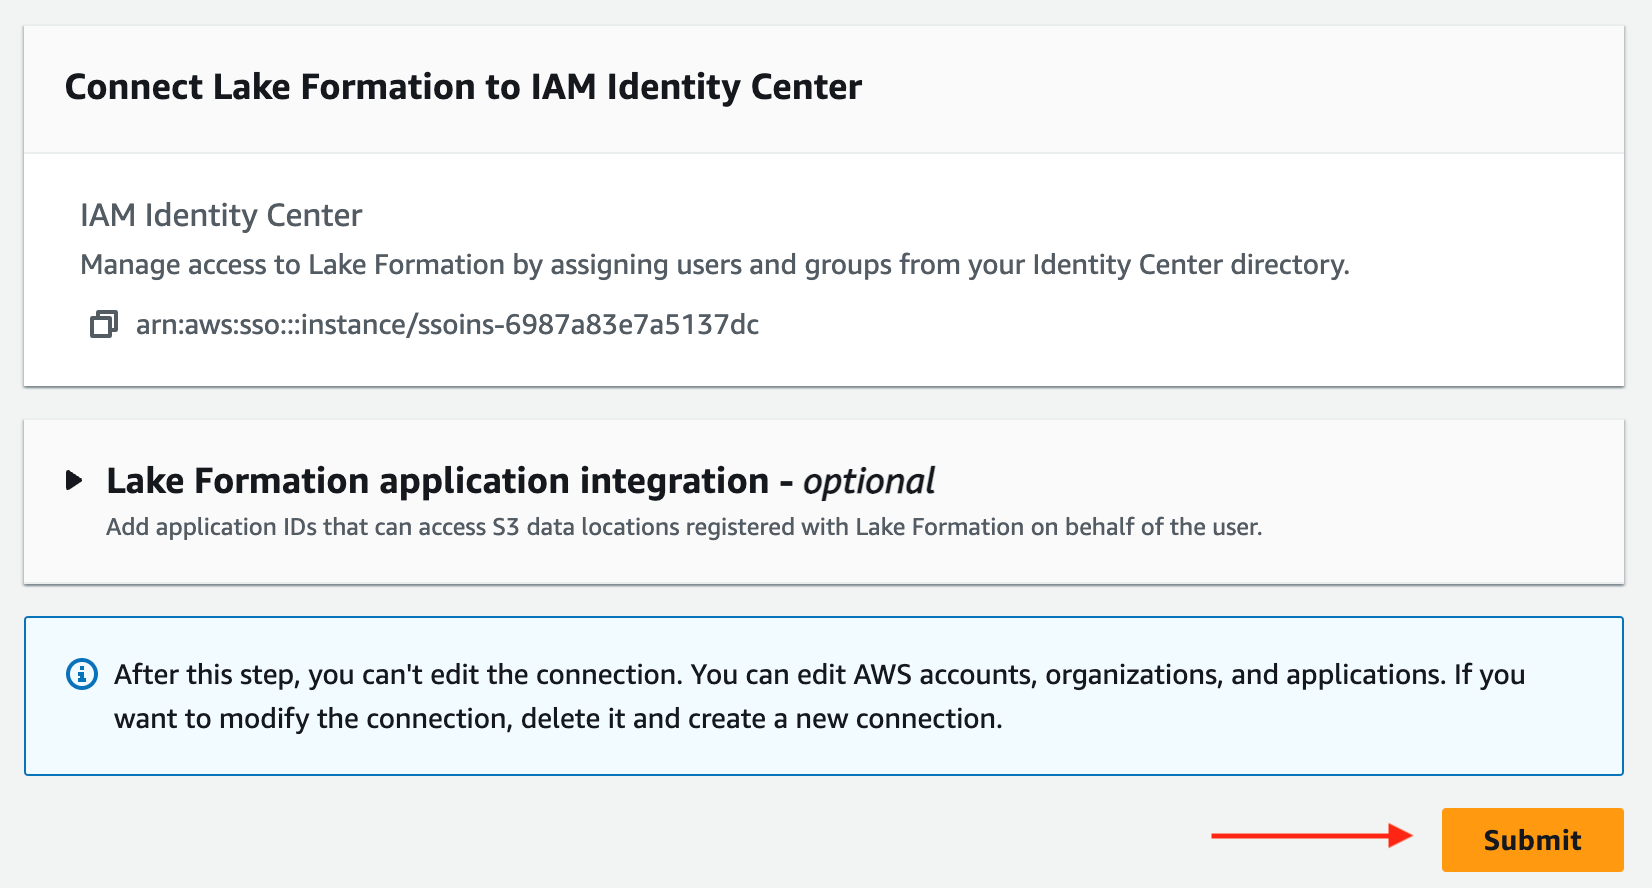
- On the Lake Formation console, under Administration in the navigation pane, choose IAM Identity Center integration.
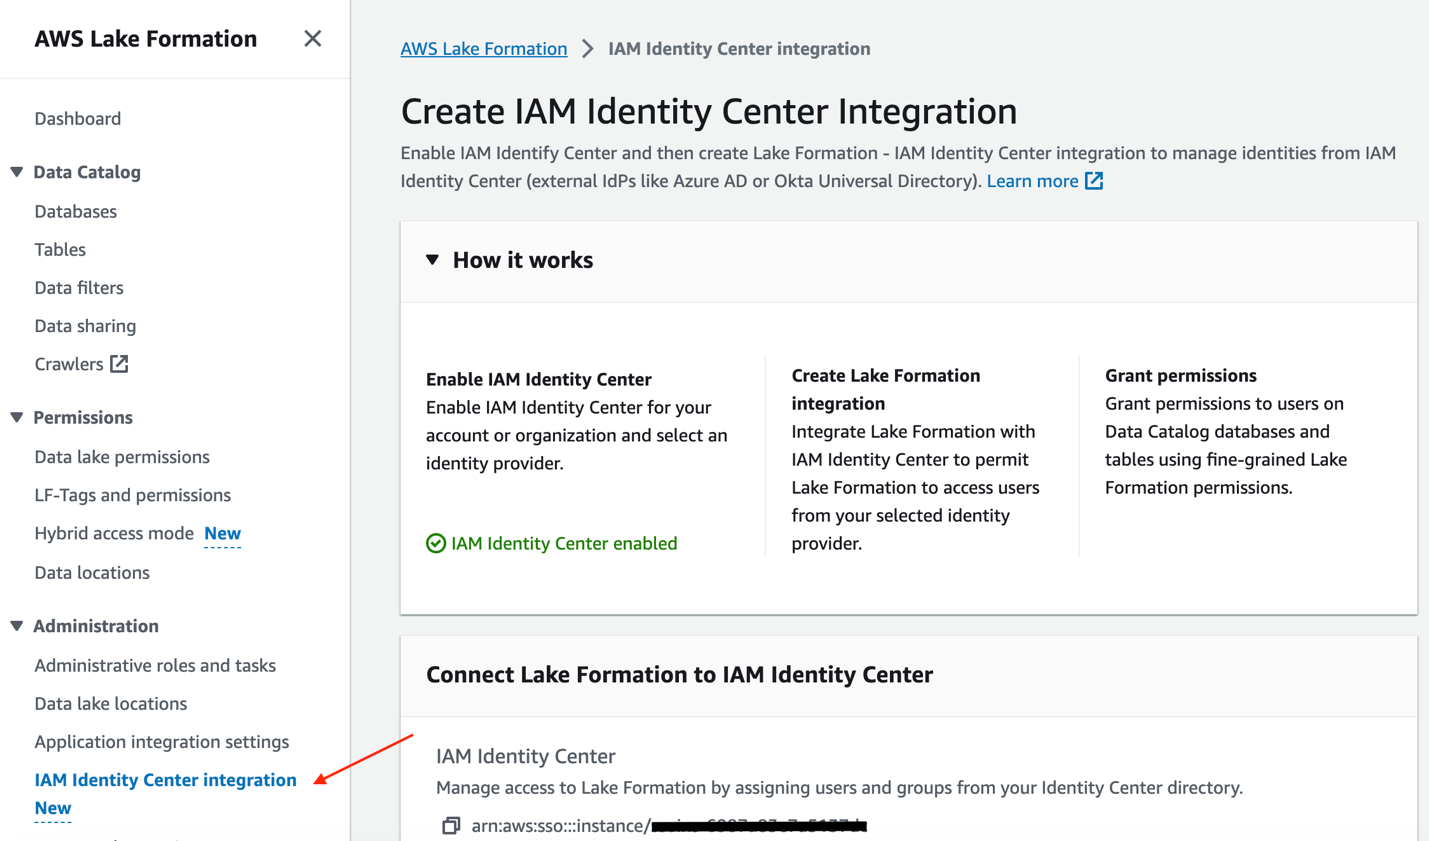
- Review the options and choose Submit to enable Lake Formation integration.
The integration status will update to Success.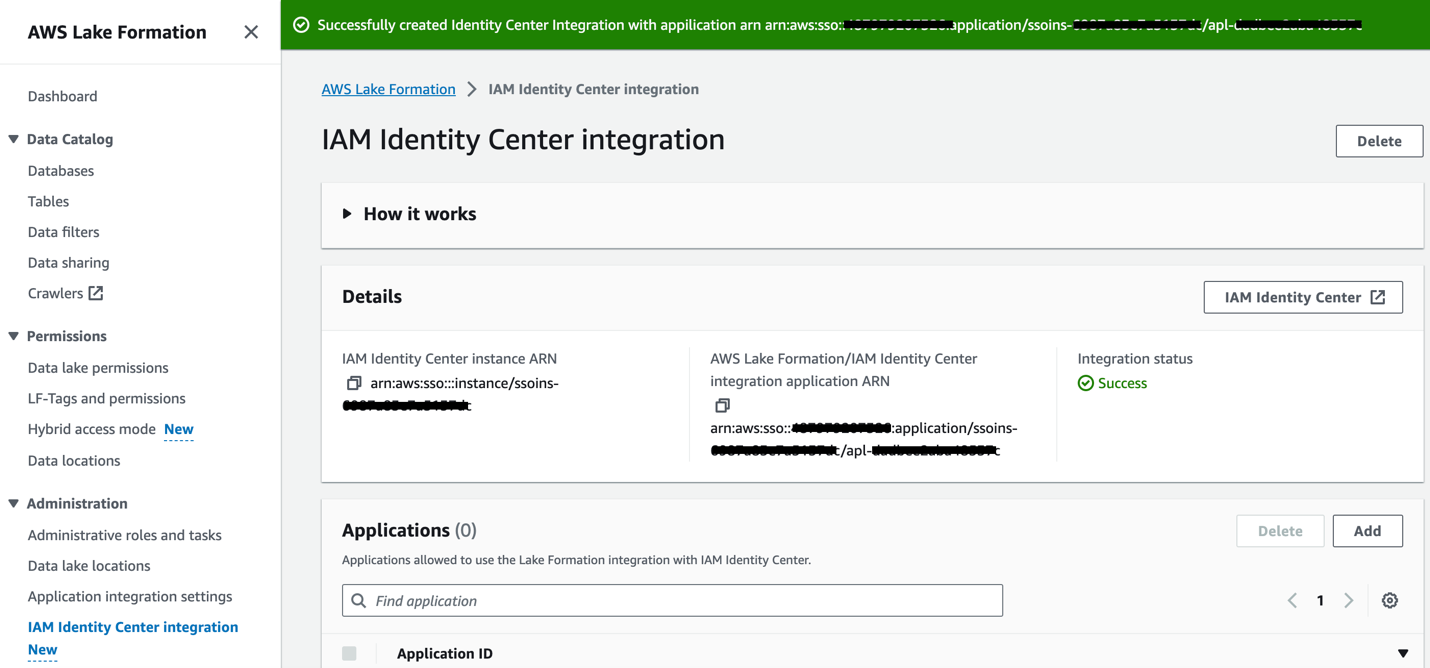 Alternatively, you can run the following command:
Register the data with Lake Formation
In this section, we register the data with Lake Formation. Complete the following steps:
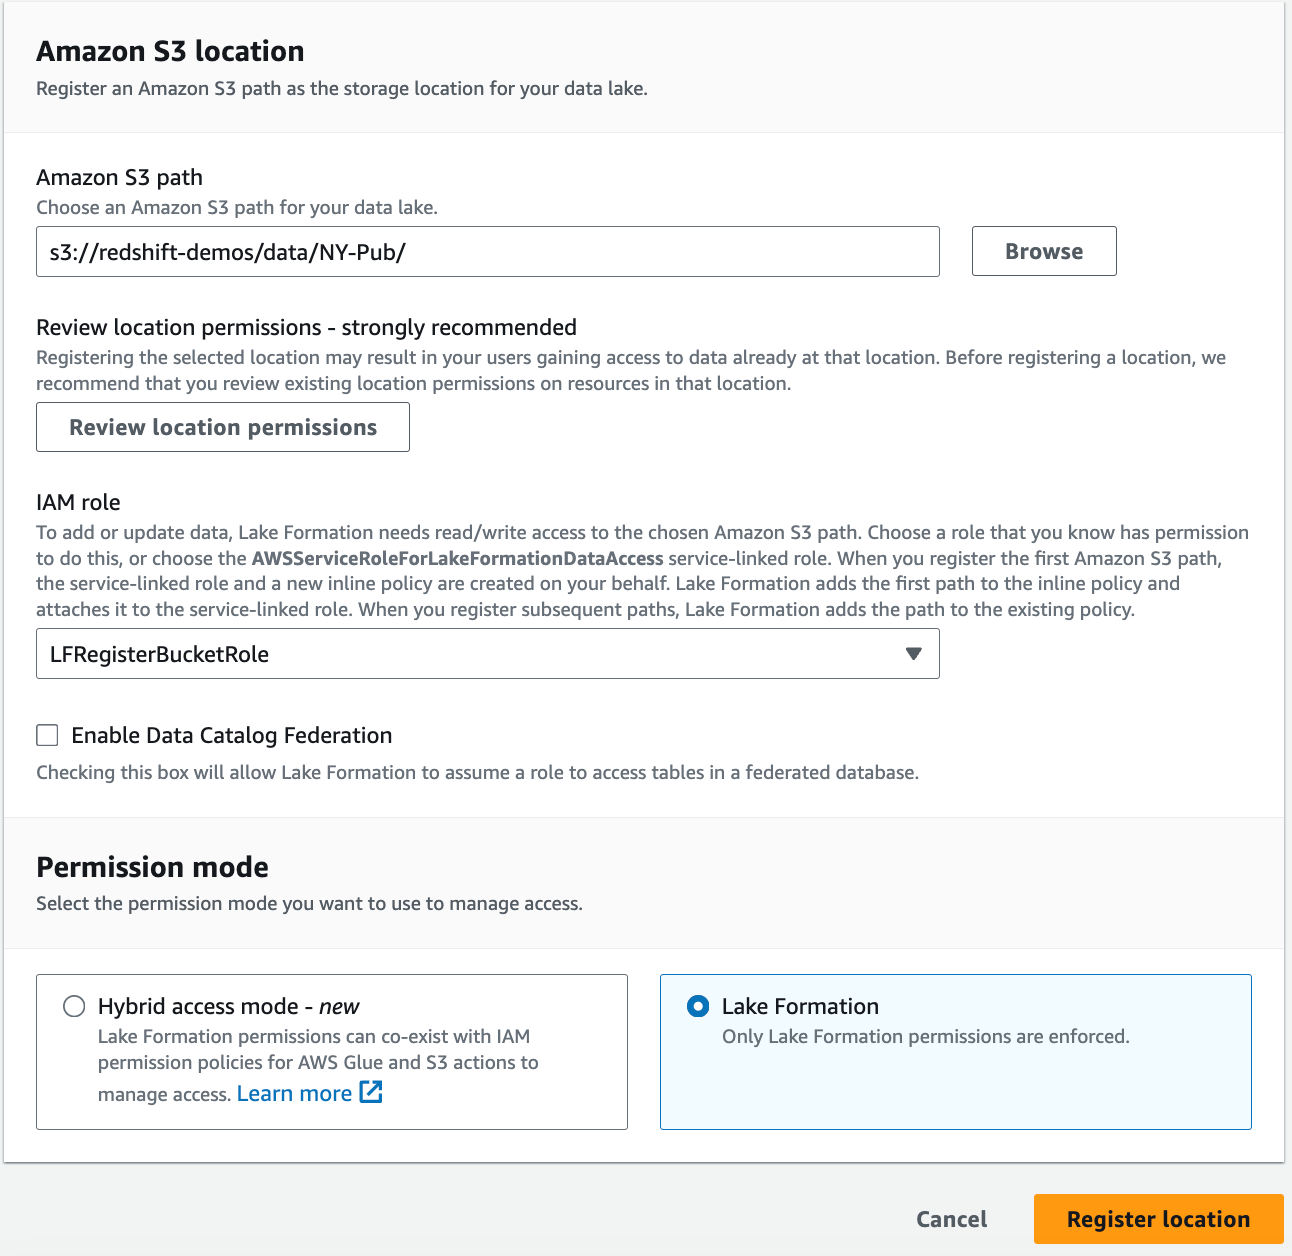
- On the Lake Formation console, under Administration in the navigation pane, choose Data lake locations.
- Choose Register location.
- For Amazon S3 path, enter the bucket where the table data resides (
s3://<bucketname>/data/NY-Pub/). - For IAM role, choose a Lake Formation user-defined role. For more information, refer to Requirements for roles used to register locations.
- For Permission mode, select Lake Formation.
- Choose Register location.
Next, verify that the IAMAllowedPrincipal group doesn’t have permission on the database.
- On the Lake Formation console, under Data catalog in the navigation pane, choose Databases.
- Select
automountdband on the Actions menu, choose View permissions. - If
IAMAllowedPrincipalis listed, select the principal and choose Revoke.
- Repeat these steps to verify permissions for the table
ny_pub.
Grant the IAM Identity Center group permissions on the AWS Glue database and table
Complete the following steps to grant database permissions to the IAM Identity Center group:
- On the Lake Formation console, under Data catalog in the navigation pane, choose Databases.
- Select the database
automountdband on the Actions menu, choose Grant. - Choose Grant database.
- Under Principals, select IAM Identity Center and choose Add.

- In the pop-up window, if this is the first time assigning users and groups, choose Get started.
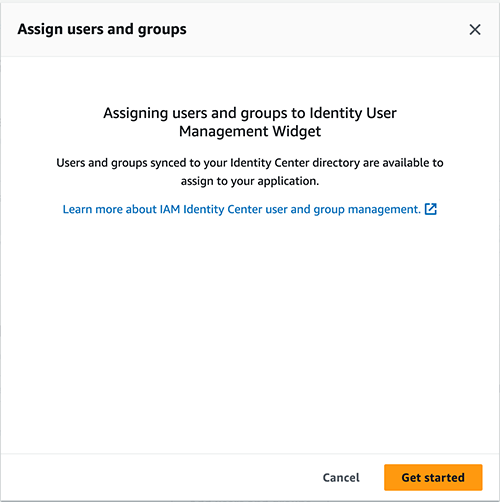
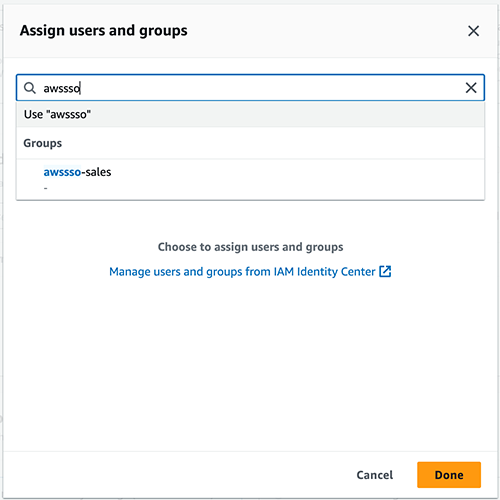
- Enter the IAM Identity Center group in the search bar and choose the group.
- Choose Assign.
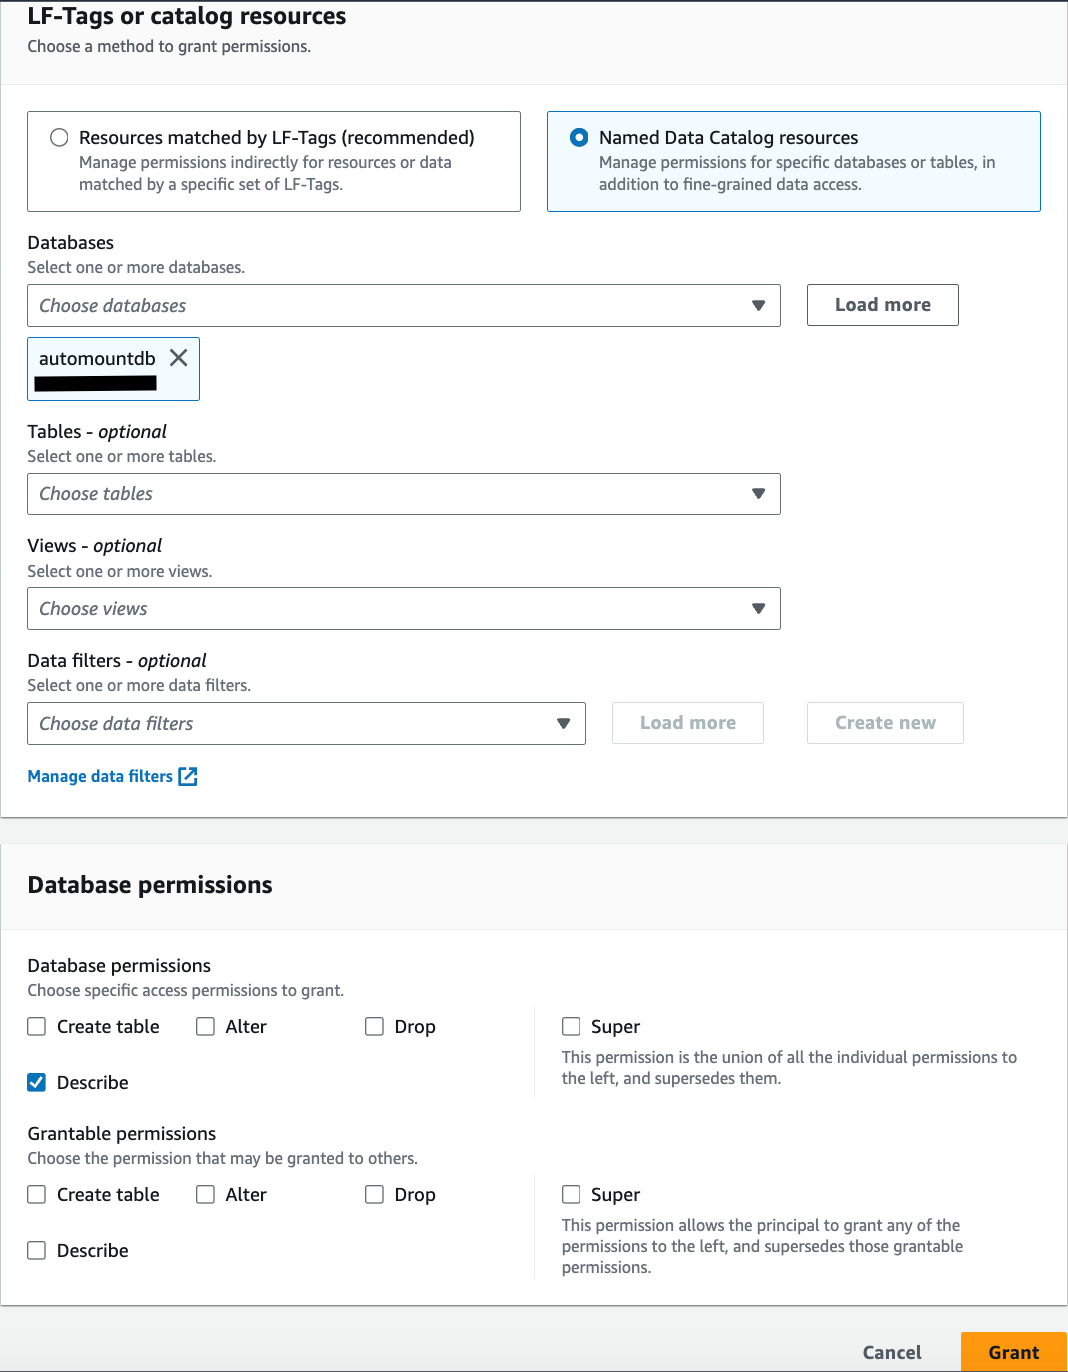
- Under LF-Tags or catalog resources,
automountdbis already selected for Databases. - Select Describe for Database permissions.
- Choose Grant to apply the permissions.
Alternatively, you can run the following command:
Next, you grant table permissions to the IAM Identity Center group.
- Under Data catalog in the navigation pane, choose Databases.
- Select the database
automountdband on the Actions menu, choose Grant. - Under Principals, select IAM Identity Center and choose Add.
- Enter the IAM Identity Center group in the search bar and choose the group.
- Choose Assign.
- Under LF-Tags or catalog resources,
automountdbis already selected for Databases. - For Tables, choose
ny_pub.
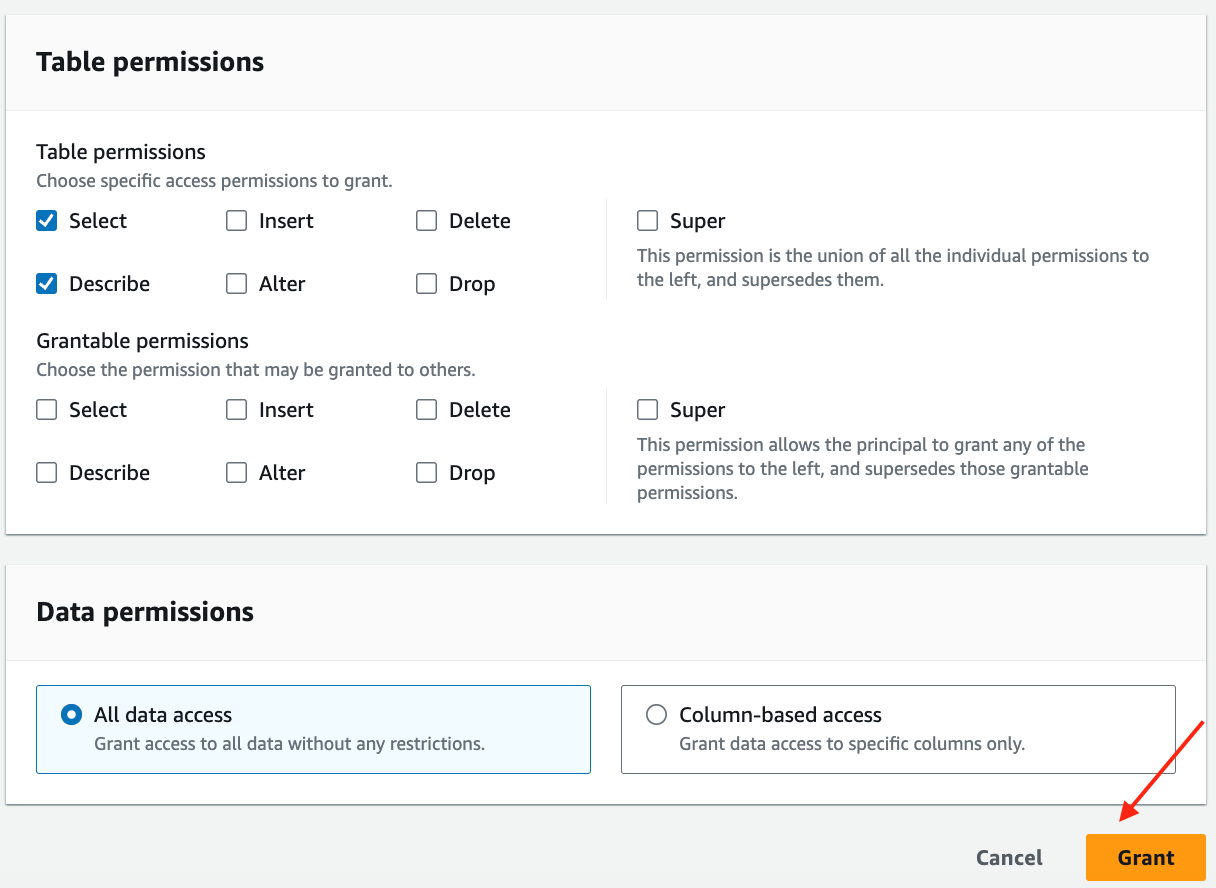
- Select Describe and Select for Table permissions.
- Choose Grant to apply the permissions.
-
-
Alternatively, you can run the following command:
Set up Redshift Spectrum table access for the IAM Identity Center group
Complete the following steps to set up Redshift Spectrum table access:
- Sign in to the Amazon Redshift console using the admin role.
- Navigate to Query Editor v2.
- Choose the options menu (three dots) next to the cluster and choose Create connection.
- Connect as the admin user and run the following commands to make the
ny_pubdata in the S3 data lake available to the sales group:
Validate Redshift Spectrum access as an IAM Identity Center user
Complete the following steps to validate access:
- On the Amazon Redshift console, navigate to Query Editor v2.
- Choose the options menu (three dots) next to the cluster and choose Create connection
- Choose select IAM Identity Center option for Connect option. Provide Okta user name and password in the browser pop-up.
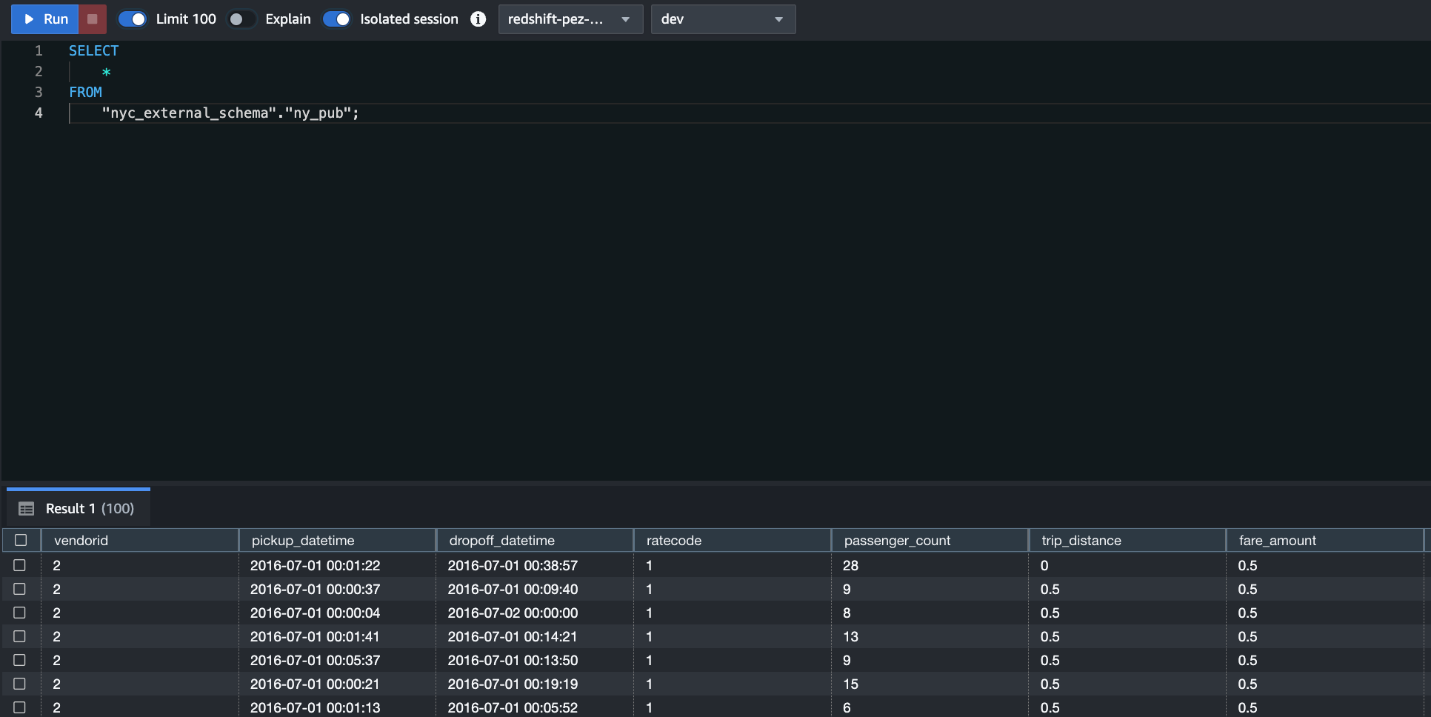
- Once connected as a federated user, run the following SQL commands to query the ny_pub data lake table:
Use Case 2: Redshift data sharing with Lake Formation
This use case assumes you have IAM Identity Center integration with Amazon Redshift set up, with Lake Formation propagation enabled as per the instructions provided in the previous section.
Create a data share with objects and share it with the Data Catalog
Complete the following steps to create a data share:
- Sign in to the Amazon Redshift console using the admin role.
- Navigate to Query Editor v2.
- Choose the options menu (three dots) next to the Redshift source cluster and choose Create connection.
- Connect as admin user using Temporarily credentials using a database user name option and run the following SQL commands to create a data share:
- Authorize the data share by choosing Data shares in the navigation page and selecting the data share
salesdb. - Select the data share and choose Authorize.
Now you can register the data share in Lake Formation as an AWS Glue database.
- Sign in to the Lake Formation console as the data lake administrator IAM user or role.
- Under Data catalog in the navigation pane, choose Data sharing and view the Redshift data share invitations on the Configuration tab.
- Select the datashare salesds and choose Review Invitation.
- Once you review the details choose Accept.
- Provide a name for the AWS Glue database (for example, salesds) and choose Skip to Review and create.
After the AWS Glue database is created on the Redshift data share, you can view it under Shared databases.
Grant the IAM Identity Center user group permission on the AWS Glue database and table
Complete the following steps to grant database permissions to the IAM Identity Center group:
- On the Lake Formation console, under Data catalog in the navigation pane, choose Databases.
- Select the database salesds and on the Actions menu, choose Grant.
- Choose Grant database.
- Under Principals, select IAM Identity Center and choose Add.
- In the pop-up window, enter the IAM Identity Center group awssso in the search bar and choose the awssso-sales group.
- Choose Assign.
- Under LF-Tags or catalog resources, salesds is already selected for Databases.
- Select Describe for Database permissions.
- Choose Grant to apply the permissions.
Next, grant table permissions to the IAM Identity Center group.
- Under Data catalog in the navigation pane, choose Databases.
- Select the database salesds and on the Actions menu, choose Grant.
- Under Principals, select IAM Identity Center and choose Add.
- In the pop-up window, enter the IAM Identity Center group awssso in the search bar and choose the awssso-sales group.
- Choose Assign.
- Under LF-Tags or catalog resources, salesds is already selected for Databases.
- For Tables, choose sales_schema.store_sales.
- Select Describe and Select for Table permissions.
- Choose Grant to apply the permissions.
Mount the external schema in the target Redshift cluster and enable access for the IAM Identity Center user
Complete the following steps:
- Sign in to the Amazon Redshift console using the admin role.
- Navigate to Query Editor v2.
- Connect as an admin user and run the following SQL commands to mount the AWS Glue database customerds as an external schema and enable access to the sales group:
Access Redshift data shares as an IAM Identity Center user
Complete the following steps to access the data shares:
- On the Amazon Redshift console, navigate to Query Editor v2.
- Choose the options menu (three dots) next to the cluster and choose Create connection.
- Connect with IAM Identity Center and the provide IAM Identity Center user and password in the browser login.
- Run the following SQL commands to query the data lake table:
With Transitive Identity Propagation we can now audit user access to dataset from Lake Formation dashboard and service used for accessing the dataset providing complete trackability. For federated user Ethan whose Identity Center User ID is ‘459e10f6-a3d0-47ae-bc8d-a66f8b054014’ you can see the below event log.

Clean up
Complete the following steps to clean up your resources:
- Delete the data from the S3 bucket.
- Delete the Lake Formation application and the Redshift provisioned cluster that you created for testing.
- Sign in to the CloudFormation console as the IAM admin used for creating the CloudFormation stack, and delete the stack you created.
Conclusion
In this post, we covered how to simplify access management for analytics by propagating user identity across Amazon Redshift and Lake Formation using IAM Identity Center. We learned how to get started with trusted identity propagation by connecting to Amazon Redshift and Lake Formation. We also learned how to configure Redshift Spectrum and data sharing to support trusted identity propagation.
Learn more about IAM Identity Center with Amazon Redshift and AWS Lake Formation. Leave your questions and feedback in the comments section.
About the Authors
 Harshida Patel is a Analytics Specialist Principal Solutions Architect, with AWS.
 Srividya Parthasarathy is a Senior Big Data Architect on the AWS Lake Formation team. She enjoys building data mesh solutions and sharing them with the community.
 Maneesh Sharma is a Senior Database Engineer at AWS with more than a decade of experience designing and implementing large-scale data warehouse and analytics solutions. He collaborates with various Amazon Redshift Partners and customers to drive better integration.
 Poulomi Dasgupta is a Senior Analytics Solutions Architect with AWS. She is passionate about helping customers build cloud-based analytics solutions to solve their business problems. Outside of work, she likes travelling and spending time with her family.
- SEO Powered Content & PR Distribution. Get Amplified Today.
- PlatoData.Network Vertical Generative Ai. Empower Yourself. Access Here.
- PlatoAiStream. Web3 Intelligence. Knowledge Amplified. Access Here.
- PlatoESG. Carbon, CleanTech, Energy, Environment, Solar, Waste Management. Access Here.
- PlatoHealth. Biotech and Clinical Trials Intelligence. Access Here.
- Source: https://aws.amazon.com/blogs/big-data/simplify-access-management-with-amazon-redshift-and-aws-lake-formation-for-users-in-an-external-identity-provider/

