Data lakes have been gaining popularity for storing vast amounts of data from diverse sources in a scalable and cost-effective way. As the number of data consumers grows, data lake administrators often need to implement fine-grained access controls for different user profiles. They might need to restrict access to certain tables or columns depending on the type of user making the request. Also, businesses sometimes want to make data available to external applications but aren’t sure how to do so securely. To address these challenges, organizations can turn to GraphQL and AWS Lake Formation.
GraphQL provides a powerful, secure, and flexible way to query and retrieve data. AWS AppSync is a service for creating GraphQL APIs that can query multiple databases, microservices, and APIs from one unified GraphQL endpoint.
Data lake administrators can use Lake Formation to govern access to data lakes. Lake Formation offers fine-grained access controls for managing user and group permissions at the table, column, and cell level. It can therefore ensure data security and compliance. Additionally, this Lake Formation integrates with other AWS services, such as Amazon Athena, making it ideal for querying data lakes through APIs.
In this post, we demonstrate how to build an application that can extract data from a data lake through a GraphQL API and deliver the results to different types of users based on their specific data access privileges. The example application described in this post was built by AWS Partner NETSOL Technologies.
Solution overview
Our solution uses Amazon Simple Storage Service (Amazon S3) to store the data, AWS Glue Data Catalog to house the schema of the data, and Lake Formation to provide governance over the AWS Glue Data Catalog objects by implementing role-based access. We also use Amazon EventBridge to capture events in our data lake and launch downstream processes. The solution architecture is shown in the following diagram.
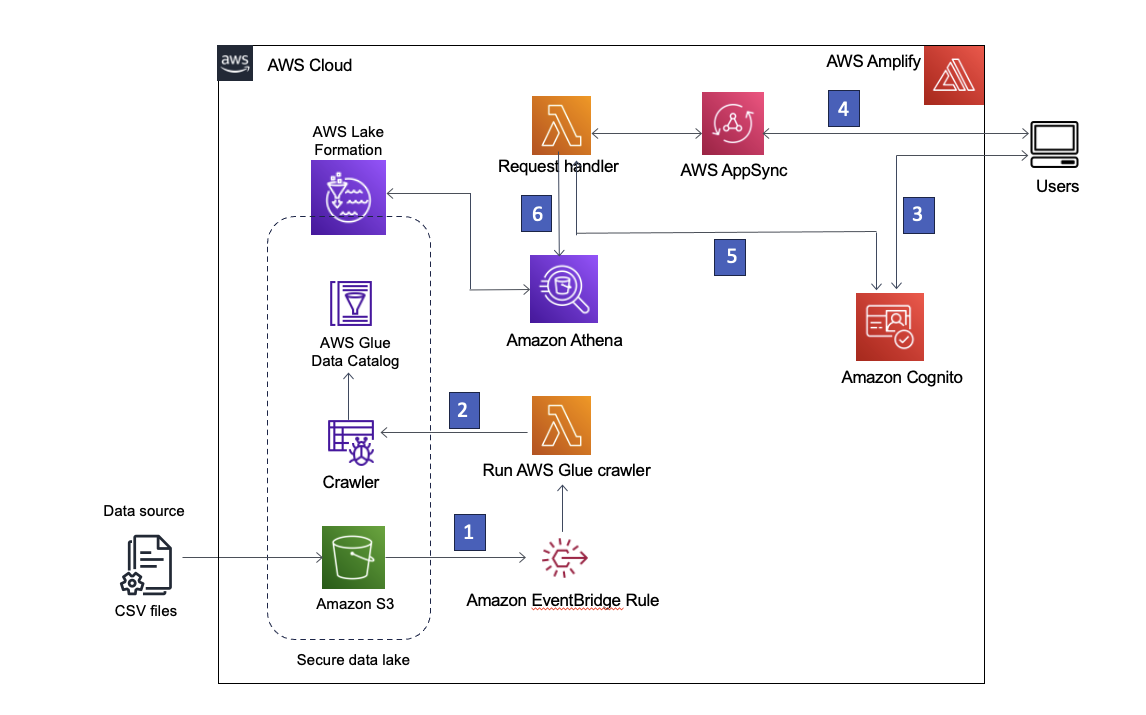
Figure 1 – Solution architecture
The following is a step by step description of the solution:
- The data lake is created in an S3 bucket registered with Lake Formation. Whenever new data arrives, an EventBridge rule is invoked.
- The EventBridge rule runs an AWS Lambda function to start an AWS Glue crawler to discover new data and update any schema changes so that the latest data can be queried.
Note: AWS Glue crawlers can also be launched directly from Amazon S3 events, as described in this blog post. - AWS Amplify allows users to sign in using Amazon Cognito as an identity provider. Cognito authenticates the user’s credentials and returns access tokens.
- Authenticated users invoke an AWS AppSync GraphQL API through Amplify, fetching data from the data lake. A Lambda function is run to handle the request.
- The Lambda function retrieves the user details from Cognito and assumes the AWS Identity and Access Management (IAM) role associated with the requesting user’s Cognito user group.
- The Lambda function then runs an Athena query against the data lake tables and returns the results to AWS AppSync, which then returns the results to the user.
Prerequisites
To deploy this solution, you must first do the following:
Prepare Lake Formation permissions
Sign in to the LakeFormation console and add yourself as an administrator. If you’re signing in to Lake Formation for the first time, you can do this by selecting Add myself on the Welcome to Lake Formation screen and choosing Get started as shown in Figure 2.

Figure 2 – Add yourself as the Lake Formation administrator
Otherwise, you can choose Administrative roles and tasks in the left navigation bar and choose Manage Administrators to add yourself. You should see your IAM username under Data lake administrators with Full access when done.
Select Data catalog settings in the left navigation bar and make sure the two IAM access control boxes are not selected, as shown in Figure 3. You want Lake Formation, not IAM, to control access to new databases.
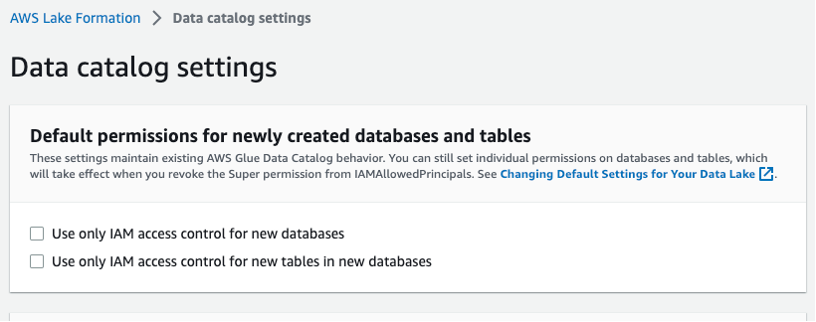
Figure 3 – Lake Formation data catalog settings
Deploy the solution
To create the solution in your AWS environment, launch the following AWS CloudFormation stack: ![]()
The following resources will be launched through the CloudFormation template:
- Amazon VPC and networking components (subnets, security groups, and NAT gateway)
- IAM roles
- Lake Formation encapsulating S3 bucket, AWS Glue crawler, and AWS Glue database
- Lambda functions
- Cognito user pool
- AWS AppSync GraphQL API
- EventBridge rules
After the required resources have been deployed from the CloudFormation stack, you must create two Lambda functions and upload the dataset to Amazon S3. Lake Formation will govern the data lake that is stored in the S3 bucket.
Create the Lambda functions
Whenever a new file is placed in the designated S3 bucket, an EventBridge rule is invoked, which launches a Lambda function to initiate the AWS Glue crawler. The crawler updates the AWS Glue Data Catalog to reflect any changes to the schema.
When the application makes a query for data through the GraphQL API, a request handler Lambda function is invoked to process the query and return the results.
To create these two Lambda functions, proceed as follows.
- Sign in to the Lambda console.
- Select the request handler Lambda function named
dl-dev-crawlerLambdaFunction. - Find the crawler Lambda function file in your
lambdas/crawler-lambdafolder in the git repo that you cloned to your local machine. - Copy and paste the code in that file to the Code section of the
dl-dev-crawlerLambdaFunctionin your Lambda console. Then choose Deploy to deploy the function.
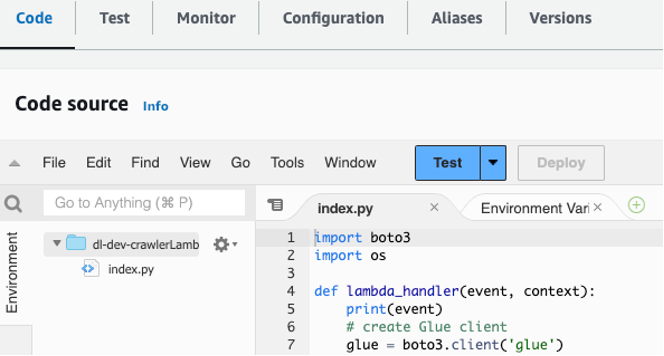
Figure 4 – Copy and paste code into the Lambda function
- Repeat steps 2 through 4 for the request handler function named
dl-dev-requestHandlerLambdaFunctionusing the code inlambdas/request-handler-lambda.
Create a layer for the request handler Lambda
You now must upload some additional library code needed by the request handler Lambda function.
- Select Layers in the left menu and choose Create layer.
- Enter a name such as
appsync-lambda-layer. - Download this package layer ZIP file to your local machine.
- Upload the ZIP file using the Upload button on the Create layer page.
- Choose Python 3.7 as the runtime for the layer.
- Choose Create.
- Select Functions on the left menu and select the
dl-dev-requestHandlerLambda function. - Scroll down to the Layers section and choose Add a layer.
- Select the Custom layers option and then select the layer you created above.
- Click Add.
Upload the data to Amazon S3
Navigate to the root directory of the cloned git repository and run the following commands to upload the sample dataset. Replace the bucket_name placeholder with the S3 bucket provisioned using the CloudFormation template. You can get the bucket name from the CloudFormation console by going to the Outputs tab with key datalakes3bucketName as shown in image below.

Figure 5 – S3 bucket name shown in CloudFormation Outputs tab
Enter the following commands in your project folder in your local machine to upload the dataset to the S3 bucket.
Now let’s take a look at the deployed artifacts.
Data lake
The S3 bucket holds sample data for two entities: companies and their respective owners. The bucket is registered with Lake Formation, as shown in Figure 6. This enables Lake Formation to create and manage data catalogs and manage permissions on the data.

Figure 6 – Lake Formation console showing data lake location
A database is created to hold the schema of data present in Amazon S3. An AWS Glue crawler is used to update any change in schema in the S3 bucket. This crawler is granted permission to CREATE, ALTER, and DROP tables in the database using Lake Formation.
Apply data lake access controls
Two IAM roles are created, dl-us-east-1-developer and dl-us-east-1-business-analyst, each assigned to a different Cognito user group. Each role is assigned different authorizations through Lake Formation. The Developer role gains access to every column in the data lake, while the Business Analyst role is only granted access to the non-personally identifiable information (PII) columns.
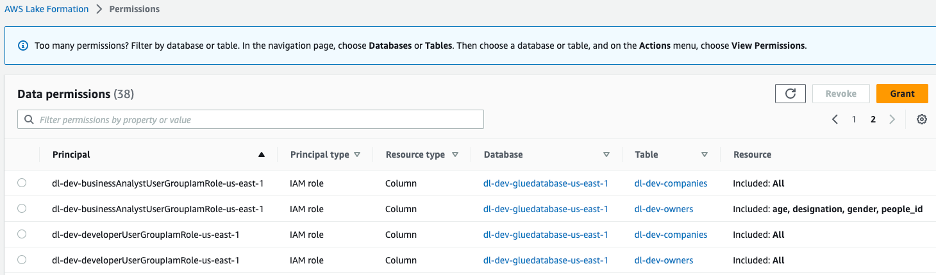
Figure 7 –Lake Formation console data lake permissions assigned to group roles
GraphQL schema
The GraphQL API is viewable from the AWS AppSync console. The Companies type includes several attributes describing the owners of the companies.
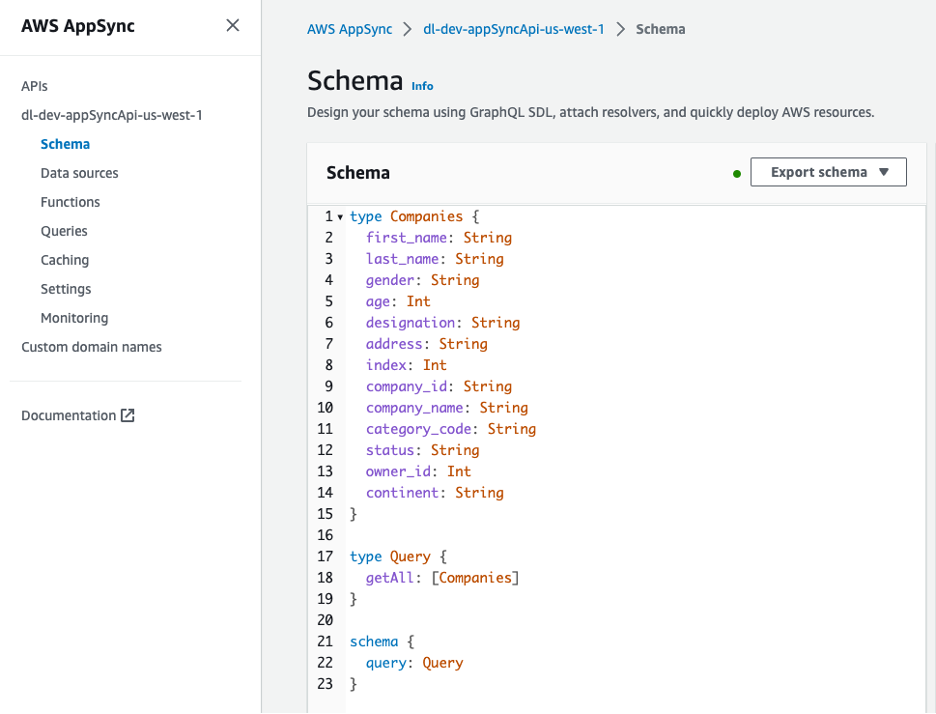
Figure 8 – Schema for GraphQL API
The data source for the GraphQL API is a Lambda function, which handles the requests.
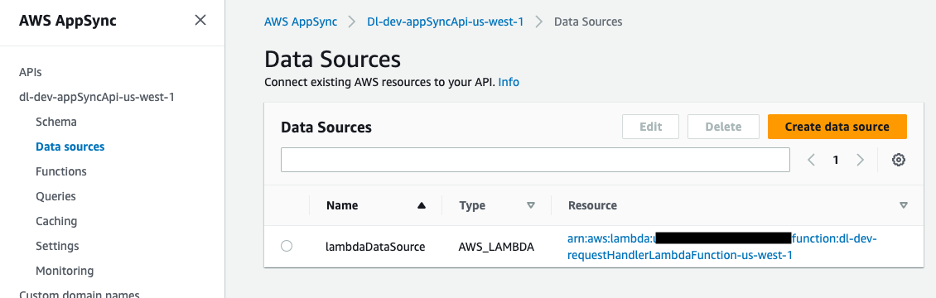
Figure 9 – AWS AppSync data source mapped to Lambda function
Handling the GraphQL API requests
The GraphQL API request handler Lambda function retrieves the Cognito user pool ID from the environment variables. Using the boto3 library, you create a Cognito client and use the get_group method to obtain the IAM role associated to the Cognito user group.
You use a helper function in the Lambda function to obtain the role.
Using the AWS Security Token Service (AWS STS) through a boto3 client, you can assume the IAM role and obtain the temporary credentials you need to run the Athena query.
We pass the temporary credentials as parameters when creating our Boto3 Amazon Athena client.
athena_client = boto3.client('athena', aws_access_key_id=access_key, aws_secret_access_key=secret_key, aws_session_token=session_token)The client and query are passed into our Athena query helper function which executes the query and returns a query id. With the query id, we are able to read the results from S3 and bundle it as a Python dictionary to be returned in the response.
Enabling client-side access to the data lake
On the client side, AWS Amplify is configured with an Amazon Cognito user pool for authentication. We’ll navigate to the Amazon Cognito console to view the user pool and groups that were created.
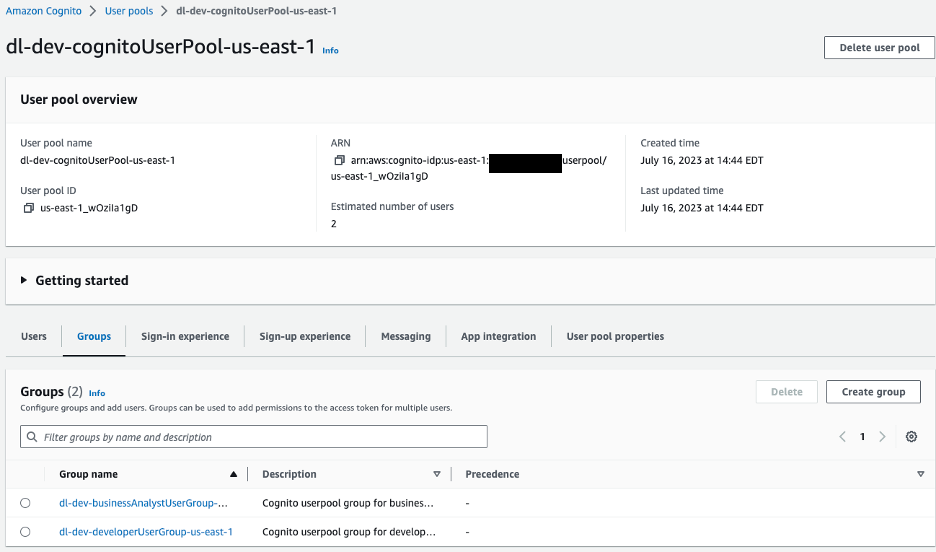
Figure 10 –Amazon Cognito User pools
For our sample application we have two groups in our user pool:
dl-dev-businessAnalystUserGroup– Business analysts with limited permissions.dl-dev-developerUserGroup– Developers with full permissions.
If you explore these groups, you’ll see an IAM role associated to each. This is the IAM role that is assigned to the user when they authenticate. Athena assumes this role when querying the data lake.
If you view the permissions for this IAM role, you’ll notice that it doesn’t include access controls below the table level. You need the additional layer of governance provided by Lake Formation to add fine-grained access control.
After the user is verified and authenticated by Cognito, Amplify uses access tokens to invoke the AWS AppSync GraphQL API and fetch the data. Based on the user’s group, a Lambda function assumes the corresponding Cognito user group role. Using the assumed role, an Athena query is run and the result returned to the user.
Create test users
Create two users, one for dev and one for business analyst, and add them to user groups.
- Navigate to Cognito and select the user pool,
dl-dev-cognitoUserPool, that’s created. - Choose Create user and provide the details to create a new business analyst user. The username can be biz-analyst. Leave the email address blank, and enter a password.
- Select the Users tab and select the user you just created.
- Add this user to the business analyst group by choosing the Add user to group button.
- Follow the same steps to create another user with the username developer and add the user to the developers group.
Test the solution
To test your solution, launch the React application on your local machine.
- In the cloned project directory, navigate to the
react-appdirectory. - Install the project dependencies.
- Install the Amplify CLI:
- Create a new file called
.envby running the following commands. Then use a text editor to update the environment variable values in the file.
Use the Outputs tab of your CloudFormation console stack to get the required values from the keys as follows:
REACT_APP_APPSYNC_URL |
appsyncApiEndpoint |
REACT_APP_CLIENT_ID |
cognitoUserPoolClientId |
REACT_APP_USER_POOL_ID |
cognitoUserPoolId |
- Add the preceding variables to your environment.
- Generate the code needed to interact with the API using Amplify CodeGen. In the Outputs tab of your Cloudformation console, find your AWS Appsync API ID next to the
appsyncApiIdkey.
Accept all the default options for the above command by pressing Enter at each prompt.
- Start the application.
You can confirm that the application is running by visiting http://localhost:3000 and signing in as the developer user you created earlier.
Now that you have the application running, let’s take a look at how each role is served from the companies endpoint.
First, sign is as the developer role, which has access to all the fields, and make the API request to the companies endpoint. Note which fields you have access to.
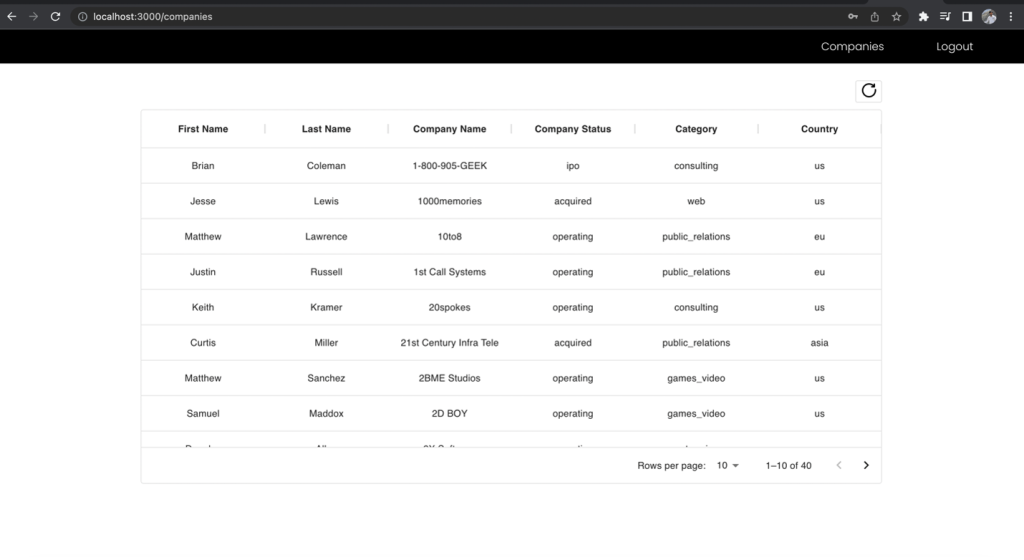
Figure 11 –The results for developer role
Now, sign in as the business analyst user and make the request to the same endpoint and compare the included fields.
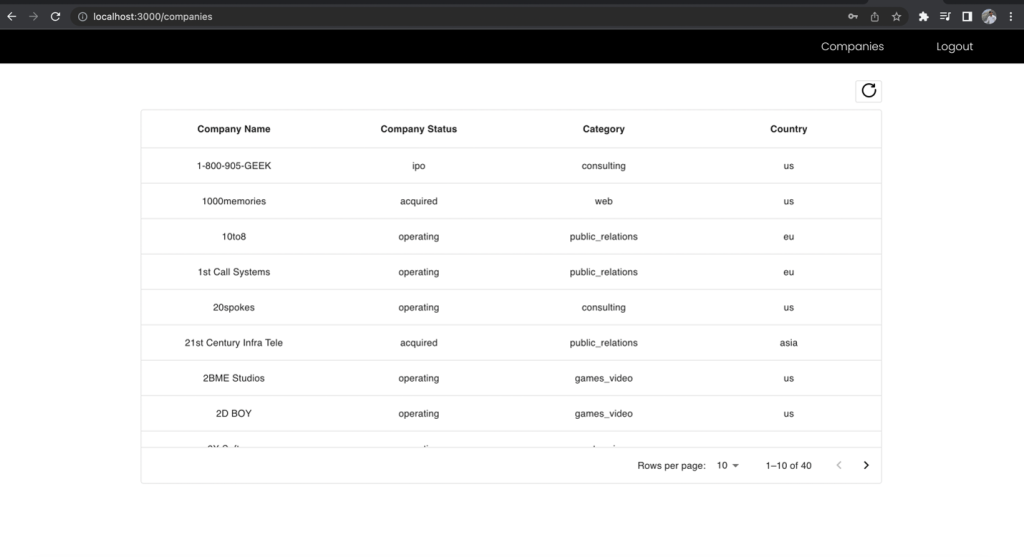
Figure 12 –The results for Business Analyst role
The First Name and Last Name columns of the companies list is excluded in the business analyst view even though you made the request to the same endpoint. This demonstrates the power of using one unified GraphQL endpoint together with multiple Cognito user group IAM roles mapped to Lake Formation permissions to manage role-based access to your data.
Cleaning up
After you’re done testing the solution, clean up the following resources to avoid incurring future charges:
- Empty the S3 buckets created by the CloudFormation template.
- Delete the CloudFormation stack to remove the S3 buckets and other resources.
Conclusion
In this post, we showed you how to securely serve data in a data lake to authenticated users of a React application based on their role-based access privileges. To accomplish this, you used GraphQL APIs in AWS AppSync, fine-grained access controls from Lake Formation, and Cognito for authenticating users by group and mapping them to IAM roles. You also used Athena to query the data.
For related reading on this topic, see Visualizing big data with AWS AppSync, Amazon Athena, and AWS Amplify and Design a data mesh architecture using AWS Lake Formation and AWS Glue.
Will you implement this approach for serving data from your data lake? Let us know in the comments!
About the Authors
 Rana Dutt is a Principal Solutions Architect at Amazon Web Services. He has a background in architecting scalable software platforms for financial services, healthcare, and telecom companies, and is passionate about helping customers build on AWS.
 Ranjith Rayaprolu is a Senior Solutions Architect at AWS working with customers in the Pacific Northwest. He helps customers design and operate Well-Architected solutions in AWS that address their business problems and accelerate the adoption of AWS services. He focuses on AWS security and networking technologies to develop solutions in the cloud across different industry verticals. Ranjith lives in the Seattle area and loves outdoor activities.
 Justin Leto is a Sr. Solutions Architect at Amazon Web Services with specialization in databases, big data analytics, and machine learning. His passion is helping customers achieve better cloud adoption. In his spare time, he enjoys offshore sailing and playing jazz piano. He lives in New York City with his wife and baby daughter.
- SEO Powered Content & PR Distribution. Get Amplified Today.
- PlatoData.Network Vertical Generative Ai. Empower Yourself. Access Here.
- PlatoAiStream. Web3 Intelligence. Knowledge Amplified. Access Here.
- PlatoESG. Carbon, CleanTech, Energy, Environment, Solar, Waste Management. Access Here.
- PlatoHealth. Biotech and Clinical Trials Intelligence. Access Here.
- Source: https://aws.amazon.com/blogs/big-data/using-aws-appsync-and-aws-lake-formation-to-access-a-secure-data-lake-through-a-graphql-api/

