개요
딥 러닝은 기계가 대량의 데이터에서 학습하고 개선할 수 있도록 함으로써 AI 분야에 혁명을 일으켰습니다. 다중 모달 ML 파이프라인을 구축하기 위한 크로스 플랫폼 및 오픈 소스 프레임워크인 Mediapipe는 프로젝트에 딥 러닝 모델을 그 어느 때보다 쉽게 통합할 수 있는 새로운 작업 API를 도입했습니다.
이 기사에서는 별도의 도메인인 오디오, 이미지 및 텍스트에 초점을 맞춘 Mediapipe Tasks API를 사용하는 세 가지 흥미로운 프로젝트를 살펴봅니다. 이러한 예제를 통해 딥 러닝을 적용하여 실제 문제를 해결하고 최첨단 애플리케이션을 구축하는 방법을 배웁니다.
엔드투엔드 프로젝트를 구축하기 전에 먼저 Mediapipe를 살펴보겠습니다.
학습 목표:
이 기사에서는 다음을 수행합니다.
- Mediapipe 작업 API의 기본 사항을 이해합니다.
- 로컬 시스템에 설치하는 방법은 무엇입니까?
- 자체 객체 감지를 구축하는 방법은 무엇입니까?
- OpenCV 및 Mediapipe를 사용하여 객체 감지를 구현하는 방법은 무엇입니까?
- Mediapipe를 사용하여 오디오 분류를 구현하는 방법은 무엇입니까?
- 텍스트 감정 분석 이해 및 Mediapipe를 사용하여 구현
이 기사는 데이터 과학 Blogathon.
차례
Mediapipe는 멀티모달 구축을 위한 유연한 오픈 소스 프레임워크입니다. ML 파이프라인 이를 통해 개발자는 오디오, 이미지 및 기타 센서 데이터에 대한 복잡한 처리 그래프를 만들 수 있습니다. 엔드투엔드 ML 파이프라인을 만들기 위해 쉽게 결합되는 "그래프"라는 미리 빌드된 구성 요소 세트를 제공합니다.
Mediapipe Tasks API의 최신 릴리스를 통해 개발자는 이제 사전 훈련된 딥 러닝 모델 오디오, 이미지 및 텍스트 처리를 포함한 다양한 작업을 위해. 이러한 사전 훈련된 모델은 최신 기술을 사용하여 대규모 데이터 세트에서 훈련됩니다. IoT 및 Android/IOS와 같은 광범위한 에지 장치에 배포하는 데 최적화된 "tflite" 형식으로 제공됩니다. Tasks API는 이러한 모델을 사용하기 위한 간단하고 호환 가능한 인터페이스를 제공하므로 개발자가 기본 모델에 대한 깊은 이해 없이 딥 러닝을 프로젝트에 쉽게 통합할 수 있습니다.
로컬 시스템에 mediapipe를 설치하려면 pip install 및 특정 버전의 mediapipe를 사용할 수 있습니다.
pip 설치 미디어파이프==0.9.1
Google Colab을 사용하여 다음 프로젝트를 실행할 수도 있습니다. Google 명령어에서 다음 명령어를 실행합니다.
- !pip 설치 -q 플랫버퍼==2.0.0
- !pip 설치 -q mediapipe==0.9.1
계속해서 첫 번째 프로젝트를 빌드해 보겠습니다.
프로젝트 1: 나만의 물체 감지 구축
물체 감지 이미지 또는 비디오 내에서 개체를 식별하고 찾는 것과 관련된 컴퓨터 비전 기술입니다. 감시, 자율주행차, 로보틱스와 같은 다양한 애플리케이션에서 중요한 작업입니다. 간단히 말해서 물체 감지는 사진이나 비디오에서 숨겨진 보물을 찾는 것과 같습니다. 이미지에 숨겨진 모든 물체를 찾기 위해 게임을 한다고 상상해 보십시오. 개체 감지는 게임을 하는 컴퓨터와 같지만 재미로 개체를 찾는 대신 실제 문제를 해결하는 데 도움이 됩니다.
이제 이 프로젝트에서 다음을 수행합니다.
- Mediapipe Tasks API가 사전 학습된 모델과 머신 러닝 알고리즘을 제공하여 객체 감지 프로세스를 간소화하는 방법을 이해합니다.
- tflite 형식의 중요성과 개발자가 모바일 장치에 c를 배포하는 데 어떻게 도움이 되는지 이해합니다.
먼저 필요한 라이브러리를 가져와야 합니다.
import cv2
import matplotlib.pyplot as plt import mediapipe as mp
from mediapipe.tasks import python
from mediapipe.tasks.python import vision
선행 학습된 모델 다운로드: Efficientdet 라이트 모델. 그리고 물체를 감지하는 데 필요한 모든 입력 이미지를 사용할 수 있습니다.
model = "efficientdet_lite2_uint8.tflite"
img = plt.imread(f"{input_image}")
plt.imshow(img)

#use Mediapipe Tasks API
base_options = python.BaseOptions(model_asset_path=model)
options = vision.ObjectDetectorOptions(base_options=base_options,score_threshold=0.5)
detector = vision.ObjectDetector.create_from_options(options) #using Mediapipe Image Attribute initialize the input image path. image = mp.Image.create_from_file(input_image)
detect_image = detector.detect(image)
image = image.numpy_view()
Mediapipe Tasks API는 세 가지 엔드포인트를 기반으로 작동합니다.
- 기본 옵션: 이 줄은 TFLite 형식의 개체 감지 모델에 대한 경로로 BaseOptions 클래스를 초기화합니다. 이 경우 'efficientdet_lite2.tflite'입니다.
- ObjectDetector옵션: 이 줄은 BaseOptions 개체를 매개 변수로 사용하여 ObjectDetectorOptions 클래스를 초기화합니다. 또한 개체 감지를 위한 최소 점수 임계값을 0.5로 설정합니다. 이는 확률 점수가 0.5보다 큰 경우에만 경계 상자가 표시됨을 나타냅니다.
- 개체 감지기: 이 줄은 ObjectDetectorOptions 개체를 매개 변수로 사용하여 ObjectDetector 클래스의 인스턴스를 만듭니다. create_from_options 메서드는 지정된 옵션으로 ObjectDetector를 초기화합니다.
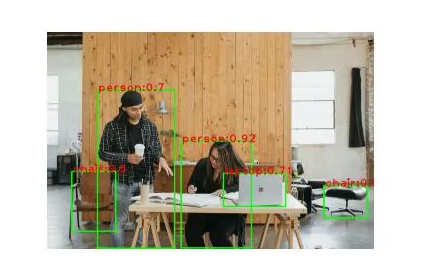
입력 이미지 경로를 읽기 위해 Mediapipe를 사용했기 때문에 감지된 객체에 경계 상자, 레이블 및 mAP 점수를 추가하려면 numpy로 변환해야 합니다.
for detection in detect_image.detections: # Insert bounding_box bbox = detection.bounding_box # the bounding box contains four parameters: #x, y, width and height start_point = bbox.origin_x, bbox.origin_y end_point = bbox.origin_x + bbox.width, bbox.origin_y + bbox.height cv2.rectangle(image, start_point, end_point, (0,255,0), 25) # mAP score and the Detected image label target = detection.categories[0] category_name = target.category_name score = round(target.score, 2) label = f"{category_name}:{score}" loc = (bbox.origin_x+15,bbox.origin_y+25) cv2.putText(image, label, loc, cv2.FONT_HERSHEY_DUPLEX,14,(255,0,0),20)
plt.imshow(image)
제공된 코드는 감지된 각 객체 주위에 경계 상자를 그려 이미지에서 객체 레이블과 해당 mAP 점수를 표시하여 이미지에서 객체를 감지합니다. 이를 달성하기 위해 OpenCV 라이브러리는 이미지에 경계 상자와 텍스트를 그리는 데 도움이 됩니다.
import cv2
import matplotlib.pyplot as plt import mediapipe as mp
from mediapipe.tasks import python
from mediapipe.tasks.python import vision input_image = "surface-81OnSSXJo-I-unsplash.jpg"
model = "efficientdet_lite2_uint8.tflite" #use Mediapipe Tasks API
base_options = python.BaseOptions(model_asset_path=model)
options = vision.ObjectDetectorOptions(base_options=base_options,score_threshold=0.5)
detector = vision.ObjectDetector.create_from_options(options) #using Mediapipe Image Attribute initialize the input image path. image = mp.Image.create_from_file(input_image)
detect_image = detector.detect(image) image = image.numpy_view()
for detection in detect_image.detections: # Insert bounding_box bbox = detection.bounding_box # the bounding box contains four parameters: #x, y, width and height start_point = bbox.origin_x, bbox.origin_y end_point = bbox.origin_x + bbox.width, bbox.origin_y + bbox.height cv2.rectangle(image, start_point, end_point, (0,255,0), 25) # mAP score and the Detected image label target = detection.categories[0] category_name = target.category_name score = round(target.score, 2) label = f"{category_name}:{score}" loc = (bbox.origin_x+15,bbox.origin_y+25) cv2.putText(image, label, loc, cv2.FONT_HERSHEY_DUPLEX,14,(255,0,0),20) plt.imshow(image)
plt.axis("off")
두 번째 프로젝트 시간
프로젝트 2: 음성 또는 무음 감지를 위한 오디오 분류
오디오 분류에는 오디오 신호를 내용에 따라 미리 정의된 클래스로 분류하는 작업이 포함됩니다. 음악, 음성 인식 및 사운드 모니터링에 수많은 응용 프로그램이 있으므로 중요한 작업입니다.
Mediapipe 작업 API는 오디오 분류 애플리케이션을 위한 다양한 ML 알고리즘을 제공합니다. 이러한 알고리즘은 순차 데이터 처리에 최적화되어 있으며 오디오 신호의 복잡한 패턴을 학습할 수 있습니다. 인기 있는 알고리즘에는 다음이 포함됩니다. RNN 오디오 신호의 스펙트로그램 및 기타 시간-주파수 표현을 처리할 수 있는 CNN.
먼저 필요한 라이브러리를 가져옵니다. 이 예에서는 .wav 오디오 파일을 사용하므로 입력 오디오 파일을 처리하기 위해 scipy.io에서 wavfile을 가져옵니다.
from mediapipe.tasks import python
from mediapipe.tasks.python.components import containers
from mediapipe.tasks.python import audio
from scipy.io import wavfile
import urllib
import numpy as np
Yamnet은 Mediapipe를 사용하여 오디오 신호를 분류하는 전이 학습 기술입니다. 시간 도메인 신호를 주파수 도메인으로 변환하는 것에 대해 걱정할 필요가 없습니다. Yamnet의 사전 훈련된 모델이 이를 처리합니다. 모델 다운로드: Yamnet Tflite 모델.
model = "yamnet_audio_classifier_with_metadata.tflite" #download sample audio file audio_file_name = 'speech_16000_hz_mono.wav'
url = f'https://storage.googleapis.com/mediapipe-assets/{audio_file_name}'
urllib.request.urlretrieve(url, audio_file_name)
다음 코드를 사용하여 샘플 오디오를 표시할 수 있습니다.
from IPython.display import Audio, display file_name = 'speech_16000_hz_mono.wav'
display(Audio(file_name, autoplay=False))
오디오는 음성 및 무음 배경음 모두인 단 4초입니다. 여기에서 오디오 분류의 대상은 오디오에 말이나 침묵이 포함되어 있는지 예측하는 것입니다. 프로세스는 이전 코드 예제와 유사합니다.
AudioClassifierOptions의 경우 임계값 점수 대신 max_results를 전달합니다. max_results=4는 오디오 파일에 녹음할 타임스탬프를 지정합니다. max_results는 분류자가 반환해야 하는 최대 분류 결과 수를 지정합니다. 이 경우 값은 4로 설정되며, 이는 분류기가 신뢰 수준에 따라 순위가 매겨진 최대 4개의 서로 다른 예측을 반환함을 의미합니다.
#mediapipe tasks API endpoints
base_options = python.BaseOptions(model_asset_path=model)
options = audio.AudioClassifierOptions(base_options=base_options, max_results=4)
classifier = audio.AudioClassifier.create_from_options(options)
입력 오디오 파일을 읽고 AudioData를 처리하기 위해 scipy 및 Mediapipe 컨테이너 구성 요소를 사용합니다.
sample_rate, wav_data = wavfile.read(audio_file_name)
audio_clip = containers.AudioData.create_from_array(wav_data.astype(float) / np.iinfo(np.int16).max, sample_rate)
result = classifier.classify(audio_clip)
이제 타임스탬프 및 해당 분류 결과의 결과 목록을 반복하고 각 타임스탬프에 대한 최상위 분류 레이블 및 점수를 출력합니다.
for idx, timestamp in enumerate([0,750,1500,3000,4500]): target = result[idx] label = target.classifications[0].categories[0] print(f'Timestamp {timestamp}: {label.category_name} ({label.score})')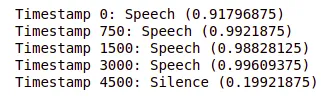
from mediapipe.tasks import python
from mediapipe.tasks.python.components import processors
from mediapipe.tasks.python.components import containers
from mediapipe.tasks.python import audio
from scipy.io import wavfile
import urllib
import numpy as np model = "yamnet_audio_classifier_with_metadata.tflite" #download sample audio file from Mediapipe Assets storageapis
audio_file_name = 'speech_16000_hz_mono.wav'
url = f'https://storage.googleapis.com/mediapipe-assets/{audio_file_name}'
urllib.request.urlretrieve(url, audio_file_name) base_options = python.BaseOptions(model_asset_path=model)
options = audio.AudioClassifierOptions(base_options=base_options, max_results=4)
classifier = audio.AudioClassifier.create_from_options(options) sample_rate, wav_data = wavfile.read(audio_file_name)
audio_clip = containers.AudioData.create_from_array(wav_data.astype(float) / np.iinfo(np.int16).max, sample_rate)
result = classifier.classify(audio_clip) for idx, timestamp in enumerate([0,750,1500,3000,4500]): target = result[idx] label = target.classifications[0].categories[0] print(f'Timestamp {timestamp}: {label.category_name} ({label.score})')
마지막으로 최종 프로젝트를 완료하겠습니다.
프로젝트 3: 텍스트 감정 분석
감정 분석은 다음의 하위 필드입니다. 자연 언어 처리 (NLP) 텍스트에서 개인이 표현하는 의견, 감정, 태도와 같은 정보를 추출하는 것을 목표로 합니다. 감정 분석의 목표는 긍정적, 부정적 또는 중립 여부에 관계없이 텍스트 조각의 극성을 자동으로 분류하는 것입니다.
만화에서는 심리 분석 캐릭터의 대사나 특정 장면의 감정 톤을 추출합니다. 감정 분석의 도움으로 대화의 감정을 부정적인 것으로 자동 분류할 수 있으므로 캐릭터의 감정과 감정이 스토리에 어떤 영향을 미칠 수 있는지 이해하는 데 도움이 됩니다. 이 예제에서는 DC/Marvel 만화에서 두 개의 대화를 가져와 Mediapipe 사전 훈련된 BERT 모델을 사용하여 감정 분석을 적용합니다.
이 프로그램은 매우 간단합니다. 이것은 세 번째 프로젝트이므로 이제 Python 프로그램에서 API 끝점을 사용하는 방법에 대한 아이디어를 얻었습니다. NLP 프로젝트이므로 입력은 이제 텍스트가 됩니다.
from mediapipe.tasks import python
from mediapipe.tasks.python import text sample_text1 = "We’ll do our part, dear sister, and let our maker do his!…It’ll work out"
sample_text2 = "Some people are in such utter darkness that they will burn you just to see a light"
Tasks API의 세 가지 API 엔드포인트를 정의해 보겠습니다. 선행 학습된 변환기 모델을 다운로드합니다. Bert 텍스트 분류기
model = "bert_text_classifier.tflite"
base_options = python.BaseOptions(model_asset_path=model)
options = text.TextClassifierOptions(base_options=base_options)
classifier = text.TextClassifier.create_from_options(options)
이 시점에서 위에서 언급한 코드가 자명하기를 바랍니다. 텍스트의 레이블 또는 감정을 분류하기 위해 동일한 3개의 API 엔드포인트를 사용하고 있습니다.
for input_text in [sample_text1,sample_text2]: sentiment = classifier.classify(input_text) label = sentiment.classifications[0].categories[0] print(f"{input_text} is:n {label.category_name}. Score:{label.score}n")
종합: Mediapipe Tasks API를 사용한 텍스트 감성 분석
from mediapipe.tasks import python
from mediapipe.tasks.python import text #example text to classify
sample_text1 = "We’ll do our part, dear sister, and let our maker do his!…It’ll work out"
sample_text2 = "Some people are in such utter darkness that they will burn you just to see a light" #define mediapipe API endpoints
model = "bert_text_classifier.tflite"
base_options = python.BaseOptions(model_asset_path=model)
options = text.TextClassifierOptions(base_options=base_options)
classifier = text.TextClassifier.create_from_options(options) #get the sentiment
for input_text in [sample_text1,sample_text2]: sentiment = classifier.classify(input_text) label = sentiment.classifications[0].categories[0] print(f"{input_text} is:n {label.category_name}. Score:{label.score}n")
그래, 우리가 해냈어👍
결론
결론적으로 Mediapipe Tasks API는 실제 프로젝트에서 딥 러닝 모델을 구현하기 위한 강력한 도구임이 입증되었습니다. 주요 내용은 다음과 같습니다.
- Mediapipe Tasks API는 실제 프로젝트에서 딥 러닝 모델을 구현하기 위한 다재다능하고 사용하기 쉬운 도구입니다. 사전 학습된 모델은 정확하고 견고하며 데이터 처리 및 모델 평가를 위한 광범위한 API 및 도구를 제공합니다.
- Tasks API를 사용하여 XNUMX개의 프로젝트를 구축함으로써 우리는 다양한 도메인에서 문제를 해결하는 데 있어 딥 러닝의 적용 가능성을 입증했습니다. 이미지의 개체 감지에서 오디오 분류 및 감정 분석에 이르기까지 딥 러닝은 광범위한 작업의 자동화에 사용되었습니다.
- 사전 훈련된 모델은 훈련을 위한 시작점을 제공하고 모델을 처음부터 훈련하는 것에 비해 시간과 리소스를 절약할 수 있기 때문에 딥 러닝 프로젝트의 필수 구성 요소입니다.
- Mediapipe를 다른 도구 및 API에 통합하는 것은 간단합니다.
이 예제가 프로젝트에 대한 Mediapipe Tasks API의 잠재력을 탐색하는 데 영감을 주셨기를 바랍니다.
이 기사에 표시된 미디어는 Analytics Vidhya의 소유가 아니며 작성자의 재량에 따라 사용됩니다.
관련
- SEO 기반 콘텐츠 및 PR 배포. 오늘 증폭하십시오.
- 플라토 블록체인. Web3 메타버스 인텔리전스. 지식 증폭. 여기에서 액세스하십시오.
- 출처: https://www.analyticsvidhya.com/blog/2023/03/mediapipe-tasks-api-and-its-implementation-in-projects/

