You can now register machine learning (ML) models built in Amazon SageMaker Canvas with a single click to the Amazon SageMaker Model Registry, enabling you to operationalize ML models in production. Canvas is a visual interface that enables business analysts to generate accurate ML predictions on their own—without requiring any ML experience or having to write a single line of code. Although it’s a great place for development and experimentation, to derive value from these models, they need to be operationalized—namely, deployed in a production environment where they can be used to make predictions or decisions. Now with the integration with the model registry, you can store all model artifacts, including metadata and performance metrics baselines, to a central repository and plug them into your existing model deployment CI/CD processes.
The model registry is a repository that catalogs ML models, manages various model versions, associates metadata (such as training metrics) with a model, manages the approval status of a model, and deploys them to production. After you create a model version, you typically want to evaluate its performance before you deploy it to a production endpoint. If it performs to your requirements, you can update the approval status of the model version to approved. Setting the status to approved can initiate CI/CD deployment for the model. If the model version doesn’t perform to your requirements, you can update the approval status to rejected in the registry, which prevents the model from being deployed into an escalated environment.
A model registry plays a key role in the model deployment process because it packages all model information and enables the automation of model promotion to production environments. The following are some ways that a model registry can help in operationalizing ML models:
- Version control – A model registry allows you to track different versions of your ML models, which is essential when deploying models in production. By keeping track of model versions, you can easily revert to a previous version if a new version causes issues.
- Collaboration – A model registry enables collaboration among data scientists, engineers, and other stakeholders by providing a centralized location for storing, sharing, and accessing models. This can help streamline the deployment process and ensure that everyone is working with the same model.
- Governance – A model registry can help with compliance and governance by providing an auditable history of model changes and deployments.
Overall, a model registry can help streamline the process of deploying ML models in production by providing version control, collaboration, monitoring, and governance.
Overview of solution
For our use case, we are assuming the role of a business user in the marketing department of a mobile phone operator, and we have successfully created an ML model in Canvas to identify customers with the potential risk of churn. Thanks to the predictions generated by our model, we now want to move this from our development environment to production. However, before our model gets deployed to a production endpoint, it needs to be reviewed and approved by a central MLOps team. This team is responsible for managing model versions, reviewing all associated metadata (such as training metrics) with a model, managing the approval status of every ML model, deploying approved models to production, and automating model deployment with CI/CD. To streamline the process of deploying our model in production, we take advantage of the integration of Canvas with the model registry and register our model for review by our MLOps team.
The workflow steps are as follows:
- Upload a new dataset with the current customer population into Canvas. For the full list of supported data sources, refer to Import data into Canvas.
- Build ML models and analyze their performance metrics. Refer to the instructions to build a custom ML model in Canvas and evaluate the model’s performance.
- Register the best performing versions to the model registry for review and approval.
- Deploy the approved model version to a production endpoint for real-time inferencing.
You can perform Steps 1–3 in Canvas without writing a single line of code.
Prerequisites
For this walkthrough, make sure that the following prerequisites are met:
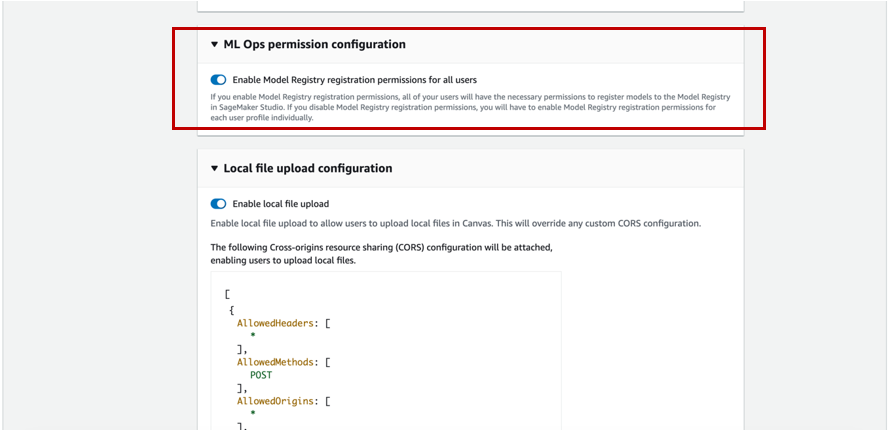
- To register model versions to the model registry, the Canvas admin must give the necessary permissions to the Canvas user, which you can manage in the SageMaker domain that hosts your Canvas application. For more information, refer to the Amazon SageMaker Developer Guide. When granting your Canvas user permissions, you must choose whether to allow the user to register their model versions in the same AWS account.
- Implement the prerequisites mentioned in Predict customer churn with no-code machine learning using Amazon SageMaker Canvas.
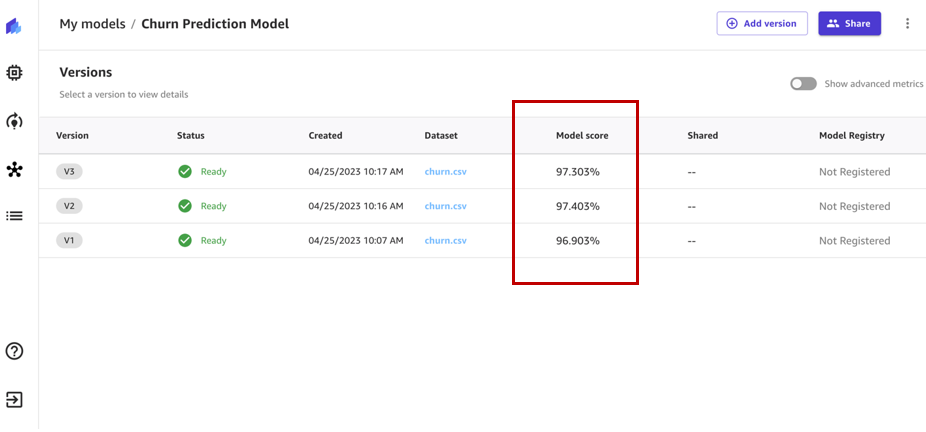
You should now have three model versions trained on historical churn prediction data in Canvas:
- V1 trained with all 21 features and quick build configuration with a model score of 96.903%
- V2 trained with all 19 features (removed phone and state features) and quick build configuration and improved accuracy of 97.403%
- V3 trained with standard build configuration with 97.03% model score
Use the customer churn prediction model
Enable Show advanced metrics and review the objective metrics associated with each model version so that we can select the best performing model for registration to the model registry.
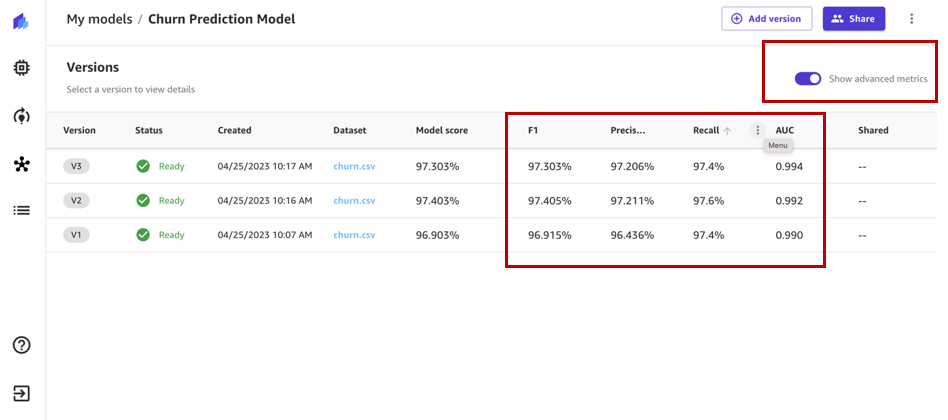
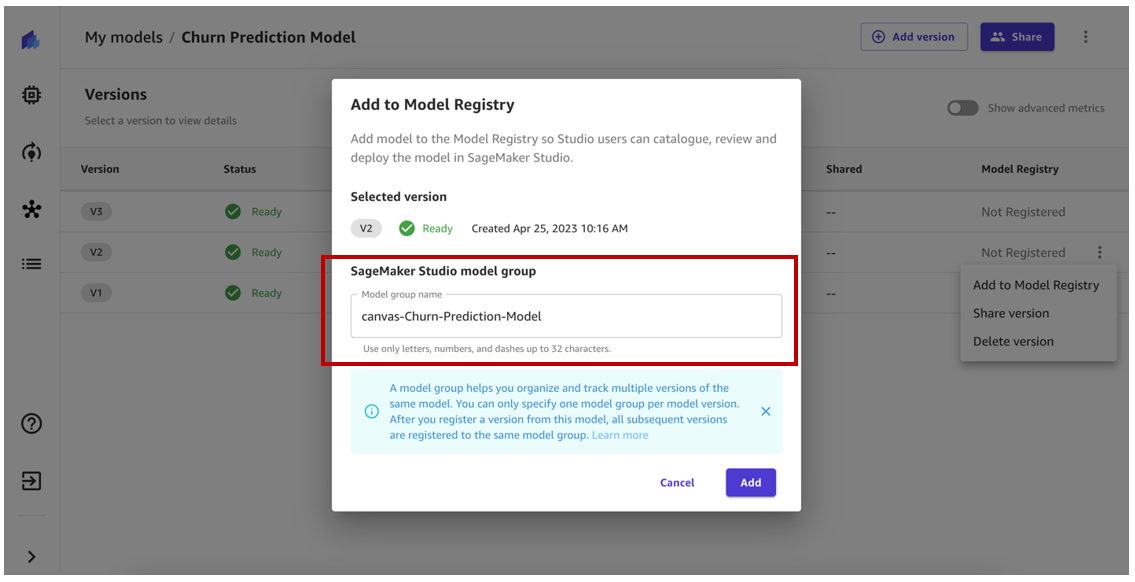
Based on the performance metrics, we select version 2 to be registered.
The model registry tracks all the model versions that you train to solve a particular problem in a model group. When you train a Canvas model and register it to the model registry, it gets added to a model group as a new model version.
At the time of registration, a model group within the model registry is automatically created. Optionally, you can rename it to a name of your choice or use an existing model group in the model registry.
For this example, we use the autogenerated model group name and choose Add.
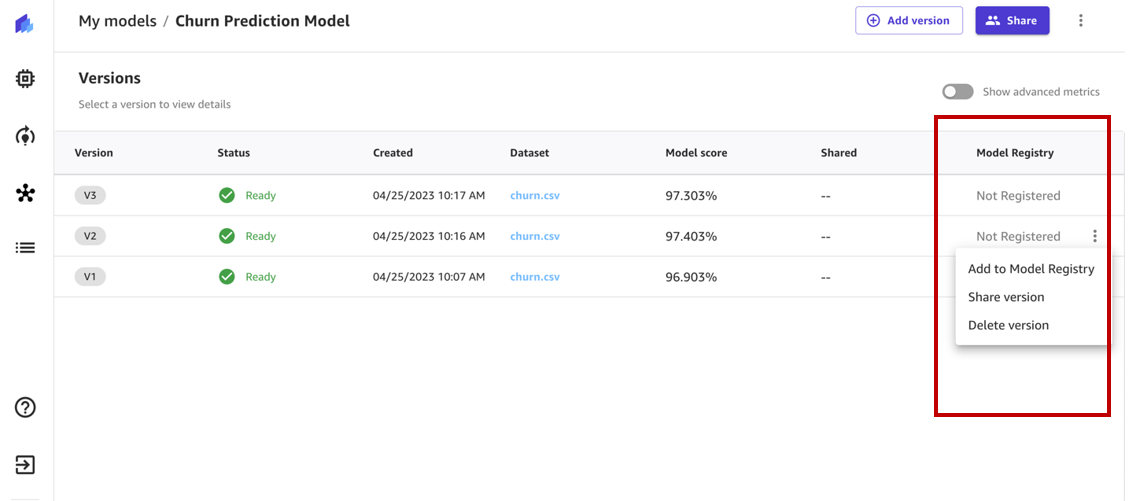
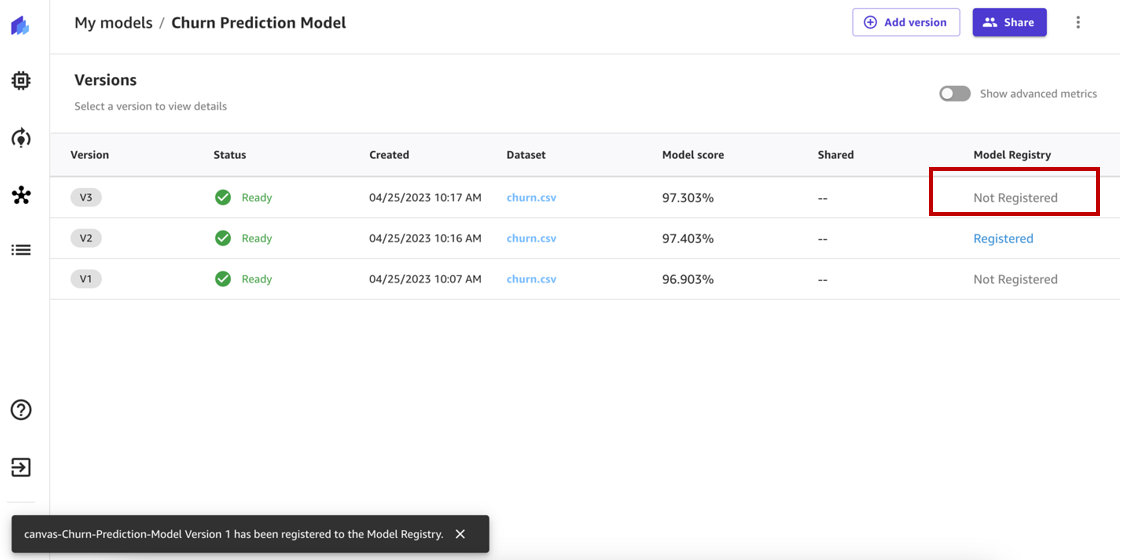
Our model version should now be registered to the model group in the model registry. If we were to register another model version, it would be registered to the same model group.
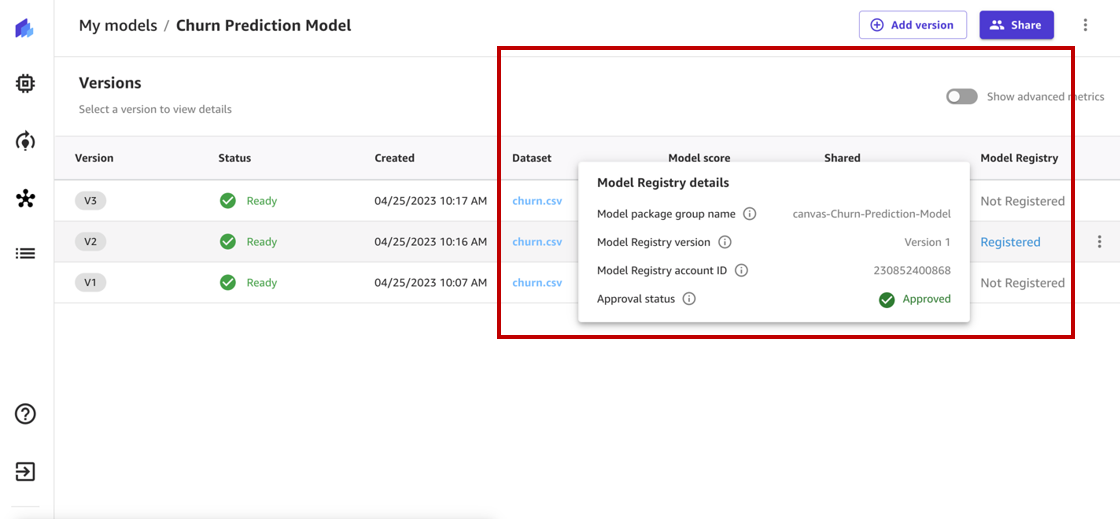
The status of the model version should have changed from Not Registered to Registered.
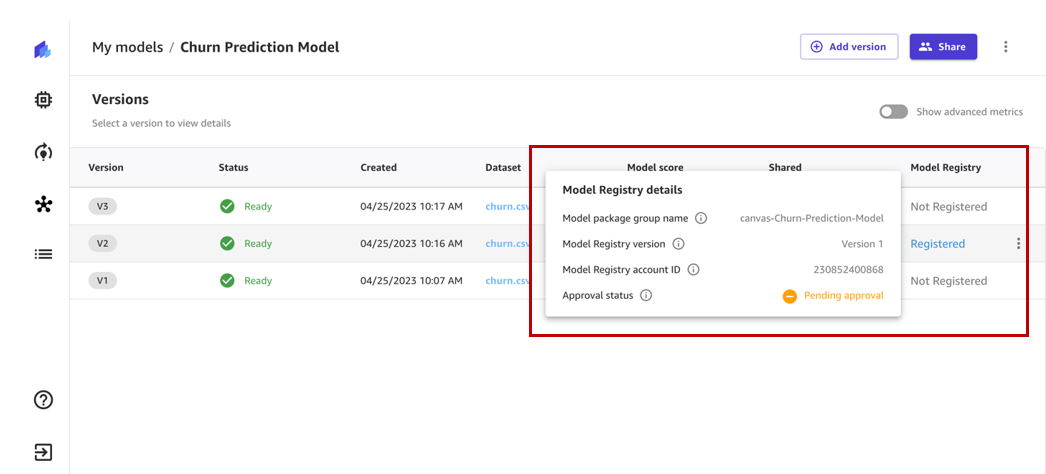
When we hover over the status, we can review the model registry details, which include the model group name, model registry account ID, and approval status. Right after registration, the status changes to Pending Approval, which means that this model is registered in the model registry but is pending review and approval from a data scientist or MLOps team member and can only be deployed to an endpoint if approved.
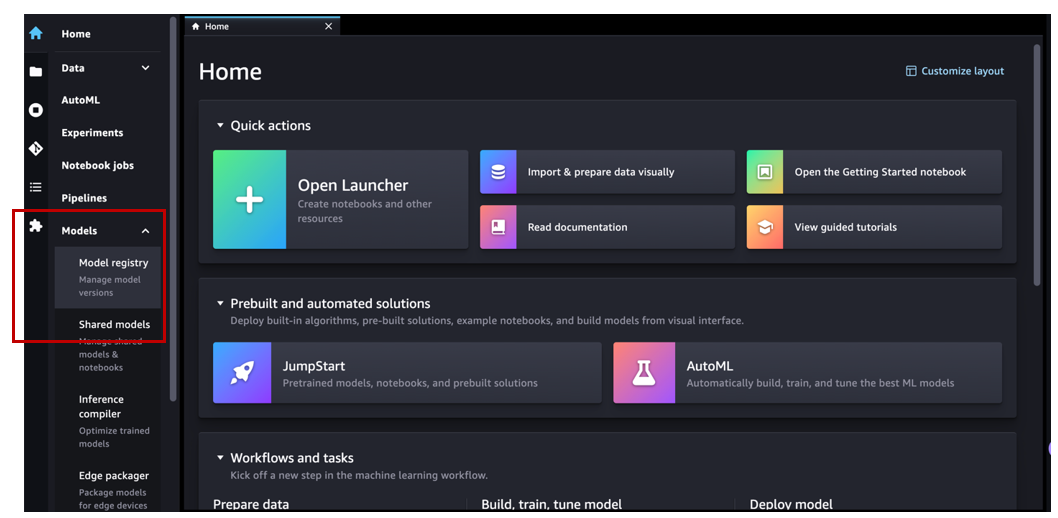
Now let’s navigate to Amazon SageMaker Studio and assume the role of an MLOps team member. Under Models in the navigation pane, choose Model registry to open the model registry home page.
We can see the model group canvas-Churn-Prediction-Model that Canvas automatically created for us.
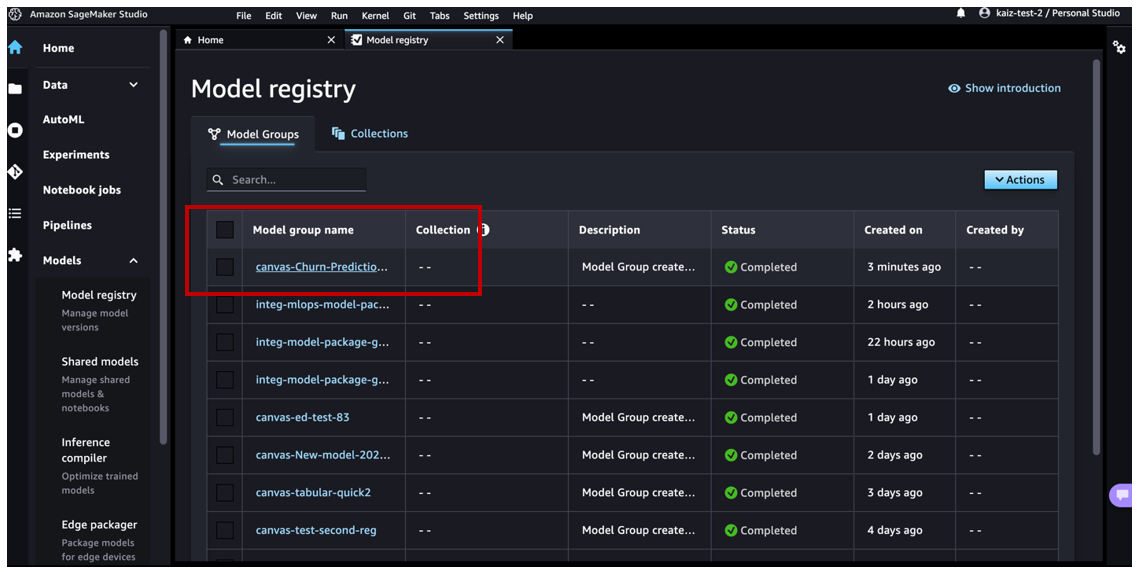
Choose the model to review all the versions registered to this model group and then review the corresponding model details.
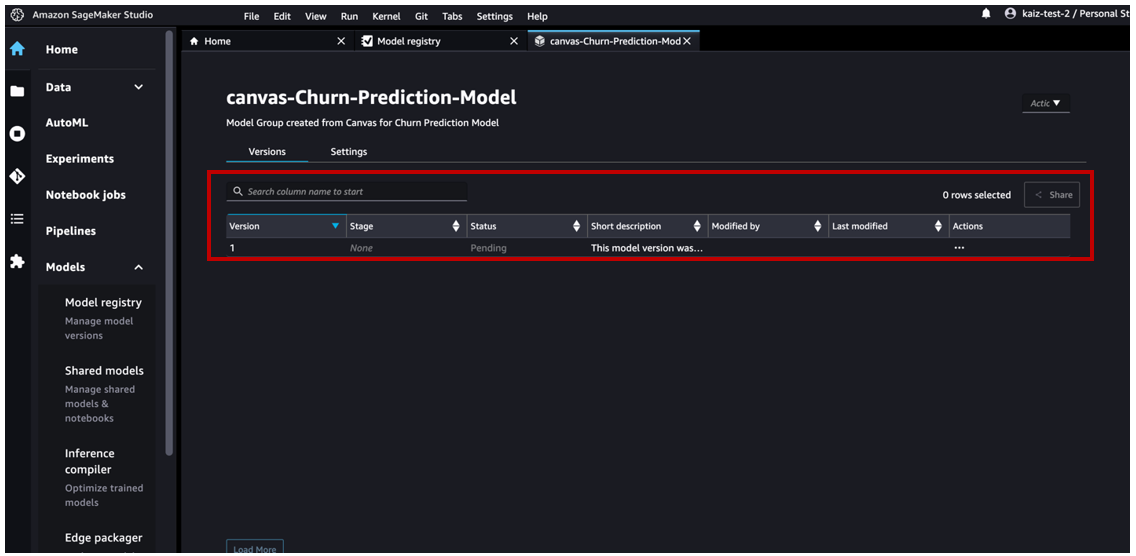
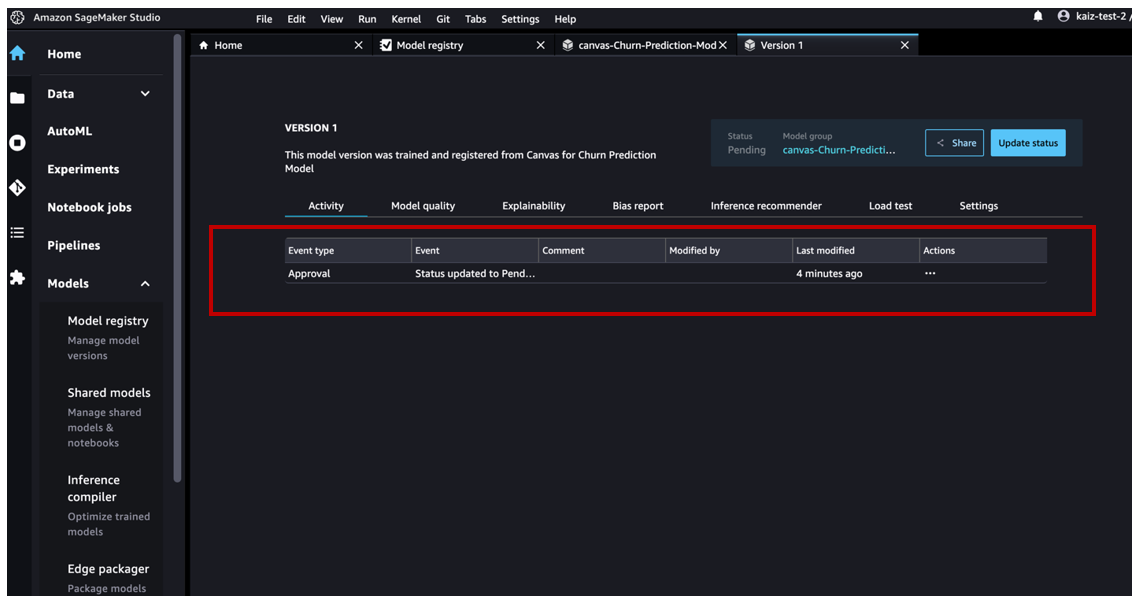
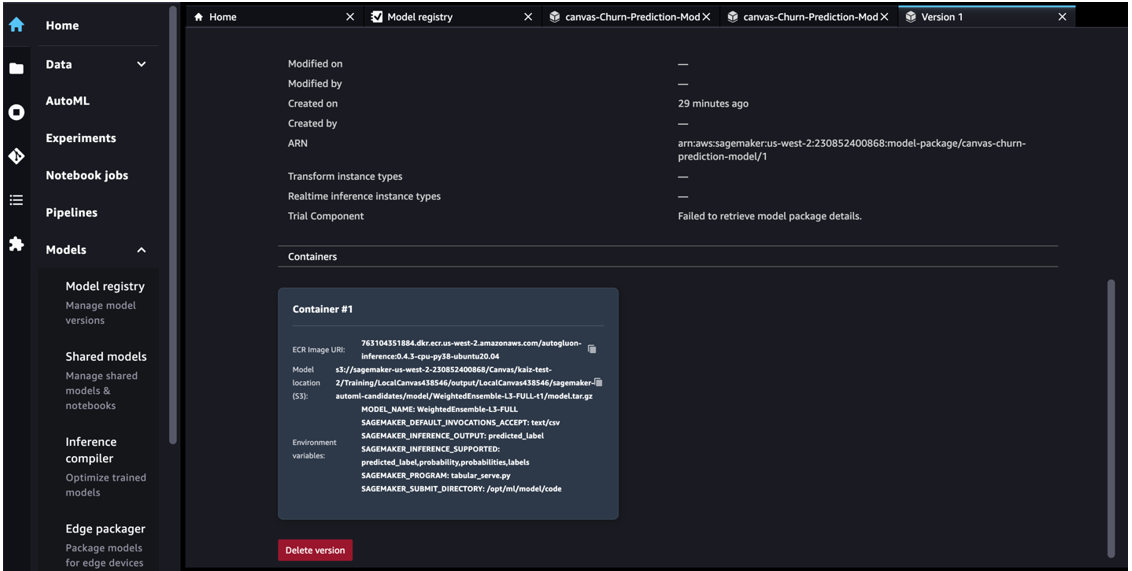
If you open the details for version 1, we can see that the Activity tab keeps track of all the events happening on the model.
On the Model quality tab, we can review the model metrics, precision/recall curves, and confusion matrix plots to understand the model performance.

On the Explainability tab, we can review the features that influenced the model’s performance the most.
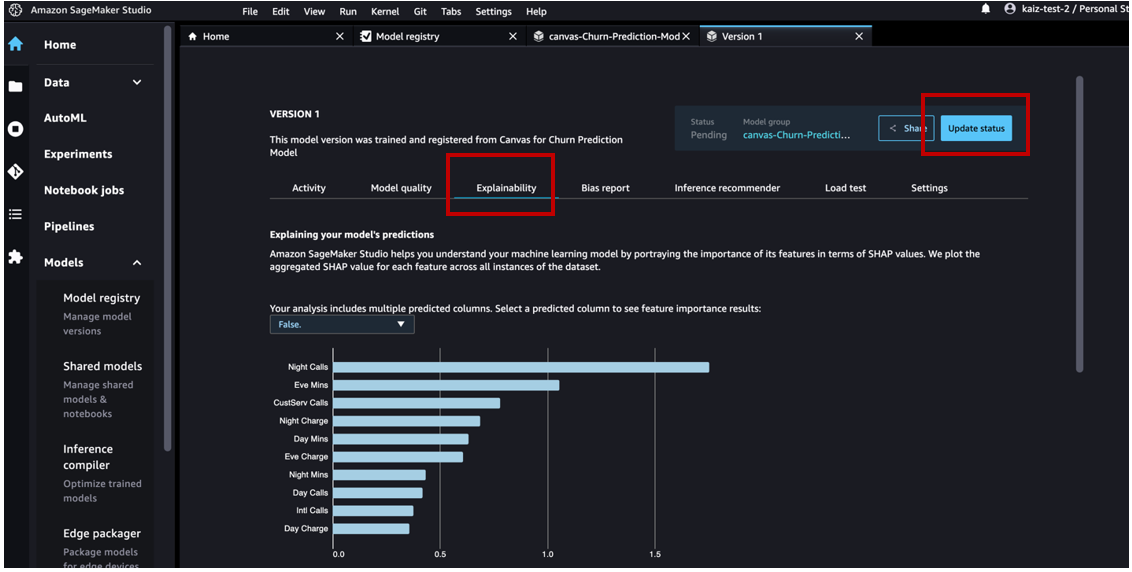
After we have reviewed the model artifacts, we can change the approval status from Pending to Approved.
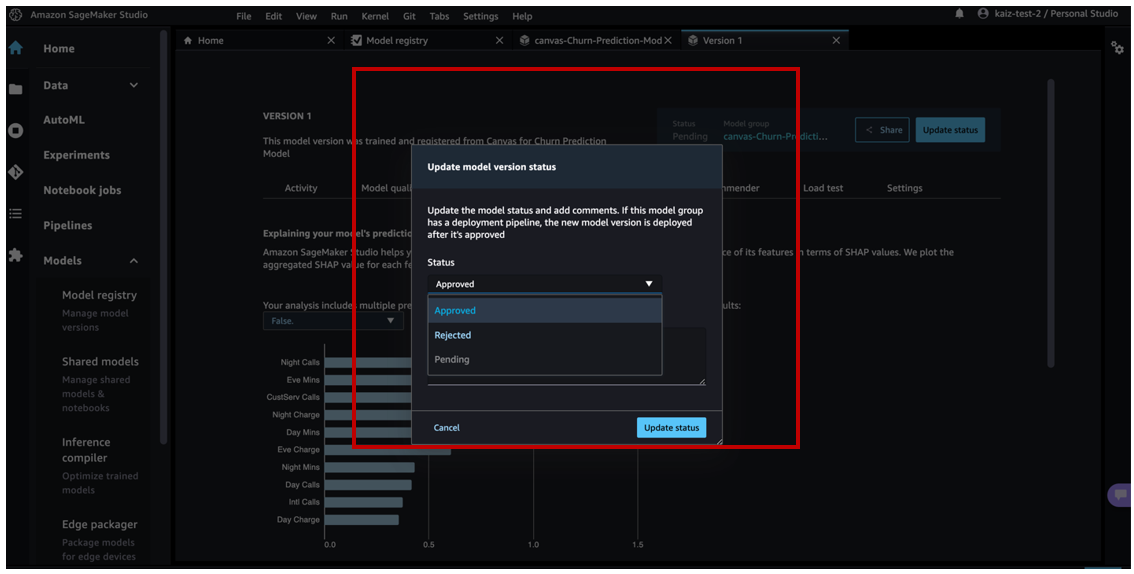
We can now see the updated activity.
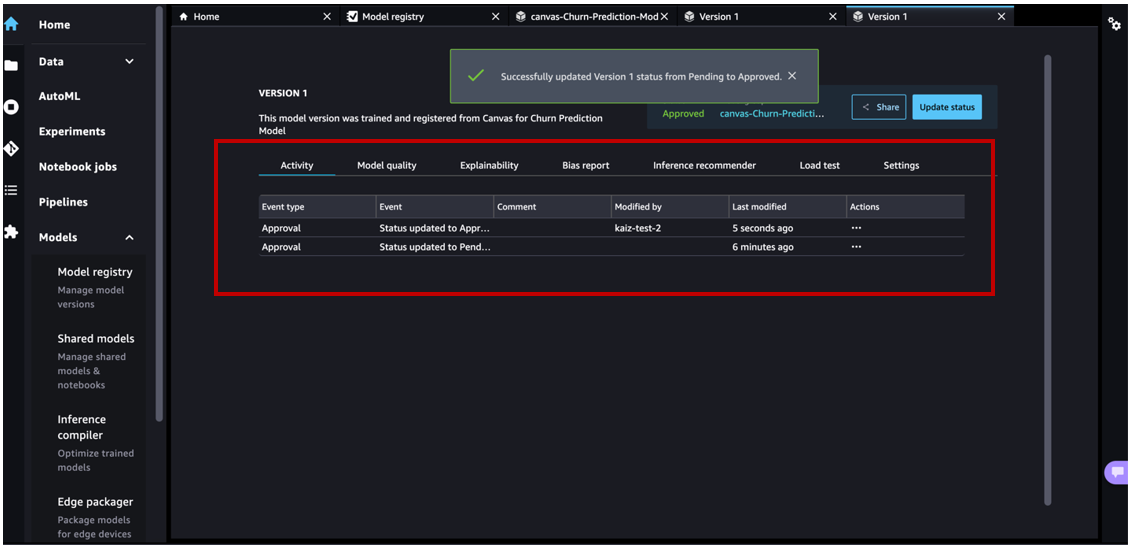
The Canvas business user will now be able to see that the registered model status changed from Pending Approval to Approved.
As the MLOps team member, because we have approved this ML model, let’s deploy it to an endpoint.
In Studio, navigate to the model registry home page and choose the canvas-Churn-Prediction-Model model group. Choose the version to be deployed and go to the Settings tab.
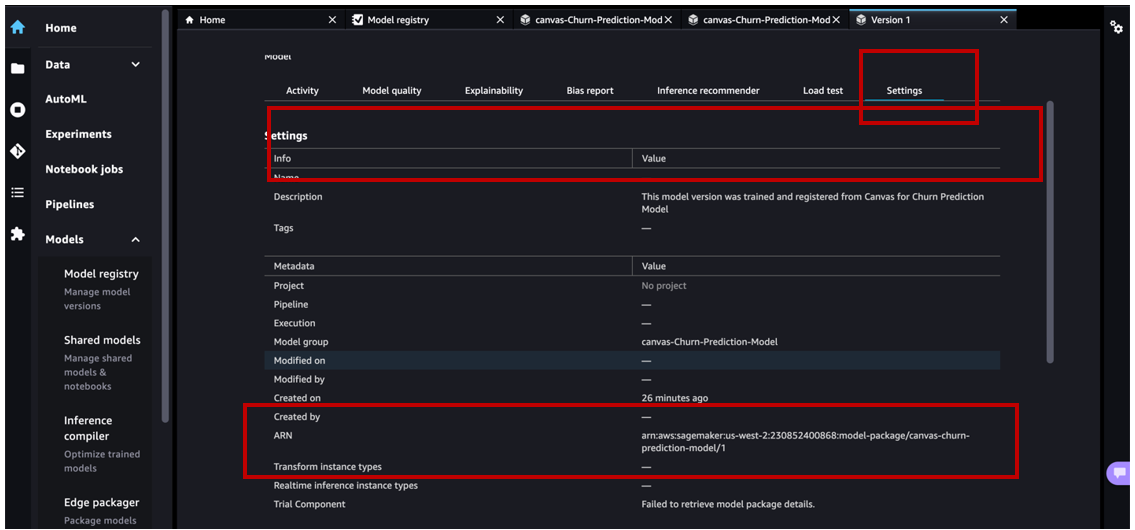
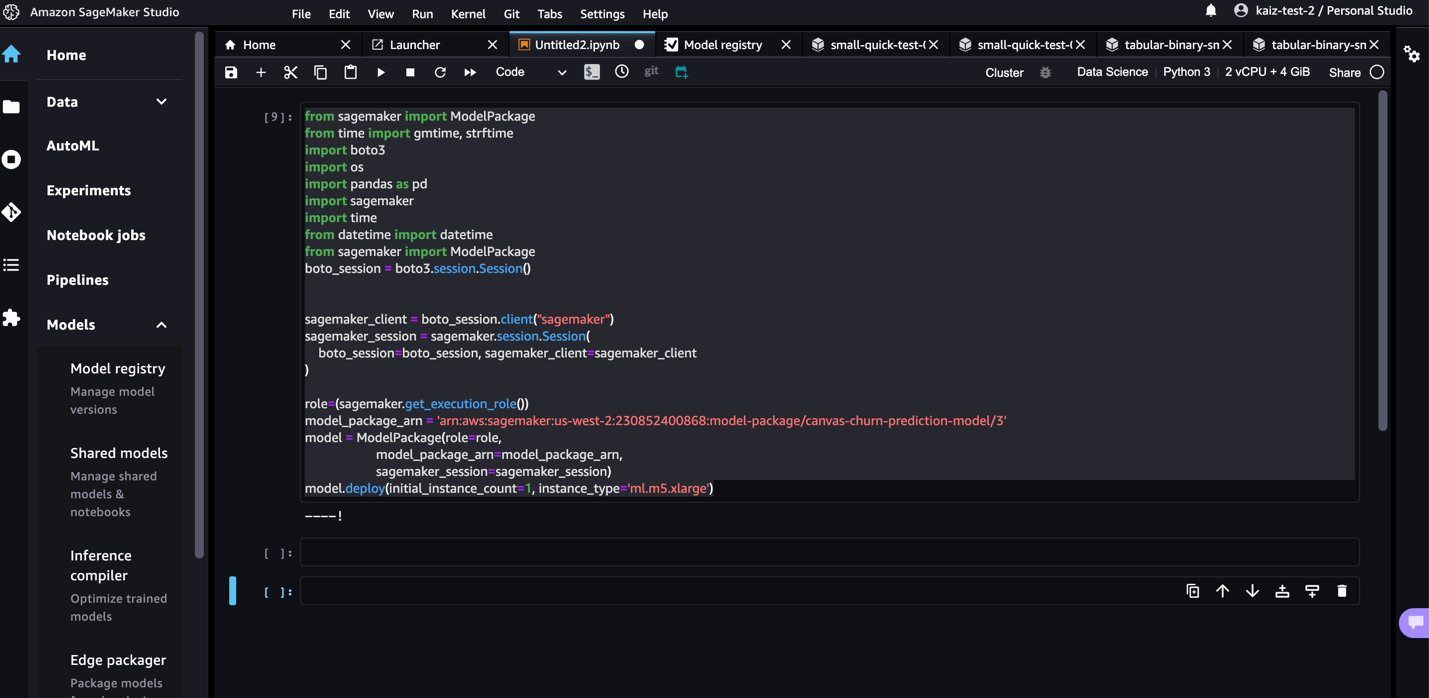
Browse to get the model package ARN details from the selected model version in the model registry.
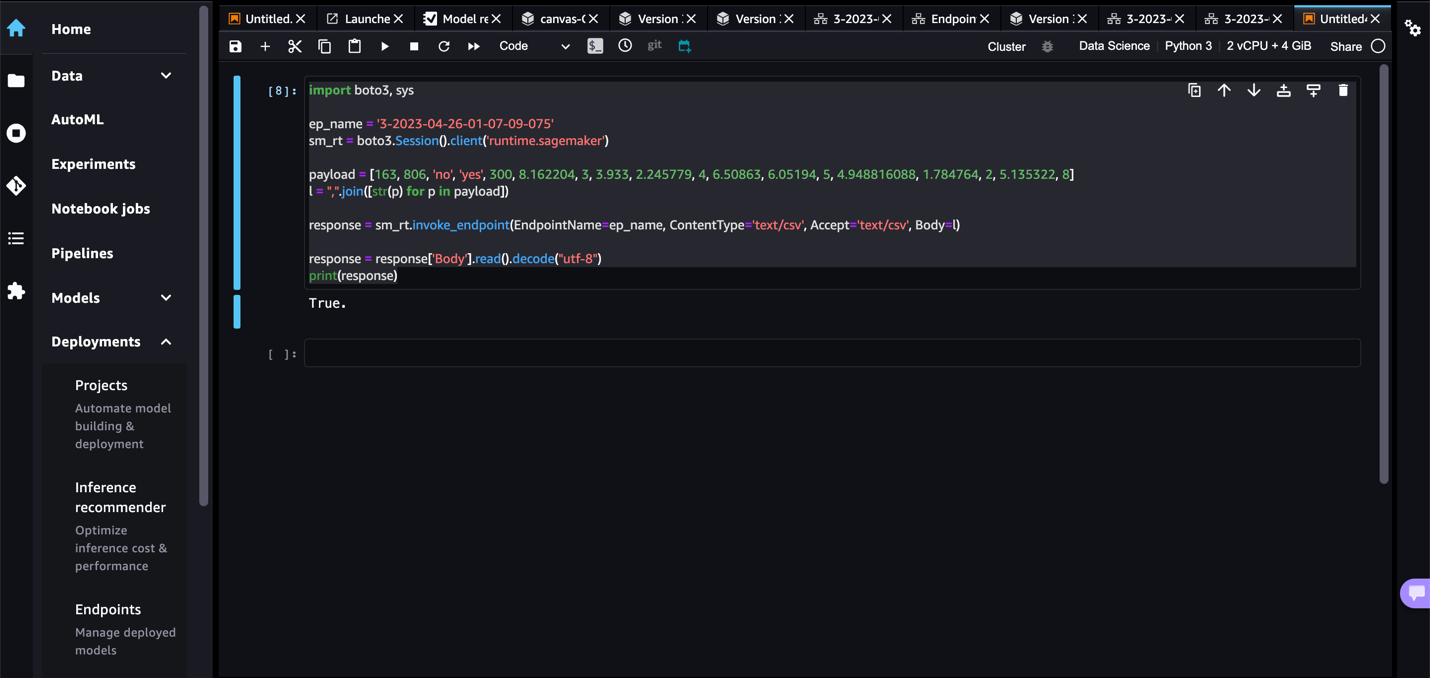
Open a notebook in Studio and run the following code to deploy the model to an endpoint. Replace the model package ARN with your own model package ARN.
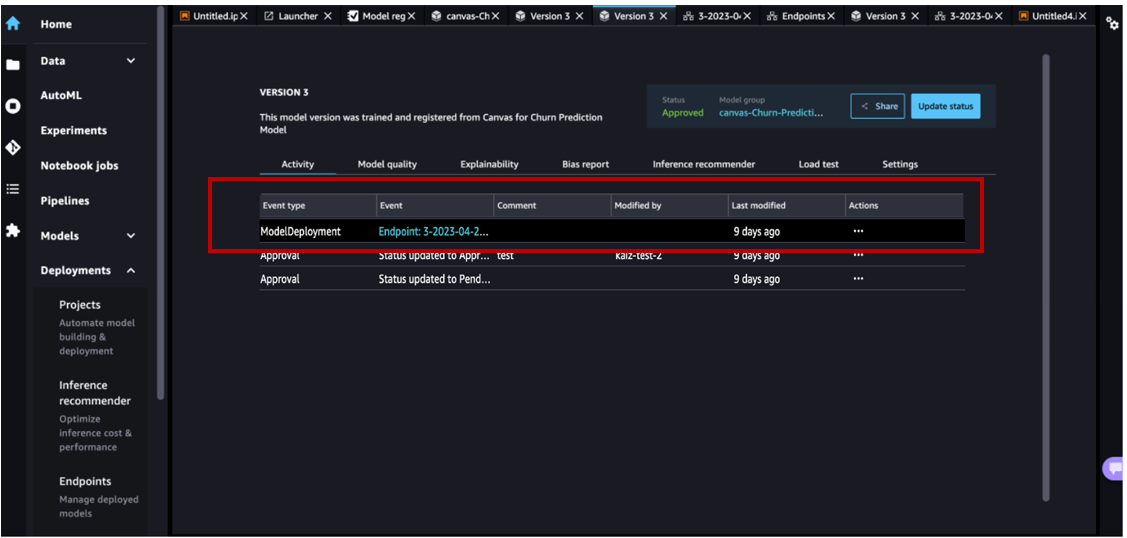
After the endpoint gets created, you can see it tracked as an event on the Activity tab of the model registry.
You can double-click on the endpoint name to get its details.
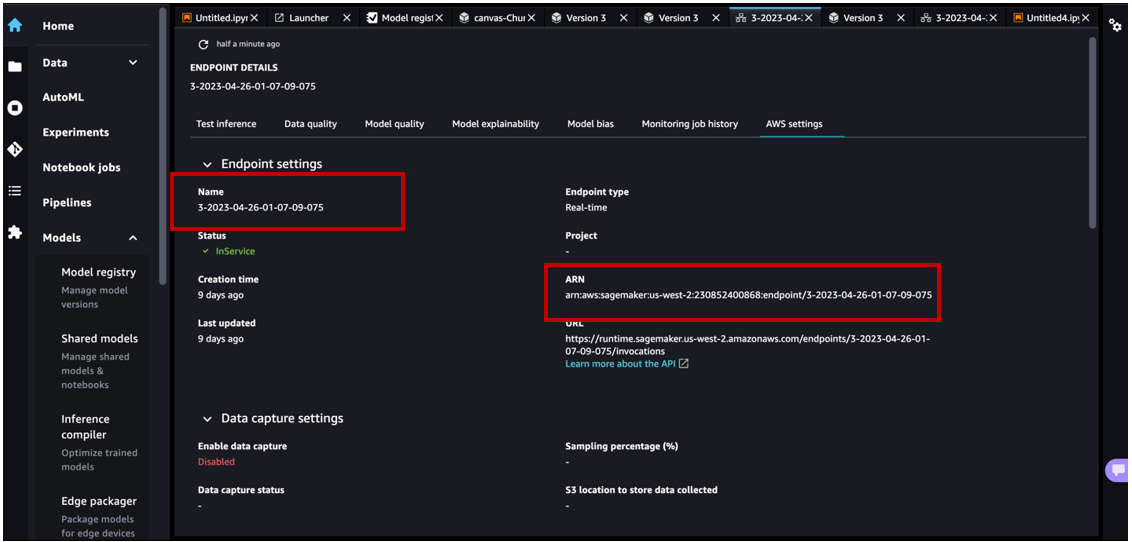
Now that we have an endpoint, let’s invoke it to get a real-time inference. Replace your endpoint name in the following code snippet:
Clean up
To avoid incurring future charges, delete the resources you created while following this post. This includes logging out of Canvas and deleting the deployed SageMaker endpoint. Canvas bills you for the duration of the session, and we recommend logging out of Canvas when you’re not using it. Refer to Logging out of Amazon SageMaker Canvas for more details.
Conclusion
In this post, we discussed how Canvas can help operationalize ML models to production environments without requiring ML expertise. In our example, we showed how an analyst can quickly build a highly accurate predictive ML model without writing any code and register it to the model registry. The MLOps team can then review it and either reject the model or approve the model and initiate the downstream CI/CD deployment process.
To start your low-code/no-code ML journey, refer to Amazon SageMaker Canvas.
Special thanks to everyone who contributed to the launch:
Backend:
- Huayuan (Alice) Wu
- Krittaphat Pugdeethosapol
- Yanda Hu
- John He
- Esha Dutta
- Prashanth
Front end:
- Kaiz Merchant
- Ed Cheung
About the Authors
 Janisha Anand is a Senior Product Manager in the SageMaker Low/No Code ML team, which includes SageMaker Autopilot. She enjoys coffee, staying active, and spending time with her family.
 Krittaphat Pugdeethosapol is a Software Development Engineer at Amazon SageMaker and mainly works with SageMaker low-code and no-code products.
 Huayuan(Alice) Wu is a Software Development Engineer at Amazon SageMaker. She focuses on building ML tools and products for customers. Outside of work, she enjoys the outdoors, yoga, and hiking.
- SEO Powered Content & PR Distribution. Get Amplified Today.
- PlatoAiStream. Web3 Data Intelligence. Knowledge Amplified. Access Here.
- Minting the Future w Adryenn Ashley. Access Here.
- Buy and Sell Shares in PRE-IPO Companies with PREIPO®. Access Here.
- Source: https://aws.amazon.com/blogs/machine-learning/operationalize-ml-models-built-in-amazon-sagemaker-canvas-to-production-using-the-amazon-sagemaker-model-registry/

