


@liskLisk
We empower developers with a software development kit for blockchain applications written in JavaScript.
A major challenge in many blockchain solutions is to securely connect physical actors or objects to their digital representation in the blockchain. Some obvious examples are supply chain and anti-counterfeiting solutions, where digital information pertaining to the production, origin, chain of custody, or shipping conditions is immutably secured in the blockchain.
In most solutions, public/private key pairs representing digital and physical actors, machines, or goods are remotely managed in remote or cloud server back-ends. As ownership, identification, and trust in blockchain solutions are conveyed through the control of private keys, remote key management systems pose an expensive and laborious affair at best, and a serious security risk at worst. Thus, moving the key management process closer to the objects of interest not only saves valuable resources; it adds a significant layer of trust to the solution.
In this article, we describe how smart card NFC chips with blockchain capacities can be used for more secure key management in blockchain solutions, and specifically in solutions built with the Lisk SDK and JavaScript.
Firstly, we briefly describe the technology that Gimly uses for this purpose. Secondly, we describe the Smart Transport proof-of-concept that was built by Marc Buma and Caspar Roelofs and that was funded through the Lisk Builders program. Finally, we dive a little bit deeper into the code, to show in more detail how the microchips interact with the Lisk blockchain in our JavaScript code base.
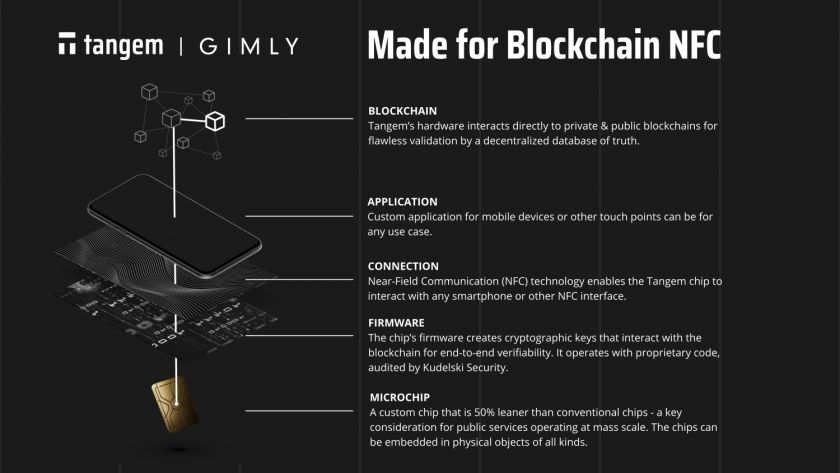
Tangem by Gimly: made for blockchain NFC chips
Gimly works with Tangem as a supplier and implementation partner, to provide a new approach towards more secure management of public/private key pairs in blockchain solutions. Tangem’s made-for-blockchain NFC smartcard chips are EAL6+ certified, containing a secure element where the keypairs are newly generated, and from which the private key cannot be extracted, exposed, or copied.
The chip’s firmware enables the use of these self-contained keys to sign blockchain transactions directly from the chip, and to sign, store, and present encrypted data using its secure storage. Chip operations are protected by means of various security options (including 2FA, passcodes, and multiple PIN options), and the firmware is independently audited by Kudelski security firm.
The chips are available here in various form-factors, including durable physical credit card format, adhesive stickers, or tags. The physical card format is currently available as pre-provisioned crypto-notes for all major cryptocurrencies, or as developer cards that can be provisioned to work with any blockchain that uses either secp256 or ed25519 cryptographic curves, including Lisk.


Lisk Builders: Smart Transport PoC
The Smart Transport PoC uses a Tangem smartcard to demonstrate how a hardware wallet can be used to secure a package using the Lisk SDK. In this demonstration, a new client application has been developed for the Lisk Transport demo that uses an NFC reader to communicate with a Tangem smartcard.

In the demo, we assume that the smartcard is part of a smart container, i.e. a container secured with its own hardware wallet that is used to sign all measurements of the temperature and alarm conditions that the container reports. During the transport, all parties connected to the transport, (client, supplier, and recipient) can determine the public key for the smart container and thus verify that the received data actually originates from this transport.
When the smart container is prepared for a new transport, a new account is created on the smartcard that is unique for this transport. This account is automatically funded with some LSK in order to be able to autonomously submit transactions.
While the transport is ongoing, all transactions that originate from the smart container (measurements, alarms) are signed by this account, thus proving their origin and authenticity.
Once the transport is finished, surplus LSK from the account is returned and the account is erased. Now the smart container can be used for a new transport.
The demo adds the following elements to the Lisk Transport example:
- A driver for PC/SC compatible smartcard readers. In our demonstration, we use an ACS ACR1252 reader. This driver is used to poll the smartcard reader.
- A driver for the Tangem protocol that implements all functions that are required to make the steps above possible (create wallet, purge wallet, sign transaction hashes using the smartcard).
- Implementation of the register-measurement custom transaction.
- A new client application that is used to start and finish the transport and that can be used to simulate measurements.
- A new IoT application that uses the smartcard reader to sign simulated temperature measurements.
- Visualisation of temperature data stored on the blockchain during the transport.
Hands-on with the demo
Since this demo builds on the Lisk Transport workshop, you should at least proceed to step 0 (Workshop Part 0: Installation and Setup) before starting. At this point, you should have a running blockchain with all prerequisites installed.
In addition, you should make sure that the proper PC/SC drivers for your NFC reader have been installed.
Now you can clone the sources of the demo to a folder on your hard disk. The repository can be found here.
The project root for the next steps is located in the gimly-transport folder.
The demonstration will use 3 terminal windows:
First window running the blockchain
- Navigate to the project root
- Install the node dependencies in the transactions folder
○ cd transactions
○ npm install - Install the node dependencies in the tangem-smart folder
○ cd ../tangem-smart
○ npm install - Next, navigate into the node folder and start the blockchain
○ cd ../node
○ npm install
○ node index.js | npx bunyan -o short
Second window running the client application
- navigate to the project root
○ cd client
○ npm install
○ node app.js
Third window running the IoT application
- navigate to the project root
○ cd iot/temperature_and_humidity
○ npm install
○ node index.js
Now you can connect to your laptop to view the client application by opening http://localhost:3000 in your web browser.
Step 1: Place the smartcard on the NFC reader

Select one of the smartcards and put it on the reader. Now press refresh. The application will recognize the card and allow you to create a new shipment. If the smartcard is already in use, it will show the status of the current transport (step 3, 4, or 5, depending on the transport status).
Step 2: Create shipment

First, select one of the demo accounts as the sender for this package. Ensure that the sender has sufficient funds, otherwise, the creation of the shipment will fail (you can use the fund button to acquire some LSK from the faucet).
Next, select the recipient and set the transport conditions (postage and security). Keep the trust level at 0 for your first transport. As you simulate more transport, the trust level of the employed carrier will increase.
Finally, press create to create the shipment. Keep an eye on the terminal window for the client to see what is happening:
- First, a new wallet account is created on the smartcard.
- Next, the wallet receives some funds from the faucet with a transfer transaction.
- Finally, the new shipment is registered on the blockchain with a register-packet transaction.
When these actions are completed, the browser will notify you:

Press back to return to the main page.
Step 3: Start transport

First, make sure that the carrier has sufficient funds to pay the security (you can use the fund button to acquire some LSK from the faucet).
Next, press “start transport”. A start-transport transaction is now sent to the blockchain. When the transaction has been sent, the browser will notify you. Press back to return to the main page.
Step 4: Track transport and add measurements

While the transport is ongoing, the IoTprocess in the separate window will start adding simulated temperature measurements to the shipment every 15 seconds. Look at the output in the IoT terminal window and the blockchain window to check.
Before committing a measurement to the blockchain, a hash of the measurement data record is calculated and sent to the smartcard. The smartcard uses its private key to sign the transaction. Next, the signature is added to the transaction and the transaction is committed to the blockchain.
When you press the yellow refresh button in the browser window, you can see the measurements appear in the graph.
Step 5: Finish transport

Finally, the recipient can select an end status for the shipment and finish the transport.
Step 6: Reset smart container

Once the shipment is finished, you can reset the smart package. Now the funds remaining in the smart wallet account are sent back to the faucet and the account is erased from the card.
You can now re-use the card for the next shipment.
Technical deep dive: looking at the code
Starting point
Below, the program code from the original Lisk Transport example is shown for a transaction that is processed using the Lisk SDK. It is part of the application that runs on the sensor module. After detecting that the package has been opened, the sensor module stores a new alarm transaction on the blockchain.
api.accounts.get({ address: packetCredentials.address
}).then(response1 => { let tx = new LightAlarmTransaction({ asset: { timestamp: new Date().getTime() / 1000 }, fee: transactions.utils.convertLSKToBeddows('0.01'), nonce: response1.data[0].nonce }); tx.sign(networkIdentifier, packetCredentials.passphrase); api.transactions.broadcast(tx.toJSON()).then(res => { console.log("transaction submitted"); }).catch(err => { console.dir(err); });
});
In this code example, a new
LightAlarmTransactionis created (#27), signed using the transaction’s sign method (#35), and then broadcast to the network (#37). Signing is done using a passphrase that is stored in local memory.
In the transport demo, the
packetCredentialsaccount that signs the transaction is created using the client app and subsequently hardcoded in the program code.
In our version of the project, credential management is transferred to the smartcard. This makes the key management more secure and adds an extra level of provenance to the data committed to the blockchain.
Since the smartcard is an external device, some means of communication are required. In this case, messages to the card are sent using an NFC radio connection. In this post, we focus on the blockchain side of the code, but if you are interested in the inner workings of NFC communication using a USB NFC card reader, and the implementation of the required methods of the tangem protocol, you can find these in the tangem-smart subfolder. In the tangemcard.js module, three important methods have been implemented:
-
createWallet: this method creates a new generic wallet account on the smartcard. The public key from this account is used to generate an address on the Lisk transport sidechain.
-
signData: this method is used to sign a hash or to hash and sign a packet of binary data using the private key stored on the smartcard.
-
purgeWallet: this method permanently erases the wallet account stored on the smartcard.
Creating a wallet on the smartcard
Before the smartcard can be used for transaction signing, a new wallet needs to be created on the smartcard and some funds need to be sent to this wallet. Once this is done, the address for the wallet needs to be registered as a valid package account on the blockchain.
The process starts (see Step 2: Create shipment above) when the user places a blank smartcard (i.e. a smartcard without a wallet) near the NFC reader, it fills in the transport conditions, and presses the create button. This causes a function call on the
handlerRegisterSmartPackagefunction. The code for this function is found in the handlers.js file in the client folder.
const handlerRegisterSmartPackage = (app, api) => async (req, res) => { // save current values app.locals.formdata.passphrasesender = req.body.passphrasesender; app.locals.formdata.passphraserecipient = req.body.passphraserecipient; app.locals.formdata.postage = req.body.postage; app.locals.formdata.security = req.body.security; app.locals.formdata.minTrust = req.body.minTrust; if(req.body.submit==='Fund Sender with 100 LSK') { // fund button pressed let participantAddress = getAddressForPassphrase(app.locals.formdata.passphrasesender); let success = await fundAddress(api, participantAddress, "100"); if(success) { doInfoMessage(res, `Fund sender ${participantAddress} with 100 LSK success`) } else { doErrorMessage(res, `Fund sender ${participantAddress} with 100 LSK failed`); } } else if(req.body.submit==='Fund carrier with 1500 LSK') { // fund button pressed let participantAddress = getAddressForPassphrase(app.locals.formdata.passphrasecarrier); let success = await fundAddress(api, participantAddress, "100"); if(success) { doInfoMessage(res, `Fund carrier ${participantAddress} with 100 LSK success`) } else { doErrorMessage(res, `Fund carrier ${participantAddress} with 100 LSK failed`); } } else { try { // // step 1 -> make sure that the card has no wallet if(haveCard && currentPacketId !== false) { doErrorMessage(res, "This card already has an address, finish the transport before using it again"); } const passphrasesender = app.locals.formdata.passphrasesender; const passphraserecipient = app.locals.formdata.passphraserecipient; const postage = app.locals.formdata.postage; const security = app.locals.formdata.security; const minTrust = app.locals.formdata.minTrust; let result1 = await createWalletUsingActiveCard() if(false===result1) { doErrorMessage(res, "Unable to create wallet on this card"); } let maxwait = 15; // max waittime in seconds do { if(currentPacketId===false) { await sleep(1000); maxwait--; } else { break; } } while(maxwait>0); console.log("got packetId %s", currentPacketId) let result = await fundAddress(api, currentPacketId, "100"); // enough for 1000 measurements @ 0.1 lsk each if(false===result) { doErrorMessage(res, `Funding failed for ${currentPacketId}, finish the transport before using it again`); } maxwait = 30; // max waittime in seconds do { let packetaccount = await getAccount(api, currentPacketId); if(false===packetaccount) { await sleep(1000); maxwait--; } else { break; } } while(maxwait>0); if(false===result) { doErrorMessage(res, "Timeout while waiting for completion of fund transaction"); } try { console.log("got senderpassphrase %s", passphrasesender) let senderAddress = getAddressForPassphrase(passphrasesender); const registerPackageTransaction = new RegisterPacketTransaction({ asset: { security: transactions.utils.convertLSKToBeddows(security), minTrust: Number(minTrust), postage: transactions.utils.convertLSKToBeddows(postage), packetId: currentPacketId, recipientId: getAddressForPassphrase(passphraserecipient), }, fee: transactions.utils.convertLSKToBeddows('0.1'), nonce: await getNonceForAddress(api, senderAddress) }); console.log("got transaction %o", registerPackageTransaction) registerPackageTransaction.sign(networkIdentifier,passphrasesender); let registerresult = await api.transactions.broadcast(registerPackageTransaction.toJSON()); doInfoMessage(res, 'package registration complete'); } catch(ex) { doErrorMessage(res, "Packet registration failed: " + JSON.stringify(ex.message, null, 2)); } } catch(ex) { doErrorMessage(res, "Packet registration failed: " + JSON.stringify(ex.message, null, 2)); } }
}
The process starts at line #40. A call to
createWalletUsingActiveCard initializes a new wallet on the smart card. A wait loop on line #45 is required because it takes a while for the new wallet to be detected by the application: variable
currentPacketIDreceives the wallet address.
An interesting bit of code related to this can be seen in the handlers.js file in the client folder.
checkReader = () => { try { let reader = getReader(); if(false!==reader) { let activeCardData = getActivecardData() haveCard = true; currentPacketPublicKey = false; currentPacketId = false; if(activeCardData && "WalletPublicKey" in activeCardData) { currentPacketPublicKey = activeCardData.WalletPublicKey.toString('hex'); currentPacketId = cryptography.getAddressFromPublicKey(activeCardData.WalletPublicKey) } } else { haveCard = false; }; // console.log("hc %s / cpid %s", haveCard, currentPacketId); } catch(ex) { console.error("app.checkReader - error ", ex.message) } finally { setTimeout(checkReader, 1000); }
}
This
checkReaderfunction is called periodically in the background using setTimeout. In this function, the NFC card reader is polled (line #5) and the
activeCardDatais retrieved. If a wallet is present on the card, the generic wallet public key is converted to a blockchain address using the
getAddressFromPublicKeyfunction from the Lisk SDK cryptography library.
The process in the
handlerRegisterSmartPackagefunction now continues at line #55 where some funds are sent to the card. These funds are required when submitting transactions that are signed by the wallet on the card to the blockchain.
Again, a wait loop is entered (line #61) that halts until the account associated with the smartcard wallet has been located on the blockchain.
// client/functions.js #49 const getAccount = async (api, address) => { try { let accounts = await api.accounts.get({address}) if(accounts.data.length>0) { return accounts.data[0] } else return false; } catch(ex) { return false; }
}
The
getAccountfunction (from functions.js#49) implements this with a call to the Lisk SDK (line #5).
Finally, at line #76 in the
handlerRegisterSmartPackagefunction, a registerPackageTransaction is instantiated and signed by the package sender (line #93).
After broadcasting this transaction to the blockchain network, package registration is complete and the function exists. Once the transaction is committed to the blockchain, a valid package account with initial funds now exists on the smartcard.
Signing measurement data
After starting the transport (not described here), the sensor starts collecting data and committing this data to the blockchain using a
register-measurementcustom transaction on the sidechain. To prove the origin of the data, each package of measurement data is signed using the wallet on the smartcard.
The important part of the
register-measurementcustom transaction is shown below:
// transactions/register-measurement.js #27 applyAsset(store) { const errors = []; const packet = store.account.get(this.senderId); if (packet === undefined) { errors.push(new TransactionError("packet not found", this.id, "this.asset.id", this.asset.id, "An existing packet ID on recipient account")); } if(packet.status==='ongoing'||packet.status==='alarm') { let timestamp = dateToLiskEpochTimestamp(new Date()); if(false === "asset" in packet) { packet.asset = {} }; if(false === "measurements" in packet.asset) { packet.asset.measurements = [] }; packet.asset.transportstatus = 'active'; packet.asset.measurements.push({ timestamp: this.asset.timestamp, temperature: this.asset.temperature, humidity: this.asset.humidity }); store.account.set(packet.address, packet); } return errors; }While the transport is ongoing (line #10) new (simulated) measurements are stored in the measurements array in the packet’s asset structure (line #15). The client application visualizes these measurements in a graph on the smart package page, (see above at Step 4: Track transport and add measurements).
A demonstration of the usage of this transaction is found in the temperature_and_humidity app. This is code that runs inside of the sensor module and is called periodically to measure the transport conditions. In this case, to be able to demonstrate the principle without actual hardware, the measurements are simulated. This can be seen here below:
// iot/temperature_and_humidity.js #30 const doMeasurements = async () => { let goFast = true; try { console.log("++++++++++++++++++++++++++++++++++++++++++++++++++++++++++++++++++") let reader = getReader(); if(reader) { await rescanActiveCard(); let activeCardData = getActivecardData() if(false===activeCardData) { console.log("no card in reader"); return; } if(undefined === activeCardData.WalletPublicKey) { console.log("not a valid smart package"); return; } let packetPublicKey = activeCardData.WalletPublicKey.toString('hex'); let packetID = cryptography.getAddressFromPublicKey(activeCardData.WalletPublicKey) let packetAccount = await getAccount(packetID); goFast = true; if(false===packetAccount) { console.log("packet with Id %s has not yet been registered", packetID); return; } else if ( packetAccount.asset.status !== 'ongoing'){ console.log("packet with Id %s - transport not active (status: %s)", packetID, packetAccount.asset.status); return; } else { // console.log("packet data: %o", packetAccount.asset); goFast = false; } // simulate gradual changes in temperature and humidity gSensorState.temperature += (gSensorState.temperatureUp ? 1 : -1) * Math.random(); if(gSensorState.temperature>30) { gSensorState.temperatureUp = false } else if(gSensorState.temperature<5) { gSensorState.temperatureUp = true } gSensorState.humidity += (gSensorState.humidityUp ? 1 : -1) * Math.random(); if(gSensorState.humidity>70) { gSensorState.humidityUp = false } else if(gSensorState.humidity<40) { gSensorState.humidityUp = true } let measurement = { timestamp: new Date().getTime() / 1000, temperature: Math.round(gSensorState.temperature*100)/100, humidity: Math.round(gSensorState.humidity*100)/100 }; // create measurement transaction let tx = new RegisterMeasurementTransaction({ networkIdentifier, senderPublicKey: packetPublicKey, asset: measurement, fee: transactions.utils.convertLSKToBeddows('0.01'), nonce: packetAccount.nonce }); // console.log("got transaction %o", tx) // console.log(tx.getBytes().toString('hex')); // sign transaction using on-card wallet const transactionWithNetworkIdentifierBytes = Buffer.concat([ cryptography.hexToBuffer(networkIdentifier), tx.getBytes() ]); // sign hash of data with the card const datatosign = cryptography.hash(transactionWithNetworkIdentifierBytes) console.log("got data to sign (%s bytes) %s", datatosign.length, datatosign.toString('hex')) tx.signatures = [await signDataUsingActiveCard(datatosign, false)]; if(false!==tx.signatures[0]) { console.log("sending transaction") // debug code: use verify function to check signature // console.log(tx.validate()); tx._id = transactions.utils.getId(tx.getBytes()); try { let res = await api.transactions.broadcast(tx.toJSON()); console.log("++++++++++++++++ API Response +++++++++++++++++"); console.log(res.data); console.log("++++++++++++++++ Transaction Payload +++++++++++++++++"); console.log(tx.stringify()); console.log("++++++++++++++++ End Script +++++++++++++++++"); } catch(ex) { console.error("broadcast transaction error %s", ex.errno) } } else { console.error("signing with card failed"); } } else { console.log('no active wallet') } } catch(ex) { console.error("doMeasurements error - %s", ex.message); } finally { setTimeout(doMeasurements, goFast? 1000: 15000); }
}
As already illustrated above, the active smartcard data is retrieved at line #21. Temperature data is generated at line #38 and stored in a measurement record at line #52. Next, a
RegisterMeasurementTransactionis instantiated.
Now things start working differently when compared to using a local wallet account.
At line #71, the transaction is converted to a byte array and a prefix consisting of the network identifier is added. The hash of this array of bytes is calculated at line #77 (using the hash function from the cryptography library in the Lisk SDK).
This hash is sent to the smartcard for signing using the
signDataUsingActiveCardfunction. The returned signature is added to the transaction (line #79).
Finally, an id for the transaction is calculated (line #85) and the transaction is broadcast to the blockchain network (line #87).
Erasing the wallet on the smartcard
Once the transport is complete, the wallet on the smartcard can be erased so that the card can be used for a new transport. This is done with a call to the
purgeWalletfunction in the
tangemcardlibrary as depicted below. This function provides a good illustration of how the communication with the smartcard works under the hood:
# tangem-smart/tangemcard.js exports.purgeWallet = async ( reader, cid = 'BB03000000000004', pin1 = '000000', pin2 = '000',
) => { try { const pin1Hex = crypto .createHash('sha256') .update(Buffer.from(pin1)) .digest('hex'); const pin2Hex = crypto .createHash('sha256') .update(Buffer.from(pin2)) .digest('hex'); let tlv; let tlv1 = Buffer.from('0108' + cid, 'hex'); let tlv2 = Buffer.from('1020' + pin1Hex, 'hex'); let tlv3 = Buffer.from('1120' + pin2Hex, 'hex'); tlv = Buffer.concat([tlv1, tlv2, tlv3]); let base = Buffer.from([ 0x00, // Class 0xFC, // INS: Purge wallet command 0x00, // P1: 0x00, // P2 tlv.length, // Le: Full Length of UID ]); let request = Buffer.concat([base, tlv]); let response = await reader.transmit(request, 8192); // console.log("response %s", response.toString('hex')); let sw1 = response[response.length - 2] let sw2 = response[response.length - 1] let sw = 256 * sw1 + sw2; if(sw===0x9000) { // console.log("purgeWallet OK (%s)", sw.toString(16)) return decodeTLV(response); } else { console.error("purgeWallet ERROR (card response %s)", sw.toString(16)) return false; } return response; } catch(ex) { console.error("purgeWallet ERROR %s", ex.message) return false; }
};
At line #35, a request is transmitted to the smartcard reader. This request is a byte array that is composed by joining a number of data structures (line #24 and line #34) such as the card id (line #21), two hashed pin codes (line #22, 23), and command data (#26). After the command has been processed by the card, the returned data structure (response, line #35) is decoded to determine if the request was processed successfully.
In this case, command code 0xFC (line #28) tells the smart card that a purge wallet command is requested.
Lisk Builders
This project was initiated by Caspar Roelofs who secured a Lisk Builders grant to enable the use of smartcard chips for private key management in Lisk blockchain solutions. As a founder of Gimly Blockchain Projects, he helps clients leverage blockchain, IoT, and other new technologies for their business needs.
Gimly believes that meaningful innovation is achieved through synergies, and maximalizes collaboration to build on the strengths of clients, partners, and community. Consultancy and development services include end-to-end product development, solutions architecture, technology, product and market research, product management, and business development.
Marc Buma joined the project as lead developer, with his expertise in IoT, blockchain, and JavaScript development. Marc started his career as an R&D engineer at Noldus Information Technology and worked on the development of automated behavior measurement systems, and has been self-employed, (Company name Bumos) since 2004. He has worked on broadcast innovation projects with Jetix, Disney, MTV, KPN, and the Netherlands Institute for Sound and Vision, and has a solid background in developing industrial strength systems.
Currently, he is developing and maintaining bespoke products for hospitality onboard luxury yachts, blockchain based decentralized logistics tracking systems in the fashion industry, and VR guided tours. Marc is active as a mentor/technical advisor for several startups and projects in the blockchain and logistics sphere. He is also an avid panorama photographer with a passion for preserving cultural heritage and an author of a virtual travel guide.
Working with Tangem by Gimly
If you are interested to use the technology in your own projects, visit gimly.io to find out how to obtain a trial kit, or enquire about business to business options if you are looking for higher volumes of customized cards, stickers, or tags with custom design and wallet for your cryptocurrency.
Disclaimer: This blog post was written by our community members, Caspar Roelofs (LinkedIn profile) and Marc Buma (LinkedIn profile) as part of their participation in the Lisk Builders program.
Tags
Create your free account to unlock your custom reading experience.
PlatoAi. Web3 Reimagined. Data Intelligence Amplified.
Click here to access.

